Table of Contents
Advertisement
Quick Links
Advertisement
Table of Contents

Subscribe to Our Youtube Channel
Related Manuals for Lilin PDR 6164


Summary of Contents for Lilin PDR 6164
- Page 1 16CH DVR CD-RW INSTRUCTION MANUAL...
-
Page 2: Trademarks And Registered Trademarks
Trademarks and registered trademarks Microsoft, Windows 2000, Windows XP, Internet Explorer are registered trademarks of Microsoft Corporation in the U.S. and/or other countries. Windows Media Player is registered trademarks of Microsoft Corporation in the U.S. and/or other countries. Adobe and Adobe PDF are registered trademarks of Adobe Systems Incorporated in the U.S. and/or other countries. -
Page 3: Major Features
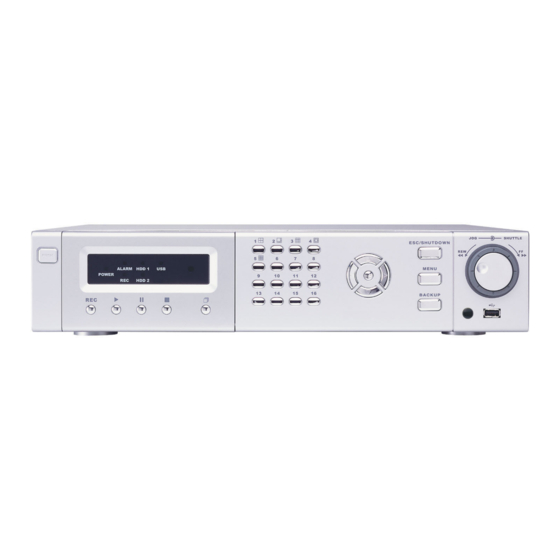
Major Features This model is a high performance real-time recording embedded Linux standalone DVR which can record 16 channels of video and audio at the same time. It provides playback, live display, backup, and network function while it is still in recording. Versatile system configuration can meet most of the system requirements. - Page 4 CHAPTER 1. SYSTEMS OVERVIEW Chapter 1-1. Front Panel 9 10 19 20 1. LED status panel 12. Down button Please see system LED status panel. a. Move cursor down at menu mode. b. Tilt down at PTZ control mode. 2. Camera buttons/function keys 13.
- Page 5 Chapter 1-2. Rear View 1. USB connector #2 RJ-45network 2. Video looping Alarm output + RS-485 3. Video in 10. Alarm in 4. Main monitor and looping 11. VGA output 5. Spot monitor 12. RS-232(reserved) 6. S-Video 13. Audio input 7.
- Page 6 Chapter 1-4. Remote controller The button arrangement of the remote controller is designed for easy-to-use purposes. Buttons are separated in regions based on their features including DVR operational keys, pan, tilt, and zoom camera device (PTZ) keys, numerical keys, and PTZ buttons. Start/ Stop Recording MENU Setup menu...
- Page 7 Chapter 1-5. Jog & Shuttle During video playback, Jog & Shuttle act as conventional VCR for video stepping forward (rewind) and fast forward (rewind). Chapter 1-6. Symbols & Icons In live monitoring mode, there are symbols and icons indicating DVR operation status. The detail are described as follows: Meaning Icons...
- Page 8 CHAPTER 2. MENU SETUP Chapter 2-1. Before Using the DVR Before using the DVR, please setup DVR settings includes menu items such as time and date, password, display, record mode, network, and so on. To setup the DVR, press MENU button. By default, the DVR requires user authentication to enter setup menu.
- Page 9 Chapter 2-3-1. Language To change language system for the DVR, press LEFT or RIGHT button to choose desired language. Chapter 2-3-2. Video Format Video format is automatically detected after power ON. The detected video information gets displayed on Video Format. Chapter 2-3-3.
- Page 10 Chapter 2-3-5. Time Format: 24/ 12 Hours Move cursor to TIME FORMAT in the SYSTEM menu using DOWN or UP button. Press the LEFT or RIGHT button to select 24 HOURS (military time) or 12 HOURS (AM/PM). Whenever Time Format is changed, clock information on monitor and file information in search list will be changed together.
- Page 11 Chapter 2-3-9. Firmware Upgrade Firmware can be upgraded through USB memory driver or network using client software. For more information, Please see Software Upgrade Procedure in appendix. Note: To preserve menu settings after firmware upgrade, press Yes on “Save” dialog box. Chapter 2-4.
- Page 12 Chapter 2-4-3. Time/Date OSD To set TIME/DATE OSD displayed on main monitor On/Off, please turn on or off on the menu item. Chapter 2-4-4. Camera Number OSD To set camera number OSD displayed on main monitor On/Off, please turn on or off on the menu item.
-
Page 13: Chapter 2-5. Recording Setup
BRIGHTNESS, CONTRAST control HUE, SATURATION control Chapter 2-4-8. Private Channel For a private camera, it does not want to get displayed on main monitor, a user can select LEFT or RIGHT button on Private menu item for the setting. Private channels are displayed in black screen for live and playback. -
Page 14: Chapter 2-5-1. Stop Key
Chapter 2-5-1. Stop Key For manual recording, manual recording is started and stopped by the REC/STOP button in the front panel of the DVR. This REC/ STOP button can be disabled to prevent recording stop operation done by unauthorized access. To disable recording stop operation, please set this option to be Disable Chapter 2-5-2. -
Page 15: Chapter 2-6. Event Setup
Chapter 2-6. Event Setup To access Event Setup, press ENTER button at Event Setup at MAIN MENU using DOWN or UP and/or LEFT or RIGHT button. The menu will be appeared on monitor. All the parameters related to Event Recording of a camera including Quality, Frame Rate, and Duration can be set separately. - Page 16 Chapter 2-6-3. Motion Area Channel To setup a camera’s motion area, please select a camera at Motion Area Ch menu item. Chapter 2-6-4. Motion Area To define motion area, please move cursor by LEFT, RIGHT, UP, or DOWN button. By pressing ENTER button, cursor becomes “+”...
- Page 17 Chapter 2-7-1 Weekly If weekly schedule is set, ALARM, MOTION, or MANUAL can be set. To enable a schedule, please press << or >> key. To remove a schedule, please press <|| or ||> key. Event scheduling recording mark Manual scheduling recording mark Chapter 2-7-2 Daily If weekly schedule is set, ALARM, MOTION or MANUAL can be set.
-
Page 18: Chapter 2-8-2. Port Number
Chapter 2-8-1. Connect STATIC IP or DHCP can be selected by LEFT or RIGHT button for the DVR. If DHCP is selected, IP Address, Subnet, Gateway, and DNS get automatically assigned. If STATIC is selected, please manually input IP Address, Subnet, Gateway, and DNS. For assigning IP address, Subnet, Gateway, and DNS for STATIC IP mode, press UP button to increase a value or DOWN button to decrease a value. - Page 19 Chapter 2-8-3. Time Zone Time information can be synchronized based on a time zone. Chapter 2-8-4. NTP Time Sync DVR can synchronize with time server via Network Time Protocol. Warrning: To use this feature, the DVR needs to be on Internet. Unstable Internet connection, it may cause database corruption of the recorded video.
- Page 20 Chapter 2-9. Copy/Backup Backup in the main menu can be selected by LEFT, RIGHT, UP, or DOWN button. If Backup is selected by ENTER button, Backup feature gets performed. Chapter 2-9-1. Backup Device To backup video, please first select the backup media. The medias can be: USB: USB flash disk CD Backup: CD-R/CD-RW (optional) Chapter 2-9-2.
- Page 21 Chapter 2-9-3. CD-RW Format To blank CD-RW, please perform CD-RW FORMAT feature Note: For DVD-RW model, only DVD+RW is supported. Chapter 2-9-4. Backup Info First, connect USB memory drive into USB port of the DVR’s front panel. Once enter menu mode, you can access the information of USB flash disk inserted in DVR including total memory size and available memory size.
-
Page 22: Chapter 2-10. Hdd Information
Please press LEFT or RIGHT button on the Time dialog box for specifying time information. Time dialog box is shown in below: After entering date and time, please specify camera(s) for backup. After above procedure, please press Check/OK button to start backup procedure. Chapter 2-10. - Page 23 Chapter 2-10-1. HDD Overwritten HDD OVERWRITE option can be used for circular recording into HDD(s). The oldest recorded videos get overwritten by the latest recorded video. The setting can be set by pressing LEFT or RIGHT button. Chapter 2-10-2. HDD Format To format HDD, please select HDD format menu item and press ENTER button.
- Page 24 Chapter 2-11-3. PTZ Type One can choose the model of PTZ devices by pressing UP or DOWN button. The DVR adopts this PTZ model’s protocol and communicates with the PTZ device. For Merit LILIN PTZ device, please select LILIN MLP2 protocol.
- Page 25 Chapter 2-11-4. PTZ ID PTZ ID is range from 00 to 19. PTZ ID can be selected for a camera channel. Chapter 2-11-5. Baud Rate Baud rate setting ranging from 2400 to 19200 BPS, please refer to PTZ user manual for baud setting.
-
Page 26: Chapter 4. Ptz Control
Chapter 3-1. Other Playback Features After selecting a playback time, please click ENTER button to play the video clips. While the DVR is in playback mode, features such as fast forward (FF), fast rewind (FR), pause, stop, step, and re-play can then be used. FF: Turn shuttle ring right on the front panel, or press FF key on the remote controller to fast forward the playing video. -
Page 27: Chapter 5. Client Software
Chapter 5. Client Software DVR remote access software including NetViewer, FilePlayer, and CMS, can be found in the software pack CD. To run the software, please install Setup.exe from 16CH DVR 6164 directory in software pack CD. Chapter 5-1 NetViewer NetViewer application can access remote DVR’s live video, remote video capturing, remote audio monitoring, playback, and AVI file conversion. - Page 28 Chapter 5-1-1. NetViewer Software Window-division Operation Please double-click on one of the 16 cameras for full screen. Double-click again returning back to 16-window-division. Chapter 5-1-2. NetViewer Software PTZ Operation For PTZ operation, please click on PTZ control. Chapter 5-1-3. Local Setting When the “Local Setting”...
- Page 29 Chapter 5-1-4. Remote Firmware Upgrade To perform firmware update of a DVR remotely via network, click on Select button to locate the file and click on Update button to update the firmware file. Chapter 5-1-5. Camera configuration Channel, camera ID, and PTZ protocol should be configured first before operating. Assign PTZ protocol for each channel.
- Page 30 Stop Key: Disable/Enable, in case of manual recording, manual recording can be started and stopped by the Rec/Stop button in the front panel of DVR. Select CH: Channel number Quality: Very low, low, normal, high, and very high Frame Rate: 60, 30, 15, 10, 5, 1, 0.5 IPS. Audio: ON/ OFF, it defines audio signal for a channel.
-
Page 31: Chapter 5-1-9. Weekly Schedule
Buzzer: It defines beeping sound ON/ OFF, when motion is detected. Lock delete: If it is ON, this recorded file does not get erased if HDD overwritten is set. Duration: It defines alarm recording time, 1,2,3,4,5, 10,20,30, and 60 minutes. Chapter 5-1-9. - Page 32 Chapter 5-2. Remote File Search for Playback and Downloading Remote Search feature can be utilized for searching files saved in remote DVR. Remote Search icon of NetViewer is clicked, below GUI is appeared. In order to backup files through FTP, Download icon can be clicked. Chapter 5-3 Video Capturing and Printing Capture feature can be utilized for both single picture saving and picture printing.
- Page 33 Chapter 5-5. Two-Way Audio For two-way audio communication, click on MIC On button to activate audio communication. For choosing audio source, please select a particular camera. Chapter 5-6. Event Notification from remote DVR If a motion/alarm event of a channel is detected, event information can notify to NetViewer. NetViewer shows additional message box representing an alarm signal.
- Page 34 Chapter 6-1. File Player Application To use File Player Application, please follow the following steps: Folder Open Button: To specify a particular file directory/folder for file player, please click on Folder Open button. By default the file directory, C:\DVR\BACKUP, is used by File Player application. For example, CD drive is found in E drive.
- Page 35 Power: It is used to close File Player Program. Playback Icons Playback : This icon is used for starting playback. Still/Pause: This icon is used for still or pause playback file. Stop: This icon is used for stopping playback. GOP Skip (Backward): This icon is used for faster playback in backward. It is a little faster than normal playback speed.
- Page 36 Chapter 7. CMX Software Chapter 7-1. CMS (Center Monitoring Software) Operation CMS Network Connection is done by clicking Connect button. CMS network connection consists of total 16 groups. Each group has maximum 16 viewing channels. Each viewing channel can be assigned by different IP address. It means that each viewing channel can be allocated to connect up to 16 DVRs.
- Page 37 Chapter 7-2. How to add Connection Address Please follow the following steps to add Connection Address: Name: DVR nickname can be remembered easily. Address: IP address of a DVR Port Number: default port number is “10000”. User: user of the DVR Password: Password of the user One way to add Connection Address is to click Add button.
- Page 38 Chapter 7-6. E-Map In CMS software, if ”E-MAP” button is clicked, E-Map is displayed as above. The path to load E-Map is at C:\Program files\DVR_APP\. Please copy E-Map pictures into this directory. The picture can be loaded by Image Load button. Cameras number can be placed in somewhere in E-MAP by dragging the camera icon.
- Page 39 Appendix Software Upgrade Procedure 1) Copy upgraded firmware file, vr535352XX.tgz into USB Memory Drive in advance. 2) Insert USB Memory Drive into USB port in front panel of DVR. 3) Press MENU button. 4) Input password and then press ENTER button. 5) Select SYSTEM SETUP menu in main menu.
-
Page 40: Specification
Motion grid 11*10 each channel Recording Pre-alarm (up to 160 images) and post-alarm Accessories Remote controller addressable up to 255 DVRs P/T/Z protocol Merit LILIN MLP2 protocol RS-485/RS-232 RS-485 PTZ output Jog & shuttle FF, FR, Step Mouse USB drag-n-drop, right-mouse-click, mouse wheel. - Page 41 DISTRIBUTOR: 66-6164OOE-1...
Need help?
Do you have a question about the PDR 6164 and is the answer not in the manual?
Questions and answers