Table of Contents
Advertisement
Quick Links
Advertisement
Table of Contents

Subscribe to Our Youtube Channel
Related Manuals for Lilin DVR004S


Summary of Contents for Lilin DVR004S
- Page 1 4-CH DVR STD DVR004S INSTRUCTION MANUAL...
-
Page 2: Trademarks And Registered Trademarks
Summary Merit LILIN DVR004S is designed to meet the demands for outstanding H.264 full D1 video recording quality, low power consumption, and cost-effective digital video recording systems. Low-power consumption design and VESA compliant LCD monitor power saving technologies minimize energy consumed by 24-hour long-term DVR operations. Video data file recovery and monitoring technologies secure the data file from power failure. - Page 3 Caution • Do not drop or strike this equipment • Do not install the equipment near any naked flames or heat sources • Do not expose this unit to rain, moisture, smoke or dust environment • Do not cover the opening of the cabinet with cloth and plastic or to install this unit in poor ventilated places.
-
Page 4: Table Of Contents
TABLE OF CONTENTS CHAPTER 1. SYSTEMS OVERVIEW ..................5 Chapter 1-1. Front Panel ....................5 Chapter 1-2. Rear View ..................... 6 Chapter 1-3. System LED Status Panel ................6 Chapter 1-4. Remote controller ..................7 Chapter 1-5. Mouse System....................7 Chapter 1-5-1. - Page 5 Chapter 6-2-3. Video Setup ..................15 Chapter 6-2-4. Video Loss Detection ................ 15 Chapter 6-3. Monitor Setup ..................... 15 Chapter 6-3-1. Main Alarm Switching ................ 15 Chapter 6-3-2. Main Monitor SEQ Time..............16 Chapter 6-3-3. Main Monitor Stand By Mode............16 Chapter 6-3-4.
- Page 6 Chapter 6-8-3. Preset ....................23 Chapter 6-8-4. Dwell ....................23 Chapter 6-8-5. Speed....................23 Chapter 6-8-6. Position ..................... 23 Chapter 6-8-7. IRIS & Auto IRIS ................23 Chapter 6-8-8. Focus & Auto Focus................24 Chapter 6-8-9. Save Presets..................24 Chapter 6-8-10. Clear All Preset ................24 Chapter 6-9.
-
Page 7: Chapter 1. Systems Overview
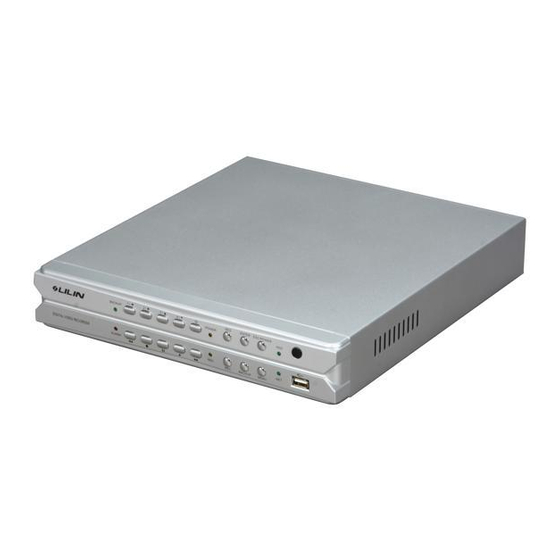
CHAPTER 1. SYSTEMS OVERVIEW Chapter 1-1. Front Panel Front View of DVR004S 1. LED status Panel 10. Pause button Please see system LED status panel. 11. Play button 2. Camera 1~4 select button a. Invoke playback selection menu. 3. Quad screen button b. -
Page 8: Chapter 1-2. Rear View
Chapter 1-2. Rear View Rear View of DVR004S 1. Camera inputs 8. RS-485 out – PTZ devices 2. Main output Alarm I/O 3. Audio inputs & output Four alarm input switches, 1 N/P alarm output, 4. VGA output and 1 N/C alarm output DC24V, 1A dry contact 5. -
Page 9: Chapter 1-4. Remote Controller
Chapter 1-4. Remote controller The button arrangement of the remote controller is designed for easy-to-use purposes. Buttons are separated in regions based on their features including DVR operational keys, pan, tilt, and zoom camera device (PTZ) keys, numerical keys, and PTZ buttons. Button Description Button... -
Page 10: Chapter 1-5-1. Mouse Menu
Mouse drag—In motion area setup mode, mouse drag can setup motion area. Mouse scroll—In setup menu, mouse scroll can increase or decrease a value. Right mouse click—Popup a submenu system or return to live in main menu. Chapter 1-5-1. Mouse Menu For using mouse menu, please use the mouse click on Menu item. -
Page 11: Chapter 2. Dvr Operations
CHAPTER 2. DVR OPERATIONS Most of the time, the DVR is operated at the surveillance/live mode. In live monitoring mode, the information of screen layout and symbols are described in this section. SCREEN LAYOUT REC 2007/06/22 11:03:50 HDD 9% ① Recording indicator ②... -
Page 12: Chapter 2-4. Ch+ & Ch
Chapter 2-4. CH+ & CH- In case of scanning through cameras in full screen, channel buttons, CH+ & CH- can be used to monitor all cameras. Chapter 2-5. Audio Button Once the audio channel is properly setup, the DVR can output the live audio. To disable live audio, one can press Audio button. -
Page 13: Chapter 3. Ptz Control
CHAPTER 3. PTZ CONTROL PTZ device can be controlled in live monitoring mode and PTZ setup mode via the front keypad and/or the remote controller. The rest of the chapter describes the ways of controlling PTZ devices using the keypad and a remove controller. Chapter 3-1. -
Page 14: Chapter 4. Recording
CHAPTER 4. RECORDING Chapter 4-1. Start Recording The DVR automatically performs recording task after power on. Press REC button on the keypad or the remote controller that it can change the recording mode from schedule recording to manual recording (emergency recording). Press REC button again. The DVR returns back to schedule recording again. -
Page 15: Chapter 5. Playback
CHAPTER 5. PLAYBACK To playback, please press Play button on the remote controller, or the keypad. A playback message box shows up for searching video clips. The details are described in the following sections: Chapter 5-1. Time Search Time search feature can perform date and time search based on recorded video data. This feature is very easy-to-use, and it allows a user to perform video searching task throughout two hard disk drives. -
Page 16: Chapter 6. Menu System
CHAPTER 6. MENU SYSTEM Chapter 6-1. Setup Menu Setup menu contains menu settings including camera, monitor, record, alarm, system, network, PTZ, and backup. The details of all the setup menu items are described in the rest of the chapters. Record Chapter 6-2. -
Page 17: Chapter 6-2-3. Video Setup
Chapter 6-2-3. Video Setup Video setup can adjust video’s contrast, brightness, hue, and saturation for each camera. To restore the default setting, please press Load Default menu item. Chapter 6-2-4. Video Loss Detection To enable or disable video loss detection, please set this option to be On or OFF. If the video signal is unstable and causes video loss, a user can disable this option. -
Page 18: Chapter 6-3-2. Main Monitor Seq Time
Chapter 6-3-2. Main Monitor SEQ Time Sequence feature can multiplex each camera screen in full size in specific time period. Once the sequence time is set, press SEQ button on the remote controller or the keypad to activate the sequence feature. Chapter 6-3-3. -
Page 19: Chapter 6-4-5. Post-Alarm Recording
Chapter 6-4-5. Post-alarm Recording Post-alarm recording can record the video of a camera after an alarm/motion is triggered. To enable post-alarm recording, please set the post-alarm recording seconds for this option. Chapter 6-4-6. Resolution The DVR can provide 720 * 480 (Full D1), 720 * 240 (Field) or 360 * 240 (CIF) recording solutions. -
Page 20: Chapter 6-5-1. Alarm Input Type
Chapter 6-5-1. Alarm Input Type The DVRs’ alarm inputs can be configured as normal open (N/O) or normal close (N/C). The alarm input is one-to-one mapped to a camera respectively. Note that the alarm is a dry contact, DC24V 1A, input. Chapter 6-5-2. -
Page 21: Chapter 6-5-6. Alarm Time
Chapter 6-5-6. Alarm Time Motion alarms and external alarm inputs can trigger the buzzer alarm. Buzzer time is adjustable from 5 to 100sec. Press Left or Right button on Buzzer Time to adjust the time setting. Chapter 6-5-7. Buzzer In case, the warning buzzer requires to be turned off. A user can disable the buzzer under System->Buzzer Enable menu item. -
Page 22: Chapter 6-6-3. Password/Access
Chapter 6-6-3. Password/Access The DVR has three sets of password protection (accounts) preventing unauthorized access. To activate password function, please turn Enable Password on or off at System->Password. The password consists of four to eight digits for entering the DVR. The default passwords are admin, “1111”, operator, “2222”, and guest, “3333”. -
Page 23: Chapter 6-6-6. Dvr Id
Chapter 6-6-6. DVR ID Each DVR can be assigned by a unique DVR ID accessed by the remote controller. With a unique DVR ID set, the remote controller issues commands to a particular DVR. The rest of DVRs are not affected by the remote controller. To operate addressable DVR control feature, please refer to chapter 1 Addressable DVR Control Button. -
Page 24: Chapter 6-6-9. Language
Import Setup To perform Import Setup feature, please select Import Setup menu item and press ENTER button. The configuration of the DVR gets updated based on the system file. Version Version menu item indicates the current version number of the DVR. Chapter 6-6-9. -
Page 25: Chapter 6-8-1. Ptz Model & Baud Rate
Chapter 6-8-1. PTZ Model & Baud Rate One can choose the model of PTZ devices by pressing Left or Right button. The DVR adopts this PTZ model’s protocol and communicates with the PTZ device. Each PTZ device can be assigned by its PTZ protocol with different baud rate. It is highly recommend to adopt MLP2 protocol at 9600 kbps baud rate. -
Page 26: Chapter 6-8-8. Focus & Auto Focus
Chapter 6-8-8. Focus & Auto Focus To adjust focus, please press Left or Right button on Focus option. For auto focus, press ENTER on Auto Focus option. Chapter 6-8-9. Save Presets Once the above parameters are entered, the lens of the PTZ device should be in place with proper IRIS and focus set. -
Page 27: Chapter 7. File Playback
CHAPTER 7. FILE PLAYBACK To play a backup file from a PC, a user can export DVR’s video file. To playback multiple video channels, H264Player.exe built-in in the DVR can be used. Chapter 7-1. Play H.264 Files The DVR can export H.264 file to (1) USB flash disk, (2) File for HTTP download. To play the exported H.264 video files on a PC, please use H264Player.exe . -
Page 28: Chapter 8. Network
To setup IP address, a user can use IPScan utility to scan all the DVRs within a LAN. This powerful tool can help the user to monitor, to find, and to set IP configuration for all Merit LILIN’s IP-based products. Note: The default IP address of the DVR is 192.168.1.111... -
Page 29: Chapter 8-2. Access The Dvr Via Internet Browser
Chapter 8-2. Access the DVR via Internet Browser To access the DVR, a user can use Internet browser to get live and stored video via Internet. The DVR’s web interface also provides features of PTZ access, split window display, and system configurations. -
Page 30: Chapter 8-2-2. Logon
Chapter 8-2-2. Logon To logon the DVR, please type in the IP address in the HTTP address box via Internet browser. By default, type “192.168.1.111” in the HTTP address box to access the logon page. Use default password “1111” for Administrator, password “2222” for Operator, and password “3333”... -
Page 31: Chapter 8-3. Configure The Dvr Via Web Page
To perform playback operation, please click on Playback hyperlink. A playback dialog box shows up. Event search list, record search list, and time search are all integrated in the dialog box on the hyper link panel. Normal Record and Event Lists Double click on the record list item or event list item for playback. -
Page 32: Chapter 8-3-2 Recording Setting
Chapter 8-3-2 Recording Setting Current Rec Mode—Current DVR recording mode HDD Overwritten—Option for circular recording Camera Recording Mode--Assign schedule recording or no recording for a camera. Camera Quality—Setup the recording quality for a camera Camera FPS—recording frame rate for a camera Chapter 8-3-3 Recording Schedule Table A user can setup record schedule table via Internet, to setup scheduling table, please specify day and time with the recording mode. -
Page 33: Chapter 8-3-4 Alarm Setting
Chapter 8-3-4 Alarm Setting Buzzer Enable—Enable/disable DVR buzzer Motion Enable—Enable/disable motion detection Motion Tracer—Enable/disable motion trace Alarm Input Type—Set alarm input as NO/NC or disable Buzzer Output Time—Assign buzzer time for each camera Chapter 8-3-5 Alarm E-mail Enable Alarm E-Mail—Option for enable alarm/motion email From—From E-Mail address To—To E-Mail address Host/IP Address—SMTP mail server’s IP or DNS address... -
Page 34: Chapter 8-3-6 Network Setting
Chapter 8-3-6 Network Setting IP Address—DVR’s IP address Subnet Mask—Subnet mask Gateway IP Address—Router/Gateway IP address Video Port—The DVR’s video port HTTP Port—HTML port number Chapter 8-3-7 System Setting MAC Address: MAC address of the DVR Firmware: firmware version of the DVR DVR/485 ID: Addressable DVR ID for multiple DVRs remote control using a remote controller. -
Page 35: Chapter 8-3-7-1 Timer
Chapter 8-3-7-1 Timer Date: Current date of the DVR Time: Current time of the DVR DST: Daylight saving time for a region Chapter 8-3-7-2 User Setting There are three levels (admin, operator and guest) of user authentication allowed in the DVR. To change password, please specify the old password, new password, and confirm password. -
Page 36: Chapter 8-3-7-3 System Status
Chapter 8-3-7-3 System Status Primary Master HDD—HDD detecting status of primary master IDE channel for the DVR Primary Slave HDD—HDD detecting status of primary slave IDE channel for the DVR Secondary Master HDD—HDD detecting status of secondary maser IDE channel for the DVR Secondary Slave HDD—HDD detecting status of secondary slave IDE channel for the DVR HDD Recording Start—Start recording time of the DVR HDD Recording End-End recording time of the DVR... -
Page 37: Chapter 8-3-8 Backup
To perform network firmware update, please click on Browse button and locate the firmware. For DVR firmware, the firmware is dvr004.bin. Chapter 8-3-8 Backup To perform remote video file backup, click Backup hyperlink. Please specify starting time and ending time. Click on Submit button to perform file backup task. A backup progress bar shows up on the web page. -
Page 38: Appendix
APPENDIX APPENDIX A. Connect External Alarm Switches For 4-Ch DVR, it has 10-pin I/O connector which contains RS-485, 4 alarm switch inputs (dry contact), and two alarm outputs. The ping assignment is in the following charts. Pin 1 Alarm input 1 Pin 2 Alarm input 2 Pin 3... -
Page 39: Appendix C. Hard Disk Recording Table
#2. Above information may be inaccurate due to the installation environment. APPENDIX D. Secured Power Lock For security purpose, DVR004S provides a secured power lock. It can prevent unauthorized person disconnecting DC power jack. To faster DC power cable, please see the followings: 1. -
Page 40: Specification
HDD failure Remote controller addressable up to 255 DVRs Accessories P/T/Z protocol LILIN and Pelco, remote controller and mouse controllable via RS-485 Mouse USB, drag-n-drop, right-mouse-click, mouse wheel. Audio RCA * 1 input / RCA * 1 output (0.7Vp-p, 300 Hz to 3KHz) - Page 41 MERIT LILIN ENT. CO., LTD http://www.meritlilin.com 66-DVR004CSE...
Need help?
Do you have a question about the DVR004S and is the answer not in the manual?
Questions and answers