Table of Contents
Advertisement
Advertisement
Table of Contents

Related Manuals for Melitta Caffeo Passione Varianza CS


Summary of Contents for Melitta Caffeo Passione Varianza CS
- Page 1 Bedienungsanleitung Operating Instructions...
-
Page 2: Table Of Contents
Table of contents Table of contents For your safety ........................57 Symbols used ......................57 Proper use .........................58 Danger from electric current ................58 Risk of burns and scalds..................59 General safety......................59 Overview of the appliance ....................60 The appliances at a glance .................60 Overview of the control panel ................62 The Cappuccinatore at a glance ...............64 First steps ..........................65 Unpacking the appliance ..................65... - Page 3 Table of contents Changing basic settings ....................82 Calling up service mode ..................82 Setting the energy save programme ..............82 Setting Auto OFF ....................83 Setting the water hardness ................84 Setting the brewing temperature ..............85 Resetting the appliance to the factory settings..........86 Setting the grinding fineness ................86 Care and maintenance ....................87 General cleaning ....................87 Cleaning the brewing unit ..................88...
-
Page 4: For Your Safety
Store the operating instructions carefully. If you pass on the appliance, include the operating instructions with it. Melitta accepts no liability for damage caused by failure to observe the operating instructions. If you require further information or have any questions on the appliance, contact Melitta or visit our website at: www.melitta.de... -
Page 5: Proper Use
The appliance is intended for use in private households. Any other use is regarded as improper and may lead to personal injury and material damage. Melitta accepts no liability for damage that arises due to improper use of the appliance. -
Page 6: Risk Of Burns And Scalds
For your safety Risk of burns and scalds Escaping fluids and steam may be very hot. Parts of the appliance can also become very hot. Observe the following safety instructions to avoid scalds and burns: ū Avoid escaping fluids and steam coming into contact with the skin. -
Page 7: Overview Of The Appliance
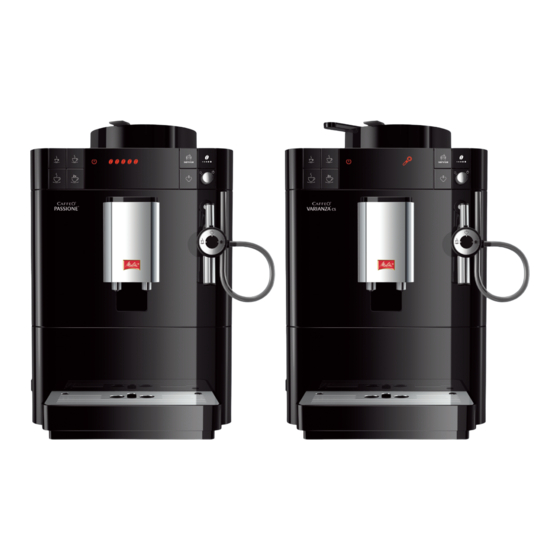
Overview of the appliance Overview of the appliance The appliances at a glance Fig. 1: Caffeo® Passione® and Caffeo® Varianza® CS from front left 1 Water tank with lid 6 Drip tray 2 Bean container with lid 7 ON/OFF button 3 Cup rest 8 Height-adjustable outlet for coffee beverages with 2 coffee noz-... - Page 8 Overview of the appliance Fig. 2: Caffeo® Passione® and Caffeo® Varianza® CS from front right 11 Cover 14 Cappuccinatore 12 Brewing unit (inner) 15 Cup plate 13 Steam pipe 16 Float...
-
Page 9: Overview Of The Control Panel
Overview of the appliance Overview of the control panel Fig. 3: Control panel 17 Direct keys 18 Displays 19 Control buttons and rotary regulator Button/ Designation Function Regulator Small cup Prepare small portion of coffee Medium cup Prepare medium portion of coffee Large cup Prepare large portion of coffee Two cups... - Page 10 Overview of the appliance Display Meaning Lights up Appliance is ready for operation Flashing Appliance heating up or preparing a coffee bever- Flashing Programme for setting coffee amount running quickly Lights up Number of coffee beans: Currently set coffee strength Flashing Fill bean container or coffee dispensing has stopped...
-
Page 11: The Cappuccinatore At A Glance
Overview of the appliance The Cappuccinatore at a glance Fig. 4: Cappuccinatore 20 Air suction pipe 21 Holder for the milk hose 22 Connection of the milk hose 23 Milk hose 24 Outlet for hot water, milk or milk foam 25 Selector switch Symbol on Function... -
Page 12: First Steps
First steps First steps This chapter describes how to prepare your appliance for use. Unpacking the appliance In addition to the appliance, there are further accessories in the packaging such as cleaning aids and agents. CAUTION Contact with cleaning agents can lead to eye and skin irritation. Keep the supplied cleaning agents out of the reach of children. -
Page 13: Installing The Appliance
First steps Installing the appliance Observe the following instructions: ū Do not install the appliance in damp rooms. ū Install the appliance on a stable, flat and dry surface. ū Do not install the appliance in the vicinity of sinks or the like. ū... - Page 14 First steps Fig. 5: ON/OFF button Requirement: The appliance has been installed and connected. 1. Place a vessel beneath the Cappuccinatore. 2. Press the ON/OFF button (7). » The appliance indicates that the water tank needs to be filled. 3. Remove the water tank. Rinse out the water tank with clean water. Fill the water tank with fresh water and insert it.
-
Page 15: Basic Operation
Basic operation Basic operation This chapter describes basic operating steps for using the appliance on a daily basis. Switching the appliance on and off Before switching on after starting up the appliance for the first time, read chapter 3.5 Switching on and venting the appliance for the first time on page 66. -
Page 16: Using The Control Panel
Basic operation Using the control panel The essential programmes can be accessed using the control panel. Press the required button. Use the following actions to operate the buttons: Brief press Briefly press a button to select a programme. Long press Press a button for longer than 2 seconds to select a second programme that may be available. -
Page 17: Filling With Water
Basic operation Fig. 6: Open the lid of the bean container (Caffeo® Varianza® CS) 1. Open the lid (26) of the bean container (2). 2. Fill coffee beans into the bean container. 3. Close the lid of the bean container. Information The flashing display requests you to refill coffee beans. - Page 18 Basic operation Fig. 7: Water tank (Caffeo® Varianza® CS) 1. Open the lid of the water tank (27) and pull the water tank (1) upwards out of the appliance by the handle. 2. Fill the water tank with water. 3. Insert the water tank into the appliance from above and close the lid.
-
Page 19: Adjusting The Outlet For Coffee Beverages
Basic operation Adjusting the outlet for coffee beverages The outlet for coffee beverages (8) is height-adjustable. Set the greatest possible distance between the outlet and the vessel. Depending on the ves- sel, push the outlet up or down. Fig. 8: Setting the outlet for coffee beverages (Caffeo® Varianza® CS) Connecting the Cappuccinatore You can prepare hot water, warm milk or milk foam with the Cappuc- cinatore. -
Page 20: Using Milk
Basic operation 1. Connect the Cappuccinatore to the steam pipe (13). Slide the connec- tion of the Cappuccinatore to the stop (28) of the steam pipe. 2. Connect the milk hose (23) to the Cappuccinatore. 3. If you do not want to use milk, clamp the milk hose in the holder (21). Using milk Use cooled milk for optimum coffee enjoyment. -
Page 21: Emptying The Drip Tray And Coffee Grounds Container
Basic operation Emptying the drip tray and coffee grounds container After several beverage dispensing processes, the drip tray (6) and the coffee grounds container (5) can become full and must be emptied. The projecting float (16) indicates the current filling level of the drip tray. After a specified number of beverage have been dispensed, the appliance also shows that the drip tray and coffee grounds container are full. -
Page 22: Using The My Bean Select® Function
Using the My Bean Select® function Using the My Bean Select® function The function for preparing single portions is only present in the Caffeo® Varianza® CS. With the My Bean Select® function, a single coffee beverage can be prepared from a different type of coffee. Separately fill a single portion of coffee beans to prepare the coffee. - Page 23 Using the My Bean Select® function Fig. 12: Removing the measuring spoon (Caffeo® Varianza® CS) Requirement: The appliance is ready for operation. 1. Remove the measuring spoon (10) from the bean chute (30). » The flashing display requests you to fill the bean chute. 2.
-
Page 24: Preparing Beverages
Preparing beverages Preparing beverages There are two options for preparing beverages: ū Preparing coffee beverages at the outlet for coffee beverages or ū preparing hot water, warm milk and milk foam on the Cappuccinatore. Note: ū There should always be sufficient water in the water tank. If the filling level is too low, the appliance requests you to refill it. -
Page 25: Preparing Coffee Beverages
Preparing beverages Preparing coffee beverages Requirement: The appliance is ready for operation. 1. Place a vessel beneath the outlet. 2. Press the "Small cup", "Medium cup" or "Large cup" direct key. » The grinding process and beverage dispensing start. » Beverage dispensing ends automatically. -
Page 26: Preparing Two Coffee Beverages Simultaneously
Preparing beverages Preparing two coffee beverages simultaneously The "Two cups" button is used to prepare two coffee beverages simulta- neously. For two-cup dispensing, the appliance carries out two grinding processes. Fig. 13: Two-cup dispensing (Caffeo® Varianza® CS) 1. Place two vessels beneath the outlet (8). 2. -
Page 27: Preparing Milk Foam Or Warm Milk
Preparing beverages Preparing milk foam or warm milk Prepare milk foam and warm milk on the Cappuccinatore. The preparation of milk foam and warm milk is similar. Steam is required for the preparation. CAUTION Hot water and hot steam flowing out of the pipe Do not reach into the steam that is flowing out. -
Page 28: Preparing Hot Water
Preparing beverages Rinsing the Cappuccinatore 1. Fill a vessel with clear water. 2. Immerse the milk hose in the filled vessel. 3. Place an empty vessel beneath the Cappuccinatore. 4. Press the "Steam dispensing" button. » The flashing display indicates that the appliance is heating up for steam dispensing. -
Page 29: Changing Basic Settings
Changing basic settings Changing basic settings The following chapter describes how to change the appliance's basic set- tings. Calling up service mode Some of the basic settings can only be changed in the service mode of the appliance. Requirement: The appliance is ready for operation. 1. -
Page 30: Setting Auto Off
Changing basic settings The following times can be set: Display Time 3 min 30 min 60 min 120 min 240 min Information Finish the energy save programme by pressing any button. Requirement: The service mode is called up. 1. Press the "Service" button repeatedly until the display for the energy save programme appears. -
Page 31: Setting The Water Hardness
Changing basic settings Requirement: The service mode is called up. 1. Press the "Service" button repeatedly until the display for the Auto OFF service mode appears. 2. Press the "Coffee strength" button repeatedly until the desired time is set. 3. Call up the next basic setting in the service mode or exit the service mode: a) Briefly press the "Service"... -
Page 32: Setting The Brewing Temperature
Changing basic settings Requirement: The service mode is called up. 1. Press the "Service" button repeatedly until the display for the water hardness service mode appears. 2. Press the "Coffee strength" button repeatedly until the desired water hardness is set . 3. -
Page 33: Resetting The Appliance To The Factory Settings
Changing basic settings Resetting the appliance to the factory settings The appliance can be reset to the factory settings. Information If the appliance is reset to the factory settings, all personal basic set- tings in service mode are lost (see section 7.1 Calling up service mode on page 82). -
Page 34: Care And Maintenance
Care and maintenance 1. Remove the water tank. The "Grinding fineness adjustment" lever (9) is visible on the housing. » 2. Move the lever to the left or right, as shown on Fig. 14. ū To the left = grinding fineness finer ū... -
Page 35: Cleaning The Brewing Unit
Care and maintenance Cleaning the brewing unit To avoid damage to the appliance, we recommend cleaning the brewing unit once a week. In the course of the cleaning operations, the coffee residues behind the cover on the appliance surfaces can be removed with a soft, dry cloth. CAUTION Electric shock when cleaning the open appliance Switch off the appliance before cleaning the appliance surfaces behind... - Page 36 Care and maintenance Fig. 16: Cleaning the brewing unit 1. Rinse the brewing unit thoroughly from all sides under running water. » The brewing unit and the sieve (33) are free of coffee residues. 2. Allow the brewing unit to drip dry. 3.
-
Page 37: Cleaning The Cappuccinatore
Care and maintenance Cleaning the Cappuccinatore In addition, we recommend cleaning the Cappuccinatore and the milk hose regularly. Fig. 17: Dismantling the Cappuccinatore Proceed as follows to dismantle the Cappuccinatore: 1. Detach the Cappuccinatore from the steam pipe (13). 2. Detach the following individual parts from the Cappuccinatore: ū... -
Page 38: Running The Cleaning Programme
Observe the processing instructions on the packaging of the fully auto- ƒ matic coffee maker cleaning agent. ATTENTION The use of unsuitable fully automatic coffee maker cleaning agent can damage the appliance. Only use the Melitta® PERFECT CLEAN Espresso Machines cleaning ƒ tablets. - Page 39 Care and maintenance Requirement: The appliance is ready for operation. The water tank is full. Buttons Displays Steps 1. Press the "Service" button and also the "Coffee strength" button for longer than 2 seconds. » The appliance indicates that: ū the cleaning programme is running ū...
- Page 40 Care and maintenance Buttons Displays Steps 4. Place the coffee grounds container beneath the outlet. 5. Remove the brewing unit and clean it as described in section 8.2 Cleaning the brewing unit on page 88. Do not switch off the appliance. 6. Place a cleaning table in the brewing unit (see Fig.
-
Page 41: Running The Descaling Programme
Wait until the steam pipe has cooled down. ƒ ATTENTION Use of unsuitable descaling agent may damage the appliance. Only use the Melitta® ANTI CALC Espresso Machines liquid descaling ƒ agent. ATTENTION A water filter may be damaged if it is screwed in during the descaling programme. - Page 42 Care and maintenance Requirement: The appliance is ready for operation. 0.5 litres of descaling solution has been prepared and is ready for use. Symbol on the Displays Steps selector switch or buttons 1. Press the "Service" button and also the "Steam dispensing"...
- Page 43 Care and maintenance Symbol on the Displays Steps selector switch or buttons 8. Insert the water tank again. » The descaling process starts. » After several minutes, the appli- ance indicates that: ū the third programme stage is reached ū the rotary regulator must be actuated.
- Page 44 Care and maintenance Symbol on the Displays Steps selector switch or buttons » The appliance indicates that the last program stage is reached. » Hot water flows into the drip tray. » After several minutes, the appli- ance indicates that the drip tray and the coffee grounds container must be emptied.
-
Page 45: Using A Water Filter
Care and maintenance Using a water filter The use of a water filter extends the service life of the appliance and the appliance has to be descaled less frequently. The water filter contained in the scope of delivery filters calcium and other pollutants out of the water. Fig. -
Page 46: Inserting The Water Filter
Care and maintenance Inserting the water filter Information The water hardness cannot be set if you use a water filter. The water hard- ness is automatically set to soft (see section 7.4 Setting the water hardness on page 84). Requirement: The appliance is ready for operation. The new water filter is at hand. -
Page 47: Problems
Problems Changing the water filter Insert a new water filter (see section Inserting the water filter on page 99). Permanently de-registering the water filter If you have removed an inserted water filter and want to continue operat- ing the appliance without a water filter, de-register the water filter from the appliance: 1. - Page 48 Problems Problem Cause Action When foaming milk, Selector switch is not in Turn the selector switch to ƒ there is not enough the correct position. the correct position (see sec- milk foam. tion 6.6 one page 80). Cappuccinatore is Clean the Cappuccinatore (see ƒ...
-
Page 49: Transport, Storage And Disposal
Transport, storage and disposal Transport, storage and disposal 10.1 Venting the appliance We recommend venting the appliance when it is not used for a long period, prior to transport and when there is a risk of frost. During venting, residual water is removed from the appliance. CAUTION Hot water and hot steam flowing out of the pipe Do not reach into the steam that is flowing out. -
Page 50: 10.2 Transporting The Appliance
Technical data 10.2 Transporting the appliance ATTENTION Freezing residual water can damage the appliance. Prevent the appliance from being exposed to temperatures below 0 °C. ƒ Information Transport the appliance in the original packaging. This avoids damage in transit. Before transporting the appliance, carry out the following activities: 1. - Page 51 Technical data Technical data Capacity Bean container 125 g Measuring spoon 10 g to 11 g (depending on coffee type) Water tank 1.2 l Capacity limits per dispens- ing process Continuous steam dis- 180 s pensing Dispensing hot water 440 ml Weight (empty) –...
- Page 52 Melitta Europa GmbH & Co. KG Division Household Products Ringstr. 99 D-32427 Minden Germany www.melitta.de Editorial department: ZINDEL AG www.zindel.de...
Need help?
Do you have a question about the Caffeo Passione Varianza CS and is the answer not in the manual?
Questions and answers