Timex Intelligent Quartz Instructions Manual
Hide thumbs
Also See for Intelligent Quartz:
- Manual (262 pages) ,
- User manual (224 pages) ,
- Manual (239 pages)
Table of Contents
Advertisement
Available languages
Available languages
Perpetual Calendar • Fly-back Chronograph
• Fly-back Chrono Compass • Linear Chronograph • World Time
• Compass • Tide Temp and Compass • Altimeter • Depth
• Yacht Racer • Yacht Racer Pro • Chrono Timer • 3GMT
Calendrier Perpétuel • Chronographe avec Fly-back
• Boussole Chrono avec Fly-back • Chronographe Linéaire
• Heure Mondiale • Boussole • Marée Température et Boussole
• Altimètre • Profondeur • Yacht Racer • Yacht Racer Pro
• Minuterie Chrono • 3 GMT
Calendario Perpetuo • Cronógrafo Fly-back
• Brújula y Cronógrafo Fly-back • Cronógrafo lineal
• Hora mundial • Brújula • Marea temperatura y brújula
™
• Altímetro • Profundidad • Yacht Racer • Yacht Racer
• Cronógrafo temporizador • 3GMT
W273 NA 355-095016
Advertisement
Chapters
Table of Contents

Related Manuals for Timex Intelligent Quartz


Summary of Contents for Timex Intelligent Quartz
- Page 1 Perpetual Calendar • Fly-back Chronograph • Fly-back Chrono Compass • Linear Chronograph • World Time • Compass • Tide Temp and Compass • Altimeter • Depth • Yacht Racer • Yacht Racer Pro • Chrono Timer • 3GMT Calendrier Perpétuel • Chronographe avec Fly-back •...
- Page 2 English ......Page 1 Français ......page 125 Español ......página 259...
- Page 3 INTELLIGENT QUARTZ watch. Please read these instructions carefully ™ to understand how to operate your Timex watch. Your watch may not have all of the features described in this booklet. For more information, and to register your product please visit:...
-
Page 4: Table Of Contents
TABLE OF CONTENTS Tide Temp and Compass..........52 Altimeter ................61 How to Start Your Watch ........... 5 Depth ................69 Water and Shock Resistance ..........6 Yacht Racer ..............74 Indiglo Night-Light ............8 ® Chrono Timer ..............85 Date and Time Setting ............ -
Page 5: How To Start Your Watch
With Timex Some watches require the setting crown to be screwed Intelligent Quartz watches, the technology is written into in. If your watch case has a protrusion with screw the design, delivering a new level of dial complication. -
Page 6: Water And Shock Resistance
WATER AND SHOCK RESISTANCE WARNING: TO MAINTAIN WATER-RESISTANCE, DO NOT PRESS ANY BUTTONS UNDER WATER UNLESS If your watch is water-resistant, meter marking (WR_M) YOUR WATCH IS INDICATED AS 200 METER WATER- is indicated. RESISTANT. NEVER PULL OUT THE CROWN WHILE UNDER WATER. -
Page 7: Indiglo ® Night-Light
INDIGLO NIGHT-LIGHT DATE AND TIME SETTING ® Press button or crown to activate light. NOTE: The watch crown has three positions: closed, Electroluminescent technology used in the INDIGLO middle and outer. To familiarize yourself with the ® night-light illuminates the watch face at night and in low difference between the various positions extend the light conditions. -
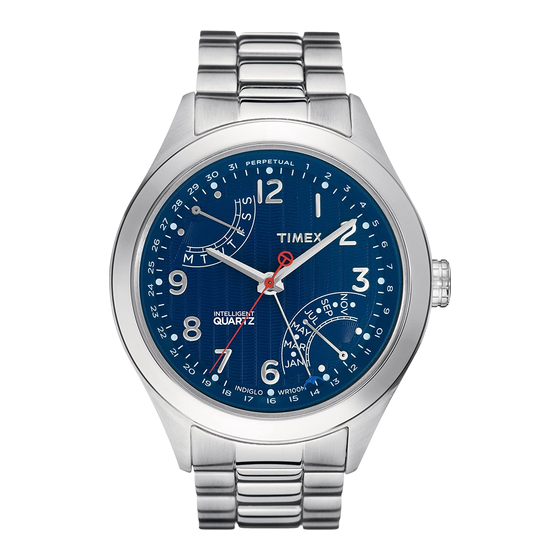
Page 8: Perpetual Calendar
date during this timeframe. Doing so could damage the PERPETUAL CALENDAR watch movement. OVERVIEW Push crown to closed position after setting date/time. The DATE HAND second hand will begin moving. BUTTON A DAY HAND (RECESSED) NOTE: For months with fewer than 31 days, the date will HOUR HAND need to be adjusted. - Page 9 The watch has two recessed push buttons for The date hand shows the offset: 1 = 1 year after leap use by Timex Service Center to set the day and date after year; 2 = 2 years after leap year; 3 = 3 years after leap battery replacement.
-
Page 10: Fly-Back Chronograph
FLY-BACK CHRONOGRAPH 4TH CENTER HAND ADJUSTMENT To readjust a misaligned 4th center hand: OVERVIEW 1. Pull the crown to its outer position. The upper and lower hands reset to the ends of their sweeps HOUR HAND 4TH CENTER HAND automatically. BUTTON A UPPER HAND 2. - Page 11 SECOND TIME ZONE TO SET THE SECOND TIME ZONE: The upper hand shows the time for the second time 1. Pull crown to its middle position. The upper hand zone. Note that the scale is 24-hours, with midnight at shows the second time zone time and the 4th center either end and noon in hand shows the minutes.
- Page 12 4. To reset the fly-back chronograph to zero position, FLY-BACK CHRONOGRAPH press Button B (FLY-BACK/RESET). The watch provides a 4-hour fly-back chronograph. When the chronograph is reset, all hands move to 1. To start, press Button A (START/STOP). zero position. After another eight seconds, the watch The 4th center hand shows the seconds with 1/5 resumes normal display of the second time zone.
-
Page 13: Fly-Back Chronograph Compass
FLY-BACK CHRONOGRAPH COMPASS INDICATOR HAND (4TH CENTER HAND) ADJUSTMENT To readjust a misaligned indicator hand: OVERVIEW 1. Pull the crown to its outer position. The upper and lower hands reset to the ends of their sweeps MINUTE HAND 4TH CENTER HAND automatically. - Page 14 2. Press B to move the 4th center hand forward. Hold the SECOND TIME ZONE button to move the hand quickly. The upper and 4th The upper hand normally shows the time for the second center hands move together; as the 4th center hand time zone.
- Page 15 2. To stop, press A again (START/STOP). All hands freeze. FLY-BACK CHRONOGRAPH The watch provides a 4-hour fly-back chronograph. 3. To resume, press A (START/STOP) again, or to reset the chronograph to zero, press B (FLY-BACK/RESET). 1. To start, press A (START/STOP). The 4th center hand shows the seconds with 1/5-second resolution and When the chronograph is reset, all hands move to the lower hand shows...
- Page 16 than normal concentrations of hard and soft iron, as they COMPASS CALIBRATION may cause inaccurate headings. Whenever a heading is Before use, the compass must be calibrated. suspect, recalibrate. Since a compass uses the earth’s magnetic field, you Do not store the watch near any source of magnetism, must be aware of large metallic objects, such as vehicles or bridges, or objects that give off electromagnetic such as a computer, appliance, or television, as the...
- Page 17 3. Press C (COMPASS) to begin. The 4th center hand 5. If you do not wish to set the magnetic declination, rotates two revolutions to remind you to rotate the push the crown in. Otherwise, to have watch watch. While level, SLOWLY rotate the watch two automatically compensate for the declination angle, revolutions, taking at least 15 seconds per revolution.
- Page 18 available through buttons A (START/STOP) and B (FLY- COMPASS OPERATION BACK/RESET). Normally, the compass is inactive, with the 4th center hand pointing to 12 o’clock or showing the chronograph NOTE: During compass operation, the second hand seconds. moves in two-second increments. Also, when the While holding the watch level, press C (COMPASS) to compass is activated, the upper and lower hands may activate the compass.
-
Page 19: Linear Chronograph
LINEAR CHRONOGRAPH LINEAR AND 4TH CENTER HAND ADJUSTMENT To readjust a misaligned 4th center hand: OVERVIEW 1. Pull the crown to its outer position. The lower hand HOUR HAND resets to the end of its sweep automatically. 4TH CENTER HAND 2. - Page 20 SECOND TIME ZONE TO SET THE SECOND TIME ZONE: 1. Pull crown to its middle position. The lower hand The lower hand shows the second time zone time and the 4th center shows the time for hand shows the minutes. the second time zone.
- Page 21 When the chronograph is reset, all hands move to zero LINEAR CHRONOGRAPH position. After another eight seconds, the watch resumes The watch provides a 4-hour split chronograph. normal display of the second time zone. While the 1. To start, press Button A (START/STOP). The 4th center chronograph is running, you may take a split time.
-
Page 22: World Time
WORLD TIME TO SET THE WORLD TIME: 1. Pull the crown to its middle position. The center hand OVERVIEW shows the world time zone city and the upper hand 24 CITIES HOUR HAND shows the time in that city. 4TH CENTER HAND UPPER HAND BUTTON A WORLD TIME... - Page 23 2. Press A or B to move the center hand to the city that 4. If the displayed season is not correct for the home represents your home time zone. Hold a button to time zone, press C to change it. If the home time zone move the hand quickly.
- Page 24 INDICATOR HAND (4TH CENTER HAND) ADJUSTMENT CITY TIME DISPLAY To readjust a misaligned indicator hand: Press A or B to move the center 1. Pull the crown to its outer position. The upper and hand backward or lower hands reset to the ends of their sweeps, forward, respec- automatically.
-
Page 25: Compass
The watch provides one setting to represent the two peri- COMPASS ods all cities that observe daylight savings time have. For OVERVIEW the watch, the period of daylight savings time is SUMMER and the period of standard time is WINTER. DECLINATION SCALE COMPASS HAND MIDDLE... - Page 26 properly near them. For best results, calibrate in the area COMPASS HAND ADJUSTMENT of intended use. Pull CROWN all the way out. Compass hand should point to 12 o’clock. If it does not, press either A or B to move In calibrating and taking headings, it is important, as with compass hand until it points to 12 o’clock.
- Page 27 4. When done, press A or B, keeping the watch level. The To calibrate the compass: 4th center hand moves back and forth to acknowledge 1. Pull the crown to its middle position and wait for the the end of calibration and then moves to the current indicator hands to stop moving.
- Page 28 compass will automatically turn off and the 4th center hand will return to its normal operation. This conserves battery life. Press A or B at any time to keep the compass on for another 20 seconds. NOTE: During compass operation, the second hand moves in two-second increments.
-
Page 29: Tide Temp And Compass
TIDE TEMP AND COMPASS INDICATOR HAND ADJUSTMENT Pull crown all the way out. Indicator hand should point OVERVIEW to 12 o’clock. If it does not, press either TIDE or TEMP push button to move hand until it points to 12 o’clock. TIDE and TEMP push buttons move hand clockwise and DECLINATION TEMPERATURE SCALE... - Page 30 Tides are influenced by sun position and shape of shore- THERMOMETER line, so tide clock cannot precisely give times of high and When worn on wrist, thermometer reading is affected by low tides. Periodic adjustment may be necessary. body heat. For more accurate readings, remove watch and put in shade for at least several minutes.
- Page 31 work properly in that same location. If the compass To calibrate the compass: is calibrated away from such objects, it will not work 1. Pull the crown to its middle position and wait for the properly near them. For best results, calibrate in the area indicator hands to stop moving.
- Page 32 4. When done, press C (COMPASS), keeping the watch level. The 4th center hand moves back and forth to acknowledge the end of calibration and then moves to the current magnetic declination setting. 5. If you do not wish to set the magnetic declination, push the crown in.
-
Page 33: Altimeter
seconds, the compass will automatically turn off and the ALTIMETER 4th center hand will return to its normal operation. This OVERVIEW conserves battery life. Press C (COMPASS) at any time to keep the compass on for another 20 seconds. ALIMETER NOTE: During compass operation, the second hand SCALE moves in two-second increments. - Page 34 if your location has not changed. Recalibrate to a known INDICATOR HAND (4TH CENTER HAND) ADJUSTMENT altitude when drastic pressure changes occur. Pull crown all the way out. The upper and lower retro- grade hands reset to the start of their scales automati- To calibrate the altimeter: cally.
- Page 35 will move the center hand more rapidly. The upper To change the unit from METERS to FEET, press C a retrograde hand moves relative to the altitude value second time. To change the unit from FEET to METERS, displayed by the 4th center hand. press C twice (altimeter is turned off first then turned back on with the unit in METERS).
- Page 36 To turn the altimeter off with the current unit set to maximum altitude’s thousands value with divisions every FEET, press C. To turn the altimeter off with the unit set one thousand METERS/FEET. to METERS, press C twice (lower hand goes to FEET first The maximum recorded altitude is displayed for ten before going to the OFF position).
-
Page 37: Depth
ten METERS/FEET. The upper retrograde hand shows the DEPTH minimum altitude’s thousands value with divisions every OVERVIEW one thousand METERS/FEET. CENTER HAND The minimum recorded altitude is displayed for ten BUTTON A seconds. To extend the display duration for another ten seconds, press B before the previous ten second duration expires To change the unit from METERS to FEET or FEET to METERS, press C. - Page 38 for 5 minutes, the sensor will automatically turn off. To TEMPERATURE turn the sensor off manually, press and hold button B The temperature sensor is always on and will take a for 2 seconds. The 4th center hand will move to the OFF reading at least once every 60 seconds.
- Page 39 When the watch is in Replace Battery Level status, the BATTERY LEVEL DETECTION second hand shall only move at 5-second intervals and The watch determines the battery level status and shall move by five hand positions. At this point, depth provides the user with a visual indication corresponding sensor cannot be activated, and the user must replace to the current battery level.
-
Page 40: Yacht Racer
SCALE HOUR HAND display the correct date upon demand. The date was preset at the Timex factory. When initially starting your UPPER new watch, if the date displays the date before or behind HAND... - Page 41 Timex service center, where the battery will be replaced and the Perfect Date function will 3. Push crown in to position 1 when finished.
- Page 42 MODE SELECTION CHRONO: Press button C to advance the upper hand to the desired The chronograph will operate without the countdown function. timer. YACHT RACE TIMER OPERATION TIME: The watch provides a 5, 3 or 1 minute countdown timer. Displays the current time only (Perfect Date function will Once the countdown timer reaches zero a one hour operate only in the Time mode).
- Page 43 the countdown process. (Please note: button C is CHRONOGRAPH OPERATION disabled until the countdown timer is reset). The watch provides a one hour chronograph which may be operated independently from the Yacht Race Timer. 4. To reset, press and hold button B (SPLIT/RESET) for 2 seconds, which will reset the countdown timer back 1.
- Page 44 3. To take a split time, press button B (SPLIT/RESET). In normal operation the Chronograph will cycle through The upper, lower, and 4th center hands will hold their the 30-minute sequence twice for a total maximum of positions for you to note the split (lap) time. The chro- one hour.
-
Page 45: Chrono Timer
INDIGLO NIGHT-LIGHT (PRO VERSION ONLY) ® CHRONO TIMER Yacht Racer PRO includes the addition of the INDIGLO ® night-light feature. During low or no-light conditions the PERFECT DATE ™ dial can easily be read by activating the INDIGLO night- ® SCALE light function by pressing in the crown. - Page 46 When the battery requires replacement, and then move to the date at which the watch is currently it is highly recommended the watch be sent to a Timex set. Rotate the crown forward to increase the time to the...
- Page 47 4TH CENTER HAND ADJUSTMENT MODE SELECTION To readjust a misaligned 4th center hand: Press button C to advance the upper hand to the desired 1. Pull the crown out to position 3. The upper and lower function. hands reset to the ends of their sweeps automatically. TIME: 2.
- Page 48 2. To start, press button A (START/STOP). The 4th center button B (SPLIT/RESET) and the hands will quickly hand displays the seconds counting up; the lower catch up to display the total elapsed time. hand shows the minutes, counting up in a 30-minute 4.
- Page 49 will need to be reset prior to using the chronograph func- button C) - Lower hand (press button C) - 4th Center hand tion again or before changing to a different mode. (Please (press button C) back to Upper hand….this allows you to note: button A is disabled when the maximum four hour advance through the cycle to engage the hands you need time has elapsed and will not function until the chrono-...
- Page 50 set, the hand will point to the time previously set. If 4. Now you may set the desired number of minutes in this is the first time the timer is being set, it will point one minute increments by pressing button A to move to the 0 on the timer scale.
- Page 51 the fourth hand counterclockwise (pressing button B COUNTDOWN TIMER OPERATION will move this hand clockwise), until the desired num- Once you have set the countdown timer to the desired ber of seconds has been selected. Please note that length of time to count down, you can now operate the you are adding or subtracting the number seconds to countdown timer.
- Page 52 Interrupting the countdown sequence: If you wish Clearing the countdown timer value: If desired, you to stop the countdown sequence prior to the sequence may clear the value of the countdown timer to zero. reaching zero, you may do so by pressing button A (the This can only be done if the countdown timer is not in fourth center hand as well as the upper and lower hands operation and has been reset.
-
Page 53: 3Gmt
3GMT Split time function: While the countdown timer is in operation, you may employ the split function to note the remaining time in the countdown sequence. INNER RING / NUMERALS To use the split time function, press button B, which will (24-HOUR FORMAT) make the upper, lower and 4th center hands freeze in HOUR HAND... - Page 54 3 TIME ZONE FUNCTION 4TH CENTER HAND ADJUSTMENT Your watch has the ability to display three time zones: To readjust a misaligned 4th center hand: 1. Hour and Minute hands: Displays the time in a stan- 1. Pull the crown out to position 3. dard 12 hour format.
- Page 55 2nd and 3rd time 4TH CENTER HAND CALIBRATION zones. The 4th center hand is calibrated at the Timex factory to 3. Push the crown in to position 2. The 4th center hand reflect the standard minutes within the hour as defined will point to its currently calibrated position of the by Universal Time Coordinated.
- Page 56 7. Push crown in to position 1 when finished. SETTING THE CASE ROTATING TOP RING (TIME ZONE III) Please note: The 4th center hand will track the time using The 3rd time zone is set by using the existing setting of the current calibration of the minutes within the hour.
-
Page 57: Tachymeter Function
TACHYMETER FUNCTION 4. The chronograph second hand is compared to the tachymeter markings to determine the target’s speed. (not all models) The tachymeter will only determine speeds greater than SLIDE-RULE BEZEL FUNCTION 60 units per hour using this method; slower speeds can The slide rule function of the top ring operates by rotating be measured by decreasing the unit of measurement. - Page 58 The following examples serve as a guide of how to use Inner Ring the slide rule. On the inner ring, “MPH” (mile per hour) refers to “speed in- dex”. This index is used to calculate the speed involving any SPEED CALCULATION: data per hour.
- Page 59 • The distance travelled can be obtained above the “15” Known Factors: Speed: 40 miles per hour Distance: marker on the inner ring. The number indicated on the 10 nautical miles outer ring is “10”. • Align “40” on the outer ring with the mark “MPH” The answer: The distance travelled is 10 nautical marking on the inner ring.
-
Page 60: How To Adjust Bracelet
HOW TO ADJUST BRACELET FOLDOVER CLASP BRACELET 1. Find spring bar that connects bracelet to clasp. (Variations of the following bracelet sections apply to all watch models). 2. Using a pointed tool, push in spring bar and gently twist bracelet to disengage. 3. -
Page 61: Bracelet Link Removal
When the battery needs to be changed, we recommend 2. Push pin forcefully in direction of arrow until link is that only TIMEX replace it. Your watch will need to be detached (pins are designed to be difficult to remove). -
Page 62: Timex International Warranty
® SHIPMENT. defects by Timex Group USA, Inc. for a period of ONE DO NOT DISPOSE OF BATTERY IN FIRE. DO NOT YEAR from the original purchase date. Timex and its RECHARGE. KEEP LOOSE BATTERIES AWAY FROM worldwide affiliates will honor this International Warranty. - Page 63 To obtain warranty service, please return your watch to 5. lens or crystal, strap or band, watch case, attachments Timex, one of its affiliates or the Timex retailer where the or battery. Timex may charge you for replacing any of watch was purchased, together with a completed original these parts.
- Page 64 If your Timex watch should ever need servicing, send it ® INTELLIGENT QUARTZ are trademarks of Timex Group B.V. and its subsidiaries. to Timex as set forth in the Timex International Warranty or addressed to: TG SERVICE CENTER, P.O. Box 2740, Little Rock, AR 72203.
- Page 65 MONTRES TIMEX ® Félicitations pour votre achat d’une montre Timex ® INTELLIGENT QUARTZ . Lire les instructions attentive- ™ ment pour bien comprendre le fonctionnement de votre montre Timex. Il est possible que ce modèle ne présente pas toutes les fonctions décrites dans le dépliant.
- Page 66 SOMMAIRE Marée Température et Boussole ........178 Altimètre ................ 188 Comment mettre la montre en marche ......129 Profondeur ..............197 Résistance aux chocs et à l’eau ........130 Yacht Racer ..............202 Veilleuse Indiglo ............132 ® Minuterie Chrono ............214 Réglage de la date et de l’heure ........
-
Page 67: Comment Mettre La Montre En Marche
, la technologie à ™ EN MARCHE quartz du futur. La technologie Timex Intelligent Quartz (Ne concerne pas les modèles à calendrier perpétuel.) combine la puissance d’un microprocesseur à la fiabilité Pour mettre la montre en marche, retirer la bague de et la précision des montres à... -
Page 68: Résistance Aux Chocs Et À L'eau
RÉSISTANCE AUX CHOCS ET À L’EAU ATTENTION : POUR PRÉSERVER L’ÉTANCHÉITÉ, NE PAS ENFONCER LES BOUTONS SOUS L’EAU, SAUF SUR Si la montre est étanche, la profondeur maximale (WR_M) LES MODÈLES ÉTANCHES JUSQU’À 200 MÈTRES. NE est indiquée. JAMAIS TIRER LA COURONNE ALORS QUE LA MONTRE EST SOUS L’EAU. -
Page 69: Veilleuse Indiglo
VEILLEUSE INDIGLO RÉGLAGE DE LA DATE ET DE L’HEURE ® Appuyez sur le bouton ou la couronne pour activer REMARQUE : La couronne de montre possède l’éclairage. La technologie électroluminescente utilisée 3 positions : enfoncée, intermédiaire et extrême. Pour dans la veilleuse INDIGLO permet d’illuminer le cadran vous familiariser avec les différentes positions, tirez la ®... -
Page 70: Calendrier Perpétuel
CALENDRIER PERPÉTUEL Date (Ne concerne pas les modèles à calendrier perpétuel) VUE D’ENSEMBLE Tirez la couronne en position intermédiaire puis tournez AIGUILLE DE LA DATE jusqu’à apparition de la date courante dans le dateur. BOUTON A AIGUILLE Remarque : La date change entre 10 pm (22h00) et 2 am (ENCASTRÉ) DES JOURS (2h00). - Page 71 Le jour après le remplacement de la pile et ne peut être modifié et la date ont été préréglés à l’usine Timex. Il ne reste mais seulement affiché. qu’à régler l’heure. La montre possède également deux Pour l’afficher, tirez la couronne en position intermédiaire.
-
Page 72: Chronographe Avec Fly-Back
CHRONOGRAPHE AVEC FLY-BACK RÉGLAGE DE LA 4ÈME AIGUILLE CENTRALE Pour réaligner la 4ème aiguille centrale : VUE D’ENSEMBLE 1. Tirez complètement la couronne. Les aiguilles 4ÈME AIGUILLE supérieure et inférieure se règlent automatiquement AIGUILLE DES HEURES CENTRALE en allant se placer en bout de trajectoire. BOUTON A AIGUILLE 2. - Page 73 SECOND FUSEAU HORAIRE POUR RÉGLER LE SECOND FUSEAU HORAIRE : L’aiguille supérieure indique l’heure pour le second fuseau 1. Tirez la couronne en position intermédiaire. L’aiguille horaire. Notez qu’il s’agit d’une échelle sur 24 heures, supérieure indique l’heure du second fuseau horaire et minuit se situant à...
- Page 74 4. Enfoncez la couronne pour valider. 2. Pour l’arrêter, appuyez de nouveau sur le bouton A (START/STOP [Démarrage/Arrêt]). Toutes les aiguilles CHRONOGRAPHE AVEC FLY-BACK OU RETOUR s’arrêtent. À LA VOLÉE 3. Pour redémarrer, appuyez de nouveau sur le bouton A La montre comporte un chronographe avec fly-back ou (START/STOP [Démarrage/Arrêt]).
-
Page 75: Boussole Chrono Avec Fly-Back
BOUSSOLE CHRONO AVEC FLY-BACK RÉGLAGE DE L’AIGUILLE INDICATRICE (4ÈME AIGUILLE CENTRALE) VUE D’ENSEMBLE POUR RÉALIGNER UNE AIGUILLE INDICATRICE : 1. Tirez complètement la couronne. Les aiguilles 4ÈME AIGUILLE AIGUILLE DES MINUTES CENTRALE supérieure et inférieure se règlent automatiquement BOUTON A AIGUILLE en allant se placer en bout de trajectoire. - Page 76 2. Appuyez sur B pour faire avancer la 4ème aiguille SECOND FUSEAU HORAIRE centrale. Maintenez le bouton enfoncé pour déplacer L’aiguille supérieure indique normalement l’heure pour le l’aiguille rapidement. L’aiguille supérieure et la 4ème second fuseau horaire. Noter qu’il s’agit d’une échelle sur aiguille centrale se déplacent ensemble, l’aiguille 24 heures, minuit se situant à...
- Page 77 utilisez le second fuseau horaire de cette manière, dernier chiffre des minutes, en comptant jusqu’à dix assurez-vous que l’affichage heure/minute correspond puis en répétant l’opération. L’aiguille supérieure bien à l’affichage sur 24 heures en vérifiant que la date indique le temps total, heures et minutes, avec des change à...
- Page 78 4. Vous pouvez également remettre à zéro et/ou ÉTALONNAGE DE LA BOUSSOLE redémarrer le chronographe lorsqu’il est en marche. La boussole doit être étalonnée avant utilisation. Pour cela, appuyez et maintenez enfoncé le bouton Une boussole utilise le champ magnétique terrestre ; B (FLY-BACK/RESET OU RETOUR À...
- Page 79 à l’étalonnage ou à des relevés d’orientation alors que 2. Tenez la montre en position horizontale ou posez-la la montre n’est pas en position horizontale peut aboutir sur une surface plane (si le bracelet gêne, poser la à d’importantes erreurs. Veillez également à éviter les montre sur une tasse retournée).
- Page 80 4. Ensuite, appuyez sur C (COMPASS [Boussole]), 7. Enfoncer la couronne pour valider. en maintenant la montre en position horizon- tale. L’aiguille centrale oscille pour confirmer que l’étalonnage est terminé et se déplace ensuite pour le réglage de la déclinaison magnétique du moment. 5.
- Page 81 s’arrête automatiquement et l’aiguille centrale reprend REMARQUE : Au cours de l’utilisation de la boussole, la son fonctionnement habituel. Ceci permet de prolonger trotteuse se déplace par intervalles de deux secondes. la durée de vie de la pile. Appuyez sur C (COMPASS Lorsque la boussole est activée, il se peut aussi que les [Boussole]) à...
-
Page 82: Chronographe Linéaire
CHRONOGRAPHE LINÉAIRE RÉGLAGE DE L’AIGUILLE LINÉAIRE ET DE LA 4ÈME AIGUILLE CENTRALE VUE D’ENSEMBLE Pour réaligner la 4ème aiguille centrale : AIGUILLES DES HEURES 1. Tirez complètement la couronne. L’aiguille inférieure 4ÈME AIGUILLE se règle automatiquement en allant se placer en bout CENTRALE BOUTON A de trajectoire. - Page 83 SECOND FUSEAU HORAIRE RÉGLAGE DU SECOND FUSEAU HORAIRE : L’aiguille inférieure 1. Tirez la couronne en position intermédiaire. L’aiguille indique l’heure pour inférieure indique l’heure du second fuseau horaire et le second fuseau la 4ème aiguille centrale indique les minutes. horaire.
- Page 84 4. Enfoncez la couronne pour valider. 3. Pour remettre le chronographe à zéro, appuyez sur le bouton B (SPLIT/RESET [Temps intermédiaire/Remise à CHRONOGRAPHE LINÉAIRE zéro]). La montre comporte un chronographe multi-cadrans avec Lors de la remise à zéro du chronographe, toutes les indicateur 4 heures.
-
Page 85: Heure Mondiale
HEURE MONDIALE POUR RÉGLER L’HEURE MONDIALE : 1. Tirez la couronne en position intermédiaire. L’aiguille VUE D’ENSEMBLE centrale indique la ville située dans le fuseau horaire 24 VILLES AIGUILLE DES HEURES mondial et l’aiguille supérieure indique l’heure dans 4ÈME AIGUILLE AIGUILLE cette ville. - Page 86 2. Appuyez sur A ou B pour déplacer l’aiguille centrale et 4. Si la saison affichée n’est pas celle correspondant au indiquer la ville correspondant à votre fuseau horaire. fuseau horaire local, appuyez sur C pour la modifier. Maintenez le bouton enfoncé pour déplacer l’aiguille Si le fuseau horaire local observe le passage à...
- Page 87 RÉGLAGE DE L’AIGUILLE INDICATRICE L’HEURE DANS UNE VILLE SÉLECTIONNÉE (4ÈME AIGUILLE CENTRALE) Appuyez sur A ou B pour Pour réaligner une aiguille indicatrice : déplacer l’aiguille centrale respectivement vers 1. Tirez complètement la couronne. Les aiguilles supéri- l’arrière ou vers l’avant eure et inférieure se règlent automatiquement en et sélectionner une ville.
-
Page 88: Boussole
La montre gère cela à l’aide d’un réglage signalant les BOUSSOLE deux périodes concernées par le changement d’heure VUE D’ENSEMBLE dans toutes les villes. Pour la montre, la période correspondant à l’heure d’été est SUMMER et la période AIGUILLE DE LA BOUSSOLE correspondant à... - Page 89 ne fonctionnera correctement qu’à cet endroit. Si la bous- RÉGLAGE DE L’AIGUILLE DE LA BOUSSOLE sole est étalonnée loin de tels objets, elle ne fonctionnera Tirez la COURONNE complètement. L’aiguille de la bous- pas correctement près d’eux. Pour de meilleurs résultats, sole devrait indiquer 12 heures.
- Page 90 électriques, téléviseurs) car cela pourrait l’aimanter et fausser les mesures ultérieures. La précision typique des montres-boussoles est de +/- 10 degrés. Pour étalonner la boussole : 1. Tirez la couronne en position intermédiaire et attendez l’arrêt des aiguilles indicatrices. 4. Ensuite, appuyez sur A ou B, en maintenant la montre 2.
- Page 91 6. Appuyez sur A ou B pour déplacer la 4ème aiguille FONCTIONNEMENT DE LA BOUSSOLE centrale respectivement vers l’ouest (-) ou vers l’est Normalement, la boussole est inactive et la 4ème aiguille (+) afin d’indiquer l’angle de déclinaison de l’endroit où centrale pointe sur 12 heures ou indique les secondes du vous vous trouvez à...
-
Page 92: Marée Température Et Boussole
MARÉE TEMPÉRATURE ET BOUSSOLE RÉGLAGE DE L’AIGUILLE DE L’INDICATEUR Tirez la couronne complètement. L’aiguille indicatrice VUE D’ENSEMBLE devrait indiquer 12 heures. Sinon, appuyez sur le bouton poussoir MARÉE ou TEMPÉRATURE pour faire avancer ÉCHELLE DE l’aiguille jusqu’à ce qu’elle indique 12 heures. Les boutons TEMPÉRATURE ÉCHELLE DE poussoirs pour MARÉE et TEMPÉRATURE font avancer... - Page 93 est indiquée, appuyez sur le bouton poussoir TEMPÉRA- HEURE DES MARÉES TURE pour sélectionner le thermomètre. L’aiguille se Dans ce mode, l’aiguille de l’indicateur se déplace place au début de l’échelle des températures et indique toujours dans le sens des aiguilles d’une montre. Ainsi, ensuite la température courante.
- Page 94 dans le sens des aiguilles d’une montre et inversement. Lors de l’étalonnage et des relevés d’orientation, il im- Enfoncez la couronne pour valider. porte, comme avec toutes les boussoles, de maintenir la montre dans un plan horizontal. Procéder à l’étalonnage ÉTALONNAGE DE LA BOUSSOLE ou à...
- Page 95 Pour étalonner la boussole : 1. Tirez la couronne en position intermédiaire et attendez l’arrêt des aiguilles indicatrices. 2. Tenez la montre en position horizontale ou posez-la sur une surface plane (si le bracelet gêne, poser la montre sur une tasse retournée). La montre peut être 4.
- Page 96 6. Appuyez sur A ou B pour déplacer la 4ème aiguille FONCTIONNEMENT DE LA BOUSSOLE centrale respectivement vers l’ouest (-) ou vers l’est Normalement, la boussole est inactive et la 4ème aiguille (+) afin d’indiquer l’angle de déclinaison de l’endroit où centrale pointe sur 12 heures ou indique les secondes du vous vous trouvez à...
-
Page 97: Altimètre
ALTIMÈTRE RÉGLAGE DE L’AIGUILLE INDICATRICE (4ÈME AIGUILLE CENTRALE) VUE D’ENSEMBLE Tirez la couronne complètement. Les aiguilles rétrogrades supérieure et inférieure se règlent automatiquement en ÉCHELLE allant se placer en début de trajectoire. L’aiguille indi- D’ALTIMÈTRE catrice (4ème aiguille centrale) doit indiquer 12 heures. (CENTAINES) BOUTON A Sinon, appuyez sur les boutons A et ou B pour faire... - Page 98 atmosphérique varie d’un point à un autre, il est très l’altimètre a été utilisé. Autrement, l’aiguille rétrograde important de régler l’altimètre par rapport à une valeur inférieure indiquera l’unité sélectionnée dans le mode d’altitude de référence connue ou par rapport à l’altitude d’affichage de l’altitude.
- Page 99 ACTIVATION/DÉSACTIVATION DE L’ALTIMÈTRE Pour activer l’altimètre, appuyez sur C. L’aiguille rétrograde inférieure indique MÈTRES. La 4ème aiguille centrale indique sur l’anneau externe les valeurs de l’altitude courante en centaines et en dizaines avec des divisions tous les dix MÈTRES/PIEDS. L’aiguille rétrograde supérieure indique les valeurs de l’altitude courante en milliers avec des divisions tous les mille MÈTRES/PIEDS.
- Page 100 La montre désactive automatiquement l’altimètre au bout appuyez sur A avant l’expiration des dix premières de 60 minutes. secondes. RAPPEL DES ALTITUDES MIN/MAX Pour changer les unités et passer des MÈTRES aux PIEDS, Pour afficher l’altitude maximale enregistrée, appuyez ou des PIEDS aux MÈTRES, appuyez sur C. sur A.
-
Page 101: Profondeur
L’altitude minimale enregistrée s’affiche pendant dix PROFONDEUR secondes. Pour prolonger l’affichage de dix secondes, VUE D’ENSEMBLE appuyez sur B avant l’expiration des dix premières sec- AIGUILLE ondes. Pour changer les unités et passer des MÈTRES aux CENTRALE BOUTON A PIEDS ou des PIEDS aux MÈTRES, appuyez sur C. COURONNE BOUTON B INDICATEUR OFF... - Page 102 TEMPÉRATURE En augmentant la profondeur, la 4ème aiguille centrale Le capteur de température est toujours en marche et indiquera la profondeur actuelle comme indiqué sur prendra la température au moins une fois toutes les l’échelle de profondeur. Si la lecture reste dans les limites 60 secondes.
- Page 103 la plus récente. Lorsque le capteur de profondeur est Pour l’état de niveau normal, la seconde aiguille se réactivé, la mémoire sera effacée. déplace d’une seconde à chaque mouvement correspon- dant à un fonctionnement normal. Si la montre n’a jamais été utilisée auparavant, les aiguilles centrales et inférieures indiqueront respective- Lorsque la montre est en état de niveau de décharge de ment 0 mètre / pied et 0º...
-
Page 104: Yacht Racer
DES HEURES toujours la date correcte lorsque vous le demanderez. AIGUILLE SUPÉR La date a été préréglée à l’usine Timex. Lorsque vous IEUR(E) réglez votre nouvelle montre pour la première fois, vous COURONNE devez réviser la date si celle-ci ne correspond pas à la 4ÈME... - Page 105 à un centre de minuit, la date change d’un jour. Après avoir réglé la date maintenance Timex, où la pile sera remplacée et la fonc- sur votre date locale, continuez à tourner la couronne tion Perfect Date à nouveau calibrée (sur la date actuelle pour positionner les aiguilles sur l’heure locale actuelle,...
- Page 106 bouton A ou B enfoncé afin de faire avancer l’aiguille COURSE DE YACHT MINUTERIE 5: plus vite. À noter qu’au bout de 5 secondes d’inac- Le compte à rebours commencera à 5 minutes et enclen- tivité lorsque la couronne est en position 3, la 4ème chera le chronographe lorsqu’il atteint zéro.
- Page 107 3. Pour arrêter le compte à rebours, appuyez le bouton UTILISATION DE LA MINUTERIE COURSE DE YACHT A (START/STOP [Démarrage/Arrêt]). (À noter que le Cette montre met à votre disposition des comptes à bouton C reste désactivé lorsque le compte à rebours rebours de 5, 3 ou 1 minute.
- Page 108 de 30 minutes deux fois, pour une durée totale et minutes, l’aiguille inférieure retourne à la position zéro maximum d’une heure. tandis que l’aiguille supérieure continue d’avancer sur une échelle de 30 minutes. (À noter que le bouton L’UTILISATION DU CHRONOGRAPHE C reste désactivé...
- Page 109 4. Pour arrêter le chronographe, appuyez le bouton changer de mode. (À noter que le bouton A est désactivé A (START/STOP [Démarrage/Arrêt]). (À noter que le lorsque la période maximale d’une heure s’est découlée, bouton C reste désactivé lorsque le chronographe et ne fonctionnera plus tant que le chronographe n’ait est arrêté, et se réactive lorsque le chronographe est pas été...
-
Page 110: Minuterie Chrono
AIGUILLE DES toujours la date correcte lorsque vous le demanderez. HEURES SUPÉRIEURE La date a été préréglée à l’usine Timex. Lorsque vous AIGUILLE réglez votre nouvelle montre pour la première fois, vous COURONNE devez réviser la date si celle-ci ne correspond pas à la date réelle là... - Page 111 à un centre minuit, la date change d’un jour. Après avoir réglé la date de maintenance Timex, où la pile sera remplacée et la sur votre date locale, continuez à tourner la couronne fonction Perfect Date à nouveau calibrée (sur la date pour positionner les aiguilles sur l’heure locale actuelle,...
- Page 112 le bouton A ou B et maintenez-le enfoncé pour faire FONCTIONNEMENT DU CHRONOGRAPHE avancer l’aiguille plus rapidement. Remarque : au bout La montre comporte un chronographe avec indicateur de 5 secondes sans action avec le bouton-poussoir 4 heures. À la fin de la période de quatre heures, le en position 3, la 4e aiguille centrale se déplace pour chronographe s’arrête automatiquement.
- Page 113 l’aiguille inférieure atteint la marque des 30 minutes, 4. Pour les arrêter, appuyez sur le bouton A (START/ elle retourne en position zéro pour commencer la STOP) de façon à arrêter le chronographe. (Remarque : période de 30 minutes suivante, tandis que l’aiguille le bouton C est désactivé...
- Page 114 mode. (Remarque : le bouton A est désactivé lorsque Aiguille supérieure (appuyez sur le bouton C) - Aiguille la durée maximum de quatre heures est passée. Il ne inférieure (appuyez sur le bouton C) - 4e aiguille centrale fonctionnera plus tant que le chronographe n’aura pas (appuyez sur le bouton C) retour à...
- Page 115 1. Appuyez sur le bouton C jusqu’à ce que l’aiguille supé- de demi-heures le plus proche de l’heure totale voulue rieure soit à un endroit précis de l’échelle Minuterie. (par exemple, pour un décompte total de 2:53:30, Si la minuterie a déjà été réglée, l’aiguille va pointer vous sélectionnerez 3 heures).
- Page 116 qui déplacera le total de la minuterie avec compte à nuterie avec compte à rebours totale de 2:53:30, vous rebours de 3 heures à 2:53:00). Vous remarquerez que appuierez 30 fois sur le bouton B pour sélectionner 30 l’aiguille des heures va se déplacer légèrement vers secondes).
- Page 117 d’une montre. L’aiguille supérieure va tourner dans il vous suffit d’appuyer à nouveau sur le bouton A (la 4e le sens des aiguilles d’une montre. Les aiguilles vont aiguille centrale ainsi que l’aiguille supérieure et inférieure continuer à indiquer le temps restant dans la séquence recommenceront à...
- Page 118 et qu’elle a été réinitialisée. Si la minuterie avec compte Fonction Temps intermédiaire : Si la minuterie avec à rebours est en cours d’utilisation, vous devez d’abord compte à rebours est en cours d’utilisation, vous pouvez arrêter la séquence de compte à rebours en appuyant utiliser la fonction Temps intermédiaire (Split) pour noter sur le bouton A, puis sur le bouton B.
-
Page 119: 3Gmt
3GMT FONCTION 3 FUSEAUX HORAIRES Votre montre peut indiquer l’heure dans trois fuseaux BAGUE INFÉRIEURE/ horaires : CHIFFRES 1. Les aiguilles des heures et des minutes : Affichage de (FORMAT 24 HEURES) AIGUILLE DES l’heure en format normal de 12 heures. Remarque : HEURES La date affichée dans la fenêtre de date est liée à... - Page 120 RÉGLAGE DE LA 4ÈME AIGUILLE CENTRALE RÉGLAGE DE LA 4ÈME AIGUILLE CENTRALE Pour ajuster la 4ème aiguille centrale lorsqu’elle La 4ème aiguille centrale est réglée à l’usine Timex selon est mal alignée : les normes gouvernant le nombre de minutes dans une heure telles qu’elles ont été...
- Page 121 2. Tournez la couronne jusqu’à ce que l’aiguille minute Remarque : La 4ème aiguille centrale indiquera le réglage ait atteint le positionnement correcte dans l’heure des en cours par rapport au nombre de minutes par heure. lieux souhaités pour les 2ème et 3ème fuseaux horaires. Les fuseaux horaires 2 et 3 sont tous les deux indiqués par le biais de la 4ème aiguille centrale, ainsi les lieux choisis 3.
-
Page 122: Fonction Tachymètre
avancer l’aiguille plus vite. Cette démarche réglera l’heure FONCTION TACHYMÈTRE du 2ème fuseau horaire sur votre montre. (certains modèles) RÉGLAGE DE LA ROTATION DU COUVERT PAR BAGUE En utilisant cette méthode, le tachymètre déterminera SUPÉRIEURE (FUSEAU HORAIRE III) uniquement les vitesses supérieures à 60 unités par Le 3ème fuseau horaire est réglé... -
Page 123: Fonction Règle À Calcul De La Bague D'encadrement
3. Arrêter le chronographe une fois que la cible de la FONCTION RÈGLE À CALCUL DE LA BAGUE mesure de vitesse dépasse le marqueur de fin. D’ENCADREMENT 4. L’aiguille des secondes du chronographe indique sur La fonction règle à calcul du cercle supérieur fonctionne l’échelle tachymétrique la vitesse de la cible. - Page 124 interne, « STAT » (mille terrestre) et « NAUT » (mille marin) Les exemples suivants servent de guide sur la manière servent à la conversion des unités de distance. d’utiliser la règle à calculer. CALCUL DE LA VITESSE : ANNEAU EXTERNE Quelle vitesse est requise pour faire 10 milles marins ANNEAU INTERNE en 15 minutes ?
- Page 125 Facteurs connus : Vitesse : 40 milles/heure Distance : CALCUL DE DISTANCE : 10 milles marins Quelle distance pouvez-vous parcourir à 40 milles/ heure pendant 15 minutes ? • Alignez « 40 » sur l’anneau externe avec le marquage Facteurs connus : Vitesse : 40 milles marins/heure «...
-
Page 126: Comment Ajuster Le Bracelet
COMMENT AJUSTER LE BRACELET CONVERSION D’UNITÉ : Pour convertir des milles marins en milles terrestres et (Les sections suivantes s’appliquent aux bracelets de tous kilomètres. les modèles de montre.) Facteur connu : La distance à convertir est de 10 milles BRACELET À... -
Page 127: Démontage De Maillons Du Bracelet
DÉMONTAGE DE MAILLONS DU BRACELET BRACELET À FERMOIR DÉPLIANT 1. Trouvez la barrette à ressort qui attache le bracelet au DÉMONTAGE DE MAILLONS : fermoir. 1. Placez le bracelet verticalement et introduisez un outil 2. À l’aide d’un outil pointu, enfoncez la barrette et pointu dans l’ouverture du maillon. -
Page 128: Pile
TIMEX s’en charge. La montre devra être étalonnée de ENFANTS. nouveau pour régler l’heure et la date après le change- ment de la pile. Lorsque la montre est renvoyée à Timex, les frais de port doivent être prépayés. Pour obtenir un emballage pré-affranchi, composer le 1-800-448- 4639, consulter le détaillant chez lequel la montre a été... -
Page 129: Garantie
Timex Group USA, Inc. pour une période brassard, du boîtier, des accessoires ou de la pile. Le d’UN AN, à compter de la date d’achat. Timex ainsi que remplacement de ces pièces peut vous être facturé ses filiales du monde entier honoreront cette Garantie par Timex. - Page 130 Pour obtenir le service de garantie, veuillez retourner Aux États-Unis, veuillez composer le 1-800-448-4639 votre montre à Timex, à une de ses filiales ou au pour plus de renseignements sur la garantie. Au détaillant Timex où la montre a été achetée. Inclure un Canada, appelez le 1-800-263-0981.
- Page 131 5 $ US par courrier à : Timex Extended Warranty, P.O. Box 1676, Dept. EF, Little Rock, AR 72203. ©2015 Timex Group USA, Inc. TIMEX, INDIGLO, et INTELLIGENT QUARTZ sont des marques déposées de Timex Group B.V. et de ses filiales.
- Page 132 RELOJES TIMEX ® Felicitaciones por la compra de su reloj TIMEX ® INTELLIGENT QUARTZ . Por favor lea atentamente las ™ instrucciones para saber cómo funciona su reloj Timex. Es posible que su reloj no tenga todas las características descritas en este folleto.
- Page 133 ÍNDICE DE CONTENIDOS Marea temperatura y brújula ......... 312 Altímetro ................ 322 Cómo inicializar su reloj ..........263 Profundidad ..............331 Resistencia al agua y a golpes ........264 Yacht Racer ..............336 Luz nocturna Indiglo ............ 266 ® Cronógrafo temporizador ..........348 Programación de fecha y hora ........
-
Page 134: Cómo Inicializar Su Reloj
La tecnología de inicializar su reloj retire el protector plástico de abajo de cuarzo inteligente de Timex brinda el poder de un la corona y luego presione la corona contra la caja. microprocesador con la eficiencia y exactitud del Algunos relojes requieren ajustar la corona para ser medidor de tiempo análogo de cuarzo. -
Page 135: Resistencia Al Agua Y A Golpes
RESISTENCIA AL AGUA Y A GOLPES ADVERTENCIA: PARA MANTENER LA RESISTENCIA AL AGUA, NO APRIETE NINGÚN BOTÓN DEBAJO DEL Si su reloj es resistente al agua, se indicarán los metros AGUA A MENOS QUE SU RELOJ ESTÉ INDICADO PARA (WR_M). UNA RESISTENCIA AL AGUA DE 200 METROS. -
Page 136: Luz Nocturna Indiglo
LUZ NOCTURNA INDIGLO PROGRAMACIÓN DE FECHA Y HORA ® Pulse el botón o la corona para activar la luz. La NOTA: La corona tiene tres posiciones: cerrada, media y tecnología electroluminiscente utilizada en la luz nocturna externa. Para que se acostumbre a la diferencia entre las INDIGLO ilumina toda la esfera del reloj por la noche y en distintas posiciones, extienda la corona hasta la posición... -
Page 137: Calendario Perpetuo
Nota: La fecha cambia entre las 10 pm y las 2 am. No CALENDARIO PERPETUO cambie la fecha durante este período. Al hacerlo, podría DESCRIPCIÓN GENERAL dañar el movimiento del reloj. MANECILLA DE LA FECHA Pulse la corona a la posición cerrada después de fijar la MANECILLA BOTÓN A fecha u hora. - Page 138 Centro de servicio media. La manecilla de fecha muestra la compensación: de Timex para ajustar la fecha y el día después del 1 = 1 año después del año bisiesto; 2 = 2 años después reemplazo de la pila.
-
Page 139: Cronógrafo Fly-Back
CRONÓGRAFO FLY-BACK AJUSTE DE LA 4TA MANECILLA CENTRAL Para reajustar una 4ta manecilla central desalineada: DESCRIPCIÓN GENERAL 1. Jale la corona hasta su posición externa. Las CUARTA MANECILLA manecillas superior e inferior se mueven hasta el final MANECILLA HORARIA CENTRAL de sus ciclos, auto-ajustándose en forma automática. - Page 140 SEGUNDA ZONA HORARIA PARA AJUSTAR LA SEGUNDA ZONA HORARIA: La manecilla supe- 1. Jale la corona hasta su posición media. La manecilla rior muestra la hora superior muestra la hora de la segunda zona horaria para la segunda zona y la 4ta. manecilla central muestra los minutos. horaria.
- Page 141 4. Pulse la corona hacia adentro cuando termine. 3. Para reanudar, pulse el botón A (START/STOP) nuevamente. CRONÓGRAFO FLY-BACK El reloj tiene un cronógrafo “fly-back” (que revisa 4. Para reiniciar el cronógrafo fly-back desde cero, pulse marcajes anteriores) de 4 horas. el botón B (FLY-BACK/RESET).
-
Page 142: Brújula Y Cronógrafo Fly-Back
BRÚJULA Y CRONÓGRAFO FLY-BACK AJUSTE DE LA MANECILLA INDICADORA (4TA MANECILLA CENTRAL) DESCRIPCIÓN GENERAL Para reajustar una manecilla desalineada: CUARTA MANECILLA 1. Jale la corona hasta su posición externa. Las maneci- MANECILLA DE MINUTOS CENTRAL BOTÓN A llas superior e inferior se mueven hasta el final de sus MANECILLA ciclos, auto-ajustándose en forma automática. - Page 143 2. Pulse B para mover hacia delante la 4ta manecilla SEGUNDA ZONA HORARIA central. Sostenga el botón para mover con rapidez La manecilla superior normalmente muestra la hora la manecilla. Las manecillas superior y 4ta manecilla para la segunda zona horaria. Observe que la escala central se mueven a la vez;...
- Page 144 de horas y minutos corresponda con la de las 24 horas, muestra el tiempo total, incluyendo horas y minutos, al verificar que la fecha cambie a medianoche y no al con divisiones a cada diez minutos. El cronógrafo mediodía. cuenta hasta 4 horas antes de detenerse automática- mente.
- Page 145 y sostenga B (FLY-BACK/RESET) para poner a cero el y computadoras, porque podrían afectar el campo cronógrafo y suéltelo cuando desee reiniciarlo. No magnético alrededor del reloj. Si la brújula se calibra tiene que esperar a que todas las manecillas lleguen cerca de tales objetos, sólo funcionará...
- Page 146 No guarde el reloj cerca de alguna fuente de magnetismo LENTAMENTE, tomando aproximadamente 15 segun- como computadoras, electrodomésticos o televisores, dos por rotación. pues el reloj puede recoger la carga magnética y conducir a rumbos inexactos. La exactitud típica de los instrumen- tos de uso en la muñeca es de +/- 10 grados.
- Page 147 hacer que el reloj compense automáticamente el FUNCIONAMIENTO DE LA BRÚJULA ángulo de declinación, mueva el anillo giratorio de la Normalmente, la brújula está apagada y la 4ta manecilla brújula hasta que el Norte esté a las 12 en punto. central apunta a las 12 en punto o muestra los segundos del cronógrafo.
-
Page 148: Cronógrafo Lineal
continúan mostrando la hora en el cronógrafo y todas las CRONÓGRAFO LINEAL funciones del cronógrafo están disponibles mediante los DESCRIPCIÓN GENERAL botones A (START/STOP) y B (FLY-BACK/RESET). NOTA: Mientras se usa la brújula, el segundero se mueve MANECILLA HORARIA 4TA MANECILLA en incrementos de dos segundos. - Page 149 3. Si el cronógrafo es reiniciado y la manecilla lineal AJUSTE DE LA MANECILLA LINEAL no está en 0, pulse y sostenga el botón B durante Y 4TA MANECILLA CENTRAL 5 segundos para hacer una calibración completa del Para reajustar una 4ta manecilla central desalineada: indicador lineal, lo cual demorará...
- Page 150 SEGUNDA ZONA HORARIA PARA FIJAR LA SEGUNDA ZONA HORARIA: La manecilla inferior 1. Jale la corona hasta su posición media. La manecilla muestra la hora para la inferior muestra la hora de la segunda zona horaria y segunda zona horaria. la 4ta.
- Page 151 4. Pulse la corona hacia adentro cuando termine. 3. Para reiniciar el cronógrafo a la posición cero, pulse el botón B (SPLIT/RESET). CRONÓGRAFO LINEAL Cuando se reinicia el cronógrafo, todas las manecillas se El reloj tiene un cronógrafo interválico de 4 horas. mueven a la posición cero.
-
Page 152: Hora Mundial
HORA MUNDIAL PARA FIJAR LA HORA MUNDIAL: 1. Jale la corona hasta su posición media. La manecilla DESCRIPCIÓN GENERAL central muestra la hora mundial de la ciudad y la 24 CIUDADES MANECILLA HORARIA manecilla superior muestra la hora de dicha ciudad. CUARTA MANECILLA MANECILLA CENTRAL... - Page 153 con rapidez la manecilla. Se puede utilizar cualquier 4. Si la estación presentada no es la correcta para la ciudad. zona horaria local, presione C para cambiarla. Si la zona horaria local observa el horario de verano, la 3. Jale la corona hasta su posición externa. La manecilla manecilla superior se moverá...
- Page 154 AJUSTE DE LA MANECILLA INDICADORA VISUALIZACIÓN DE LA HORA DE LA CIUDAD (4TA MANECILLA CENTRAL) Pulse A o B para mover Para reajustar una manecilla desalineada: la manecilla central hacia atrás o hacia adelante 1. Jale la corona hasta su posición externa. Las maneci- respectivamente, y llas superior e inferior se mueven hasta el final de sus seleccionar una ciudad.
-
Page 155: Brújula
El reloj se encarga de esto dando una configuración BRÚJULA para representar los dos periodos que tienen todas las DESCRIPCIÓN GENERAL ciudades que observan la hora de verano. Para el reloj, AGUJA DE LA el periodo de hora de verano es VERANO y el periodo de ESCALA DE DECLINACIÓN BRÚJULA MEDIO... - Page 156 objetos, sólo funcionará apropiadamente en ese mismo AJUSTE DE LA AGUJA DE LA BRÚJULA lugar. Si la brújula se calibra lejos de tales objetos, no Jale la CORONA totalmente hacia afuera. La aguja de la funcionará apropiadamente en la cercanía de ellos. Para brújula debe señalar las 12 en punto.
- Page 157 a rumbos inexactos. La exactitud típica de los instrumen- tos de uso en la muñeca es de +/- 10 grados. Para calibrar la brújula: 1. Jale la corona a su posición media y espere a que las manecillas indicadoras se detengan. 2.
- Page 158 ángulo de declinación, mueva el anillo giratorio de la FUNCIONAMIENTO DE LA BRÚJULA brújula hasta que el Norte esté a las 12 en punto. Normalmente, la brújula está apagada y la 4ta manecilla central apunta a las 12 en punto o muestra los segundos 6.
-
Page 159: Marea Temperatura Y Brújula
MAREA TEMPERATURA Y BRÚJULA AJUSTANDO LA AGUJA INDICADORA Jale la corona totalmente hacia afuera. La aguja indica- DESCRIPCIÓN GENERAL dora debe señalar las 12 en punto. Si no las señala, pulse cualquiera de los botones MAREA o TEMPERATURA ESCALA DE TEMPERATURA hasta que la aguja marque las 12 en punto. - Page 160 comienzo del termómetro y luego a la temperatura actual. en el sentido de las manecillas del reloj, de modo que la marea va subiendo cuando la aguja señala a la izquierda y TERMÓMETRO bajando cuando señala a la derecha. El número de horas Cuando se lleva puesto en la muñeca, la lectura del para la siguiente marea alta/baja se muestra en la escala termómetro es afectada por el calor corporal.
- Page 161 resultar en errores grandes. Hay que evitar también áreas CALIBRACIÓN DE LA BRÚJULA que pudieran exhibir concentraciones de hierro duro y Se debe calibrar la brújula, antes de usarse. suave más elevadas de lo normal, pues pueden ocasionar Dado que la brújula usa el campo magnético de la Tierra, rumbos incorrectos.
- Page 162 sobre un vaso invertido). El reloj puede estar bocabajo, 4. Cuando haya acabado, pulse C (BRÚJULA), mante- pero tome precauciones para proteger el cristal. niendo el reloj a nivel. La 4ta manecilla central se mueve hacia atrás y adelante indicando el final de la 3.
- Page 163 7. Pulse la corona hacia adentro cuando termine. Norte. Después de 20 segundos, la brújula se apagará automáticamente y la 4ta manecilla central retornará a su operación normal. Esto alarga la duración de la pila. Pulse C (BRÚJULA) en cualquier momento para mantener la brújula encendida durante otros 20 segundos.
-
Page 164: Altímetro
ALTÍMETRO AJUSTE DE LA MANECILLA INDICADORA (4TA MANECILLA CENTRAL) DESCRIPCIÓN GENERAL Jale la corona totalmente hacia afuera. Las manecil- las retrógradas superior e inferior se reinician hasta el ESCALA DE comienzo de sus escalas automáticamente. La manecilla ALTÍMETRO indicadora (4ta manecilla central) debe señalar las 12 en (CENTENAS) BOTÓN A punto. - Page 165 programar el altímetro a una altitud de referencia en la pantalla de altitud. La 4ta manecilla central y la conocida, o a una referencia de altitud estándar de un retrógrada superior deben apuntar a la altitud actual. determinado lugar. Cambios repentinos en presión debido 3.
- Page 166 ALTÍMETRO ENCENDIDO/APAGADO Para encender el altímetro pulse C. La manecilla retrógrada inferior apunta a METROS. Usando las marcas en el anillo superior, la 4ta manecilla central muestra las decenas y centenas del valor de la altitud actual con di- visiones cada diez METROS/PIES. La manecilla retrógrada superior muestra los miles del valor de la altitud actual con divisiones cada mil METROS/PIES.
- Page 167 El reloj apagará el altímetro automáticamente después de La máxima altitud grabada aparece durante diez segun- 60 minutos desde la activación. dos. Para extender la duración de la pantalla durante otros diez segundos, pulse A antes de que termine la MEMORIA DE ALTITUD MÍNIMA/MÁXIMA duración previa de diez segundos.
-
Page 168: Profundidad
La altitud mínima grabada aparece durante diez segun- PROFUNDIDAD dos. Para extender la duración de la pantalla durante DESCRIPCIÓN GENERAL otros diez segundos, pulse B antes de que termine la MANECILLA duración previa de diez segundos. Para cambiar la unidad CENTRAL de METROS a PIES o de PIES a METROS, pulse C. - Page 169 apuntará a la profundidad del momento como se indica TEMPERATURA en la escala de profundidad. Si la lectura permanece en El sensor de temperatura está siempre activado y tomará el rango de 0 a 2 metros (0 a 6 pies) durante 5 minutos, una lectura al menos cada 60 segundos.
- Page 170 Si el reloj no ha sido usado todavía, las manecillas central 2 segundos en desplazamientos de dos posiciones de e inferior mostrarán en la pantalla 0 metros/pies y 0ºC/32 manecilla. Se recomienda que el usuario reemplace la pila ºF, respectivamente. La corona se debe enroscar nueva- cuando el nivel de la bateria es bajo.
-
Page 171: Yacht Racer
La MANECILLA HORARIA fecha fue programada en la fábrica de Timex. Cuando SUPERIOR inicie su reloj por primera vez, si la fecha mostrada no corresponde con la fecha en su ubicación, necesitará... - Page 172 Cuando la pila deba cambiarse, se mueva más rápido. Tenga en cuenta: después de se recomienda enfáticamente enviar el reloj al centro de 5 segundos sin actividad con la corona en la posición servicio Timex donde la pila será reemplazada y la función...
- Page 173 3, la 4ta manecilla central se moverá a mostrar la el cronógrafo cuando éste llega a cero. fecha actual. TEMPORIZADOR 1 YACHT RACE: 3. Empuje la corona adentro a la posición 1 cuando El contador regresivo comenzará al 1er minuto e inicia el termine.
- Page 174 2. Para comenzar, pulse el botón A (START/STOP). La 4ta cuando el contador regresivo llega a cero el cronógrafo manecilla central muestra los segundos de conteo arrancará automáticamente. Igualmente, hay una alerta regresivo y la manecilla inferior muestra los minutos, acústica que marca cada vez que el contador pasa por en conteo regresivo.
- Page 175 manecilla central muestra los segundos ascendentes; las manecillas, pulse el botón B (SPLIT/RESET) y éstas la manecilla inferior muestra los minutos ascendentes rápidamente se moverán para mostrar el tiempo en una escala de 5 minutos y la manecilla superior transcurrido total. muestra la media hora contando ascendentemente 4.
- Page 176 En funcionamiento normal el cronógrafo circulará por LUZ NOCTURNA INDIGLO ® una secuencia de 30 minutos dos veces, hasta el máximo (ÚNICAMENTE EN LA VERSIÓN PRO) total de 1 hora. Una vez haya transcurrido esa hora, Yacht Racer PRO incluye la adición de la función de luz la manecilla superior permanecerá...
-
Page 177: Cronógrafo Temporizador
ESCALA MANECILLA y siempre mostrará la fecha correcta a pedido. La HORARIA fecha fue programada en la fábrica de Timex. Cuando MANECILLA inicie su reloj por primera vez, si la fecha mostrada no SUPERIOR corresponde con la fecha en su ubicación, necesitará... - Page 178 Cuando la pila deba cambiarse, se mueva más rápido. Tenga en cuenta: después de se recomienda enfáticamente enviar el reloj al centro 5 segundos sin actividad con la corona en la posición de servicio Timex donde la pila será reemplazada y la...
- Page 179 3, la 4ta manecilla central se moverá para mostrar la 1. Pulse el botón C hasta que la manecilla superior esté al inicio de la escala superior del cronógrafo, la fecha actual. manecilla inferior en 0 en la escala inferior. 3.
- Page 180 3. Para tomar un tiempo fraccionario, pulse el botón desde el inicio de las escalas de 30 minutos y 4 horas B (SPLIT/RESET). La manecilla superior, la inferior en las dos esferas. y la 4a conservarán sus posiciones para que usted En el funcionamiento normal, el cronógrafo circulará...
- Page 181 para lograr el periodo de tiempo deseado para la cuenta TEMPORIZADOR REGRESIVO regresiva. Presionar la corona terminará el procedimiento El reloj cuenta con una función de temporizador de ajuste y confirma los valores establecidos hasta ese regresivo. momento en cualquier punto del ciclo. Nota especial: La manecilla superior, la manecilla inferior AJUSTE DEL TEMPORIZADOR REGRESIVO y la 4a manecilla central se unen durante los pasos 3, 4...
- Page 182 2. Tire de la corona hacia afuera hasta la posición media. (pulsar el botón B moverá la manecilla en sentido horario), hasta que haya seleccionado el número 3. Para ajustar el número deseado de horas en deseado de minutos. Tenga en cuenta que está incrementos de media hora (hasta un tiempo máximo ajustando el número de minutos hacia adelante o de 4:00:00) pulse el botón A para mover la manecilla...
- Page 183 antihorario (pulsar el botón B moverá la manecilla FUNCIONAMIENTO DEL TEMPORIZADOR REGRESIVO en sentido horario), hasta que haya seleccionado el Cuando haya ajustado el temporizador regresivo al número deseado de segundos. Tenga en cuenta que tiempo deseado, puede poner a funcionar la cuenta está...
- Page 184 Interrupción de secuencia regresiva: Si desea interrum- Borrado del valor del temporizador regresivo: Si lo pir la secuencia regresiva antes que llegue a cero, puede desea, puede borrar el valor del temporizador a cero. hacerlo pulsando el botón A (la cuarta manecilla central Esto sólo puede hacerse si el temporizador regresivo no así...
-
Page 185: 3Gmt (Hora De Greenwich)
Para usar la función de tiempo parcial, pulse el botón B, lo 3GMT (HORA DE GREENWICH) que hará que las manecillas superior, inferior y cuarta se ANILLO INTERNO/ congelen en su posición. La cuenta regresiva continuará NUMERALES funcionando internamente mientras las manecillas están (FORMATO MANECILLA congeladas. - Page 186 La 4ta manecilla central tiene calibración de fábrica por muestra la hora en formato de 24 horas. Timex para reflejar los minutos estándar dentro de la AJUSTE DE LA 4TA MANECILLA CENTRAL hora como lo define el Tiempo Universal Coodinado.
- Page 187 Pulsar y sostener el botón A hará que la manecilla se Solamente si usted desea hacer que la segunda y tercera mueva más rápido. zona horaria reflejen las ubicaciones que no siguen los minutos estándar, las instrucciones para recalibrar la 4ta 5.
- Page 188 CONFIGURACIÓN DE LA 4TA MANECILLA CENTRAL CONFIGURACIÓN DEL ANILLO SUPERIOR GIRATORIO (ZONA HORARIA II) DE LA CAJA (ZONA HORARIA III) Observe la hora actual en la ubicación que desea rastrear La 3ra zona horaria se programa usando la existente como 2da zona horaria. Pulse el botón A hasta que la 4ta configuración de la 4ta manecilla central y ajustando manecilla central esté...
-
Page 189: Función Taquímetro
FUNCIÓN TAQUÍMETRO 3. Detenga el cronógrafo cuando el objetivo para la medida de velocidad pase por el punto final. (no todos los modelos) 4. El segundero del cronógrafo es comparable con El taquímetro sólo determina velocidades que sean los marcadores del taquímetro para determinar la mayores a 60 unidades por hora usando este método;... -
Page 190: Función De Regla Deslizante
FUNCIÓN DE REGLA DESLIZANTE La función de regla deslizante integrada al anillo giratorio ANILLO INTERNO superior se utiliza rotando el aro. El anillo interno no se mueve. El aro siempre se refiere a distancia o velocidad, o a cualquier dato que varíe con tiempo. El anillo interno solo anota unidades de tiempo. - Page 191 Los siguientes ejemplos sirven de guía para el uso de la Cálculo de tiempo: ¿En cuánto tiempo se harán 10 regla deslizante. millas náuticas a una velocidad de 40 millas por hora? Factores conocidos: Velocidad: 40 millas por hora CÁLCULO DE VELOCIDAD: Distancia: 10 millas náuticas ¿Cuál velocidad se requiere para ir a 10 millas náuti- •...
- Page 192 CÁLCULO DE DISTANCIA: CONVERSIÓN DE UNIDADES: ¿A qué distancia se puede viajar a 40 millas por hora Para convertir distancia de millas náuticas a millas durante 15 minutos? terrestres y kilómetros: Factores conocidos: Velocidad: 40 millas náuticas por Factor conocido: Distancia a convertir es 10 millas hora Tiempo: 15 minutos náuticas •...
-
Page 193: Cómo Ajustar La Pulsera
CÓMO AJUSTAR LA PULSERA PULSERA CON BROCHE PLEGABLE 1. Localice la barra de resorte que conecta la pulsera al (Las variaciones de las siguientes secciones de pulseras broche. se aplican a todos los modelos de relojes). 2. Utilizando una herramienta puntiaguda, empuje el PULSERA CON BROCHE DESLIZANTE perno de resorte hacia adentro y gire suavemente la 1. -
Page 194: Remoción De Eslabones De La Pulsera
Para devolver su reloj a Timex use un envío de prepago. 3. Repita el procedimiento hasta que se haya quitado el Para obtener un envío prepago llame al 1-800-448-4639 número de eslabones deseado. -
Page 195: Garantía
UN AÑO autorizada o abuso, y a partir de la fecha de compra original. Timex y sus 5. en el cristal, la correa o pulsera, la caja, los accesorios sucursales en todo el mundo respaldarán esta garantía o la pila. - Page 196 ARTÍCULO DE VALOR PERSONAL. Para solicitar los servicios incluidos en la garantía, devuelva el reloj a Timex a una de sus sucursales o al En EUA puede llamar al número 1-800-448-4639 para comercio minorista adonde se compró el reloj junto obtener información adicional sobre la garantía.
- Page 197 1-800-328-2677 o custserv@timex.com correo a: Timex Extended Warranty, P.O. Box 1676, Dept. EF, Little Rock, AR 72203. ©2015 Timex Group USA, Inc. TIMEX, INDIGLO, PERFECT DATE e INTELLIGENT QUARTZ son marcas registradas de Timex Group B.V. y sus afiliados.
Need help?
Do you have a question about the Intelligent Quartz and is the answer not in the manual?
Questions and answers