Bpt MITHO User Manual
Hide thumbs
Also See for MITHO:
- Manual for installation and use (60 pages) ,
- Technical manual (24 pages) ,
- Installation instructions manual (20 pages)
Table of Contents
Advertisement
Available languages
Available languages
Quick Links
Advertisement
Chapters
Table of Contents

Related Manuals for Bpt MITHO


Summary of Contents for Bpt MITHO
- Page 1 Manuale per l’Utente User Guide 24845502 - 04_09...
-
Page 3: Table Of Contents
Manuale per l’Utente INDICE INFORMAZIONI GENERALI . . . . . . . . . . . . . . . . . . . . . . . . . . . . . . . . . . . . . . . . . . . . . . . . . . . . . . . . . . . . . . Pag . Caratteristiche tecniche . -
Page 4: Informazioni Generali
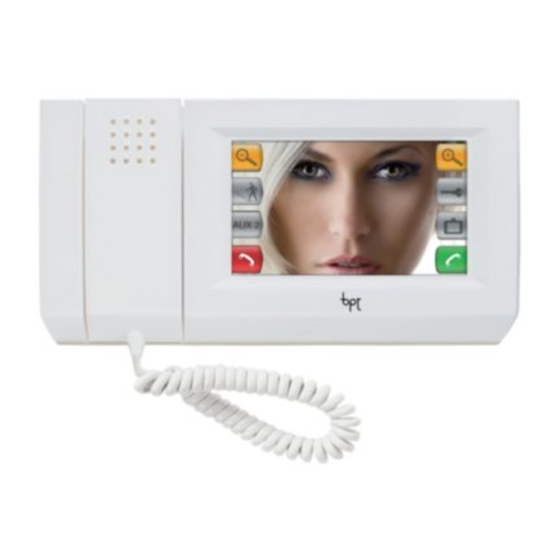
Manuale per l’Utente INFORMAZIONI GENERALI Caratteristiche tecniche Mitho è l’innovativo videocitofono a colori touch screen, pensato per gli impianti sistema a due fili X1 e 300 (alimentazione separata) . 1 – Altoparlante (vivavoce) 2 – Cornetta 3 – Microfono 4 – Display 16:9 touch screen 4,3”... -
Page 5: Principali Funzioni Associate Alle Icone Della Schermata Di Apertura
INFORMAZIONI GENERALI Principali funzioni associate alle icone della schermata di apertura La schermata di apertura permette di accedere rapidamente ed in maniera intuitiva a tutte le funzioni gesti- bili dal terminale Mitho e di avere un immediato feed back degli eventi che interessano il sistema . Menù principale per abitazioni senza Centralino di Portineria Luce scale... -
Page 6: Funzioni Videocitofoniche
Manuale per l’Utente FUNZIONI VIDEOCITOFONICHE Funzioni base Rispondere ad una chiamata In caso di chiamata, la schermata principale (fig . 1) viene automaticamente sostituita dalla schermata di fig . 2 che mostra l’immagine del chiamante ripre- so dal posto videocitofonico esterno . Premere il pulsante per rifiutare la chiamata . -
Page 7: Trasferire Una Chiamata Verso Altri Interni
Manuale per l’Utente FUNZIONI VIDEOCITOFONICHE Trasferire una chiamata verso altri interni Premendo il pulsante (fig . 4) apparirà un elenco degli interni verso i quali è possibile deviare la chiamata (fig. 5); selezionare l’interno desiderato, attendere risposta e chiudere la comunicazione per trasferire la chiamata . -
Page 8: Assegnare Un Nome Ad Un Interno
Manuale per l’Utente FUNZIONI VIDEOCITOFONICHE Assegnare un nome ad un Interno Per semplificare il riconoscimento degli interni è possibile assegnare a ciascuno di essi un nome . Dalla finestra principale (fig . 9) selezionare il pul- sante 1 . Premere il pulsante e selezionare l’interno al quale si vuole cambiare il nome. -
Page 9: Visualizzare Immagini Da Posti Esterni
Manuale per l’Utente FUNZIONI VIDEOCITOFONICHE Visualizzare immagini da posti esterni Dalla schermata principale (fig . 12) selezionare l’ico- na 4, immediatamente sarà possibile visualizzare le immagini riprese dalle telecamere dei posti esterni (se più di uno) . Accesso al comando ausiliario e luce scale Visualizza immagini da posto esterno successi- vo (se presente) Apriporta del posto esterno visualizzato*... -
Page 10: La Segreteria Videocitofonica
Manuale per l’Utente FUNZIONI VIDEOCITOFONICHE La segreteria videocitofonica Mitho consente di registrare un messaggio che può venire riprodotto dal posto esterno in caso di assenza . Il chiamante, in risposta, potrà lasciare un videomes- saggio (riportante data e ora della chiamata) in una videosegreteria consultabile al rientro . -
Page 11: Consultare La Segreteria Videocitofonica
Manuale per l’Utente FUNZIONI VIDEOCITOFONICHE Consultare la segreteria videocitofonica La presenza di messaggi videocitofonici non letti in segreteria è rivelata dall’icona “chiamate” lampeg- giante sulla schermata principale . Selezionare l’icona “chiamate” 3 . La schermata di figura 21 propone un elenco dei messaggi registrati in ordine cronologico, partendo dal più... -
Page 12: Programmare La Sveglia
Manuale per l’Utente FUNZIONI VIDEOCITOFONICHE Programmare la Sveglia Selezionare l’icona “sveglia” 1 . Per impostare l’ora di sveglia selezionare il pulsante (fig . 24) e premere il pulsante “SET” . Sulla tastiera che appare (fig . 25), digitare l’ora di sveglia desiderata e premere “OK”... -
Page 13: Setup Dispositivo
Principali funzioni del menù setup Dalla schermata principale, premere sull’icona “se- tup” 1 . Il menù “setup” raccoglie tutte le impostazioni di base del terminale Mitho . Scegliere una melodia per le chiamate Premendo sul pulsante “melodie” (fig . 2) si accede alla schermata di figura 3 che presenta un elenco delle tipologie di chiamata 2 alle quali è possibile... -
Page 14: Regolare Numero E Pausa Degli Squilli
Manuale per l’Utente SETUP DISPOSITIVO Premendo il pulsante “TONI” (fig . 5), sarà pos- sibile attivare/disattivare il suono associato alla pressione dei pulsanti e regolarne il volume con le frecce poste sulla parte superiore della finestra . Regolare numero e pausa degli squilli Numero di squilli e pausa tra gli stessi possono venire modificati sulle suonerie che presentano l’icona... -
Page 15: Regolare Data E Ora Del Terminale
Manuale per l’Utente SETUP DISPOSITIVO Regolare Data e Ora del Terminale Premere sul pulsante “data/ora” (fig . 2) . Per impostare l’ora esatta selezionare il pulsante (fig . 8) e premere il pulsante “SET” . Sulla tastiera che appare (fig . 9), digitare l’ora esatta e premere “OK”... -
Page 16: Setup Citofonia
Manuale per l’Utente SETUP DISPOSITIVO Setup Citofonia Premere sul pulsante “citofonia” (fig . 2) . La schermata di figura 9, contenente i comandi necessari per registrare e riascoltare il messaggio da lasciare in segreteria . Vedi capitolo “La segreteria Videocitofonica” Funzione Sveglia Premere sul pulsante “sveglia”... -
Page 17: Setup Tecnico
Manuale per l’Utente SETUP DISPOSITIVO Setup Tecnico Premere sul pulsante “tecnico” (fig. 2); selezionare il pulsante (fig . 13) . Le funzioni di setup tecnico sono riservate a per- sonale qualificato per questo motivo l’accesso a questa area può essere protetto da password. Per assegnare una password di accesso al menù... -
Page 18: Scelta Lingua Terminale
Manuale per l’Utente SETUP DISPOSITIVO Il pulsante J permette di selezionare lo standard del segnale video dell’ impianto tra PAL e NTSC. Premere il pulsante “PAL -> NTSC” per passare da PAL a NTSC, premere il pulsante “NTSC -> PAL” per pas- sare da NTSC a PAL. Scelta lingua terminale Premere sul pulsante (fig . 16) e scegliere la lingua desiderata per l’interfaccia Utente. Info Terminale Il pulsante “INFO” (fig . 16) permette di visua- lizzare (fig . - Page 19 User Guide CONTENTS GENERAL INFORMATION . . . . . . . . . . . . . . . . . . . . . . . . . . . . . . . . . . . . . . . . . . . . . . . . . . . . . . . . . . . . . . . . Pag . Technical Features .
-
Page 20: General Information
User Guide GENERAL INFORMATION Technical Features Mitho is the innovative colour touch screen video entry control, designed for two-wire X1 and 300 systems (separate power supply) . 1 – Loudspeaker (hands free) 2 – Receiver 3 – Microphone 4 – 4 . 3 " touch screen 16:9 display 5 –... -
Page 21: Main Functions Associated With The Icons On The Opening Screen
GENERAL INFORMATION Main functions associated with the icons on the opening screen The opening screen provides fast, intuitive access to the functions managed by the Mitho terminal . It also provides immediate feedback on events involving the system . Main menu for dwellings without porter switchboard... -
Page 22: Video Entry Control Functions
User Guide VIDEO ENTRY CONTROL FUNCTIONS Standard functions Answering a call In the event of a call, the main screen (fig . 1) is automatically replaced by the screen in fig . 2 , which shows the image of the caller filmed from the video entry control panel . -
Page 23: Transferring A Call To Other Extensions
User Guide VIDEO ENTRY CONTROL FUNCTIONS Transferring a call to other extensions If you press button (fig . 4), a list will appear of the extensions where you can transfer the call (fig. 5). Select the desired extension, wait for an answer and hang up to transfer the call . Receiving a call from other extensions (intercom) If the call comes from other internal extensions (in- tercom), the window in figure 6 will appear . -
Page 24: Assigning A Name To An Extension
User Guide VIDEO ENTRY CONTROL FUNCTIONS Assigning a name to an extension To make it easier to identify extensions, you can give each one of them a name . From the main window (fig . 9) select button 1 . Press button 2 and select the extension whose name you want to change . Type in the new name of the selected extension. -
Page 25: Display Images From Entry Panels
User Guide VIDEO ENTRY CONTROL FUNCTIONS Display images from entry panels Select icon on the main screen (fig . 12) . It will now be immediately possible to view images taken by the entry panel surveillance cameras (if more than one) . 5 Access to auxiliary command and stair lighting 6 Display images from the next entry panel (if present) -
Page 26: Video Entry Control Voice Mail
User Guide VIDEO ENTRY CONTROL FUNCTIONS Video entry control voice mail Mitho allows you to record a message, that can be played from the entry panel if you are out . The caller can respond by leaving a video message (indicating the call date and time) on a video an- swer phone that you can check when you return . -
Page 27: Checking The Video Entry Control Answer Phone
User Guide VIDEO ENTRY CONTROL FUNCTIONS Checking the video entry control answer phone The presence of unread video entry control mes- sages on your answer phone is indicated by the flashing “call list” icon on the main screen . Select the “call list ” icon 3 . The screen in figure 21 provides a list of recorded messages in chronological order, starting with the most recent . -
Page 28: Setting The Alarm Clock
User Guide VIDEO ENTRY CONTROL FUNCTIONS Setting the alarm clock Select the “alarm clock” icon 1 . To set the alarm clock time, select button (fig . 24) and press the “SET” button . On the keypad that appears (fig. 25), type the de- sired alarm time and press “OK” . Note: If you programme only the alarm time, the alarm will sound every day. -
Page 29: Device Setup
Press the “setup” icon on the main screen . The “setup” menu encompasses all the basic set- tings for the Mitho terminal . Select a call melody Press the “melodies” button (fig . 2) to access the screen in figure 3, which provides a list of the call... -
Page 30: Adjust Number And Pause Of Rings
User Guide DEVICE SETUP Pressing the “TONE” button (fig . 5) allows you to activate or deactivate the sound associated with pressing the buttons and to regulate their volume with the arrows at the top of the window . Adjust number and pause of rings The number of rings and the pause between them can be modified on ringtones with the icon Press button... -
Page 31: Adjusting The Terminal Date And Time
User Guide DEVICE SETUP Adjusting the terminal date and time Press the “date/time” button (fig . 2) . To set the current time, select button (fig . 8) and press the “SET” button . On the keypad that appears(fig. 9), type in the cur- rent time and press “OK” . To set the current day, month, and year, select but- (fig . -
Page 32: Door Entry Setup
User Guide DEVICE SETUP Door entry setup Press the “ door entry” button (fig . 2) . The screen shown in figure 9 contains the com- mands needed to record and listen to your answer phone message . See the chapter “Video entry control voice mail” Alarm clock function Press the “alarm clock”... -
Page 33: Service Setup
User Guide DEVICE SETUP Service setup Press the “service” button (fig. 2); select button (fig . 13) . The functions of service setup are reserved for qualified personnel. For this reason, access to this area can be protected by a password. To assign an access password to the service menu, select button (fig . -
Page 34: Terminal Language Selection
User Guide DEVICE SETUP Button J allows selection of the standard of the video signal of the system, either PAL or NTSC. Press the button “PAL -> NTSC” to change from PAL to NTSC. Press the button “NTSC -> PAL” to change from NTSC to PAL. Terminal language selection Press button (fig . 16) and select the desired language for the user interface . Terminal info The “INFO” button (fig . - Page 36 Eventuali aggiornamenti del presente documento sono disponibili sul sito www.bpt.it. Any updates made to this document are available at this site: www.bpt.it. Il produttore si riserva il diritto di apportare qualsiasi modifica al prodotto al fine di migliorarne le funzionalità.
Need help?
Do you have a question about the MITHO and is the answer not in the manual?
Questions and answers