Aqualisa Quartz Electric Installation Instuctions
Hide thumbs
Also See for Quartz Electric:
- Installation and user manual (36 pages) ,
- Installation manual (29 pages) ,
- User manual (9 pages)
Table of Contents
Advertisement
Quartz
Electric
The Waste Electrical and Electronic Equipment
(Producer Responsibility) Regulation 2004
This product is outside the scope of the European Waste Electrical and
Electronic Equipment Directive as interpreted within the UK.
In the UK this product can therefore be disposed of through commercial
non-WEEE waste facilities.
The original manufacturer does not accept any liability under the
WEEE directive.
Quartz Electric installation instuctions
®
page 1
Advertisement
Table of Contents

Related Manuals for Aqualisa Quartz Electric


Summary of Contents for Aqualisa Quartz Electric
- Page 1 Electronic Equipment Directive as interpreted within the UK. In the UK this product can therefore be disposed of through commercial non-WEEE waste facilities. The original manufacturer does not accept any liability under the WEEE directive. Quartz Electric installation instuctions page 1...
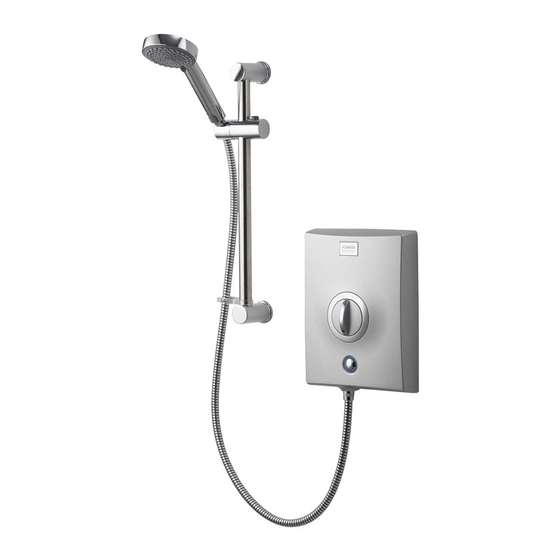
- Page 2 Shower systems Quartz Electric shower with adjustable height head in white/chrome Quartz Electric shower with adjustable height head in chrome Quartz Electric installation instuctions page 2...
- Page 3 Components Quartz Electric installation instuctions page 3...
-
Page 4: Safety Information
Quartz Electric is supplied with a 2 year guarantee. The guarantee can be extended by a further 2 years by completing the optional guarantee extension agreement document supplied with the product and posting it to Aqualisa Products Ltd. -
Page 5: Isolating Valves
Spacers are provided fitted to the service tunnel to enable the unit to be fitted to an uneven wall surface. DO NOT tile up to or use sealants around the Quartz Electric unit. The shower is spaced off the wall by integral pillars to allow air circulation around the unit. -
Page 6: Pipe Work Installation
The Quartz Electric is supplied with universal fittings intended to secure the unit to a suitable wall. Aqualisa reserves the right to revoke the terms of the warranty should access to service connections be denied by the use of solid setting infill material. -
Page 7: Front Cover Preparation
Fix the self tapping screws a couple of turns into the fixing points at the top and bottom of the unit to aid locating the fixing points when securing the front casing to the back plate. Quartz Electric installation instuctions page 7... -
Page 8: Electrical Installation
Zone 1 Zone 1 Zone 2 2.25m Zone 1 Zone 3 Zone 2 Zone 1 2.25m Zone 2 Zone 0 Zone 2 Zone 3 Zone 0 Zone 2 Zone 2 0.6m 0.6m 0.6m 0.6m Quartz Electric installation instuctions page 8... -
Page 9: Mains Voltage Connection
RCD (can be part of consumer unit) Recommended 80A or 100A mains switch Double pole isolating switch - pull cord or wall mounted in accordance with BS7671 Shower unit Quartz Electric installation instuctions page 9... -
Page 10: Electrical Rating
Any cable MUST NOT have the outer insulation stripped back beyond the bottom of back plate or service tunnel (if used) and must be pro- tected from water as shown. Quartz Electric installation instuctions page 10... -
Page 11: Earth Bonding
25mm above the spill over level of the bath or tray. If this is not achieved, then the hose restraint/gel hanger must be used Slide this onto the rail under the handset holder. Quartz Electric installation instuctions page 11... - Page 12 ! THE TENSION OF THE HANDSET STATION OF THE HANDSET HOLDER IS FACTORY SET. HOWEVER, IT MAY BE NECESSARY, TO TIGHTEN THE TENSION AS REQUIRED. TIGHTEN THE SCREW INSIDE THE HANDSET STATION TAKING CARE NOT TO OVER-TIGHTEN. Quartz Electric installation instuctions page 12...
-
Page 13: Front Cover Installation And Shower Commissioning
Hold the cover next to the shower unit on the wall and carefully attach the two sole- noid connectors. Place the solenoid connec- tor block into the saddle within the shower unit and neatly tuck the wires into the recess provide. Quartz Electric installation instuctions page 13... - Page 14 The temperature achieved will depend on the incoming water temperature and pressure. When the unit is fully commissioned please remove the red warning label from the front of the shower casing. Quartz Electric installation instuctions page 14...
-
Page 15: Inspection And Maintenance
After installation Inspection & maintenance In the interests of safety, we recommend the Quartz Electric and its electrical installation are checked by a qualified electrician at least every 2 years. Cleaning the filter should only be completed by a qualified person. Please refer to the instructions opposite of how to clean the filter. -
Page 16: User Instructions
2 Angular adjustment is made by carefully but firmly pulling forwards or pushing back the shower head against the knuckle in the holder. 3 To select the desired spray pattern rotate the shower spray plate clockwise or anti-clockwise. Quartz Electric installation instuctions page 16... - Page 17 Brochure Hotline: 0800 652 3669 Website: www.aqualisa.co.uk Email: enquiries@aqualisa.co.uk Please note that calls may be recorded for training and quality purposes The company reserves the right to alter, change or modify the product specifications without prior warning ® Registered Trademark Aqualisa Products Limited...
- Page 18 Pdf Supplied By http://www.plumbworld.co.uk/...
Need help?
Do you have a question about the Quartz Electric and is the answer not in the manual?
Questions and answers