
Related Manuals for Morsø S81-90


Summary of Contents for Morsø S81-90
- Page 1 Morsø S81-90 Installations- og betjeningsvejledning Instructions for installation and use www.morsoe.com...
-
Page 2: Table Of Contents
InDholD · ConTEnTS Installation af Deres Morsø ovn ...... 5 Fyringsteknik/Brugen af Deres ovn ....16 Regelmæssig vedligeholdelse af ovnen... . 19 Tekniske data.. - Page 3 Installations- og betjeningsvejledning Morsø S81-90 En 13 229 MORSØ JERNSTØBERI A/S . DK-7900 NYKØBING MORS E-Mail: stoves@morsoe.com · Website: www.morsoe.com...
-
Page 4: Installation Af Deres Morsø Ovn
Til lykke med Deres nye Morsø ovn! Morsø, som er den største udbyder på det danske marked, har siden 1853 fremstillet brændeovne af den højeste kvalitet. hvis De blot følger omstående instruktioner, er vi sikre på, at De også vil få nytte og glæde af Deres nye ovn i mange år. -
Page 5: Udpakning Af Ovnen
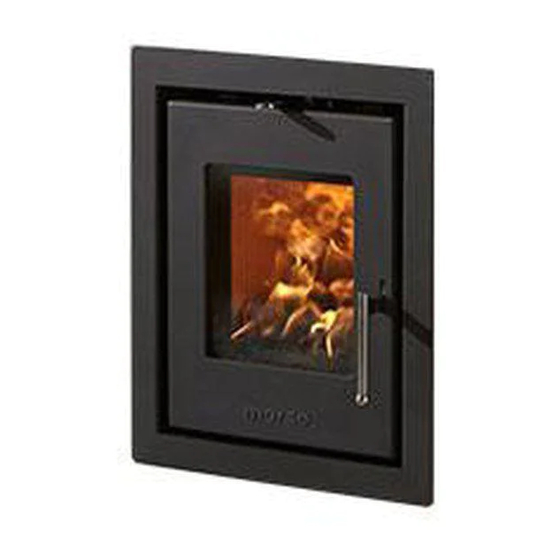
1.0 opstilling af Deres Morsø ovn 1.1 Udpakning af ovnen Morsø S81-90 indsatsovnen vejer 58 kg. For at undgå skamferinger i forbindelse med udpak- ning og montering af ovnen anbefales det at være 2 personer til dette arbejde. Emballagen kan bortskaffes efter gældende regler om renovation. - Page 6 S81-90 installeret i eksisterende murværk...
- Page 7 Herved gøres monteringen af røgrøret lettere; men i nogle tilfælde kan det være et krav fra skorstensfejeren. Til Morsø S81-90 indsatsovnen skal der tilsluttes en rørbøjning eller et flexrør på den støbte røgtud (1). Med rørbøjningen kan man opnå både vandret og lodret røgafgang, afhængig af, hvorledes man vender rørbøjningen under monteringen...
- Page 8 B. Specialbygget pejsemiljø i brændbare omgivelser Såfremt indsatsovnen opstilles i brændbart miljø skal der bygges et pejsemiljø som indsatsen skal sættes ind i. Pejsemiljøet skal sikre beskyttelse af omgivelserne mod indsatsens varme- påvirkning ved hjælp af afskærmning og ventilation. Der findes utallige individuelle måder at bygge et pejsemiljø...
- Page 9 Isoleret stålskorsten Ventilationsåbning 140 cm² Ubrændbar plade Gasbetonsten Ventilationsåbning 105 cm² S81-90 installeret i specialbygget pejse- miljø...
-
Page 11: Skorstenen
Møbleringsafstand Den anbefalede møbleringsafstand er 700 mm, men man bør dog vurdere, om møbler og andet vil blive udtørret af at stå tæt på ovnen. Afstand til brændbart materiale foran ovnen er 700 mm. En brændeovn bliver varm under fyring. Der skal derfor udvises en fornøden forsigtighed, specielt i.f.m. -
Page 12: Tilslutning Til Stålskorsten
1.7 Tilslutning til stålskorsten Er der tale om opstilling, hvor skorstenen føres direkte op gennem loftet, skal man følge de nationale og lokale bestemmelser m.h.t. skorstenens afstand til brandbart loft. Skorstenen tætnes ved røgtuden med vedlagte glassnor. Det er vigtigt at skorstenen er monteret med tagbæring eller loftkrave med styr. - Page 13 Trækforhold Skorstenens træk skabes på grund af forskellen mellem den høje temperatur i skor- stenen og den koldere udetemperatur. Skorstenens længde og isolering, vind og vejr- forhold er også afgørende for, at man kan opnå det rette undertryk, så trækket skabes. nedsat træk fremkommer når: temperaturforskellen er for lille.
-
Page 14: Fyringsteknik/Brugen Af Deres Ovn
2.0 Fyringsteknik/Brugen af Deres ovn Ovnens varmeafgivelse reguleres med reguleringshåndtaget over lågen. Ovnen har 3 typer forbrændingsluft. Primær forbrændingsluft, der tilføres op gennem askeristen. Denne luft reguleres af håndtaget over lågen. Minimums position er i midten og maximum position er helt til venstre. Denne luft- type benyttes kun i opstarten ved dårlige driftforhold. -
Page 15: Optænding Og Fyringsintervaller
2.1 optænding og fyringsintervaller Under optænding er der behov for en stor luftmængde. Startes der op med en helt kold ovn, kan man med fordel lade døren stå på klem de første minutter. For at opbygge et isolerende askelag i bunden af ovnen, bør De ved første optænding afbrænde ca. - Page 16 Herefter justeres den sekundære luftmængde ned til den ønskede position, og den optimale forbrænding vil fortsætte til grundglød. Man skal sikre sig, at der altid er luft (ilt) nok til at opretholde klare og blivende flammer under og efter nedjustering af forbrændingsluften. Ved nominelle drifteffekt er påfyldningsintervallet omkring en time.
-
Page 17: Regelmæssig Vedligeholdelse Af Ovnen
3.0 Regelmæssig vedligeholdelse af ovnen 3.1. Udvendig vedligeholdelse Ovnens overflade er malet med en varmebestandig senotherm maling. Den holder sig pænest, hvis den blot støvsuges med et blødt mundstykke eller aftørres med en tør fnugfri klud. Den malede overflade kan med tiden, ved for kraftig fyring, få et gråligt skær; men ovnen kan let opfriskes med en Morsø... -
Page 18: Tekniske Data
Asken må i de fleste tilfælde bortskaffes med dagrenovationen. Da der kan ligge gløder gemt i askeskuffen i flere døgn, kan det være nødvendigt at opbevare asken i en beholder af ubrændbart materiale, inden asken hældes i affaldssækken. Der må ikke foretages uautoriserede ændringer på indsatsen. Vedligeholdelsesdele til S81-90 Beskrivelse Produktnr. Sten, bag... - Page 21 Instructions for installation and use Morsø S81-90 En 13 229 MORSØ JERNSTØBERI A/S . DK-7900 NYKØBING MORS E-Mail: stoves@morsoe.com · Website: www.morsoe.com...
- Page 22 Enjoy your new Morsø stove! Morsø, the biggest stove company in the Danish market, has been making wood-burning stoves of the highest quality since 1853. Just follow the instructions below, and we are certain that you will be able to use and enjoy your new stove for many years.
-
Page 23: Installing Your Morsø Stove
1.0 Installing your Morsø stove 1.1 Unpacking the stove We recommend that two persons perform this task since the stove is too heavy to handle sin- gle-handedly. Morsø S81-90 weighs approximately 58 kg. The stove is suited for intermittent use. 1.2 Installing the stove National and local regulations regarding the installation of wood-burning stoves must be observed, as must local regulations regarding chimney connections and chimney installation. - Page 24 S81-90 connected to existing masonry chimney...
- Page 25 If there is no cleaning door as shown in the drawings, it may be advantageous to install one. This will make the installation of the flue pipe easier, and in some cases, the chimney sweep may require one. For the Morsø S81-90 stove, you will need to connect a bended pipe to the cast-iron flue pipe (1).
- Page 26 B. Custom-built fireplace structure in flammable surroundings If the insert is installed in a flammable environment, a fireplace structure must be built where the insert may be mounted. The fireplace structure will protect the surroundings against the heat effects of the insert through shielding and ventilation. There are numerous ways to build a fireplace structure.
- Page 27 Insulated steel chimney Ventilation hole, 140cm² nonflammable sheet/slab Cellular concrete min. 100 mm. Ventilation hole, 105 cm² S81-90 connected to custom-built fireplace structure...
-
Page 29: The Chimney
Distance to furniture We recommend that the stove be installed 700 mm. from furniture, but consideration should also be given to whether furniture, etc., will dry out as a result of its proximity to the stove. The distance to flammable material in front of the stove is 700 mm. A wood-burning stove gets hot when it is fired. -
Page 30: Connecting To A Brick Chimney
1.6 Connecting to a brick chimney Securely fix a register plate (minimum 1.5 mm. thick rust protected sheet steel e.g. stainless) into the chimney aperture with non-combustible materials. Insert the flue pipe no more than 20 mm. through the register plate, the pipe must not extend into the actual chimney opening. The joints between the stove collar and connecting flue pipe must be sealed with the 5 mm. - Page 31 1.8 Draught If smoke comes out of the stove when the fire door is opened, it will be due to the poor draught in the chimney. This type of stove requires at least 12 PA of chimney draught to achieve satis- factory combustion and to prevent smoke from escaping.
-
Page 32: Firing/Using The Stove
2.0 Firing/using the stove The heat emission of the stove is regulated with the control lever above the door. The stove uses three types of combustion air. The primary combustion air is supplied up through the grate. The air is only used at start-up if the operating conditions are poor (e.g. -
Page 33: Lighting Instructions And Fuelling Intervals
2.1 lighting instructions and fuelling intervals A lot of air is needed when lighting the stove. If you are starting with a cold stove, the door should be left ajar for the first few minutes. In order to build up an insulating layer of ash in the bottom of the stove, you should burn 1,5-2,0 kg of dry kindling when you light the stove the first time. - Page 34 8. Subsequently, the secondary air supply is adjusted to the desired level, and the optimum combustion will continue until only embers are left. Make sure that there is always enough air (oxygen) to maintain clear, lasting flames when, and after, reducing the amount of combustion air.
- Page 35 The stove door should never be opened when the stove is being fired vigorously. Refuelling on to a low fire bed If there is insufficient burning material in the firebed to light a new fuel charge, excessive smoke emission can occur. Refuelling must be carried out onto a sufficient quantity of glowing embers and ash that the new fuel charge will ignite in a reasonable period.
-
Page 36: Routine Stove Maintenance
3.0 Routine stove maintenance 3.1 External maintenance The surface of the stove is painted with heat-resistant Senotherm paint. It is best maintained by simply vacuuming it with a soft brush attachment or wiping it down with a dry, dust-free cloth. If the stove is used too vigorously, the painted surface may assume a greyish tinge over time, but the stove can easily be freshened up with Morsø... -
Page 37: Cleaning The Stove
Unauthorised changes on the insert are not allowed. Spare parts for the S81-90 Description Product no. - Page 40 Morsø Jernstøberi A/S - 16.11.2012 - 72814100 www.morsoe.com...
Need help?
Do you have a question about the S81-90 and is the answer not in the manual?
Questions and answers