Table of Contents
Advertisement
Quick Links
Advertisement
Table of Contents

Related Manuals for Amplicomms PowerTel M6500


Summary of Contents for Amplicomms PowerTel M6500
- Page 1 PowerTel M6500 mobile phone Operating Instructions...
- Page 2 M6500 HAC Hearing Aid Compatible to M4 / T4 Rating The M6500 Phone has a built in Induction Coil and is hearing aid compatible. To ensure optimum benefit, users with hearing aids may wish to select the T setting on their hearing aids. Exposure to the receiver at full volume for a long period could cause ear damage.
-
Page 3: Table Of Contents
ONTENTS Quick Start Guide.............6 Quick Glance ................6 What is in the box ..............8 Installing the SIM card and battery ........8 Charging the battery ...............10 Charging via the mini USB charging socket .......10 Charging via the desktop charging unit .......10 Battery status ................11 Switching the mobile phone on and off .......11 Make sure you are in range of your Network .....12 Setting the display language ..........12... - Page 4 ONTENTS The phone in details ............18 Keys and Parts ................18 Special key functions ...............18 Icons in the display ..............22 Using the phone .............24 General ..................24 Switching the mobile phone on and off .......25 Dialling a phone number / Calling .........26 Dialling with the speed dialling keys........26 Dialling with the one−touch dialling keys......26 Using redial / using the Calls list..........27...
- Page 5 ONTENTS Creating a new phonebook entry...........30 Calling from the phonebook...........32 Editing a phonebook entry............32 Deleting a phonebook entry ...........33 Deleting all phonebook entries ..........33 Copying all phonebook entries ..........33 Storing a phonebook entry to a speed dialling key.....34 Storing a phonebook entry to an one−touch ......35 dialling key ................35 “Messages“...
- Page 6 ONTENTS Entering emergency call numbers.........49 Select an outgoing emergency voice message ....50 Recording a personal emergency voice message....51 Emergency call procedure ............51 Cancel the emergency call function........53 “Settings“ menu ............54 User profiles................54 Direct number................56 Tone control ................56 Switching Boost on and off ............57 Phone settings ................57 Network settings ..............58 Security settings...............59...
- Page 7 ONTENTS Tasks...................64 Stopwatch .................64 “Services“ menu ............66 Appendix .................67 Technical data ................67 Service hotline................68 Problems and solutions............68 Tips on the battery ..............71 Intended use ................71 Areas of use ................72 Safety Information ..............72 Power adapter plug..............75 Disposal ..................75 Declaration of Conformity ............77 Maintenance ................77 Guarantee .................77 Index ................80...
-
Page 8: Quick Start Guide
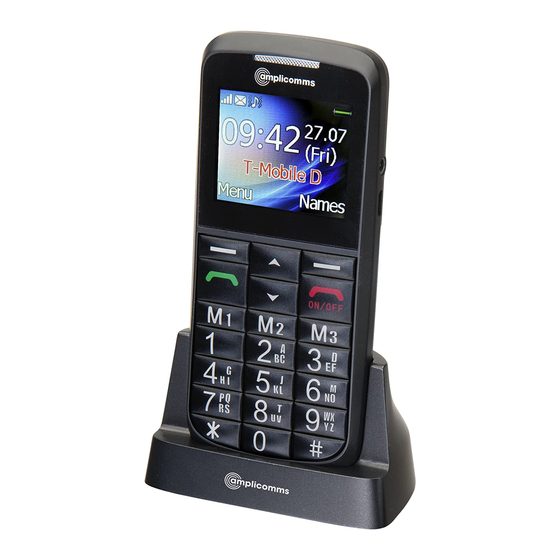
UICK TART UIDE Quick Start Guide Important: Before you start, please read the safety infor- mation on page 72. Quick Glance 1 Boost Key 13 Hash key 2 Volume up/Down 14 Microphone 3 Display 15 Charge contact plate 4 Left soft key 16 Headset socket (Headset not 5 Call key supplied) - Page 9 UICK TART UIDE Helpline 0844 800 6503 (See page 68 for costs and hours of operation)
-
Page 10: What Is In The Box
UICK TART UIDE What is in the box 1 mobile phone 1 power adapter plug 1 li−ion battery 1 operating manual 1 desktop charging unit Installing the SIM card and battery Risk of swallowing small objects! The SIM card can be removed. Small children can swallow them. - Page 11 UICK TART UIDE • Slide the SIM card with the gol- den contacts facing down in the moulded SIM card holder. The SIM card must be located under the metal retaining bar to be in the correct position. • Insert the battery. The golden contacts on the battery must face towards the bottom right.
-
Page 12: Charging The Battery
UICK TART UIDE Charging the battery • Before starting to charge the battery, check that it has been installed properly. Do not remove the battery while it is being charged. This could damage the phone. • When charging the battery for the first time, it should be charged for at least 4 hours. -
Page 13: Battery Status
UICK TART UIDE • It may take a few seconds before the phone indicates the charging process. Battery status The current battery charge status is indicated in the display as follows: Full - - > - - > - - > - - > - - Empty When the battery charge is low, a corresponding warning message appears in the display. -
Page 14: Make Sure You Are In Range Of Your Network
UICK TART UIDE The SIM code (PIN of the SIM card) that you received with your SIM card, protects the SIM card against unauthorised use. The PIN2 code supplied with some SIM cards, you need to access certain services. If you enter the PIN or PIN2 code incorrectly three times in a row, you will be prompted to enter the PUK or PUK2 code. -
Page 15: Taking A Call
Clear Delete the last digit if incorrect Dial the phone number Advanced Settings and Functions For more details about setting up your Amplicomms M6500 and other functions follow the descriptions in this user guide. Examples: • Set your one−touch dialling keys -> page 35. -
Page 16: Questions And Answers
UICK TART UIDE Questions and Answers In the majority of cases your M6500 phone is supplied with out a SIM card. You may find the following “Questions and Ans- wers“ (Q & A) helpful. Why hasn’t the mobile phone been supplied with a SIM card? Many people already have a mobile phone and wish to trans- fer their existing SIM card over to the new phone. - Page 17 SIM card design. Can I use a SIM card from any mobile phone company? Yes. The Amplicomms mobile phone is what is termed as an open SIM card phone and so it is not restricted to any particu-...
- Page 18 UICK TART UIDE lar service provider or mobile phone company. How do I pay for my calls? There are two main types of registration with a service provi- der or mobile phone company. One is a contract − this is where you sign up for an agreed contract over several months / year and pay an agreed monthly fee.
- Page 19 UICK TART UIDE number to dial in order to check your balance. These access codes differ between mobile phone companies so please check the details specific to your service provider. Key in your number, press the talk button and the credit balance will be announced to you.
-
Page 20: The Phone In Details
HE PHONE IN DETAILS The phone in details Keys and Parts for the explanation of keys and parts please refer to 6. Special key functions Left softkey In standby -> open the main menu In menus the function changes due to the term in the display above the soft- key (e. - Page 21 HE PHONE IN DETAILS touch dialling key“ page 35). Note: Since this operation only requires a short press of a button, it could lead to unintentional dialling. Call key - Take a call or dial a number. - Open the call list and the redial list End call key - End or reject a call - Cancel the current process and return...
- Page 22 HE PHONE IN DETAILS Digit key 0 In idle mode, long press (approx 3 s) to toggle the tone control setting bet- ween “Low frequency“, “High fre- quency“ and “Normal frequency“. (See page 56 for explanation of tone control). Digit key 1 Long press (approx.
- Page 23 HE PHONE IN DETAILS (may be necessary for call-through numbers or remote accessing an ans- wering machine). - when entering text: open the special character table. Long press (3 seconds): to switch bet- ween ringer off (Silent mode) and rin- ger on (General activated).
-
Page 24: Icons In The Display
HE PHONE IN DETAILS SOS switch Start the SOS sequence. For details please refer to page 51. Icons in the display Signal strength of the phone’s connection Battery capacity (refer to page 11) New SMS Unread voice message New call Call forwarding active Alarm is activated Boost is activated... - Page 25 HE PHONE IN DETAILS Vibrate only A headset is connected Bluetooth is activated Silent mode is activated The keypad is locked USB is connected A stopwatch is running in the background The “Roaming” symbol will appear if the phone switches to an alternate network provider.
-
Page 26: Using The Phone
SING THE PHONE Using the phone General All the functions can be accessed via the various menus. Use the up/down key ▲ /▼ to scroll though the menus and • the lists (e. g. phonebook). • Press Back, to return to the last step. •... -
Page 27: Switching The Mobile Phone On And Off
SING THE PHONE enter the first character. Then wait for approx. 2 sec. and enter the second letter. Use the up/down key ▲ /▼ or M1 (◄) or M3 (►) to place • the cursor and press Delete for deleting characters. Important Note: If the display light turns off, any keystro- ke activates only the light again. -
Page 28: Dialling A Phone Number / Calling
SING THE PHONE Dialling a phone number / Calling • The phone must be in standby (SIM card inserted and the phone switched on). • Enter the telephone number incl. the prefix. For entering a + in front of the country prefix press quickly two times. -
Page 29: Using Redial / Using The Calls List
SING THE PHONE see "Storing a phonebook entry to an one-touch dialling key," page 35. Using redial / using the Calls list • In standby press the green call key. A list of the last calls is shown (Missed calls, dialled calls, received calls). Select an entry using the up/down key ▲... -
Page 30: Setting The Volume
SING THE PHONE Setting the volume • During a call you can set the volume using the + / - keys on the right hand side of the phone. The setting will be saved. Hands-free • During a call press H-Free. You can hear the caller via the loudspeaker. - Page 31 SING THE PHONE • Call the first subscriber. • Press Options, select New call and press OK. • Enter the phone number for the second subscriber or press Options and Phonebook, to select a phonebook entry. • Press Options, select Call and press OK. •...
-
Page 32: Phonebook" Menu
“P “ HONEBOOK MENU “Phonebook“ menu You can save names and phone numbers in the internal memory (up to 300 entries) and on the SIM card. Opening the phonebook • In standby press Names • During a call press Options, select Phonebook and press Checking the memory status For checking how many names and phone numbers are sto- red in the phonebook press Names ->... - Page 33 “P “ HONEBOOK MENU Enter the name and press ▼. • Enter the (first) phone number and press ▼. • • If necessary enter additional phone numbers (Home num- ber/Office number). After every input press ▼. • Assign a ring melody to the entry. Use M1 (◄) or M3 (►) to select a melody.
-
Page 34: Calling From The Phonebook
“P “ HONEBOOK MENU Note: Your personal ringtone You can record e. g. “Peter is calling“ as a ringtone. Did you associate this ringtone to phonebook entry “Peter“, your phone will announce calls from Peter with: “Peter is calling“. Calling from the phonebook •... -
Page 35: Deleting A Phonebook Entry
“P “ HONEBOOK MENU Deleting a phonebook entry • Press Names to open the phonebook. • Select an entry, press Options and select Delete. Press Yes in the following confirmation query. Deleting all phonebook entries • Press Names -> Options -> Phonebook settings -> Delete all contacts. -
Page 36: Storing A Phonebook Entry To A Speed Dialling Key
“P “ HONEBOOK MENU Storing a phonebook entry to a speed dialling key • Press Names -> Options -> Phonebook settings -> Speed dial. • Make sure that the feature Speed dial is switched on. Note: When you see “Off“ below status press the left softkey (On) to switch on the function. -
Page 37: Storing A Phonebook Entry To An One−Touch
“P “ HONEBOOK MENU Storing a phonebook entry to an one−touch dialling key • Press Menu -> Settings -> Direct Number. • Select a direct call key (M1, M2, M3) and press OK. Change the name for the key if necessary and press ▼. •... - Page 38 “P “ HONEBOOK MENU number. • Call: Make a call to the respective phone number. • Edit: You can edit the entry. • Delete: The entry will be deleted. • Copy: You can copy the entry to the telephone or to the SIM card.
- Page 39 “P “ HONEBOOK MENU • Memory status • Copy contacts: To copy all contacts from the SIM card to the telephone and vice versa. • Move contacts: To move all contacts from the SIM card to the telephone and vice versa. •...
-
Page 40: Messages Menu
“M “ ESSAGES MENU “Messages“ menu You can send and receive text messages (SMS / Short Mes- sage Service). Received SMS are stored either internally in the phone or on the SIM card. Unread text messages are stored in the Inbox. When a new SMS is received, a message appears on the display. - Page 41 “M “ ESSAGES MENU Note: These settings should only be changed by advanced users. • SMS templates: Open the list of templates. • SMS settings: You can change some of the SMS related parameters. Note: These settings should only be changed by advanced users.
-
Page 42: Writing And Sending A Sms
“M “ ESSAGES MENU your network provider.) If necessary delete the phone number with Clear, enter a new number using the digit keys and press Validity period: Select the preferred validity period using the keys M1 (◄) and M3 (►). Message type: Please let the setting Text untouched in the M6500. -
Page 43: Reading/Deleting Sms And Further Options
“M “ ESSAGES MENU • Write your SMS using the digit keys. For more information for entering text refer to chapter “Using the phone / Gene- ral“, page 24. • After having entered the text press Options and select Send to. •... - Page 44 “M “ ESSAGES MENU • Press Options -> View to read the message. • Read the text and the date and time of receiving. • Press Options and select from the following options: Reply: Reply to the number from which the text was sent.
-
Page 45: Call Center" Menu
“C “ ALL CENTER MENU “Call center“ menu A new call is shown on the display. • Press Back to delete the message. The icon for a new call appears in the display. You can see this call “normally“ in the Missed calls list. -
Page 46: Deleting The Calls List
“C “ ALL CENTER MENU Add to block list: Add the entry to the block list. Edit before call: Edit the phone number before calling back. Delete: Delete the entry. Deleting the calls list • Press Menu, select Call center -> Call history. •... -
Page 47: Call Settings
“C “ ALL CENTER MENU Call settings • After pressing Menu -> Call center -> Call settings you have the following options: • Call waiting: Settings for an incoming call if you are already in a conversation. Activate: The second call will generate a short beep in the earpiece. - Page 48 “C “ ALL CENTER MENU Divert if unreachable: Call diversion, if your phone is not available (switched off or “No network“). For information on settings please refer to “Divert all voice calls“. Divert if no answer: Call diversion, if you do not accept the call.
- Page 49 “C “ ALL CENTER MENU please contact your network provider. Outgoing calls: If you select All voice calls, no more calls can be dialled. If you select International voice calls, no more calls to networks abroad can be dialled. If you select International calls except to home, only calls to your home country can be made.
- Page 50 “C “ ALL CENTER MENU phones with the respective numbers will not be sig- nalled any more. Auto redial: If the function is activated, phone num- bers that were "busy," will be redialled automatically (interval 5 min, max. 5 attempts). Call time display: If the function is activated, the duration of the call is displayed.
-
Page 51: Sos" Menu
“SOS“ MENU “SOS“ menu This phone is equipped with an emergency call function. You can register up to 5 personal phone numbers for automatic periodic dialling or an emergency phone number for an emer- gency call centre. Selecting an emergency call destination •... -
Page 52: Select An Outgoing Emergency Voice Message
“SOS“ MENU the phonebook or Edit number, to enter the phone num- ber manually. • Select Call center number and enter the desired phone number. Note: It is forbidden to enter a public emergency num- ber such as police, fire and rescue control centre. It is a purely "private"... -
Page 53: Recording A Personal Emergency Voice Message
“SOS“ MENU Recording a personal emergency voice mes- sage • Press Menu, select SOS -> SOS setting -> Set outgoing voice MSG. • Press Options, select User recorded and press Options. • Select Record to enter the record screen. • Speak your personal outgoing message to the micropho- •... - Page 54 “SOS“ MENU (max. 5) will be called one by one subsequently. If you have only set one phone number, the phone will only call that number cyclically. This procedure will be repeated as long as the phone’s battery is not empty. The procedure stops, as soon as the first person answers.
-
Page 55: Cancel The Emergency Call Function
“SOS“ MENU • Note: Please mention explicitly in your personal emer- gency message, that the called party will have to press key “0“ to be able to speak with you. If not, the loop continues. This prevents the emergency loop from ter- minating, when, for example, an answering machine takes your emergency call. -
Page 56: Settings" Menu
“S “ ETTINGS MENU “Settings“ menu User profiles You can store different profiles (special settings dependent on user and surroundings), which you can switch quickly. • Press Menu, select Settings -> User profiles. • Select one of the profiles from the list and press Options. •... - Page 57 “S “ ETTINGS MENU Alarm tone - Set the melody for the alarm. Alarm volume - Set the volume for the alarm tone. Keypad - Select whether the confirmation of a pres- sed button should be confirmed with a Click, Tone, Talking (with a voice prompt when entering a digit) or Silent.
-
Page 58: Direct Number
“S “ ETTINGS MENU Direct number You can assign important phone numbers to the one−touch dialling keys M1, M2 and M3. • Press Menu, select Settings -> Direct Number. • Select a one–touch dialling key and press OK. • Change the name if necessary (max. 4 characters) and press ▼. -
Page 59: Switching Boost On And Off
“S “ ETTINGS MENU Switching Boost on and off • Press Menu, select Settings -> Boost. • Select Boost On to activate the Boost function permanent- ly or Boost Off to deactivate it. During a call the volume control can be used to adjust the volume level in both Boost ON or OFF modes. -
Page 60: Network Settings
“S “ ETTINGS MENU using M1 (◄) or M3 (►) to activate the function. Select whether the phone should be switched on (“Power on“) or switched off (“Power off“). Enter the desired time and press OK. Note: Please note that depending on the settings entering the SIM PIN is required when switching the phone on. -
Page 61: Security Settings
“S “ ETTINGS MENU Select whether the network selection should be auto- matic or manual (Selection mode), start a New search or select a network from the list (Select network). When Automatic is selected the phone tries to connect to your SIM card’s provider. Security settings •... -
Page 62: Bluetooth
“S “ ETTINGS MENU Bluetooth • Press Menu, select Settings -> Bluetooth. • You have the following options: Bluetooth: Switching the function on or off. Visibility: Select whether your phone is visible for other Bluetooth devices when the Bluetooth function is activated. -
Page 63: Restore Factory Settings
“S “ ETTINGS MENU Search audio device: After pressing OK the phone searches active bluetooth devices. Having found a devi- ce this must be paired with the phone (left softkey: Pair). My name: The Bluetooth name. Can be changed. Advanced: After pressing OK you have the following options: Audio path: Determine whether the audio remains on the phone or is routed to a Bluetooth headset. -
Page 64: Organizer" Menu
“O “ RGANIZER MENU “Organizer“ menu Calender You can set the calendar from January 1970 to December 2030. With Options the following functions are available: • View • View all • Add event • Delete event • Jump to date •... -
Page 65: Alarm
“O “ RGANIZER MENU • Enter the next digit(s) • Press Equal to carry out the operation. Alarm You can set 5 different alarms, which will sound once, daily or only on certain days. • Select an entry and press Edit. •... -
Page 66: Tasks
“O “ RGANIZER MENU Tasks After pressing Add you can define tasks. There are various options available. Stopwatch The stopwatch has various features. • Typical stopwatch • Split timing: Stopwatch with split timing and total time. Press Start to start the function, Split to take the split time (the total time is still displayed), Pause stops the stopwatch with saving ability, and after pressing Options you can Reset or Continue the stopwatch. - Page 67 “O “ RGANIZER MENU • View records: list of the stored records. • nWay stopwatch The nWay stopwatch is composed of 4 parallel stopwat- ches that you can individually start with the up/down key ▲ /▼ and M1 (◄) or M3 (►). The active timer can be started with the left soft key (Start), stopped (Pause) and resumed (Cont.).
-
Page 68: Services" Menu
“S “ ERVICES MENU “Services“ menu The items in this menu depend on your network operator. Please check with your provider for details. Helpline 0844 800 6503 (See page 68 for costs and hours of operation) -
Page 69: Appendix
PPENDIX Appendix Technical data Dual-Band GSM 900 / DCS 1800 Additional functions Bluetooth, emergency call function Battery Li-Ion, 3.7V, 900 mAh Maximum earpiece volume +40 dB (distortion < 5 %) Talk time up to 7 hours Standby time up to 8 days Dimensions 125 x 56 x 15 mm USB connection... -
Page 70: Service Hotline
PPENDIX Service hotline Should problems arise with the telephone, please refer to the following information first. In the event of technical problems, please contact our service hotline under tel. 0844 800 6503 (Using a UK landline, at the time of going to print: calls cost 6p for connection charge and then 5p a minute. - Page 71 PPENDIX No signal quality is No network connection. The displayed. mobile phone is in a location where there is no network ser- vice. Move to a different location or contact your service provider. Keypad does not The operating speed of the dis- function or only play is reduced in the case of functions very slowly.
- Page 72 PPENDIX Screen frozen or no Remove the battery for 3 minu- response when tes and try again. pressing keys. No connection to the Contact your service provider. mobile telecommunication network. The “Insert SIM“ message Ensure that the SIM card has appears in the been installed correctly.
-
Page 73: Tips On The Battery
PPENDIX ging unit with a soft, dry cloth. − Charge the mobile for 4 hours. Tips on the battery • Only use batteries, cables and charging unit approved by the manufacturer, otherwise the battery could be damaged. • Do not short circuit the battery. Always leave the battery in the phone to avoid accidentally short circuiting the battery contacts. -
Page 74: Areas Of Use
PPENDIX permitted. Under no circumstances open the device or com- plete any repair work yourself. Areas of use • Do not use the phone in prohibited areas. • Switch the phone off in the vicinity of medical equipment (e.g. in hospitals). •... - Page 75 PPENDIX • If you want to connect the phone to another device, read the manual supplied with that device with regard to any detailed safety information. • Never attempt to connect incompatible products. • Repairs to this device may only be completed by qualified service personnel.
- Page 76 PPENDIX that no safety−related functions are interfered with when operating the phone. It is essential to observe the applica- ble national laws and regulations. • Always maintain a distance of at least 15 cm to implanted heart pacemakers to prevent any possible interference. If you have had a pacemaker implanted, do not carry the phone in a breast pocket when switched on.
-
Page 77: Power Adapter Plug
PPENDIX ble to guarantee a reliable connection under all circums- tances. Power adapter plug The power adapter plug supplied fulfils the ecodesign requirements of the Euro- pean Community (Directive 2005/32/EC). This means that the current consumption is considerably less, both in operation as well as in standby, in comparison to older power adapter plug models. - Page 78 PPENDIX sed of in normal domestic waste! Batteries represent a hazard to health and the environment! Never open, damage or swallow batteries or allow them to pollute the environment. They may contain toxic, ecologically hazardous heavy metals. You are legally obliged to dispose of power packs and batte- ries at the point of sale or in the corresponding con- tainers provided at collection points by local public waste authorities.
-
Page 79: Declaration Of Conformity
Clean the housing surfaces with a soft, fluff−free cloth. Do not use any cleaning agents or solvents. Guarantee AMPLICOMMS equipment is produced and tested according to the latest production methods. The implementation of care- fully chosen materials and highly developed technologies ensure trouble−free functioning and a long service life. - Page 80 PPENDIX terms of guarantee do not apply when a device malfunction was caused by the mobile telecommunications network opera- tor/provider. The terms of guarantee do not apply to the batte- ries or power packs used in the products. The period of gua- rantee is 24 months from the date of purchase.
- Page 81 If your device shows signs of defect during the period of gua- rantee, please return it to the sales outlet in which you purcha- sed the AMPLICOMMS device together with the purchase receipt. All claims under the terms of guarantee in accordance with this agreement can only be asserted at the sales outlet.
-
Page 82: Index
NDEX Index 3-party conference ..28 Calling ....26 Calls list ....27, 43 Cancel the emergency call Alarm . - Page 83 NHANG NDEX Emergency call destination 49 Language ... . 12, 58 Emergency call numbers . . 49 Emergency call procedure . 51 Maintenance ... . . 77 Emergency voice message.
- Page 84 NDEX SMS centre number ..39 Personal emergency voice SOS ....49 message ....51 Special key functions.
- Page 85 NHANG NDEX Voicemail server number . . 39 Volume....28 Volume control ... 21 What is in the box .
-
Page 86: Menu Tree
ENU TREE Menu tree Messages Write message Inbox Drafts Outbox Sent Broadcast messages SMS templates SMS settings SIM card Memory status Save sent message Preferred storage Phonebook (Option) View Add new contact Send text message Call Edit Delete Copy Move Add to block list Caller groups Helpline 0844 800 6503... - Page 87 ENU TREE NHANG Phonebook settings Preferred storade Speed dial Owner numbers Memory status Copy contacts Move contacts Delet all contacts Call center Call history Missed calls Dialled calls Received calls Delete call logs Call settings Call settings Call waiting Call divert Call barring Advance settings Block list...
- Page 88 ENU TREE SOS setting SOS mode setting Set SOS numbers Call center number Set outgoing voice MSG Record SOS MSG Settings User profiles Direct Number Tone Control Boost Phone settings Time and date Schedule power on/off Language Pref. input methods Wallpaper LCD backlight Network settings...
- Page 89 ENU TREE NHANG Bluetooth Bluetooth Visibility My device Search audio device My name Advanced Audio path My address Restore factory settings Organizer Calendar Calculator Alarm Tasks Stopwatch Services (depending on network provider)
- Page 90 4 250711 990855 Distribution: Audioline GmbH D-41460 Neuss 09/2012 – Edition 1.1...
Need help?
Do you have a question about the PowerTel M6500 and is the answer not in the manual?
Questions and answers