Table of Contents
Advertisement
Quick Links
Advertisement
Table of Contents

Related Manuals for Ducasa RP-10


Summary of Contents for Ducasa RP-10
- Page 1 Models: RP-10, RP-15, RP-20 User Manual...
-
Page 2: Table Of Contents
Contents Thank you for purchasing the Ducasa Sunburst Radiant Panel Heater. Index Safety Precautions & Important Safeguards: ..............3 Specifications: ........................5 Features ..........................5 Removal of Packaging ......................5 Controls & Features ......................6 Control Panel ........................6 Installation Kit ........................7 Installation Precautions....................... -
Page 3: Safety Precautions & Important Safeguards
Safety Precautions & Important Safeguards: The appliance must only be used as described in the instructions for use! Use for any other purpose is forbidden! Any damage resulting from improper use and non- observance of the safety information will invalidate any liability and warranty! ... - Page 4 Important! Do not insert any foreign objects into the appliance openings! Risk of injury (electric shock) and damage to the appliance! Place the appliance so that it cannot be touched by accident. Risk of burns! The appliance will cool down gradually after being switched off. ...
-
Page 5: Specifications
Specifications: Model RP-10 RP-15 RP-20 Voltage Rating 230V AC, 50Hz 230V AC, 50Hz 230V AC, 50Hz Power Consumption (W) 650W / 1000W 900W / 1500W 1300W / 2000W Unit Size (cm) 72 x 12.5 x 49 92 x 12.5 x 49 112 x 12.5 x 49... -
Page 6: Controls & Features
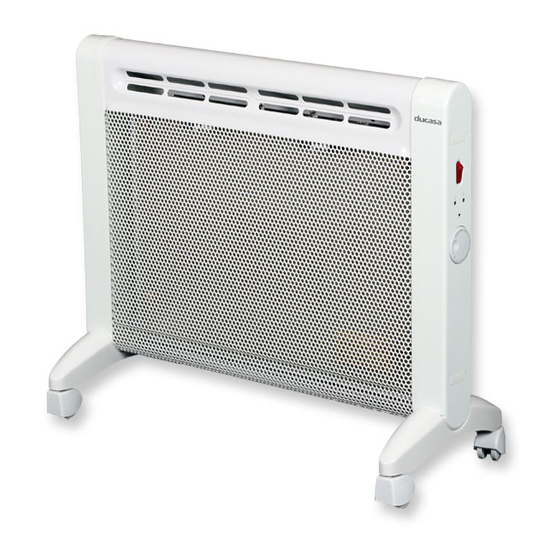
Controls & Features: Air Outlet Front View Control Panel Front Grille Carrying Handle Side View Rear View Castors Feet Wall mounting support Control Panel : Power Selection Switch Power Indicator Light (Green) Heating Indicator Light (Orange) Temperature Control Knob Frost protection (Snowflake Position) ... -
Page 7: Installation Kit
Installation Kit Carefully unpack the components and check that no damage occurred during transportation. If any damage is apparent or any component is missing, please contact the dealer immediately. Wall mounting bracket Screw for wall mounting 2pcs Feet 2pcs Wall plugs 2pcs Castors 2pcs... -
Page 8: Installation Precautions
Installation Precautions:... -
Page 9: Heater For Bathroom Area
Heater for Bathroom Area: We recommend to install the heater in the bathroom area at least 0.6m away from shower OR bathtub as shown in the picture. The figure 0.6m is a suggested distance; the actual distance from the shower and bathtub should follow national standard in each country. -
Page 10: Installation Instruction
Installation instruction: A. For free-standing use: 1. Fix 2 castors to the feet. 2. Push feet onto heater until they click into place. -
Page 11: For Wall Mounting
B. For wall mounting: 400mm 405mm. Follow the dimension to drill 2 holes on the wall. Fit 2 wall plugs into the wall. Fix the wall-mounting bracket on the wall with the screws provided. Hang the heater on the wall mounting support. Insert the screwdriver in the upper-hole of both wall support and turn the screwdriver 90... -
Page 12: Operation
Operation: 1. Ensure that the Temperature Control Knob is in the Off position (the Dot on the Temperature Control). Also, make sure the electric socket is switched off. 2. Plug the power cable into the electrical socket. (Rated not less than 13A) then switch the socket on. -
Page 13: Fault Finding
Storage: Store the heater in a cool dry place when not in use. To prevent dust and dirt getting into the heater, use the original box to repack the unit. Fault Finding: Heater not warm or not operating: 1. Check if the electrical supply in the house or the main fuse is working? 2. -
Page 14: Warning
WARNING: Please do not attempt to repair the heater, as it is potentially hazardous and will void the heater’s warranty. Only authorised personnel may repair the heater. Plastic bags are not toys. Keep them away from infants and children as they represent risk of suffocation and other hazards. - Page 15 Installation Notes -------------------------------------------------------------------------------- -------------------------------------------------------------------------------- -------------------------------------------------------------------------------- -------------------------------------------------------------------------------- -------------------------------------------------------------------------------- -------------------------------------------------------------------------------- -------------------------------------------------------------------------------- -------------------------------------------------------------------------------- -------------------------------------------------------------------------------- -------------------------------------------------------------------------------- -------------------------------------------------------------------------------- -------------------------------------------------------------------------------- -------------------------------------------------------------------------------- -------------------------------------------------------------------------------- -------------------------------------------------------------------------------- -------------------------------------------------------------------------------- --------------------------------------------------------------------------------...
- Page 16 UK Distributor of Ducasa Products: Heattend Products Ltd Web: www.heattend.co.uk Email: enquiries@heattend.co.uk...
Need help?
Do you have a question about the RP-10 and is the answer not in the manual?
Questions and answers