
Related Manuals for Bodart & Gonay Optifire OPTI700


Summary of Contents for Bodart & Gonay Optifire OPTI700
-
Page 1: Instructions For Use
Instructions for use and maintenance Optifi re Caution: Remove the instructions from the fi replace and give them to the client, along with the necessary instructions (explanations and demonstrations). 01/09 07DHOPFV2 Optifi re 1... - Page 2 For the chimney sweep, tick the correct position of the baffl es (see 1.5). 2 Opti-...
- Page 3 Dear Client, We congratulate you on the purchase of your Bodart & Gonay fi replace. We are happy to inform you that you have chosen a quality product wholly designed and manufactured by our company, using the most up-to-date production techniques. To get the best use out of your appliance, we strongly recommend that you read these instructions carefully and keep them safe.
-
Page 4: Table Of Contents
CONTENTS RECOMMENDATIONS 1. Fuel 2. First fi re 3. With each fi re 1. Use: 1.1. Description of elements 1.2. Opening – closing the fi replace 1.3. Fire behaviour 1.3.1. Lighting 1.3.2. Ideal rate 1.3.3. Reduced rate 1.4. Operating with coal (occasional) 1.5. -
Page 5: Fuel
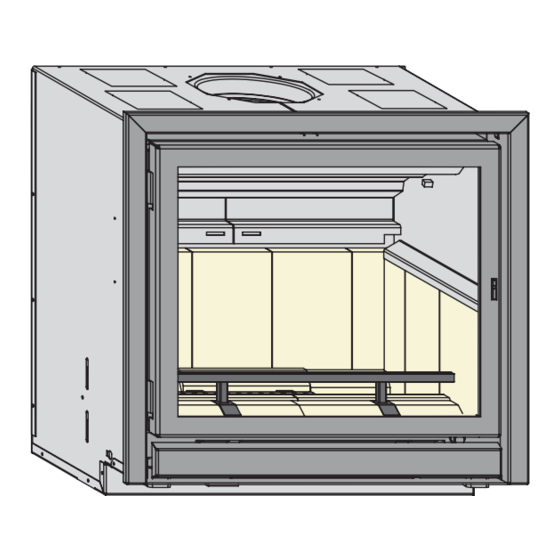
1. Use: 1.1. Description of elements 1. The gate: Never leave it open when the 7. Microswitch: A switch that automatically stops appliance is in operation the fan on opening the door. 2. The thermostat: It regulates the quantity of 8. -
Page 6: Fire Behaviour
15. The variator: It enables adjustment of fan speed. 1. Speed adjustment. 2. Minimum speed adjustment screw under the knob 3. Fuse (Remove the knob, unscrew the plate, remove old fuse, replace with identical fuse). Do not forget to calibrate the variator; refer to the installation manual in options 6. -
Page 7: Lighting
1.3.1. Lighting 1. OPEN the air control to maximum: Thermostat 9. Place the grill in open position (lever to the left). 2. Lay fi relighter or crumpled-up newspaper. Finish off with kindling. The use of infl ammable liquids is prohibited. 3. -
Page 8: Operating With Coal (Occasional)
1.3.3. Reduced rate and long-lasting combustion Maximum permitted load in one go at reduced rate (see previous table). 1. Keep a 3 to 5 cm bed of embers at the bottom of the fi replace. 2. Choose logs with a very wide section. 3. - Page 9 CAUTION! When the fi replace is being used, and even if there are no more fl ames, certain accessible parts of the appliance are at very high temperatures. Do not leave children unsupervised near the fi replace. 1.6. Fans and speed variator Caution ! The fan is engaged when the temperature switch is hot (+ 20 min.) MAX.
-
Page 10: Adjusting Baffl Es
1.5. Adjusting baffl es: Most open position: the fi replace is delivered with this confi guration. It allows easy passage of fumes. Caution: lower baffl e perforations on left. Intermediate position: if no backdraft is observed on opening, it is possible to close the baffl... - Page 11 Except: OPTI 760 D Most open position: the fi replace is delivered with this confi guration. It allows easy passage of fumes. Intermediate position: if no backdraft is observed on opening, it is possible to close the baffl es slightly to increase yield.
-
Page 12: Maintenance
2. Maintenance: 2.1. Everyday maintenance GLASS To clean the glass, open the door using the following procedure: CAUTION! - Do not clean the glass when it is hot. - Spray the product* on the centre of the glass, then spread it using a cloth or absorbent paper. - Do not use water and/or cleaning products on the painted areas. -
Page 13: Annual Servicing
2.2. Annual servicing CHIMNEY-SWEEPING Have the chimney swept at least once a year, not only to comply with the law, but also for safety reasons. - Take note of the position of the 2 baffl es. - Remove the baffl es, as shown in the drawing. - If the third baffl... -
Page 14: Faults
3. Faults FAULTS SOLUTIONS GLASS GETS DIRTY TOO QUICKLY -Check that the fuel is not damp. - Use the thermostat on 7-8. - Check the position of the air detector. - Open the baffl e passage. FAN Not working any more - Check if the motor is working. -
Page 15: Spare Parts
4. Spare parts Optifi re 15... - Page 16 OPTIONS/RECHANGES/OPTIE/WISSELSTUKKEN OPTI 700 Pièces de rechange / wisselstukken Omschrijving Description Code 07BP03 poignée fil 07BP0103 NOIRES ZWARTE KOUDE HANDGREEP PORTE SOUDEE OPTI 700 PLAT GELASTE DEUR OPTI 700 VLAK 27M70016 07RV1050 CERAM. 596 X 497 X 4 OPTI 700 KERAM. 596 X 497 X 4 OPTI 700 27M70015 CONTREPORTE OPTI 700 PLAT TEGENDEUR OPTI 700 VLAK...
- Page 17 Optifi re 17...
- Page 18 OPTIONS/RECHANGES/OPTIE/WISSELSTUKKEN OPTI 760 Pièces de rechange / wisselstukken Omschrijving Description Code 27B78016 PORTE SOUDEE OPTI 780 PLAT GELASTE DEUR OPTI 780 VLAK PORTE SOUDEE CINTREE OPTI 780 GEBOGEN GELASTE DEUR OPTI 780 27B78017 27B78015 CONTREPORTE OPTI 780 PLAT TEGENDEUR OPTI 780 VLAK 27B78021 CONTREPORTE OPTI 780 CINTREE TEGENDEUR OPTI 780 AFGERONDE...
- Page 19 Optifi re 19...
- Page 20 OPTIONS/RECHANGES/OPTIE/WISSELSTUKKEN OPTI 760 DF Pièces de rechange / wisselstukken Omschrijving Description Code 37B78017 PORTE MONTEE OPTI 780 PLAT VOLLEDIGE DEUR OPTI 760/1 27B78015 CONTREPORTE OPTI 780 PLAT TEGENDEUR OPTI 780 VLAK 07RV1039 CERAM. 656X487X4 OPTI 780 + OPTI 760 DF KERAM.
- Page 21 4920 Harzé BELGIUM EN 13229:2001 and EN 13229 A2:2004 Inset appliance fired by solid fuel Optifi re 703/704 Mininum insulation thickness: Side wall: 111 mm minimum Back wall: 113 mm minimum Ceiling: 89 mm minimum Floor: no insulation required Recommended fuels :Woodlogs Emission of CO in combustion products...
- Page 22 4920 Harzé BELGIUM EN 13229:2001 and EN 13229 A2:2004 Inset appliance fired by solid fuel Optifi re 760 D Mininum insulation thickness: Side wall: 103 mm minimum Back wall: 113mm minimum Ceiling: 90 mm minimum Floor: 42mm minimum Recommended fuels :Woodlogs Emission of CO in combustion products...
- Page 23 4920 Harzé BELGIUM EN 13229:2001 and EN 13229 A2:2004 Inset appliance fired by solid fuel Optifi re 763/764 Mininum insulation thickness: Side wall: 118 mm minimum Back wall: 174 mm minimum Ceiling: 107 mm minimum Floor: no insulation required Recommended fuels :Woodlogs Emission of CO in combustion products...
-
Page 24: Guarantee
5. Guarantee DURATION AND LIMITATION - 6 years guarantee on: the overall structure - 2 years guarantee on: removable parts - 2 years guarantee on: fans and speed variator - No guarantee on: glass, bricks AGREEMENT Bodart & Gonay guarantees its appliances: - in accordance with its catalogues and instructions for use, - for safety of operational use. - Page 25 Installation Instructions Optifi re Caution: Remove the instructions from the fi replace and give them to the client, along with the necessary instructions 01.09 (explanations and demonstrations). 07DHOPFV2 Optifi re 24...
- Page 26 INSTALLATION INSTRUCTIONS 1. Characteristics 2. Flue 3. Outside air supply 4. Convection air 5. Installation 5.1. Recommendations 5.2. Alcove 5.3. Electricity 5.4. Putting the fi replace in place 5.5. Frames 6. Options 6.1. Fan, speed variator, door- and temperature switch 6.2.
-
Page 27: Characteristics
1.Characteristics : Optifi re 703: Optifi re 26... - Page 28 Optifi re 704: 27 Optifi re...
- Page 29 Optifi re 763: Optifi re 28...
- Page 30 Optifi re 764: 29 Optifi re...
- Page 31 Optifi re 763D: Optifi re 30...
- Page 32 Optifi re 764D: 31 Optifi re...
-
Page 33: Flue
2. Flue RECOMMENDATIONS The fl ue must be built according to good practice, the most impor- tant elements of which are as follows: - Minimum height (distance between connection and top of chimney stack) will be 4 m. - Section: chimney: Ø... -
Page 34: Outside Air Supply
Airtight connec- tion - In case of a double fl ue: - choose the best, 45° “Breeching” to prevent - seal the unused one. soot build-up Soot trap - In case of a side connection on an existing fl ue, carry out one of the following two assemblies: - It is essential that the connection is airtight. -
Page 35: Installation
- If hot air is sent to another room, it is essential to fi t an air return port with section at least equivalent to the hot air outlets. This is very important so as not to create a vacuum in the room, which would cause the fi... -
Page 36: Alcove
5.2. Alcove - Clear the way for connection to the chimney and, if necessary, the hot air pipes. - Remove any hoods and dampers. - Insulate the outside walls. - In the case of new building work, it is PROHIBITED to rest the building work on top of the fi... -
Page 37: Frames
- It is vital that the feet are pinned down. To do this, drill a 5.25 diameter hole with the bit provided and insert the M6 SELF-CUTTING screws (except OPTI760 DF). - Plan for passage of the motor electrical power cable when doing building work. - Connect the hot air collars if necessary. -
Page 38: Options
6. Options 6.1. Fan, speed variator, door switch and temperature switch The fan enables you to pump air between the heating unit and the cabinet to recover maximum heat and thereby increase the yield and power of the appliance. The speed variator enables you to vary, according to requirements, the output of the fan. The door switch breaks contact when you open the door to prevent any backdraft of smoke and puff... - Page 39 6.1. N°10 220V 220V IMPORTANT: Adjustment (calibration) of the speed variator: Once installation of the fan and the diff erent components has been fully completed: - Turn on power. - Put the fan on minimum = knob turned fully in a clockwise direction. - Pull the knob (1) out.
-
Page 40: Pivoting Valve Kit
6.2. Pivoting valve kit This kit enables you to seal, if required, the hot air stream above the door, sending more or less hot air to the hot air outlets if the latter are connected! Bodart & Gonay SA - Parc Artisanal de Harzé - Rue de Lambinon, 3 - B-4920 HARZE tel: 32 (0)4 239 93 93 - fax: 32 (0)4 239 93 98 info@b-g.be - www.b-g.be 39 Optifi...
Need help?
Do you have a question about the Optifire OPTI700 and is the answer not in the manual?
Questions and answers