Gigaset A400 User Manual
Hide thumbs
Also See for A400:
- User manual (25 pages) ,
- Instruction manual (25 pages) ,
- Manual (17 pages)
Table of Contents
Advertisement
Quick Links
Gigaset A400
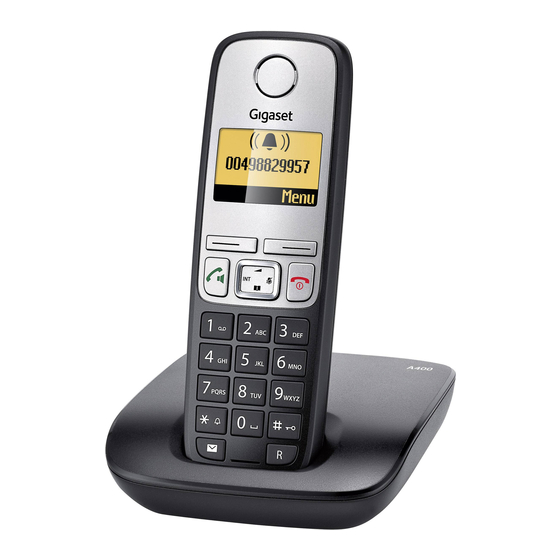
The handset at a glance
1 Charge status of the batteries
(¢ page 6)
2 Signal strength (¢ page 6)
3 Internal number of the handset
4 Using the display keys
5 Control key (p)
t: Open the menu for setting
the volume (¢ page 15)
s: Open the directory
(¢ page 8)
u: Display the list of registered
handsets
v: Microphone off (¢ page 7)
6 Accept/speaker key (¢ page 7)
7 End call key and On/Off key
8 Ringer melody on/off
(press and hold in idle status)
9 Keypad lock on/off
(press and hold in idle status)
10 Message key (¢ page 8)
11 Microphone
12 Recall key
- Recall (flash)
- Dialling pause (press and hold)
The base at a glance
Registration/paging key:
Search for handsets
(press briefly, "paging"
¢ page 9)
Register handsets (press
and hold ¢ page 9).
1
Ð
2
3
11.12.
Þ
4
5
6
7
8
9
10
11
12
Please note
To change the display language, proceed as described on page 10.
ECO DECT
You are helping to protect the environment with your Gigaset A400.
Reducing energy consumption
Your telephone has a power-saving adapter plug and uses less power.
Reduced transmission power
The transmission power of your telephone is reduced automatically:
The handset's transmission power is reduced depending on the distance to the
base. The transmission power on the base is reduced to virtually zero when only
one handset is registered and the handset is in the base.
You can reduce the transmission power of the handset and base even more by
using Eco Mode/Eco Mode+ (see menu tree page 15):
u Eco Mode: 80% transmission power reduction in standby mode and during
a call (the range of the base is reduced).
u Eco Mode+: 100% transmission power deactivation in standby mode (top
½
left display icon
). Press and hold the accept key
can be reached. You hear the ringing tone if the base can be reached. When
Eco Mode+ is activated, handset standby time is reduced by approx. 50%.
1
Display keys on handset:
Pressing a key launches the func-
tion that appears above that key in
the display.
Dis-
play
Þ
V
Menu
INT 1
"
11:56
U
Menu
T
˜
OK
Other icons in the top display line:
Ú
Ø
½
Function when pressed
Open redial list ¢ page 8.
Open main/submenu (see
menu tree ¢ page 15).
Go back one menu level.
Scroll up/down or adjust
volume with q.
Move cursor to left/right
with r.
Backspace deletes one
character at a time from
right to left.
Confirm menu function or
save entry.
Ringer melody off
Keypad locked
Eco Mode+ activated
(¢ page 1)
c
to check that the base
Advertisement
Table of Contents

Related Manuals for Gigaset A400


Summary of Contents for Gigaset A400
- Page 1 To change the display language, proceed as described on page 10. The base at a glance ECO DECT You are helping to protect the environment with your Gigaset A400. Reducing energy consumption Your telephone has a power-saving adapter plug and uses less power.
-
Page 2: Safety Precautions
Do not use your phone in environments with a potential explosion hazard, e.g. paint shops. ƒ If you give your Gigaset to a third party, make sure you also give them the user guide. Remove faulty bases from use or have them repaired by our Service department, as they could interfere with other wireless services. -
Page 3: First Steps
Please note: u Never expose the telephone to the influence of heat sources, direct sunlight or other elec- trical devices. u Protect your Gigaset from moisture, dust, corrosive liquids and fumes. Connecting the base ¤ First, connect the telephone jack and insert the cables into the cable ducts. -
Page 4: Connecting The Charger (If Included)
Inserting the batteries and closing the battery cover Warning Only use rechargeable batteries (¢ page 12) recommended by Gigaset Communications GmbH, i. e. never use a conventional (non-rechargeable) battery, as this could result in sig- nificant health risks and personal injury. For example, the outer casing of the batteries could be damaged or the batteries could explode. - Page 5 ¤ Charge the handset in the base for 6 hours. Please note The handset must only be placed in the designated Gigaset A400 base or the correspond- ing charging cradle. ¤ After charging, remove the handset from the base and only replace it when the batteries are fully discharged.
- Page 6 Setting the date and time Set the date and time so that the correct date and time can be assigned to incoming calls, and so that the alarm clock can be used. Menu ¤ Settings ¤ OK ¤ Date/Time ¤ OK ¤...
-
Page 7: Making Calls
Notes on calling line display (CLIP) By default, the number of the caller is shown in the display of your Gigaset telephone. You do not have to make any other settings on your Gigaset telephone. However, if the caller's number is not displayed, this... -
Page 8: Call List/Network Mailbox List
Using the directory and lists Using speed dial keys You can assign directory entries to the keys 0 and 2-9: ¤ (Select entry) ¤ Menu Directory ¤ Shortcut ¤ OK ¤ (Press the key to which you want To open the directory: press and hold the bottom to assign the entry) control key To dial, press and hold the required speed dial key. -
Page 9: Locating A Handset ("Paging")
Locating a handset (paging) Call list Prerequisite: CLIP (¢ page 7) You can locate your handset using the base. Depending on the type of list set, the call list contains u Briefly press the registration/paging key on the (¢ page 15) base (¢... -
Page 10: De-Registering Handsets
De-registering handsets Setting the alarm clock Menu ¤ Settings ¤ OK ¤ Handset ¤ OK Activating/deactivating the alarm clock ¤ De-register HS ¤ OK ¤ Select handset ¤ OK ¤ Enter Menu ¤ Alarm Clock ¤ OK ¤ Activation the base system PIN (default setting: 0000) ¤ OK ‰... -
Page 11: Resetting The Base To The Default Settings
Operating the base on the Resetting the base to the default settings PABX When restoring factory settings: The following settings are only necessary if your PABX u Individual settings are reset requires them, see the user guide for your PABX. u All lists are deleted When entering the digits, enter them slowly one after the other. -
Page 12: Entering Letters/Characters
0.5 W General specifications DECT standard Is supported GAP standard Is supported (The Gigaset handset is only fully functional on Gigaset bases) Range Up to 300 m outdoors Up to 50 m indoors Base power supply 230 V ~/50 Hz Environmental condi- +5°C to +45°C, 20% to 75% relative... -
Page 13: Customer Service & Assistance
Customer Service & Assistance Do you have any questions? As a Gigaset customer, you can find help quickly in this User Manual and in the serv- ice section of our Gigaset online portal www.gigaset.com/service. Please register your phone online right after purchase. - Page 14 This device is intended for analogue phone lines in your network. Country-specific requirements have been taken into consideration. We, Gigaset Communications GmbH, declare that this device meets the essential requirements and other rele- vant regulations laid down in Directive 1999/5/EC.
-
Page 15: Menu Tree
Menu tree Your phone has an extensive range of features. These scroll to the function you require and press OK to con- are offered in the form of menus. firm. To select a function while the phone is in idle status, To return to idle status: press and hold the key.
Need help?
Do you have a question about the A400 and is the answer not in the manual?
Questions and answers