
Related Manuals for Küppersbusch EKI9652.1F


Summary of Contents for Küppersbusch EKI9652.1F
- Page 1 BEDIENUNGSANWEISUNG mit Montageanweisungen Instructions for use and installation Instructions d’utilisation et d’installation EKI9652.1F...
-
Page 2: Table Of Contents
Dear customer, Thank you for having chosen a KÜPPERSBUSCH induction hob. In order to install properly your appliance and to make the best use of it, please read this entire instruction manual carefully. SUMMARY SAFETY ............................24 ...................... 24 RECAUTIONS BEFORE USING ........................ -
Page 3: Safety
SAFETY Precautions before using • Unpack all the materials. • The installation and connecting of the appliance have to be done by approved specialists. The manufacturer can not be responsible for damage caused by building-in or connecting errors. • To be used, the appliance must be well-equipped and installed in a kitchen unit and an adapted and approved work surface. -
Page 4: Precautions Not To Damage The Appliance
• Metallic objects such as knives, forks, spoons and lids should not be placed on the hob surface since they can get hot. • In general do not place any metallic object except heating containers on the glass surface. In case of untimely engaging or residual heat, this one may heat, melt or even burn. -
Page 5: Precautions In Case Of Appliance Failure
• If a drawer is situated under the embedded appliance, make sure the space between the content of the drawer and the inferior part of the appliance is large enough (2 cm). This is essential to guaranty a correct ventilation. •... -
Page 6: Description Of The Appliance
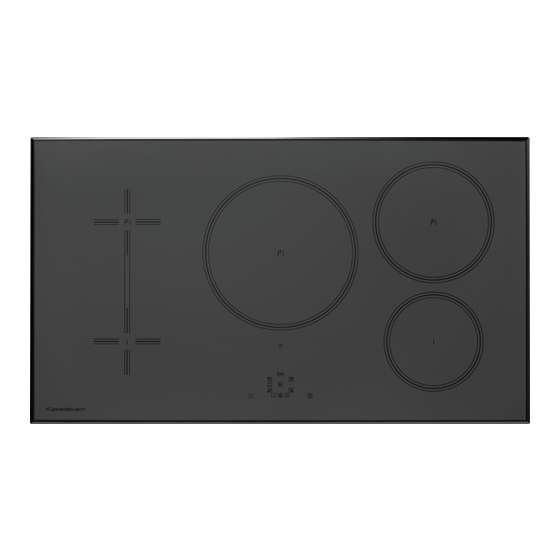
DESCRIPTION OF THE APPLIANCE Technical characteristics Type EKI9652.1F Total power 7400 W Energy consumption for the hob EC 174.4 Wh/kg Front left heating zone Ø 168 mm Minimum detection Ø 90 mm Nominal power* 1400 W Booster power* Standardised cookware category** Energy consumption EC 177.3 Wh/kg... -
Page 7: Control Panel
Control panel Timer display Control light timer Selection and Timer Power display MY key Bridge key Pause key [ - ] key [ + ] key On/off key Keep Warm key USE OF THE APPLIANCE Display Display Designation Function Zero The heating zone is activated. -
Page 8: Starting-Up And Appliance Management
STARTING-UP AND APPLIANCE MANAGEMENT Before the first use Clean your hob with a damp cloth, and then dry the surface thoroughly. Do not use detergent which risks causing blue-tinted colour on the glass surface. Induction principle An induction coil is located under each heating zone. When it is engaged, it produces a variable electromagnetic field which produces inductive currents in the ferromagnetic bottom plate of the pan. -
Page 9: Pan Detection
Pan detection The pan detection ensures a perfect safety. The induction doesn’t work: • If there is no pan on the heating zone or if this pan is not adapted to the induction. In this case it is impossible to increase the power and the display shows [ U ]. This symbol disappears when a pan is put on the heating zone. -
Page 10: Timer
Timer The timer is able to be used simultaneous with all heating zones and this with different time settings (from 0 to 99 minutes) for each heating zone. • Setting and modification of the cooking time : Action Control panel Display Zone selection Press key [... -
Page 11: Automatic Cooking
Automatic cooking All the cooking zones are equipped with an automatic cooking device. The cooking zone starts at full power for a certain time, and then reduces automatically its power to the pre-selected level. • Start-up : Action Control panel Display Zone selection Press key [... -
Page 12: Pause Function
Pause function This function brakes all the hob’s cooking activity and allows restarting with the same settings. • Startup/stop the pause function : Action Control panel Display Engage pause press key [ ll ] displays [ II ] in the heating zone displays Stop the pause press key[ II ]... -
Page 13: My Function
My Function After having set cooking level and timer value for the zone, it is possible to memorize the settings on the same zone. • cooking stages of cooking zone (power) • minutes and seconds of programmed cooking zone-related timer •... -
Page 14: Cooking Advices
COOKING ADVICES Pan quality Adapted materials : steel, enamelled steel, cast iron, ferromagnetic stainless-steel, aluminium with ferromagnetic bottom. Not adapted materials : aluminium and stainless-steel without ferromagnetic bottom, cupper, brass, glass, ceramic, porcelain. The manufacturers specify if their products are compatible induction. To check if pans are compatibles : •... -
Page 15: Examples Of Cooking Power Setting
Examples of cooking power setting (the values below are indicative) 1 to 2 Melting Sauces, butter, chocolate, gelatine Reheating Dishes prepared beforehand 2 to 3 Simmering Rice, pudding, sugar syrup Defrosting Dried vegetables, fish, frozen products 3 to 4 Steam Vegetables, fish, meat 4 to 5 Water... -
Page 16: Environment Preservation
One or all cooking zone cut-off : • The safety system functioned. • You forgot to cut-off the cooking zone for a long time. • One or more sensitive keys are covered. • The pan is empty and its bottom overheated. •... -
Page 17: Installation Instructions
Stick the gasket (2) two millimeters from the external edge of the glass, after removing the protection sheet (3). Aeration Fitting - installing: • The cut out sizes are: EKI9652.1F 900 mm 520 mm 810 mm 490 mm 54 mm •... -
Page 18: Electrical Connection
• Materials which are often used to make worktops expand on contact with water. To protect the cut out edge, apply a coat of varnish or special sealant. Particular care must be given to applying the adhesive joint supplied with the hob to prevent any leakage into the supporting furniture. - Page 19 Caution! This appliance has only to be connected to a network 230 V~ 50/60 Hz. Connect always the earth wire. Respect the connection diagram. The connection box is located underneath at the back of the hob casing. To open the cover use a medium screwdriver.
- Page 20 19828-0...
Need help?
Do you have a question about the EKI9652.1F and is the answer not in the manual?
Questions and answers