Pioneer DDJ-RZ Operating Instructions Manual
Dj controller
Hide thumbs
Also See for DDJ-RZ:
- Operating instructions manual (16 pages) ,
- Operating instructions manual (30 pages)
Table of Contents
Advertisement
Available languages
Available languages
Quick Links
DDJ-RZ
http://www.pioneerdj.com/
http://rekordbox.com/
The Pioneer DJ site shown above offers FAQs, information on software, and various other types of information
and services to allow you to use your product in greater comfort.
For the latest version of the rekordbox software, access rekordbox.com and download the software from there.
Le site Pioneer DJ indiqué ci-dessus propose une FAQ, des informations sur le logiciel et divers types
d'informations et de services qui permettent une utilisation plus confortable de ce produit.
Pour la toute dernière version du logiciel rekordbox, accédez à rekordbox.com et téléchargez le logiciel de ce site.
Die oben angegebene Pioneer DJ-Website enthält häufig gestellte Fragen, Informationen über Software und
andere wichtige Informationen und Dienste, die Ihnen helfen, Ihr Produkt optimal zu verwenden.
Für die neueste Version der rekordbox-Software gehen Sie zu rekordbox.com und laden die Software von dort herunter.
Il sito Pioneer DJ indicato qui sopra offre una sezione FAQ, informazioni sul software ed informazioni e servizi
di vario tipo, per permettere un uso più confortevole dei nostri prodotti.
Per ottenere la più recente versione del software rekordbox, accedere a rekordbox.com e scaricare il software di lì.
Op bovengenoemde Pioneer DJ website vindt u FAQ's, informatie over software, en andere informatie en
diensten voor nog meer gebruiksgemak van uw product.
Ga voor de nieuwste versie van de rekordbox-software naar rekordbox.com en download de software van deze site.
El sitio de Pioneer DJ indicado más arriba tiene una sección con las preguntas más frecuentes, y además
ofrece información del software y varios tipos de información y servicios para que usted pueda usar su
producto con la mayor comodidad.
Para la versión más reciente del software rekordbox, acceda a rekordbox.com y descargue el software desde allí.
O site da Pioneer DJ mostrado acima oferece FAQs, informações sobre o software e outros tipos de
informações e serviços para permitir utilizar o produto com um maior conforto.
Para obter a versão mais recente do software rekordbox, aceda a rekordbox.com e transfira o software a partir daí.
Указанный выше сайт Pioneer DJ содержит ответы на часто задаваемые вопросы, информацию о
программном обеспечении и различную другую информацию, а также предлагает услуги, чтобы вы
могли с большим комфортом пользоваться приобретенным изделием.
Относительно самой последней версии программного обеспечения rekordbox зайдите на
rekordbox.com и загрузите оттуда программное обеспечение.
Operating Instructions (Quick Start Guide)
Mode d'emploi (Guide de démarrage rapide)
Bedienungsanleitung (Kurzanleitung)
Istruzioni per l'uso (Guida di avvio veloce)
Handleiding (Snelstartgids)
Manual de instrucciones (Guía de inicio rápido)
Manual de instruções (Guia de início rápido)
Инструкции по эксплуатации (Краткое руководство пользователя)
DJ Controller
Contrôleur pour DJ
DJ Controller
DJ Controller
DJ Controller
Controlador DJ
Controlador para DJ
DJ Контроллер
Advertisement
Chapters
Table of Contents

Related Manuals for Pioneer DDJ-RZ


Summary of Contents for Pioneer DDJ-RZ
- Page 1 Für die neueste Version der rekordbox-Software gehen Sie zu rekordbox.com und laden die Software von dort herunter. Il sito Pioneer DJ indicato qui sopra offre una sezione FAQ, informazioni sul software ed informazioni e servizi di vario tipo, per permettere un uso più confortevole dei nostri prodotti.
- Page 2 CAUTION Operating Environment TO PREVENT THE RISK OF ELECTRIC SHOCK, DO NOT Operating environment temperature and humidity: +5 °C to +35 °C (+41 °F to +95 °F); less than 85 %RH REMOVE COVER (OR BACK). NO USER-SERVICEABLE PARTS INSIDE. REFER SERVICING TO QUALIFIED (cooling vents not blocked) Do not install this unit in a poorly ventilated area, or in SERVICE PERSONNEL.
- Page 3 (2) this device must accept any interference received, including interference that may cause undesired operation. Product Name: DJ Controller Model Number: DDJ-RZ Responsible Party Name: PIONEER ELECTRONICS (USA) INC. SERVICE SUPPORT DIVISION Address: 1925 E. DOMINGUEZ ST. LONG BEACH, CA 90810-1003, U.S.A. Phone: 1-800-421-1404 URL: http://www.pioneerelectronics.com...
-
Page 4: Table Of Contents
Thank you for buying this Pioneer DJ product. Be sure to read this manual and the Operating Instructions that is available on the Pioneer DJ site. Both contain important information that you should understand before using this product. After you have finished reading the instructions, put them away in a safe place for future reference. -
Page 5: Before Start
3 Click the [Software & firmware updates] icon. 2 Click the [Support] icon. 4 Click the [DDJ-RZ] icon in the [CONTROLLER] category. 3 Click the [FIND TUTORIAL & MANUALS] icon. 5 After clicking [Drivers], download the latest driver software from the download page. -
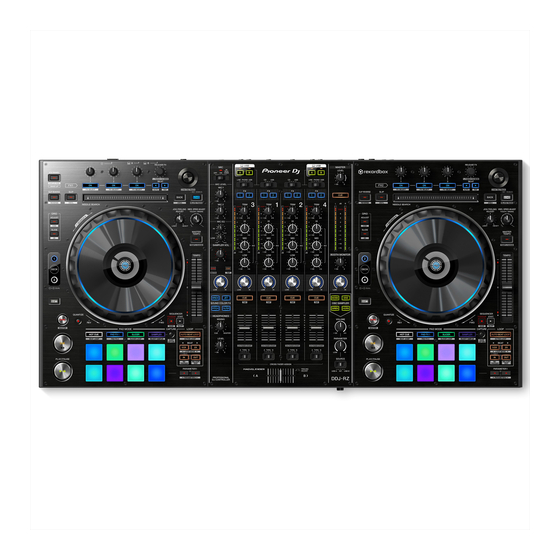
Page 6: Names Of Parts
Deck section Names of Parts This section is used to control the four decks. The buttons and controls For details on the functions of the various buttons and controls, see for operating decks 1 and 3 are located on the left side of the controller, Part names and functions in the Operating Instructions. -
Page 7: Mixer Section
o CUE button d SOURCE selector switch p QUANTIZE button e HEADPHONES LEVEL control q SYNC button f HEADPHONES MIXING control r SHIFT button g SOUND COLOR FX buttons s DECK 3 button h MIC COLOR control t DECK 1 button i SAMPLER SYNC button u GRID SLIDE button j SAMPLER CUE button... -
Page 8: Rear Panel
Rear panel 1 Kensington security slot 8 CD terminals 2 MASTER OUT 1 terminals 9 MIC1 terminal 3 MASTER OUT 2 terminals a MIC2 terminal 4 BOOTH OUT terminals b USB-B terminal 5 SIGNAL GND terminal c USB-A terminal 6 PHONO terminals switch 7 LINE terminals e AC IN terminal... -
Page 9: Connections
Connections Connect the power cord after all the connections between devices have been completed. Be sure to turn off the power and unplug the power cord from the power outlet whenever making or changing connections. Refer to the operating instructions for the component to be connected. Be sure to use the included power cord. -
Page 10: Connections
For information on using this product with rekordbox dj, refer to this 6 Press the [ ] switch on this unit’s rear panel to turn product’s operating instructions published on the Pioneer DJ site. this unit’s power on. 1 Connect headphones to one of the [PHONES] terminals. -
Page 11: Additional Information
Total harmonic distortion (20 Hz — 20 kHzBW) the items in the “Troubleshooting” section of this unit’s operating USB ....................0.002 % instructions and access the Pioneer DJ site and check [FAQ] for the CD/LINE ..................0.004 % [DDJ-RZ]. Standard input level / Input impedance http://www.pioneerdj.com/... - Page 12 Si vous souhaitez vous débarrasser de cet appareil, ne le mettez pas à la poubelle avec vos ordures ménagères. Il existe un système de collecte séparé pour les appareils électroniques usagés, qui doivent être récupérés, traités et recyclés conformément à la législation. Les habitants des états membres de l’UE, de Suisse et de Norvège peuvent retourner gratuitement leurs appareils électroniques usagés aux centres de collecte agréés ou à...
- Page 13 Merci d’avoir acheté ce produit Pioneer DJ. Veillez à lire ce manuel et le mode d’emploi disponible sur le site Pioneer DJ. Ces deux documents contiennent des informations importantes que vous devez comprendre avant d’utiliser ce produit. Cela fait, conservez le mode d’emploi de façon à pouvoir vous y référer en cas de nécessité.
-
Page 14: Informations Préliminaires
2 Cliquez sur l’icône [Support]. http://www.pioneerdj.com/ 3 Cliquez sur l’icône [Software & firmware updates]. 2 Cliquez sur l’icône [Support]. 4 Cliquez sur l’icône [DDJ-RZ] dans la catégorie 3 Cliquez sur l’icône [FIND TUTORIAL & MANUALS]. [CONTROLLER]. 4 Cliquez sur l’icône [DDJ-RZ] dans la catégorie 5 Cliquez sur [Drivers], puis téléchargez le pilote le plus... -
Page 15: Noms Des Éléments
Section Platines Noms des éléments Cette section permet de contrôler les quatre platines. Les touches et Pour plus de détails sur les fonctions des diverses touches et com- commandes utilisées pour l’exploitation des platines 1 et 3 se trouvent mandes, reportez-vous à Noms et fonctions des éléments dans le sur le côté... - Page 16 o Touche CUE d Sélecteur SOURCE p Touche QUANTIZE e Commande HEADPHONES LEVEL q Touche SYNC f Commande HEADPHONES MIXING r Touche SHIFT g Touches SOUND COLOR FX s Touche DECK 3 h Commande MIC COLOR t Touche DECK 1 i Touche SAMPLER SYNC u Touche GRID SLIDE j Touche SAMPLER CUE...
- Page 17 Panneau arrière 1 Fente de sécurité Kensington 8 Prises CD 2 Prises MASTER OUT 1 9 Prise MIC1 3 Prises MASTER OUT 2 a Prise MIC2 4 Prises BOOTH OUT b Prise USB-B 5 Prise SIGNAL GND c Prise USB-A 6 Prises PHONO d Commutateur 7 Prises LINE...
-
Page 18: Raccordements
Raccordements Lorsque tous les appareils ont été raccordés, vous pouvez brancher le cordon d’alimentation. Veillez à toujours éteindre les appareils et à débrancher le cordon d’alimentation de la prise secteur avant de raccorder un appareil ou de changer les liaisons. Reportez-vous au mode d’emploi de l’appareil devant être raccordé. -
Page 19: Raccordements
6 Appuyez sur le commutateur [ ] sur le panneau dj, reportez-vous au mode d’emploi de ce produit publié sur le site de arrière de cet appareil pour allumer l’appareil. Pioneer DJ. 1 Raccordez un casque à l’une des prises [PHONES]. Allumez cet appareil. -
Page 20: Informations Supplémentaires
Niveau de sortie nominal / Impédance de charge MASTER OUT 1 ..............24 dBu/10 k MASTER OUT 2 ..............20 dBu/10 k « Pioneer DJ » est une marque déposée de PIONEER CORPORATION Diaphonie qui est utilisée sous licence. CD/LINE ................... 82 dB Les noms de sociétés et de produits mentionnés ici sont des marques... - Page 22 Mischen Sie dieses Produkt, wenn Sie es entsorgen wollen, nicht mit gewöhnlichen Haushaltsabfällen. Es gibt ein getrenntes Sammelsystem für gebrauchte elektronische Produkte, über das die richtige Behandlung, Rückgewinnung und Wiederverwertung gemäß der bestehenden Gesetzgebung gewährleistet wird. Privathaushalte in den Mitgliedsstaaten der EU, in der Schweiz und in Norwegen können ihre gebrauchten elektronischen Produkte an vorgesehenen Sammeleinrichtungen kostenfrei zurückgeben oder aber an einen Händler zurückgeben (wenn sie ein ähnliches neues Produkt kaufen).
- Page 23 Zum Lesen dieser Anleitung Vielen Dank, dass Sie sich für dieses Pioneer DJ-Produkt entschie- den haben. Lesen Sie bitte unbedingt dieses Handbuch und die auf der Pioneer DJ-Website erhältliche Bedienungsanleitung. Beide enthalten wichtige Informationen, die Sie vor der Verwendung dieses Produkts verstehen sollten.
-
Page 24: Vor Der Inbetriebnahme
3 Klicken Sie auf das [Software & firmware 2 Klicken Sie auf das [Support]-Symbol. updates]-Symbol. 3 Klicken Sie auf das [FIND TUTORIAL 4 Klicken Sie auf das [DDJ-RZ]-Symbol in der & MANUALS]-Symbol. [CONTROLLER]-Kategorie. 4 Klicken Sie auf das [DDJ-RZ]-Symbol in der 5 Laden Sie nach dem Klicken auf [Drivers] die neueste [CONTROLLER]-Kategorie. -
Page 25: Bezeichnungen Der Teile
Deck-Sektion Bezeichnungen der Teile Diese Sektion dient zum Steuern der vier Decks. Die Tasten und Regler Einzelheiten zu den Funktionen der verschiedenen Tasten und Regler zur Bedienung von Deck 1 und 3 befinden sich an der linken Seite des finden Sie unter Bezeichnungen und Funktionen der Komponenten in Controllers, und die zur Bedienung von Deck 2 und 4 befinden sich an der Bedienungsanleitung. - Page 26 o CUE-Taste d SOURCE-Wahlschalter p QUANTIZE-Taste e HEADPHONES LEVEL Regler q SYNC-Taste f HEADPHONES MIXING Regler r SHIFT-Taste g SOUND COLOR FX-Tasten s DECK 3-Taste h MIC COLOR Regler t DECK 1-Taste i SAMPLER SYNC-Taste u GRID SLIDE-Taste j SAMPLER CUE-Taste v GRID ADJUST-Taste k SAMPLER VOL-Regler w SLIP-Taste...
- Page 27 Rückseite 1 Kensington-Diebstahlsicherung 8 CD-Buchsen 2 MASTER OUT 1-Buchsen 9 MIC1-Buchse 3 MASTER OUT 2-Buchsen a MIC2-Buchse 4 BOOTH OUT-Buchsen b USB-B-Buchse 5 SIGNAL GND-Buchse c USB-A-Buchse 6 PHONO-Buchsen Schalter 7 LINE-Buchsen e AC IN-Buchse Frontplatte 1 PHONES-Buchsen 2 CROSS FADER CURVE-Wahlschalter...
-
Page 28: Anschlussbeispiel
Anschlüsse Schließen Sie das Netzkabel an, nachdem alle Anschlüsse zwischen den Geräten vorgenommen wurden. Schalten Sie die Stromversorgung aus und ziehen Sie das Netzkabel aus der Netzsteckdose, bevor Sie Geräte anschließen oder die Anschlüsse ändern. Beachten Sie die Bedienungsanleitung der angeschlossenen Komponente. Verwenden Sie immer das mitgelieferte Netzkabel. - Page 29 Anschlüsse Einzelheiten zur Verwendung dieses Produkts mit rekordbox dj 5 Schließen Sie das Netzkabel an. finden Sie in der Bedienungsanleitung des Produkt auf der Pioneer DJ-Website. Zur Netzsteckdose Netzkabel 1 Schließen Sie Kopfhörer an eine der Buchsen (mitgeliefert) [PHONES] an.
-
Page 30: Zusätzliche Informationen
Überprüfen Sie die anderen verwendeten Komponenten und CD/LINE ..................0,004 % elektrischen Geräte. Wenn Sie das Problem nicht beheben können, Standard-Eingangspegel / Eingangsimpedanz wenden Sie sich an die nächste Pioneer-Kundendienststelle oder an CD/LINE ................–12 dBu/47 k Ihren Händler zum Ausführen der Reparaturarbeit. PHONO................–52 dBu/47 k Dieses Gerät kann möglicherweise aufgrund von statischer... - Page 32 Se si vuole eliminare questo prodotto, non gettarlo insieme ai rifiuti domestici. Esiste un sistema di raccolta differenziata in conformità alle leggi che richiedono appositi trattamenti, recupero e riciclo. I privati cittadini dei paesi membri dell’UE, di Svizzera e Norvegia, possono restituire senza alcun costo i loro prodotti elettronici usati ad appositi servizi di raccolta o a un rivenditore (se si desidera acquistarne uno simile).
- Page 33 Indice Come leggere questo manuale Vi ringraziamo per avere acquistato questo prodotto Pioneer DJ. Leggere questo manuale e le istruzioni operative presenti sul sito Pioneer DJ. Entrambi contengono importanti informazioni che è necessario comprendere prima di usare il prodotto. Dopo aver letto queste istruzioni, riporle in un luogo sicuro per poterle consultare di nuovo al momento del bisogno.
-
Page 34: Prima Di Cominciare
Download delle Istruzioni per l’uso di 1 Lanciare il web browser del proprio computer e questa unità raggiungere il sito Pioneer DJ indicato di seguito. http://www.pioneerdj.com/ 1 Lanciare il web browser del proprio computer e 2 Fare clic sull’icona [Support]. -
Page 35: Nome Delle Varie Parti
Nome delle varie parti Per dettagli sulle funzioni dei vari pulsanti e comandi, vedere Nome delle varie parti e funzioni nelle istruzioni per l’uso. 1 Sezione browser 2 Sezione deck 3 Sezione mixer 4 Sezione effetti 1 Sezione display della manopola 2 Jog dial Sezione browser 3 Pad NEEDLE SEARCH... - Page 36 r Pulsante SHIFT g Pulsanti SOUND COLOR FX s Pulsante DECK 3 h Controllo MIC COLOR t Pulsante DECK 1 i Pulsante SAMPLER SYNC u Pulsante GRID SLIDE j Pulsante SAMPLER CUE v Pulsante GRID ADJUST k Controllo SAMPLER VOL w Pulsante SLIP l Controlli EQ (HI, LOW) x Pulsante SLIP REVERSE...
- Page 37 Pannello posteriore 1 Slot di sicurezza Kensington 8 Terminali CD 2 Terminali MASTER OUT 1 9 Terminale MIC1 3 Terminali MASTER OUT 2 a Terminale MIC2 4 Terminali BOOTH OUT b Terminale USB-B 5 Terminale SIGNAL GND c Terminale USB-A 6 Terminali PHONO d Interruttore 7 Terminali LINE...
-
Page 38: Esempio Di Collegamenti
Collegamenti Collegare il cavo di alimentazione dopo che tutti i collegamenti fra dispositivi sono stati fatti. Prima di fare o modificare collegamenti, non mancare di spegnere l’apparecchio e di scollegare il cavo di alimentazione. Consultare le istruzioni per l’uso del componente da collegare. Usare solo il cavo di alimentazione accluso. -
Page 39: Collegamenti
Per informazioni sull’uso di questo prodotto con rekordbox dj, vedere 6 Premere l’interruttore [ ] del pannello posteriore di le istruzioni per l’uso pubblicate sul sito Pioneer DJ. questa unità per farla accendere. 1 Collegare la cuffia ad uno dei terminali [PHONES]. -
Page 40: Informazioni Aggiuntive
Se si ritiene che l’unità sia guasta, controllare la voci della sezione Distorsione armonica complessiva (20 Hz — 20 kHzBW) “Diagnostica” delle istruzioni per l’uso di questa unità e accedere al USB ....................0,002 % sito Pioneer DJ e selezionare [FAQ] per il [DDJ-RZ]. CD/LINE ..................0,004 % http://www.pioneerdj.com/ Livello/impedenza di ingresso standard A volte il problema risiede in un altro componente. - Page 42 Deponeer dit product niet bij het gewone huishoudelijk afval wanneer u het wilt verwijderen. Er bestaat een speciaal wettelijk voorgeschreven verzamelsysteem voor de juiste behandeling, het opnieuw bruikbaar maken en de recycling van gebruikte elektronische producten. In de lidstaten van de EU, Zwitserland en Noorwegen kunnen particulieren hun gebruikte elektronische producten gratis bij de daarvoor bestemde verzamelplaatsen of een verkooppunt (indien u aldaar een gelijkwaardig nieuw product koopt) inleveren.
-
Page 43: Aanvullende Informatie
Inhoud Opmerkingen over deze handleiding Hartelijk dank voor uw aankoop van dit Pioneer DJ product. Lees deze documentatie en de handleiding die beschikbaar is op de website van Pioneer DJ. Beide bevatten belangrijke informatie die u moet begrijpen voordat u dit product gaat gebruiken. -
Page 44: Alvorens Te Beginnen
3 Klik op het pictogram [Software & firmware updates]. 2 Klik op het pictogram [Support]. 4 Klik op het pictogram [DDJ-RZ] in de categorie [CONTROLLER]. 3 Klik op het pictogram [FIND TUTORIAL & MANUALS]. 5 Klik op [Drivers], en download het meest recente 4 Klik op het pictogram [DDJ-RZ] in de categorie stuurprogramma van de downloadpagina. -
Page 45: Benaming Van De Onderdelen
Deckgedeelte Benaming van de onderdelen Met dit gedeelte worden de vier decks bediend. De toetsen en instellin- Zie voor details over de functies van de toetsen en bedienings- gen voor het bedienen van deck 1 en 3 bevinden zich aan de linkerzijde elementen het gedeelte Overzicht van de bedieningstoetsen in de van de controller, en die voor het bedienen van deck 2 en 4 aan de rech- Handleiding. - Page 46 o CUE-toets d SOURCE-selectieschakelaar p QUANTIZE-toets e HEADPHONES LEVEL instelling q SYNC-toets f HEADPHONES MIXING instelling r SHIFT-toets g SOUND COLOR FX toetsen s DECK 3-toets h MIC COLOR-instelling t DECK 1-toets i SAMPLER SYNC-toets u GRID SLIDE-toets j SAMPLER CUE-toets v GRID ADJUST-toets k SAMPLER VOL-instelling w SLIP-toets...
- Page 47 Achterpaneel 1 Kensington-beveiligingsgleuf 8 CD aansluitingen 2 MASTER OUT 1-aansluitingen 9 MIC1-aansluiting 3 MASTER OUT 2-aansluitingen a MIC2-aansluiting 4 BOOTH OUT-aansluitingen b USB-B aansluiting 5 SIGNAL GND aansluiting c USB-A aansluiting 6 PHONO aansluitingen -schakelaar 7 LINE aansluitingen e AC IN-aansluiting Voorpaneel 1 PHONES-aansluitingen 2 CROSS FADER CURVE-keuzeschakelaar...
-
Page 48: Aansluitvoorbeeld
Aansluitingen Sluit het netnoer pas aan nadat alle aansluitingen tussen de apparatuur volledig zijn gemaakt. Schakel altijd eerst de stroom uit en trek de stekker uit het stopcontact alvorens u enige aansluiting maakt of verbreekt. Zie tevens de gebruiksaanwijzingen van de aan te sluiten apparatuur. Gebruik alleen het bijgeleverde netsnoer. - Page 49 Voor informatie over het gebruik van dit product met rekordbox dj, 5 Sluit het netsnoer aan. raadpleeg de handleiding voor dit product die gepubliceerd is op de website van Pioneer DJ. Naar stopcontact Stroomsnoer 1 Sluit een hoofdtelefoon aan op één van de (meegeleverd) [PHONES]-aansluitingen.
-
Page 50: Instellingen Aanpassen
MIC1 ....................84 dB onderwerpen in het gedeelte voor probleemoplossing van deze hand- MIC2 ....................84 dB leiding, en bezoek de Pioneer DJ website en lees het gedeelte [FAQ] Totale harmonische vervorming (20 Hz — 20 kHzBW) voor de [DDJ-RZ]. - Page 52 PRECAUCIÓN PRECAUCIÓN PARA LA VENTILACIÓN PARA PREVENIR EL PELIGRO DE CHOQUE ELÉCTRICO Cuando instale este aparato, asegúrese de dejar NO REMOVER LA TAPA NI LAS PARTES DENTRO NO espacio en torno al mismo para la ventilación con el fin UTILIZADAS, LLAMAR UNA PERSONA CUALIFICADA. de mejorar la disipación de calor (por lo menos 5 cm encima, 5 cm detrás, y 5 cm en cada lado).
- Page 53 Cómo leer este manual Gracias por adquirir este producto Pioneer DJ. Asegúrese de leer este manual y el Manual de instrucciones que está disponible en el sitio de Pioneer DJ. Ambos contienen infor- mación importante que debe comprender antes de utilizar este producto.
-
Page 54: Antes De Empezar A Usar La Unidad
1 Inicie un navegador de Web en el ordenador y acceda 3 Haga clic en el icono [Software & firmware updates]. al sitio de Pioneer DJ de abajo. 4 Haga clic en el icono [DDJ-RZ] de la categoría http://www.pioneerdj.com/ [CONTROLLER]. -
Page 55: Nombres De Las Partes
Sección de deck Nombres de las partes Esta sección se usa para controlar los cuatro decks. Los botones y con- Para más información sobre las funciones de los diferentes botones troles para operar los decks 1 y 3 están situados en el lado izquierdo del y controles, consulte Nombres y funciones de los controles en el controlador, los que se usan para operar los decks 2 y 4 están situados manual de instrucciones. - Page 56 o Botón CUE d Conmutador selector SOURCE p Botón QUANTIZE e Control HEADPHONES LEVEL q Botón SYNC f Control HEADPHONES MIXING r Botón SHIFT g Botones SOUND COLOR FX s Botón DECK 3 h Control MIC COLOR t Botón DECK 1 i Botón SAMPLER SYNC u Botón GRID SLIDE j Botón SAMPLER CUE...
- Page 57 Panel trasero 1 Ranura de seguridad Kensington 8 Terminales CD 2 Terminales MASTER OUT 1 9 Terminal MIC1 3 Terminales MASTER OUT 2 a Terminal MIC2 4 Terminales BOOTH OUT b Terminal USB-B 5 Terminal SIGNAL GND c Terminal USB-A 6 Terminales PHONO d Conmutador 7 Terminales LINE...
-
Page 58: Ejemplo De Conexiones
Conexiones Conecte el cable de alimentación después de terminar las conexiones entre los aparatos. Asegúrese de desconectar la alimentación y desenchufar el cable de alimentación de la toma de corriente siempre que haga o cambie conexiones. Consulte el manual de instrucciones del componente que va a ser conectado. Asegúrese de usar el cable de alimentación incluido. - Page 59 6 Pulse el conmutador [ ] del panel trasero de esta dj, consulte el manual de instrucciones del producto publicado en el unidad para conectar su alimentación. sitio de Pioneer DJ. 1 Conecte auriculares a uno de los terminales [PHONES]. Conecte la alimentación de esta unidad.
-
Page 60: Información Adicional
“Solución de problemas” del manual de ins- Nivel de entrada / Impedancia de entrada estándar trucciones de esta unidad y acceda al sitio de Pioneer DJ y consulte CD/LINE ................–12 dBu/47 k [FAQ] para el [DDJ-RZ]. - Page 62 Se quiser eliminar este produto, não o misture com resíduos domésticos gerais. Existe um sistema de recolha separado para produtos eletrónicos usados de acordo com a legislação que requer tratamento, recuperação e reciclagem adequados. Os consumidores dos Estados-membros da UE, da Suíça e da Noruega podem entregar equipamentos eletrónicos fora de uso em determinadas instalações de recolha ou a um retalhista (se adquirirem um equipamento novo similar).
- Page 63 Obrigado por adquirir este produto da Pioneer DJ. Certifique-se de que lê este manual e o Manual de instruções que está disponível no site da Pioneer DJ. Ambos incluem informações importantes que deve compreender antes de utilizar este produto. Após terminar de ler as instruções, coloque-as num local seguro para futura referência.
-
Page 64: Antes De Começar
2 Clique no ícone [Support]. funcionamento desta unidade 3 Clique no ícone [Software & firmware updates]. 4 Clique no ícone [DDJ-RZ] na categoria [CONTROLLER]. 1 Inicie um browser Web no computador e aceda ao site da Pioneer DJ abaixo. 5 Após clicar em [Drivers], transfira o software http://www.pioneerdj.com/... -
Page 65: Nome Das Peças
Secção do deck Nome das peças Esta secção é utilizada para controlar os quatro decks. Os botões e con- Para obter mais informações sobre as funções dos diversos botões trolos para operar os decks 1 e 3 estão localizados no lado esquerdo do e controlos, consulte Nomes de peças e funções no Manual de controlador e os utilizados para operar os decks 2 e 4 estão localizados instruções. - Page 66 o Botão CUE d Interruptor seletor SOURCE p Botão QUANTIZE e Controlo HEADPHONES LEVEL q Botão SYNC f Controlo HEADPHONES MIXING r Botão SHIFT g Botões SOUND COLOR FX s Botão DECK 3 h Controlo MIC COLOR t Botão DECK 1 i Botão SAMPLER SYNC u Botão GRID SLIDE j Botão SAMPLER CUE...
- Page 67 Painel posterior 1 Ranhura de segurança Kensington 8 Terminais CD 2 Terminais MASTER OUT 1 9 Terminal MIC1 3 Terminais MASTER OUT 2 a Terminal MIC2 4 Terminais BOOTH OUT b Terminal USB-B 5 Terminal SIGNAL GND c Terminal USB-A 6 Terminais PHONO d Interruptor 7 Terminais LINE...
-
Page 68: Exemplo De Ligações
Ligações Ligue o fio elétrico depois de terminar de fazer todas as conexões entre os dispositivos. Certifique-se de desligar a energia e desligar o fio da tomada sempre que fizer ou mudar as conexões. Consulte as instruções de funcionamento do componente a ligar. Certifique-se de que utiliza o cabo de alimentação incluído. - Page 69 6 Prima o interruptor [ ] no painel posterior desta rekordbox dj, consulte as instruções de funcionamento deste produto unidade para ligar a alimentação desta unidade. publicadas no site da Pioneer DJ. 1 Ligue auscultadores a um dos terminais [PHONES]. Ligue a alimentação desta unidade.
-
Page 70: Alterar As Configurações
PHONO.................... 90 dB os pontos da secção “Resolução de problemas” das instruções de MIC1 ....................84 dB funcionamento desta unidade e aceda ao site da Pioneer DJ para MIC2 ....................84 dB consultar as [FAQ] do [DDJ-RZ]. Distorção total de harmónicas (20 Hz — 20 kHzBW) http://www.pioneerdj.com/... - Page 72 Если вы желаете утилизировать данное изделие, не выбрасывайте его вместе с обычным бытовым мусором. Существует отдельная система сбора использованных электронных изделий в соответствии с законодательством, которая предполагает соответствующее обращение, возврат и переработку. Чacтные клиенты-в странах-членах ЕС, в Швейцарии и Норвегии могут бесплатно возвращать использованные электронные изделия в...
- Page 73 Files MIC1])
- Page 74 — — ® ® Support]. DDJ-RZ Support]. CONTROLLER]. Drivers DDJ-RZ CONTROLLER].
- Page 75 NEEDLE SEARCH JOG FEELING ADJUST VINYL SPEED ADJUST MASTER TEMPO BACK TEMPO LOAD AUTO BEAT LOOP LOOP 1/2X LOOP 2X LOOP IN LOOP OUT PARAMETER PARAMETER SEQUENCER START SEQUENCER OVERDUB HOT CUE PAD FX1 SLICER SAMPLER CAPTURE PLAY/PAUSE...
- Page 76 SOURCE QUANTIZE HEADPHONES LEVEL SYNC HEADPHONES MIXING SHIFT SOUND COLOR FX DECK 3 MIC COLOR DECK 1 SAMPLER SYNC GRID SLIDE SAMPLER CUE GRID ADJUST SAMPLER VOL SLIP EQ HI LOW) SLIP REVERSE MIC2 FX PANEL MIC1 CD, USB LINE, PHONO, USB FX 1 FX 2 TRIM...
- Page 77 MASTER OUT 1 MIC1 MASTER OUT 2 MIC2 BOOTH OUT USB-B SIGNAL GND USB-A PHONO LINE AC IN PHONES CROSS FADER CURVE...
- Page 78 DJ проигрыватель DJ проигрыватель DJ проигрыватель Аналоговый Переносное проигрыватель аудиоустройство AUDIO OUT CONT К розетке Силовой кабель (поставляется) Микрофон Микрофон Компьютер Переносное Аналоговый проигрыватель аудиоустройство DJ проигрыватель Компоненты, усилители, активные громкоговорители, др. Наушники Усилитель напряжения, Усилитель напряжения активные громкоговорители, др. (для...
- Page 79 К розетке Силовой кабель (поставляется) PHONES]. MASTER OUT 1 MASTER OUT 2]. Активные громкоговорители, др. BOOTH OUT BOOTH OUT USB кабель (поставляется)
- Page 80 USB CD/LINE MIC1 MIC2 CD/LINE PHONO MIC1 MIC2 DDJ-RZ CD/LINE CD/LINE PHONO MIC1 MIC2 MASTER OUT 1 MASTER OUT 2 BOOTH OUT PHONES MASTER OUT 1 MASTER OUT 2 CD/LINE CD/LINE PHONO MIC1 MIC2 MASTER OUT 1 MASTER OUT 2...
- Page 82 Примечание: Корпорация Пайонир Диджей устанавливает следующую продолжительность срока службы официально поставляемых на Российский рынок товаров. Аудио и видеооборудование: 7 лет Переносное аудиооборудование: 6 лет Другое оборудование (наушники, микрофон и т.д.): 5 лет D3-7-10-6_A1_Ru Информация для покупателей в ЕАЭС: Уполномоченной организацией в соответствии с требованиями ТР ТС 004/2011, 020/2011, 017/2011 является...
- Page 84 1-1, Син-Огура, Сайвай-ку, г. Кавасаки, префектура Канагава, 212-0031, Япония Arab Emirates TEL: 971-4-8815756 Pioneer DJ Europe Limited PIONEER ELECTRONICS DE MEXICO S.A. DE C.V. Anteros Building, Odyssey Business Park, West End Road,South Ruislip, Middlesex, HA4 Blvd.Manuel Avila Camacho 138 10 piso Col.Lomas de Chapultepec, 6QQ, U.K.
Need help?
Do you have a question about the DDJ-RZ and is the answer not in the manual?
Questions and answers