
Related Manuals for Pioneer DDJ-FLX4


Summary of Contents for Pioneer DDJ-FLX4
- Page 1 Instruction Manual DJ Controller DDJ-FLX4 pioneerdj.com/support/ rekordbox.com serato.com For FAQ and other support information for this product, visit the websites above.
-
Page 2: How To Read This Manual
How to read this manual Thank you for choosing this Pioneer DJ product. Be sure to read this manual, the “Quick Start Guide” and the “Precautions for Use” which are included with this product. These documents include important information that you should understand before using the unit. -
Page 3: What's In The Box
What’s in the box • USB cable • Warranty (for some regions)* • Quick Start Guide • Precautions for Use * Only products in North America and Europe. -
Page 4: Table Of Contents
Contents How to read this manual ............... 2 What’s in the box ................3 Before you start................. 6 User guides................... 6 DJ software................... 7 Part names and functions ............10 Top panel..................11 Browse section ................12 Deck section ................15 Mixer section................ - Page 5 rekordbox for iOS/Android ........... 107 Installing rekordbox for iOS/Android ......... 107 Basic use .................. 109 Advanced use ................120 Changing the settings in rekordbox for iOS/Android....140 Changing the settings............144 Launching Utilities mode............144 Utilities mode settings............... 145 ® Changing the Bluetooth MIDI device name ......
-
Page 6: Before You Start
Before you start User guides rekordbox Introduction, Instruction Manual Refer to the “rekordbox Introduction” to find out how to set up rekordbox for Mac/Windows, and see the “rekordbox Instruction Manual” to find out how to use rekordbox for Mac/Windows. rekordbox.com/manual Serato DJ Lite software manual Visit the Serato DJ Lite website. -
Page 7: Dj Software
Before you start DJ software rekordbox for Mac/Windows • rekordbox for Mac/Windows is a complete DJ application you can use to manage your music and perform. • Even if you don’t have a paid subscription plan, you can use Performance mode by connecting this unit to your PC/Mac with rekordbox for Mac/Windows installed. - Page 8 Before you start Serato DJ Lite Serato DJ Lite is DJ software from Serato Limited. This unit unlocks the software, which you can download from the Serato website. serato.com/dj/lite/downloads • If you haven’t registered an account, follow the steps below. –...
- Page 9 Before you start rekordbox for iOS/Android • rekordbox for iOS/Android is a mobile device application you can use to manage your music and perform. • By connecting a mobile device running rekordbox for iOS/Android to the unit via a USB cable or Bluetooth, you can perform with music files stored on the device or from a compatible streaming service.
-
Page 10: Part Names And Functions
Part names and functions This unit supports the following DJ software. • rekordbox for Mac/Windows • rekordbox for iOS/Android • Serato DJ Lite • Serato DJ Pro (paid license needed.) The following section shows functions of rekordbox for Mac/Windows, rekordbox for iOS/Android, and Serato DJ Lite separately. About “... -
Page 11: Top Panel
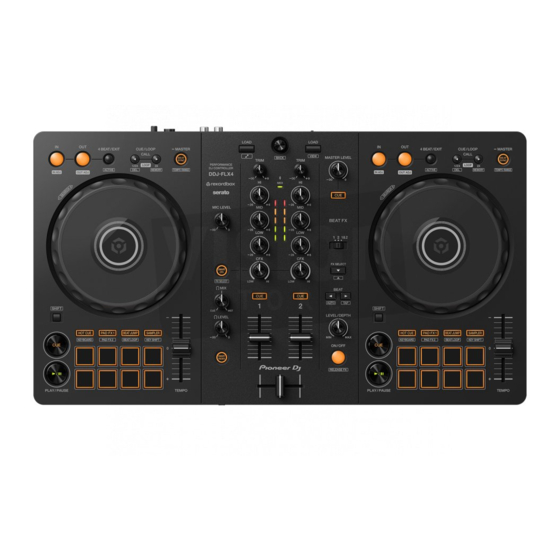
Part names and functions Top panel 1 Browse section Selects tracks and loads them to the decks. 2 Deck sections Control each deck. There are knobs and buttons on the left side to control deck 1, and on the right side to control deck 2. 3 Mixer section Controls the level adjustment for each channel, track mixing, etc. -
Page 12: Browse Section
Part names and functions Browse section Using rekordbox for Mac/Windows or rekordbox for iOS/ Android 1 LOAD buttons Press: Load the selected track to the respective deck. Mac/Windows Press twice: Load the track from the deck that isn’t playing onto the deck that is playing. If you do this while the track is playing, it plays from the same position (Instant Doubles). - Page 13 Part names and functions 2 Rotary selector Turn: Moves the cursor in rekordbox. Mac/Windows [SHIFT] + turn: Enlarges or shrinks the enlarged waveform in rekordbox. Turn to the right to enlarge, or the left to shrink it. Press: Mac/Windows Moves the cursor between the tree view and track list each time you press the button.
- Page 14 Part names and functions Using Serato DJ Lite 1 LOAD buttons Press: Load the selected track to the respective deck. Press twice: Load the track from the deck that isn’t playing onto the deck that is playing. If you do this while the track is playing, it plays from the same position (Instant Doubles).
-
Page 15: Deck Section
Part names and functions Deck section Using rekordbox for Mac/Windows or rekordbox for iOS/ Android 1 IN button Press: Sets the loop in point. Press (during loop playback): Adjusts the loop in point using the jog wheel. 2 OUT button Press: Sets the loop out point, and loop playback begins. - Page 16 Part names and functions Press (during loop playback): Adjusts loop out point using the jog wheel. 3 4 BEAT/EXIT button Press: Starts Auto Beat Loop of 4 beats. Press (during loop playback): Cancels loop playback. [SHIFT] + press: Sets/cancels the loop nearest the playback position as Active Loop. This is enabled for loops saved on the track or set in Hot Cue mode.
- Page 17 Part names and functions [SHIFT] + press: During cue standby, saves the cue point. During loop playback, saves the loop. 6 BEAT SYNC button Press: Automatically synchronizes the tempo (BPM) and beatgrid with the deck set as the master. Press (during Beat Sync): Cancels Beat Sync.
- Page 18 Part names and functions Read more: Using Keyboard mode (page 62) 9 PAD FX1 mode button Press: Enters Pad FX mode 1. Read more: Using Pad FX (page 58) [SHIFT] + press: Enters Pad FX mode 2. Read more: Using Pad FX (page 58) 10 BEAT JUMP mode button Press:...
- Page 19 Part names and functions 13 PLAY/PAUSE button Press: Plays/pauses a track. 14 CUE button Press: Sets, calls up, and plays a cue point. • Press the button when the track is paused to set the cue point. • Press the button when the track is playing to return to the cue point and pause.
- Page 20 Part names and functions iOS/Android Turn the outer section: Bends the pitch (Pitch Bend – slows down or speeds up the track). [SHIFT] + turn the top: Fast-forward or fast-reverse the track with extra speed. Using Serato DJ Lite 1 IN button Press: Sets the loop in point.
- Page 21 Part names and functions 4 CUE/LOOP CALL button Press (during loop playback): Halves the loop playback length. Serato DJ Pro Press: Selects the loop slot. 5 CUE/LOOP CALL button Press (during loop playback): Doubles the loop playback length. Serato DJ Pro Press: Selects the loop slot.
- Page 22 Part names and functions 8 HOT CUE mode button Press: Enters Hot Cue mode. Read more: Using Hot Cues (page 92) Serato DJ Pro [SHIFT] + press: Enters Pitch Play mode. Read more: Using Pitch Play (page 96) 9 PAD FX1 mode button Press: Enters Pad FX mode.
- Page 23 Part names and functions Serato DJ Pro [SHIFT] + press: Enters Key Shift mode. Read more: Using Key Shift (page 99) 12 Performance Pads Press: You can use Performance Pads to trigger various features. Read more: Using the Performance Pads (page 92) 13 PLAY/PAUSE ...
- Page 24 Part names and functions 16 Jog wheel Turn the top when Vinyl mode is on: Scratches the track. Turn the outer section or turn the top when Vinyl mode is off: Bends the pitch (Pitch Bend – slows down or speeds up the track). [SHIFT] + turn the top: Fast-forward or fast-reverse the track with extra speed when Vinyl mode is on.
-
Page 25: Mixer Section
Part names and functions Mixer section Using rekordbox for Mac/Windows or rekordbox for iOS/ Android 1 TRIM knobs Adjust the volume of each channel’s sound. 2 MASTER LEVEL knob Adjusts the volume of the master output sound. 3 Headphones CUE button (master) Press: Plays the master sound through your headphones. - Page 26 Part names and functions Turns off: The unit has recognized the connection with a DJ application using the USB cable. • When using rekordbox for iOS/Android with the unit being powered via the USB port of your PC/Mac, do not start a DJ application on your PC/Mac. 5 Channel level indicators Indicate the volume of the sound of the respective channels before it passes through the channel faders.
- Page 27 Part names and functions 9 SMART CFX button Press: Mac/Windows Turns Smart CFX mode on/off. iOS/Android Turns Sound Color FX on/off. [SHIFT] + press: Mac/Windows Changes the preset for Smart CFX. iOS/Android Changes the Sound Color FX type. 10 Headphones CUE buttons (channel) Press: Play the sound of the relevant channel through your headphones.
- Page 28 Part names and functions 14 Channel faders Slide: Adjust the volume of the sound for each channel. [SHIFT] + slide: Triggers Fader Start. 15 Crossfader Slide: Adjusts the sound balance between the left and right channels depending on the crossfader curve setting. [SHIFT] + slide: Triggers Fader Start.
- Page 29 Part names and functions 6 EQ (HI, MID, LOW) knobs Boost or reduce the relevant frequency for the selected channel. 7 MIC LEVEL knob Adjusts the volume of input sound from the [MIC] input terminal. 8 CFX knobs When the [SMART CFX] button is off: Control the filter effect for each channel.
- Page 30 Part names and functions 11 HEADPHONES MIX knob Adjusts the monitor volume balance between sounds from the channels which have the headphones [CUE] button pressed, and the master channel. 12 HEADPHONES LEVEL knob Adjusts the level of the headphones sound. 13 SMART FADER button Press: Turns Smart Fader mode (Preset 1) on/off.
-
Page 31: Effects Section
Part names and functions Effects section Using rekordbox for Mac/Windows or rekordbox for iOS/ Android 1 BEAT FX CH SELECT switch Slide: Changes the channel that Beat FX will be applied to. 2 BEAT FX SELECT button Press: Changes the Beat FX each time the button is pressed. [SHIFT] + press: Changes the Beat FX in the reverse order each time the button is pressed. - Page 32 Part names and functions 4 BEAT button Press: Increases the number of beats for synchronizing the Beat FX sound each time the button is pressed. [SHIFT] + press: Sets the Beat FX Tempo mode to BPM Tap mode. The BPM used as the basis for Beat FX is set in time with your tapping of the button.
- Page 33 Part names and functions 3 BEAT button Press: Decreases the number of beats for synchronizing the FX sound each time the button is pressed. [SHIFT] + press: Sets the FX Tempo mode to BPM Auto mode. The track’s BPM is used as the basis for the FX tempo.
-
Page 34: Rear Panel
Part names and functions Rear panel 1 USB port (for power supply) Connection for a USB power adapter (not supplied) or mobile battery (not supplied). • Use a USB cable certified to the appropriate standard. • When using a USB hub, be sure it's a product recommended by the manufacturer of your PC/Mac. - Page 35 Part names and functions 4 MASTER output terminals (RCA pin jack type) Connection for a powered speaker, a power amplifier, etc. • Compatible with RCA pin jack-type unbalanced outputs. 5 MIC input terminal (1/4" TS Jack) Connection for a microphone. •...
-
Page 36: Front Panel
Part names and functions Front panel (headphones) output terminal Connection for your headphones. Stereo mini phone plugs (ø 3.5 mm) can be used with the unit. • Only use headphones with 32 Ω or more impedance. Headphones with impedance lower than 32 Ω won’t work with the unit. -
Page 37: Connections
Connections • Be sure to disconnect the USB cable before connecting different devices or changing connections. Refer to the instruction manuals for devices to be connected. • For connection to PC/Mac or a mobile device, be sure to use the USB cable specified below. - Page 38 Connections • When using the unit with a USB power adapter or mobile battery connected to the USB port (for power supply), make sure it has a maximum voltage of 24V or less and DC 9V 3A. Use a USB cable certified to the appropriate standard. Use a mobile battery without a power-saving function.
-
Page 39: Connection Examples
Connections Connection examples Connecting input / output terminals Rear panel For PC/Mac (1) PC/Mac (2) Powered speakers, power amplifier, etc. (3) Microphone... - Page 40 Connections For a mobile device (1) USB power adapter, mobile battery (2) Mobile device (3) Powered speakers, power amplifier, etc. (4) Microphone DC 9V 3A Front panel (1) Headphones...
- Page 41 Connections Connecting 1 Connect your headphones to the headphones output terminal. • Only connect headphones with 32 Ω or more impedance. Headphones with impedance lower than 32 Ω won’t work with the unit. 2 Connect powered speakers, a power amplifier, etc. to the [MASTER] output terminals.
- Page 42 Connections 3 Connect your PC/Mac or mobile device to the USB port (for device connection) via a USB cable. 4 Turn on your PC/Mac or mobile device. 5 When using with a mobile device, connect a USB power adapter or mobile battery to the USB port (for power supply).
- Page 43 Connections Connecting via Bluetooth You can connect your mobile device via Bluetooth. Sound does not output from the unit via Bluetooth. Instead, connect a cable from the mobile device to an audio output device before use. DC 9V 3A Connecting to an audio device (example 1) In this example, the master sound plays in stereo and there is no sound output to the headphones.
- Page 44 Connections Connecting to an audio output device (example 2) In this example, the master sound and the headphones monitor sound both play in mono. (1) Speaker with built-in amplifier, etc. (2) Headphones (3) Plug for the speaker with built-in amplifier, etc. (4) Plug for the headphones (5) Split cable (not supplied) (6) USB/Lightning to 3.5 mm headphones jack (not supplied)
-
Page 45: Rekordbox For Mac/Windows
rekordbox for Mac/Windows Installing rekordbox for Mac/Windows Getting started with rekordbox for Mac/Windows If you’re using rekordbox for Mac/Windows for the first time, download the latest version from rekordbox.com and install it in the following way. If you already have rekordbox for Mac/Windows installed, update to the latest version using the Update Manager which you’ll see when you start rekordbox for Mac/Windows. - Page 46 rekordbox for Mac/Windows 3 Read the terms of the License Agreement carefully and if you agree to them, click [Agree]. • If you do not agree to the contents of the License Agreement, click [Disagree] to cancel the installation. 4 When the screen for completing the installation appears, click [Close] to end the installation.
- Page 47 rekordbox for Mac/Windows 3 Read the terms of the License Agreement carefully and if you agree to them, select [Agree], then click [Next]. • If you do not agree to the contents of the license agreement, click [Cancel] to cancel the installation. •...
-
Page 48: Basic Use
Mac/Windows Basic use Starting rekordbox for Mac/Windows You need to register a Pioneer DJ account to use rekordbox for Mac/ Windows. For details, see “rekordbox Introduction”. For Mac In Finder, open the [Applications] folder, then double-click the [rekordbox 6] > [rekordbox.app] icon. - Page 49 Windows are set as follows: For Mac [Audio]: [DDJ-FLX4] [Output channels]: [Master Output]: [DDJ-FLX4 : MASTER + audio device name on Mac] [Headphones Output]: [DDJ-FLX4 : PHONES] • When PC MASTER OUT is off, [Master Output] in the [Audio] setting is [DDJ-FLX4 : MASTER].
- Page 50 rekordbox for Mac/Windows Adding music files into your Collection The [Collection] screen contains a list of music files managed by rekordbox for Mac/Windows. Add music files on your PC/Mac to your Collection so the software can analyze them and they can be used in rekordbox for Mac/Windows. 1 Click [Collection] on the tree view.
- Page 51 rekordbox for Mac/Windows Playing a track This section explains how to play sound from deck 1 (left) as an example. 1 Set the positions of the knobs, etc. as follows: • [TRIM] knob: turned fully counterclockwise • EQ [HI/MID/LOW] knobs: center position (12 o’clock) •...
- Page 52 PC/Mac instead of using the [MASTER LEVEL] knob. • If you can’t output sound from the [MASTER] output terminals or the unit isn’t recognized by your PC/Mac, refer to the [FAQ] on the Pioneer DJ support website. pioneerdj.com/support/...
- Page 53 rekordbox for Mac/Windows Monitoring with headphones This section explains how to play sound from deck 1 (left) as an example. 1 Set the positions of knobs, etc. as shown below. • [HEADPHONES MIX] knob: Center • [HEADPHONES LEVEL] knob: Turned fully counterclockwise 2 Press the headphones [CUE] button for channel 1.
-
Page 54: Advanced Use
rekordbox for Mac/Windows Advanced use Using 4 Beat Loop While a track is playing, press the [4 BEAT/EXIT] button. Loop playback starts with 4 beats from the point where you press the button. • When the Quantize function is turned on, you might notice a slight delay as the loop synchronizes to the beat. - Page 55 rekordbox for Mac/Windows Cutting the loop Press the [CUE/LOOP CALL ] button during loop playback. Each time you press the button, the loop cuts in half. • You can cut the loop length in half even during 4 Beat Loop playback. ...
- Page 56 rekordbox for Mac/Windows Using the Performance Pads Using Hot Cues You can start playback instantly from the position where a Hot Cue is set. Loops can also be set and called up instantly. • Up to 16 Hot Cues can be set and saved for each track in rekordbox for Mac/Windows.
- Page 57 rekordbox for Mac/Windows Setting and calling up 4 Beat Loop 1 Press the [HOT CUE] mode button. The unit enters Hot Cue mode. 2 Press and hold the [4 BEAT/EXIT] button during playback. A loop with 4 beats is set at the position where you pressed the button, and loop playback starts.
- Page 58 rekordbox for Mac/Windows Using Pad FX You can add a wide range of effects to your performances simply by pressing and releasing the Performance Pads. 1 Turn on Pad FX mode 1 or Pad FX mode 2. • Pad FX mode 1: Press the [PAD FX1] mode button. •...
- Page 59 rekordbox for Mac/Windows 2 Press and hold down a Performance Pad, or press and hold down a Performance Pad while holding the [SHIFT] button. The effect turns on. The sound changes according to the type of effect and the number of beats in the settings assigned to that pad. 3 Release the Performance Pad.
- Page 60 rekordbox for Mac/Windows 1: 1 beat (left direction), 2: 1 beat (right direction), 3: 2 beats (left direction), 4: 2 beats (right direction), 5: 4 beats (left direction), 6: 4 beats (right direction), 7: 8 beats (left direction), 8: 8 beats (right direction) 2 Press Performance Pad 7 or 8 while holding the [SHIFT] button to change the number of beats set to the Performance Pad.
- Page 61 rekordbox for Mac/Windows Loading a track into a Sampler slot 1 Press the [SAMPLER] mode button. The unit enters Sampler mode. 2 Click the button at the right of [BANK] on the [SAMPLER] panel in rekordbox for Mac/Windows to change the Sampler bank. In rekordbox for Mac/Windows, the sampler has 4 banks, and each bank has 16 slots.
- Page 62 rekordbox for Mac/Windows • Sampler slots are set to Performance Pads as follows. (The slots in brackets are for when the Pad mode of deck 2 is set to Sampler mode.) 1: Slot 1 (slot 9), 2: Slot 2 (slot 10), 3: Slot 3 (slot 11), 4: Slot 4 (slot 12), 5: Slot 5 (slot 13), 6: Slot 6 (slot 14), 7: Slot 7 (slot 15), 8: Slot 8 (slot 16) 5 During Sampler playback, press the Performance Pad again.
- Page 63 rekordbox for Mac/Windows When the Hot Cue is selected, the various pitches are set to the Performance Pads as follows (Default): 1: +4 Semitones, 2: +5 Semitones, 3: +6 Semitones, 4: +7 Semitones, 5: ±0 Semitones, 6: +1 Semitone, 7: +2 Semitones, 8: +3 Semitones A semitone is a unit used to determine the pitch of a sound.
- Page 64 rekordbox for Mac/Windows Using Beat Loop If you press a Performance Pad, a loop with the number of beats assigned to the pad is set. The loop keeps playing after you remove your finger from the pad. 1 Press the [BEAT JUMP] mode button while holding the [SHIFT] button.
- Page 65 rekordbox for Mac/Windows Using Key Shift When you press a Performance Pad in Key Shift mode, the key of the track that’s currently playing is changed to the pitch set to the pressed pad. 1 Press the [SAMPLER] mode button while holding the [SHIFT] button.
- Page 66 rekordbox for Mac/Windows Setting and calling up a cue point or loop point Setting a cue point or loop point 1 Pause the track and move the playback position to where you want to set a cue point or loop point. 2 Press the [CUE] button while the track is paused.
- Page 67 rekordbox for Mac/Windows Using Fader Start Using Channel Fader Start 1 Set the cue point. Pause the track at the position you want to start playback from, then press the [CUE] button on that deck. 2 While holding the [SHIFT] button, move the channel fader from the bottom to the top.
- Page 68 rekordbox for Mac/Windows Analyzing tracks Track analysis starts when you drag and drop a music file, or a folder containing music files, into the Track List in rekordbox for Mac/ Windows. • If a track is loaded to a deck before analysis is complete, it may take some time to display its BPM and waveform.
- Page 69 rekordbox for Mac/Windows 4 Press the [BEAT ] or [BEAT ] button. Set the number of beats (or parameters) synchronized to the effect sound. 5 Press the [BEAT FX ON/OFF] button. The Beat FX is applied to the sound of the channel you set in step 3. You can adjust the parameter of Beat FX by turning the [BEAT FX LEVEL/ DEPTH] knob.
- Page 70 rekordbox for Mac/Windows Using Smart CFX 1 Press the [SMART CFX] button while holding the [SHIFT] button. The preset screen for Smart CFX is displayed to change the effect type. 2 Press the [SMART CFX] button. Smart CFX turns on. 3 Turn the [CFX] knob.
- Page 71 rekordbox for Mac/Windows Using Smart Fader 1 Load tracks onto deck 1 and deck 2. 2 Press the [SMART FADER] button. Smart Fader turns on. • When Smart Fader is turned on, Beat Sync turns on. (Beat Sync can't be canceled.) •...
- Page 72 rekordbox for Mac/Windows Operation examples (1): Deck 1, (2): Deck 2 Sound outputs only Sound outputs from Sound outputs only from deck 1: deck 1 and deck 2 at the from deck 2: Plays with the BPM same volume: Plays with the BPM at 100.
- Page 73 rekordbox for Mac/Windows In this example, it changes as follows. • Channel 1: When the crossfader position is between 1/3 and 2/3 from the left, the EQ LOW knob position changes from the center position to the minimum value. • Channel 2: When crossfader position is between 1/3 and 2/3 from the left, the EQ LOW knob position changes from the minimum value to the center position.
- Page 74 rekordbox for Mac/Windows * The echo effect isn’t applied when the crossfader is moved to the right starting from the left edge. • You can select the fader to control Smart Fader in [Preferences] > [Controller] > [Mixer] > [SMART FADER] > [Fader Used with SMART FADER] in rekordbox for Mac/Windows.
- Page 75 rekordbox for Mac/Windows • If [Microphone Input] in rekordbox for Mac/Windows is set to [Low Latency Mode], the sound from the [MIC] input terminal of the unit can't be recorded. To record the sound from the [MIC] input terminal, set [Microphone Input] in rekordbox for Mac/Windows to [Effect Mode].
- Page 76 rekordbox for Mac/Windows The following shows the function differences depending on the above settings. • MIC LEVEL knob — Via PC/Mac: Enabled — Not via PC/Mac: Enabled • Limiter for the microphone sound output to the Master — Via PC/Mac: Enabled —...
-
Page 77: Changing The Settings In Rekordbox For Mac/Windows
rekordbox for Mac/Windows Changing the settings in rekordbox for Mac/ Windows You can change the settings of the unit in rekordbox for Mac/Windows under [Controller] in [Preferences]. When you connect the unit to rekordbox for Mac/Windows, you can change the following settings: [Controller] >... - Page 78 rekordbox for Mac/Windows [CROSSFADER] > [Cut Lag] setting Adjust the Cut Lag on both edges of the crossfader. Units of 0.1 mm can be adjusted from 0.3 mm to 5.5 mm. • The default Cut Lag is 1.0 mm. • This Cut Lag setting is a guide, and may not be exact. [Level Meter] setting Select the channel level meter or master level meter to show on the level meter in the mixer section.
- Page 79 rekordbox for Mac/Windows [Talkover Mode] setting Change Talkover mode. • [Advanced]: Only the mid-range sound, other than the microphone channel, is attenuated according to the set value of the Talkover level. Volume Frequency • [Normal]: Sound, other than the microphone channel, is attenuated according to the set value of the Talkover level.
- Page 80 Change the position of the SMART CFX preset window from [Top Left], [Top Right], [Center], [Bottom Left], and [Bottom Right]. The default setting is [Center]. [Controller] > [DDJ-FLX4] tab: [Master output] > [Monaural/Stereo Selection] setting Change whether mono or stereo sound is output from the [MASTER] output terminal.
-
Page 81: Serato Dj Lite
Serato DJ Lite Installing Serato DJ Lite Installing (Mac) Do not connect the unit to your Mac until installation is complete. • Close all programs on your Mac. 1 Unzip the downloaded Serato DJ Lite software file. 2 Double-click the unzipped software file to launch the installer. 3 Read the terms of the License Agreement carefully and if you agree, click [Agree]. - Page 82 Serato DJ Lite 6 Click [Close] to quit the installer.
- Page 83 Serato DJ Lite Installing (Windows) Do not connect the unit to your PC until installation is complete. • Log into your PC as an administrator before starting the installation. • Close all programs on your PC. 1 Unzip the downloaded Serato DJ Lite software file. 2 Double-click the unzipped software file to launch the installer.
-
Page 84: Basic Use
Serato DJ Lite Basic use Serato DJ Lite Starting This manual mainly focuses on explaining the hardware functions of the unit. For detailed instructions on using the Serato DJ Lite software, see the Serato DJ Lite software manual. For Mac In Finder, open the [Applications] folder, then double-click the [Serato DJ Lite] icon. - Page 85 Serato DJ Lite The following screen shows when tracks are loaded onto decks in Serato DJ Lite. A Deck section Track information (track name, artist name, BPM, etc.), the overall waveform, and other information about the loaded track is displayed. B Waveform display The waveform of the loaded track is displayed.
- Page 86 Serato DJ Lite Importing music files (tracks) • There are various ways to import tracks into Serato DJ Lite. For details, see the Serato DJ Lite software manual. • If you've previously used Serato Limited’s DJ software (e.g. Scratch Live, ITCH, Serato DJ Intro, Serato DJ, or Serato DJ Pro) and you’ve already created track libraries, you can use these libraries with Serato DJ Lite.
- Page 87 Serato DJ Lite Loading an audio track onto a deck The following explains how to load a track onto deck 1 as an example. Turn the rotary selector to select a track from the library, then press the [LOAD] button for deck 1 (left). The track is loaded onto the deck.
- Page 88 Serato DJ Lite Playing a track This section explains how to play sound from deck 1 (left) as an example. 1 Set the positions of the knobs etc. as shown below. • [TRIM] knob: turned fully counterclockwise • EQ [HI/MID/LOW] knobs: center position (12 o’clock) •...
- Page 89 5 Turn the [MASTER LEVEL] knob to adjust the volume of the speakers to a level you’re happy with. • If you can’t output sound from the [MASTER] output terminals or the unit isn’t recognized by your PC/Mac, refer to the [FAQ] on the Pioneer DJ support website. pioneerdj.com/support/...
- Page 90 Serato DJ Lite Monitoring with headphones This section explains how to play sound from deck 1 (left) as an example. 1 Set the positions of knobs etc. as shown below. • [HEADPHONES MIX] knob: Center • [HEADPHONES LEVEL] knob: Turned fully counterclockwise 2 Press the headphones [CUE] button for channel 1.
-
Page 91: Advanced Use
Serato DJ Lite Advanced use Using 4 Beat Loop While a track is playing, press the [4 BEAT/EXIT] button. Loop playback starts with 4 beats from the point where you press the button. Canceling loop playback Press the [4 BEAT/EXIT] button. When the loop out point is reached, the rest of the track continues to play without returning to the loop in point. - Page 92 Serato DJ Lite Extending the loop Press the [CUE/LOOP CALL] button during loop playback. Each time you press the button, the loop doubles in length. • You can double the loop length even during 4 Beat Loop playback. Canceling a loop Press the [4 BEAT/EXIT] button.
- Page 93 Serato DJ Lite 1: Hot Cue A, 2: Hot Cue B, 3: Hot Cue C, 4: Hot Cue D, 5: Previous track, 6: Search , 7: Search , 8: Censor Serato DJ Pro 1: Hot Cue A, 2: Hot Cue B, 3: Hot Cue C, 4: Hot Cue D, 5: Hot Cue E, 6: Hot Cue F, 7: Hot Cue G, 8: Hot Cue H •...
- Page 94 Serato DJ Lite 1: Effect A, 2: Effect B, 3: Effect C, 4: Effect D, 5: Previous track, 6: Search , 7: Search , 8: Censor Serato DJ Pro 1: Effect A, 2: Effect B, 3: Effect C, 4: Effect D, 5: Effect E, 6: Effect F, 7: Effect G, 8: Effect H 3 Release the Performance Pad.
- Page 95 Serato DJ Lite Using Sampler You can use the Performance Pads to play tracks or sounds assigned to the Sampler slots. 1 Open the [SAMPLER] panel in Serato DJ Lite. 2 Press the [SAMPLER] mode button on the unit. The unit enters Sampler mode.
- Page 96 Serato DJ Lite Using Pitch Play Serato DJ Pro Pitch Play is a function of the Pitch ’n Time DJ expansion pack. • To use Pitch ’n Time DJ, you'll need to activate it first. For details, visit the website below. serato.com/activation/pitch-n-time 1 Press the [HOT CUE] mode button while holding the [SHIFT] button.
- Page 97 Serato DJ Lite Using Roll If you press a Performance Pad when the unit is in Roll mode, a loop with the number of beats assigned to the pad is set and the loop plays until you release the pad. During Loop Roll playback, normal playback with the original rhythm continues in the background (but you can only hear the Loop Roll).
- Page 98 Serato DJ Lite 3 Release the Performance Pad. Loop Roll is canceled, and playback resumes from the position reached in the background. Using Auto Loop When you press a Performance Pad in Auto Loop mode, a loop with the number of beats assigned to the pad is set and the loop plays until you release the pad.
- Page 99 Serato DJ Lite Using Key Shift Serato DJ Pro Key Shift is a function of the Pitch ’n Time DJ expansion pack. • To use Pitch ’n Time DJ, you'll need to activate it first. For details, visit the website below. serato.com/activation/pitch-n-time When you press a Performance Pad in Key Shift mode, the key of the track that’s currently playing is changed to the pitch set to the pressed...
- Page 100 Serato DJ Lite Using Fader Start Using Channel Fader Start 1 Set the temporary cue point. Pause the track at the position you want to start playback from, then press the [CUE] button on that deck. 2 While holding the [SHIFT] button, move the channel fader from the bottom to the top.
- Page 101 Serato DJ Lite Analyzing tracks Click the [Analyze Files] button in Serato DJ Lite to analyze tracks in your library that haven't been analyzed yet. You can also analyze the track by dragging and dropping it on the [Analyze Files] button. •...
- Page 102 Serato DJ Lite Using an effect The following explains how to operate the slot 1 effect for FX1 on the Serato DJ Lite screen. 1 Display the [FX] panel on the Serato DJ Lite screen. 2 Press the [FX SELECT] button. The effect changes each time you press the button.
- Page 103 Serato DJ Lite You can adjust the parameter of the effect by turning the [FX LEVEL/DEPTH] knob. When the effect is turned on, the [FX ON/OFF] button flashes. • Press the [FX ON/OFF] button again to turn off the effect. Using Smart CFX Using the [CFX] knob, you can add a dynamic effect to liven up the track.
- Page 104 Serato DJ Lite Using Smart Fader With Smart Fader, you can use the crossfader or channel faders to create an exciting transition as you mix from one track to the next. 1 Press the [SMART FADER] button. The Smart Fader preset 1 (Echo type) is turned on. •...
- Page 105 Serato DJ Lite Using a microphone 1 Connect a microphone to the [MIC] input terminal. 2 Turn the [MIC LEVEL] knob. Adjust the volume of the sound output from the [MIC] channel. • The sound comes out at a high volume if the knob is turned all the way to the right.
- Page 106 Serato DJ Lite Setting the crossfader curve You can set the crossfader curve on the Serato DJ Lite screen. 1 Click in Serato DJ Lite. 2 Click the [Mixer] tab. 3 Adjust the crossfader curve. • The more you turn it toward [SLOW], the more gradual the rise of the curve. •...
-
Page 107: Rekordbox For Ios/Android
rekordbox for iOS/Android Installing rekordbox for iOS/Android Getting started with rekordbox for iOS/Android If you’re using rekordbox for iOS/Android for the first time, install the latest version. If you already have rekordbox for iOS/Android installed, update to the latest version using App Store or Google Play. •... - Page 108 rekordbox for iOS/Android 2 Install rekordbox for iOS. When installation is finished, tap [Open] to start rekordbox for iOS. Installing (Android) 1 Scan the QR code or visit the URL below to open Google Play. https://play.google.com/store/apps/details?id=com.pioneerdj.rekordbox 2 Install rekordbox for Android. When installation is finished, tap [Open] to start rekordbox for Android.
-
Page 109: Basic Use
rekordbox for iOS/Android Basic use Starting rekordbox for iOS/Android Tap the rekordbox icon. rekordbox will ask for permission to access your mobile library (including music). Tap [OK]. Read the terms of the license agreement carefully and if you agree to them, check [I have read the above software use, license agreement], then tap [Agree]. - Page 110 rekordbox for iOS/Android Connecting via Bluetooth 1 Connect your USB power adapter or mobile battery to the unit's USB port (for power supply) using a USB cable to turn the unit on. 2 Start rekordbox for iOS/Android and turn your mobile device screen horizontal to close the browse screen.
- Page 111 5 Tap [DDJ-FLX4]. When connection is complete, the following screen appears.
- Page 112 rekordbox for iOS/Android Loading an audio track onto a deck The following explains how to load a track onto deck 1 as an example. 1 Turn the rotary selector to select a track. • Press the rotary selector to move the cursor to the next level down. Cursor on the upper level Cursor on the lower level •...
- Page 113 rekordbox for iOS/Android 2 Press the [LOAD] button for deck 1 (left). The track loads onto the deck.
- Page 114 rekordbox for iOS/Android Playing a track This section explains how to play sound from deck 1 (left) as an example. 1 Set the positions of the knobs etc. as follows: • [TRIM] knob: turned fully counterclockwise • EQ [HI/MID/LOW] knobs: center position (12 o’clock) •...
- Page 115 rekordbox for iOS/Android 4 Move the channel fader to the top. 5 Adjust the volume of the speakers to a level you're happy with. When using a USB connection: Turn the [MASTER LEVEL] knob to adjust the volume of sound from the [MASTER] output terminal. •...
- Page 116 rekordbox for iOS/Android Monitoring with headphones when using a USB connection When your mobile device is connected to the unit with a USB cable, you can monitor with headphones from the headphones output terminal on the unit. This section explains how to play sound from deck 1 (left) as an example.
- Page 117 rekordbox for iOS/Android 3 Start rekordbox for iOS/Android and turn your mobile device screen horizontal to close the browse screen. The screen in step 4 is displayed. 4 Tap at the top-center of the screen. 5 Tap to open the [Settings] screen.
- Page 118 rekordbox for iOS/Android 6 Tap [Audio] > [PRE-CUEING] > [Split Output] to turn it on. 7 Press the headphones [CUE] button of channel 1 on the unit. 8 Tap [Audio] > [PRE-CUEING] to adjust the volume. If stereo sound doesn't output correctly If your Android device is connected with a USB cable, it may not connect correctly and the stereo sound may not output normally.
- Page 119 rekordbox for iOS/Android Turning off the unit Disconnect the USB cable to turn off the unit.
-
Page 120: Advanced Use
rekordbox for iOS/Android Advanced use Using 4 Beat Loop While a track is playing, press the [4 BEAT/EXIT] button. Loop playback starts with 4 beats from the point where you press the button. • When the Quantize function is turned on, you might notice a slight delay as the loop synchronizes to the beat. - Page 121 rekordbox for iOS/Android Cutting the loop Press the [CUE/LOOP CALL ] button. Each time you press the button, the loop cuts in half. • You can cut the loop length in half even during 4 Beat Loop playback. Extending the loop Press the [CUE/LOOP CALL ] button.
- Page 122 rekordbox for iOS/Android Using the Performance Pads Using Hot Cues You can start playback instantly from the position where a Hot Cue is set. Loops can also be set and called up instantly. • Up to 8 Hot Cues can be set and saved for each track in rekordbox for iOS/Android.
- Page 123 rekordbox for iOS/Android Setting and calling up 4 Beat Loop 1 Press the [HOT CUE] mode button. The unit enters Hot Cue mode. 2 Press and hold the [4 BEAT/EXIT] button during playback. A loop with 4 beats is set at the position where you pressed the button, and loop playback starts.
- Page 124 rekordbox for iOS/Android Using Pad FX You can add a wide range of effects to your performances simply by pressing and releasing the Performance Pads. 1 Turn on Pad FX mode 1 or Pad FX mode 2. • Pad FX mode 1: Press the [PAD FX1] mode button. •...
- Page 125 rekordbox for iOS/Android Using Release FX of Pad FX You need to assign a Release FX to a Performance Pad in advance. 1 Press and hold down a Performance Pad that has an effect other than a Release FX assigned to it. The effect turns on.
- Page 126 rekordbox for iOS/Android Using Sampler You can use the Performance Pads to play tracks or sounds assigned to the Sampler slots. 1 Press the [SAMPLER] mode button. The unit enters Sampler mode. 2 Adjust the sampler volume. 3 Press a Performance Pad. The track or sound assigned to the relevant slot is played.
- Page 127 rekordbox for iOS/Android Using Keyboard mode Use Performance Pads to play a Hot Cue in different pitches, as if you’re using a keyboard. 1 Press the [HOT CUE] mode button while holding the [SHIFT] button. The unit enters Keyboard mode. 2 Press a Performance Pad.
- Page 128 rekordbox for iOS/Android Using Beat Loop If you press a Performance Pad, a loop with the number of beats assigned to the pad is set. The loop keeps playing after you remove your finger from the pad. 1 Press the [BEAT JUMP] mode button while holding the [SHIFT] button.
- Page 129 rekordbox for iOS/Android Using Key Shift When you press a Performance Pad in Key Shift mode, the key of the track that’s currently playing is changed to the pitch set to the pressed pad. 1 Press the [SAMPLER] mode button while holding the [SHIFT] button.
- Page 130 rekordbox for iOS/Android Setting and calling up a cue point or loop point Setting a cue point or loop point 1 Pause the track and move the playback position to where you want to set a cue point or loop point. 2 Press the [CUE] button while the track is paused.
- Page 131 rekordbox for iOS/Android Using Fader Start Using Channel Fader Start 1 Set the cue point. Pause the track at the position you want to start playback from, then press the [CUE] button on that deck. 2 While holding the [SHIFT] button, move the channel fader from the bottom to the top.
- Page 132 rekordbox for iOS/Android Analyzing tracks Set [Settings] > [In-app player settings] > [Track Analysis] > [Auto Analysis] on the vertical screen or [Settings] > [General] > [Track Analysis] > [Auto Analysis] on the horizontal screen to start track analysis. • If a track is loaded to a deck before analysis is complete, it may take some time to display its BPM and waveform.
- Page 133 rekordbox for iOS/Android 4 Press the [BEAT FX ON/OFF] button. The Beat FX is applied to the sound of the channel you set in step 2. You can adjust the parameter of Beat FX by turning the [BEAT FX LEVEL/ DEPTH] knob.
- Page 134 rekordbox for iOS/Android Using Smart CFX 1 Press the [SMART CFX] button while holding the [SHIFT] button. The preset screen for Smart CFX is displayed to change the effect type. 2 Press the [SMART CFX] button. Smart CFX turns on. 3 Turn the [CFX] knob.
- Page 135 rekordbox for iOS/Android Using Smart Fader 1 Load tracks onto deck 1 and deck 2. 2 Press the [SMART FADER] button. Smart Fader turns on. • When Smart Fader is turned on, Beat Sync turns on. (Beat Sync can't be canceled.) •...
- Page 136 rekordbox for iOS/Android Operation examples (1): Deck 1, (2): Deck 2 Sound outputs only Sound outputs from Sound outputs only from deck 1: deck 1 and deck 2 at the from deck 2: Plays with the BPM same volume: Plays with the BPM at 100.
- Page 137 rekordbox for iOS/Android In this example, it changes as follows. • Channel 1: When the crossfader position is between 1/3 and 2/3 from the left, the EQ LOW knob position changes from the center position to the minimum value. • Channel 2: When crossfader position is between 1/3 and 2/3 from the left, the EQ LOW knob position changes from the minimum value to the center position.
- Page 138 • For microphone sound, there are [Effect Mode] which applies an effect to the sound and [Low Latency Mode] which doesn't apply an effect to the sound. Set [Settings] > [DDJ-FLX4 settings] > [Microphone Input] to [Effect Mode] (default) or [Low Latency Mode].
- Page 139 rekordbox for iOS/Android Adjust the volume of the sound output from the [MIC] input terminal. • The sound comes out at a high volume if the knob is turned all the way to the right. 4 Input audio to the microphone. You can use the microphone EQ, microphone effect, TALKOVER, FEEDBACK REDUCER, etc.
-
Page 140: Changing The Settings In Rekordbox For Ios/Android
Changing the settings in rekordbox for iOS/ Android You can change the settings of the unit in rekordbox for iOS/Android under [DDJ-FLX4 Settings] in [Settings]. When you connect the unit to rekordbox for iOS/Android, you can change the following settings:... - Page 141 rekordbox for iOS/Android [Level Meter] setting Select the channel level meter or master level meter to show on the level meter in the mixer section. The default setting is [Channel Level]. • [Channel Level]: Channel level meter • [Master Level]: Master level meter [Microphone Input] setting •...
- Page 142 rekordbox for iOS/Android • [Normal]: Sound, other than the microphone channel, is attenuated according to the set value of the MIC talkover level. Volume Frequency [Talkover Level] setting Set the audio attenuation level of Mic talkover mode. Setting values: -6 dB / -12 dB / -18 dB / -24 dB SMART FADER setting Select the fader to be used for Smart Fader.
- Page 143 rekordbox for iOS/Android [Master output] > [Peak Limiter] setting Prevent sudden and unpleasant digital clipping of audio output from the [MASTER] output terminal. • ON: The peak limiter of the master output is enabled. • OFF: The peak limiter of the master output is disabled.
-
Page 144: Changing The Settings
Changing the settings Launching Utilities mode Be sure to close your DJ application and then launch Utilities mode. To use Utilities mode when connected to rekordbox for Mac/Windows or rekordbox for iOS/Android, set it on the preferences screen in rekordbox for Mac/Windows or rekordbox for iOS/Android. ... -
Page 145: Utilities Mode Settings
Changing the settings Utilities mode settings You can change the following settings in Utilities mode: • Back Spin Length • Fader Start • Crossfader Reverse • Crossfader Cut Lag • Demo mode Back Spin Length When using a jog wheel to perform a Back Spin, you can make the Back Spin longer or shorter than the amount you rotate the jog wheel You can set the Back Spin Length to short, normal, or long. - Page 146 Changing the settings • The [PAD FX1] mode button is not lit: Cross Reverse is turned off. (Default) The left side of the crossfader is for deck 1 and the right side is for deck 2. Crossfader Cut Lag You can adjust the cut lag (the range where no sound is heard from the relevant deck) at both edges of the crossfader.
- Page 147 Changing the settings • Pad 2 is lit: Demo mode starts when you don’t use the unit for 1 minute. • Pad 3 is lit: Demo mode starts when you don’t use the unit for 5 minutes. • Pad 4 is lit: Demo mode starts when you don’t use the unit for 10 minutes.
-
Page 148: Changing The Bluetooth Midi Device Name
Changing the settings Changing the Bluetooth MIDI device name ® Before you potentially use other units, you can set the unit to be identified by your mobile device. You can change the Bluetooth MIDI device name displayed for the Bluetooth connection between the unit and your mobile device. •... - Page 149 Changing the settings 3 Connect rekordbox for iOS/Android to the unit via Bluetooth. Read more: Connecting via Bluetooth (page 110)
-
Page 150: Additional Information
Additional information Troubleshooting If you think something is wrong with the unit, check the information below and refer to the [FAQ] for the DDJ-FLX4 on the Pioneer DJ website. pioneerdj.com/support/ Sometimes, the problem may be caused by another device. Inspect the other devices and electrical appliances you’re using and refer to... - Page 151 [MIDI Window] or [MIDI Studio]. Select the [DDJ-FLX4] icon, and click [Remove Device]. (The icon may be [USB MIDI Device] instead of [DDJ-FLX4]. In this case, select [USB MIDI Device].) Connect the unit with the USB cable again. The [DDJ- FLX4] icon is displayed.
- Page 152 Additional information When using a USB connection, the unit isn't recognized by a mobile device. • Connect the USB power adapter (or mobile battery) and USB cable correctly. See: Connections (page 37). • Change the USB power adapter (or mobile battery) or USB cable. ...
- Page 153 Additional information Headphones sound is too quiet. • When the power supply from the USB port is insufficient, the unit limits the volume of headphones. Disconnect devices you’re not using for DJing to direct more power to the unit. rekordbox for Mac/Windows ...
- Page 154 Additional information Fader Start doesn’t work. • Set a cue. • To activate Fader Start, mark the [Fader Start] check box in [Preferences] > [Controller] > [Mixer] tab in rekordbox for Mac/ Windows. When the unit is disconnected, recording isn’t available in rekordbox.
- Page 155 Additional information Serato DJ Lite Serato DJ Lite becomes unstable. • Update Serato DJ Lite to the latest version. See: Installing Serato DJ Lite (page 81) • Quit any other applications on your PC/Mac. If Serato DJ Lite remains unstable, try disabling the wireless network or other wireless connections, antivirus software, screen saver, low-power mode, etc.
- Page 156 Additional information Serato DJ Lite virtual deck isn’t displayed. (Practice mode is displayed.) • Connect the supplied USB cable correctly. See: Connections (page 37) • Update Serato DJ Lite to the latest version. See: Installing Serato DJ Lite (page 81) ...
- Page 157 Additional information rekordbox for iOS/Android When connecting an Android device, stereo sound doesn’t output correctly, MASTER output sound is distorted, then no sound outputs from headphones. • If your Android device is connected with a USB cable, it may not connect correctly and the stereo sound may not output normally.
- Page 158 Additional information When using the Bluetooth connection, sound from the microphone connected to the unit doesn’t output. • Microphone sound can't be output from the [MASTER] output terminals or headphones output terminal on the unit when the Bluetooth connection is in use. When the USB connection is in use, sound can be output from the [MASTER] output terminals and headphones output terminal on the unit.
-
Page 159: Specifications
Additional information Specifications General – Main Unit Rated power supply When a USB power adapter is used .......DC 9 V, 3 A When a USB bus power is used .......DC 5 V, 500 mA Main unit weight............2.1 kg (4.6 lbs.) Max. - Page 160 Additional information MASTER output terminal RCA pin jacks ................1 set Headphones output terminals 3.5 mm stereo mini jack............. 1 set USB port USB (Type C) ................2 sets Bluetooth® Section Wireless system ..........Bluetooth Low Energy Maximum transmission distance ......Approximately 10 m* in unobstructed circumstances Frequency band used............
-
Page 161: Using The Unit As A Controller For Other Dj Applications
• For details, see your DJ application’s user guide. About MIDI messages For details on this unit’s MIDI messages, see the List of MIDI Messages. • You can find the List of MIDI Messages on the Pioneer DJ website: pioneerdj.com/... -
Page 162: Trademarks And Registered Trademarks
Additional information Trademarks and registered trademarks • rekordbox is a trademark or registered trademark of AlphaTheta Corporation. • Apple, Apple Logo, Apple Music, Finder, iPad, iPadOS, iTunes, Mac, MacBook, MacBook Pro, macOS and OS X are trademarks of Apple Inc., registered in the U.S. and other countries. •... -
Page 163: Software License Notice
Additional information Software license notice Apache Copyright (c) 2009-2019 ARM Limited. All rights reserved. SPDX-License-Identifier: Apache-2.0 Licensed under the Apache License, Version 2.0 (the License); you may not use this file except in compliance with the License. You may obtain a copy of the License at www.apache.org/licenses/LICENSE-2.0 Unless required by applicable law or agreed to in writing, software distributed under the License is distributed on an AS IS BASIS,... - Page 164 Additional information 2. Redistributions in binary form must reproduce the above copyright notice, this list of conditions and the following disclaimer in the documentation and/or other materials provided with the distribution. 3. Neither the name of the copyright holder nor the names of its contributors may be used to endorse or promote products derived from this software without specific prior written permission.
-
Page 165: Cautions On Copyrights
Additional information Cautions on copyrights rekordbox restricts playback and duplication of copyright-protected music contents. • When coded data, etc., for protecting the copyright is embedded in the music contents, it may not be possible to operate the program normally. • When rekordbox detects that coded data, etc., for protecting the copyright is embedded in the music contents, processing (playback, reading, etc.) may stop.
Need help?
Do you have a question about the DDJ-FLX4 and is the answer not in the manual?
Questions and answers