
Subscribe to Our Youtube Channel
Related Manuals for Zeiss Primo Star


Summary of Contents for Zeiss Primo Star
- Page 1 Primo Star Operating manual Bedienungsanleitung Mode d’emploi Instrucciones de manejo Инструкция по применению 操作手册...
- Page 2 возмещение убытков. Фирма оставляет за собой право на выдачу патента или регистрацию зарегистрированной модели. 版 权 操作本仪器必须先阅读本手册内容。因此请务必熟悉本手册内容,尤其要遵从有关仪器正确操作的注意事项。技 术可能会有更新,此手册不含升级服务。未经授权禁止复制,利用和转载本手册内容。如有违背必须承担相应赔 偿责任。保留所有申请专利或者样品注册权利。 Issued by: Carl Zeiss MicroImaging GmbH P.O.B. 4041, 37030 Göttingen, Germany Phone: +49 (0) 551 5060 660 Fax: +49 (0) 551 5060 464 E-Mail: micro@zeiss.de...
-
Page 3: Table Of Contents
Primo Star Contents Carl Zeiss CONTENTS Page Notes on Instrument Safety....................4 General safety notes......................4 Instrument safety and EMC ....................4 Unpacking, transportation, storage..................5 Disposal..........................5 Use............................5 Notes on warranty........................ 7 Description ......................... 8 System overview........................8 Total view........................... -
Page 4: Notes On Instrument Safety
DIN EN 61010-1 (IEC 61010-1) and IEC 61010-2-101 "Safety requirements for electrical equipment for measurement, control and laboratory use “. The Primo Star microscope meets the requirements of the EC Directive 98/79/EC Annex 1 and carries the mark. Radio-noise suppression in compliance with EN 55011 Class B Noise immunity in compliance with DIN EN 61326 The instruments are disposed of in compliance with the WEEE Directive 2002/96/EC. -
Page 5: Unpacking, Transportation, Storage
Primo Star Notes on Instrument Safety Carl Zeiss Unpacking, transportation, storage Please observe the following safety notes for unpacking, transportation and storage of the microscope: − The microscope is supplied packed to commercial standards in a plastic case with cardboard packaging;... - Page 6 If it is determined that protection measures are no longer effective, the instrument must be switched off and safeguarded against inadvertent operation. Please contact a Zeiss service agency or the Carl Zeiss Microscopy Service to repair the instrument.
-
Page 7: Notes On Warranty
Notes on Instrument Safety Carl Zeiss Notes on warranty The Primo Star Microscope including its original accessories must not be used for microscopic techniques other than those described in this Operating Manual. The manufacturer cannot assume any liability for other applications. -
Page 8: Description
Carl Zeiss Description Primo Star DESCRIPTION System overview B 46-0071 v 03/06... - Page 9 Primo Star Description Carl Zeiss B 46-0071 v 03/06...
-
Page 10: Total View
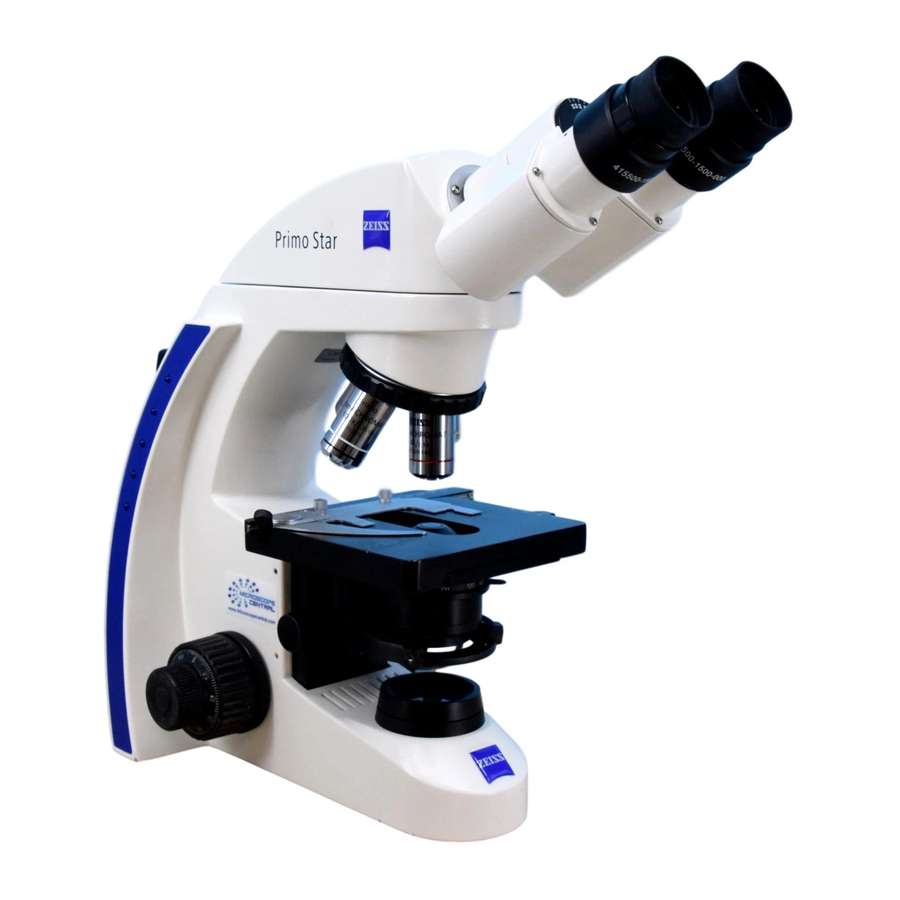
Carl Zeiss Description Primo Star Total view 1 Eyepiece 2 Binocular head 3 Tube 4 Carrying handle 5 Plug-in power unit 6 Stand 7 ON/OFF switch; illumination intensity 8 Illumination module 9a Luminous-field diaphragm, adjustable 9b Luminous-field diaphragm, fixed 10a Condenser carrier, Full Köhler... -
Page 11: Intended Use
Description Carl Zeiss Intended use The Primo Star microscope is a universally applicable light microscope primarily designed for the examination of cell and tissue cultures as well as sediments in culture flasks, Petri dishes and microplates. Typical applications: Examination of blood and tissue samples from the human body, observation of intracellular processes on living cell cultures, cell-cell interactions, motility, growth, potential measurement, detection of medical drugs, microinjection and in vitro fertilization. -
Page 12: Objectives
Plan-ACHROMAT 10×/0.25 ∞/-. where: 10× Objective magnification, With a defined color ring on the objective being assigned to each magnification step (Carl Zeiss color code) 0.25 Numerical aperture ∞ Infinite mechanical tube length − Usable with cover slip thickness D = 0 or 0.17 mm... -
Page 13: Start-Up And Operation
Primo Star Start-Up and Operation Carl Zeiss START-UP AND OPERATION Starting up the microscope Before installing and starting up the microscope, be sure to carefully read and observe the notes on instrument safety (see Section 1). Do not touch optical surfaces when unpacking the microscope to avoid fingerprints! The microscope is supplied completely assembled and inclusive of accessories packed to commercial standards. -
Page 14: Controls
Carl Zeiss Start-Up and Operation Primo Star Controls Fig. 4 Controls B 46-0071 v 03/06... - Page 15 Primo Star Start-Up and Operation Carl Zeiss Legend to Fig. 4: 1 Eyepieces 2 Binocular body of the tube 3 Illumination-intensity indicators 4 Rotary knob for switch ON/OFF and adjustment of illumination intensity 5 Fine focusing drive (right side) 6 Coarse focusing drive (right side)
-
Page 16: Operating The Microscope
Carl Zeiss Start-Up and Operation Primo Star Operating the microscope 3.3.1 Setting interpupillary distance and viewing height • Swing the eyepiece tubes symmetrically slightly toward or away from one another to adjust the distance between the tubes to your individual interpupillary distance (Fig. -
Page 17: Adjusting Transmitted-Light Brightfield On The Full Köhler Microscope
Primo Star Start-Up and Operation Carl Zeiss • Turn the focusing ring of the eyepiece (Fig. 7/3) to focus on the triangular figure of the eyepiece pointer. • Put the specimen onto the mechanical stage. Look at the specimen through the eyepiece with the eyepiece pointer and focus on the microscopic image by turning on the focusing drive. -
Page 18: Adjusting Transmitted-Light Brightfield On The Fixed Köhler Microscope
3.3.4 Adjusting transmitted-light brightfield on the Fixed Köhler microscope The Primo Star Fixed Köhler Microscope is supplied factory-adjusted. Operation is restricted to a few manipulations. • Place the specimen in the specimen holder of the mechanical stage. • If the microscope stand is equipped with a phase or dark-filed slider, pull this slider out to the left as far as it will go. -
Page 19: Adjusting Transmitted-Light Phase Contrast Or Transmitted-Light Darkfield
Primo Star Start-Up and Operation Carl Zeiss 3.3.5 Adjusting transmitted-light phase contrast or transmitted-light darkfield • First, adjust the microscope as you do for brightfield. • Turn the nosepiece to swing the phase-contrast objective (40x/Ph 2) into the light path. -
Page 20: Converting The Microscope
Carl Zeiss Start-Up and Operation Primo Star Converting the microscope Unplug the plug-in power unit from line power before converting the microscope. 3.4.1 Changing the tube • Loosen clamp screw (Fig. 11/2), turn the installed tube (Fig. 11/1) clockwise approximately 90° (Fig. 11/A) and on the right side take it of upward (Fig. -
Page 21: Replacing The 6V 30W Halogen Lamp Or The Led Illumination
Primo Star Start-Up and Operation Carl Zeiss 3.4.3 Replacing the 6V 30W halogen lamp or the LED illumination Unplug the plug-in power unit from the power outlet and allow for a sufficient cool-down time of the 6V 30W halogen lamp before you replace it. -
Page 22: Installing/Removing The Illuminating Mirror
The mirror serves to illuminate the specimen if no power outlet is available. It can be used only in combination with the Primo Star Fixed Köhler Microscope. For this purpose, it is necessary to remove the condenser and the condenser carrier insert. -
Page 23: Installing A Camera
Primo Star Start-Up and Operation Carl Zeiss • Taking care that the locating screw on the rear side of the condenser fits in groove (Fig. 16/4) of the condenser carrier insert, put the condenser into this insert. • Screw the cover cap back onto the luminous-field diaphragm. - Page 24 • Carry out this test until the image is format filling without masking or vignetting. • Retighten the grub screw (Fig. 17/5). With camera/adapter combinations that have not been recommended expressly by Zeiss, it may be quite impossible to obtain an unvignetted image.
-
Page 25: Care And Troubleshooting
Primo Star Care and Troubleshooting Carl Zeiss CARE AND TROUBLESHOOTING Instrument care Care of the microscope is restricted to the following operations: • Cover the instrument with the dust cover after every use. • Do not install the microscope in a humid room; maximum humidity < 75%. -
Page 26: Troubleshooting
Carl Zeiss Care and Troubleshooting Primo Star Troubleshooting Problem Cause Remedy The field of view is not Nosepiece with objective has not been Switch nosepiece with objective into completely visible. switched into click-stop position. click-stop position. Condenser has not been set correctly. -
Page 27: Appendix
Stand with phototube approx. 190 x 425 x 395 mm With tube / phototube turned by 180° approx. 190 x 375 x 395 mm Weight Primo Star with phototube 8.2 kg Ambient conditions Transport (in packaging): Permissible ambient temperature -40 to +70 °C... - Page 28 Carl Zeiss Appendix Primo Star LED illumination Constant, brightness-independent color temperature of 7480 K Homogeneous field illumination 20 mm diameter Suitable for objectives with magnifications of 4x to 100x Analogous brightness adjustment from approx. 15 to 100% Optical/mechanical data Stand with stage focusing...
Need help?
Do you have a question about the Primo Star and is the answer not in the manual?
Questions and answers