Table of Contents
Advertisement
Available languages
Available languages
Advertisement
Chapters
Table of Contents

Related Manuals for Black & Decker SPACEMAKER SCM2000BD


Summary of Contents for Black & Decker SPACEMAKER SCM2000BD
- Page 1 SPACEMAKER 8-CUP THERMAL CAFETERA TÉRMICA CAFETIÈRE THERMIQUE UNDER THE DE 8 TASSES POUR DE 8 TAZAS PARA CABINET INSTALAR DEBAJO INSTALLATION SOUS COFFEEMAKER DEL GABINETE UNE ARMOIRE use & care manual guide d’utilisation et d ’entretien manual de uso y cuidado SCM2000BD...
- Page 2 Thank you for your purchase! Gracias por su compra! Merci de votre achat! Should you have any questions or concerns with your new product, please call our Customer Service Line at 1-800-231-9786 (US and Canada). Please do not return to the store. Si usted tiene alguna inquietud o pregunta con su producto, por favor llame a nuestra línea de servicio al cliente una atención inmediata 1-800-231-9786 (EE.UU/Canadá) 01-800-714-2503 (México).
-
Page 3: Table Of Contents
WELCOME! Congratulations on your purchase of the Black+Decker SpaceMaker™ 8 Cup Thermal Coffeemaker. We have developed this guide to ensure optimal product performance and your complete satisfaction. Save this use and care manual and be sure to register your appliance online at www.prodprotect.com/applica. -
Page 4: Important Safeguards
PLEASE READ AND SAVE THIS USE AND CARE BOOK. IMPORTANT SAFEGUARDS. When using electrical appliances, always follow basic safety precautions to reduce the risk of fire, electric shock, and/or injury, including the following: • Do not use appliance for other than •... -
Page 5: Getting To Know Your Coffeemaker
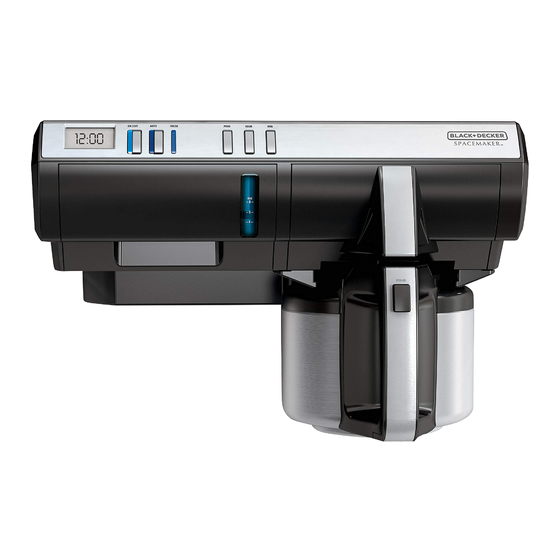
G E T T ING TO KN OW YO UR SPACEMAKER 8 CUP THERMAL COFFEEMAKER ™ Brew basket Reservoir lid (not shown) (Part # SCM003) Digital display Sneak-A-Cup™ interrupt feature Control panel Thermal carafe with lid (Part # SCM002) Cord management hook (not shown) Keep hot carafe plate 10. -
Page 6: Installation Hardware
INSTAL LATI ON HA RDWA RE SCREWS SPACERS WASHERS • Mounting Parts You will also need: (Part # SDC-MOUNTING KIT) • Tape 16 Spacers • Ruler ⁄ " ⁄ " • Electric drill with a ⁄ " drill bit ⁄ "... -
Page 7: Installing Your Spacemaker
IN STAL L I N G YOUR SPAC EMA KER ™ G E T T I NG STARTE D • Carefully unpack your coffeemaker, removing all packaging materials, labels and/or stickers, and the plastic band around the power plug. • Register your product at www.prodprotect.com/applica •... -
Page 8: Standard Installation For Flat Cabinets
STANDARD INSTALLATION FOR FLAT CABINETS ONLY Important: Always wear protective glasses or goggles to prevent injury when drilling. Important: Do not align screw holes on the template directly under the partition between cabinets, as this will prevent you from installing the appliance properly. - Page 9 Important: Always ensure you are drilling straight up or straight down through the marked mounting holes on the template. Drilling at an angle may prevent proper installation and may damage cabinets if the drill bit pierces the partition. Using a ⁄...
-
Page 10: Programming Your Coffemaker
Note: Always tighten screws to properly secure the appliance to the cabinet and to ensure the appliance does not move or shake during operation. 13. Pull out cord from cord storage behind the appliance and plug into a standard electrical outlet. -
Page 11: Auto Brew Delay
AC TI VATI N G THE AUTO BREW D ELAY Ensure the Auto Brew delay time has been set (see “SETTING THE AUTO BREW DELAY” section for assistance). Press the AUTO button once. The word “AUTO” will appear and the LED light above the AUTO button will illuminate. -
Page 12: Brewing Coffee
BR E W I NG COFF E E Fill water reservoir with desired amount of fresh, cool water using water markings on water reservoir window. Do not exceed the maximum marked level. Replace water reservoir into coffeemaker. Be sure it snaps into place securely. Remove the brew basket and place an empty 8-12 cup basket style paper filter into it. -
Page 13: Care And Cleaning
CA RE A N D C LEA N IN G CLEANING: Follow the directions below to clean your coffeemaker after each use. 1. Make sure your coffeemaker is unplugged and cool. 2. Open your coffeemaker’s filter basket lid and remove the brew basket. 3. -
Page 14: Troubleshooting
TR OU B L E SHOOTI N G PROBLEM POSSIBLE CAUSE SOLUTION Coffeemaker Coffeemaker is Check to be sure appliance is does not turn on. not plugged in. plugged into a working outlet and the ON/OFF (I/O) button has been pressed. Coffeemaker is Water reservoir Make sure the water reservoir... -
Page 15: Warranty And Customer Service Information
NE ED H EL P? For support or any questions regarding your appliance, call the appropriate 800 number listed within this section. Please DO NOT return the product to the place of purchase. Also, please DO NOT mail product back to manufacturer, nor bring it to a service center. -
Page 16: Tabla De Contenido
¡BIE NVEN I DO ! Felicitaciones por su compra de la Cafetera Térmica De 8 Tazas Para Instalar Debajo del Gabinete de Black+Decker. Hemos diseñado esta guía para asegurar un rendimiento óptimo del producto y garantizar su satisfacción completa. Conserve este manual de uso y cuidado y asegúrese de registrar su producto en línea, visitando www.prodprotect.com/applica. -
Page 17: Instrucciones Importantes De Seguridad
POR FAVOR LEA ESTE INSTRUCTIVO ANTES DE USAR EL PRODUCTO. INSTRUCCIONES IMPORTANTES DE SEGURIDAD Cuando se usan aparatos eléctricos, siempre se deben respetar las siguientes medidas básicas de seguridad: • Este aparato se debe usar únicamente con • El uso de accesorios no recomendados por el fin previsto. -
Page 18: Conozca Su Cafetera
CONOZCA SU CAFETERA TÉRMICA DE 8 TAZAS PARA INSTALAR DEBAJO DEL GABINETE Cesto de colar Tapa del tanque (Pieza No SCM003) (no mostrado) Dispositivo de interrupción de Pantalla digital colado Sneak-A-Cup™ Panel de control Jarra térmica con tapa Gancho para manejo del cable (Pieza No SCM002) (no mostrado) Placa de calentamiento... -
Page 19: Piezas De Montaje
PIE Z AS DE MO N TA JE TORNILLOS SEPARADORES ARANDELAS • Piezas para el ensamblaje • También necesitará: (Pieza Nº SDC-MOUNTING KIT) • Cinta adhesiva 16 Separadores ⁄ " • Regla ⁄ " • Taladro eléctrico con una broca ⁄... -
Page 20: Instalación De Su Aparato Spacemaker
INSTALACIÓN DE SU APARATO SPACEMAKER™ PAS OS PR ELI MIN A R ES • Desempaque su cafetera con cuidado, retirando todo material de empaque, etiquetas y (o) etiquetas adhesivas, y la tira plástica alrededor del enchufe. • Vaya a www.prodprotect.com/applica para registrar su garantía. •... - Page 21 MONTAJE ESTÁNDAR SOLO PARA GABINETES DE INFERIOR PLANO Importante: Siempre utilice lentes o gafas de protección, a fi n de evitar lesiones al perforar. Importante: No alinee los agujeros de los tornillos en la plantilla debajo de la partición entre los gabinetes, ya que esto impide la instalación apropiada del aparato.
- Page 22 Important: Siempre asegúrese de perforar derecho hacia arriba o hacia abajo a través de os agujeros marcados en la plantilla. El perforar en ángulo puede impedir la instalación correcta del aparato y dañar los gabinetes si la broca del taladro llegase a perforar la partición. Utilizando una broca de ⁄...
-
Page 23: Programación De Su Cafetera
Nota: Es posible que se requieran dos personas a fi n de sostener el aparato en su lugar mientras se perfora. 12. Atornillando desde adentro del gabinete hacia abajo, directo en los agujeros del aparato, utilice su taladro o destornillador para apretar los cuatro tornillos en su lugar. -
Page 24: Colado Automático
ACTIVACIÓN DE LA FUNCIÓN DE COLADO AUTOMÁTICO Asegúrese que la hora en que la función de colado automático debe comenzar haya sido seleccionada. Presione el botón AUTO una vez. La palabra “AUTO” aparecerá en la pantalla y la luz LED arriba del botón AUTO se iluminará. Cuando la función de colado automático sea activada, asegúrese de que la cafetera contenga ambos café... -
Page 25: Preparación De Café
PR EPAR ACI ÓN DE L C A FÉ Llene el tanque de agua con la cantidad deseada de agua fría, guíandose por los niveles de agua marcados en la ventanilla del tanque. No exceda el nivel máximo marcado. Vuelva a colocar el tanque de agua en la cafetera. -
Page 26: Cuidado Y Limpieza
CUIDAD O Y L IM P IE ZA LIMPIEZA: Siga las instrucciones a continuación para limpiar su cafetera después de cada uso. 1. Asegúrese de que el aparato esté desenchufado y que se haya enfriado antes de limpiarlo. 2. Abra la tapa del cesto de colar y retire el cesto de colar. 3. -
Page 27: Resolución De Fallas
RE S O LU C I Ó N D E FA LLAS PROBLEMA CAUSA POSIBLE SOLUCIÓN La cafetera no se La cafetera no Verifique que la cafetera esté enciende. está enchufada. conectada a un enchufe que funciona y que el botón de encendido/apagado (I/O) esté... -
Page 28: Información De Garantía Y Servicio Al Cliente
¿N EC ESI TA AYUDA? Para servicio, reparaciones o preguntas relacionadas al producto, por favor llame gratis al número “800” que aparece en la cubierta de este manual. No devuelva el producto al establecimiento de compra. No envíe el producto por correo al fabricante ni lo lleve a un centro de servicio. - Page 29 BIE NV ENU E! Félicitations pour votre achat de la C afetière Programmable De 12 Tasses Pour Installation Sous Une Armoire. N ous avons élaboré ce guide pour assurer le rendement optimal du produit, et votre entière satisfac tion . Conser ver ce guide d ’utilisation et d ’entretien , et assurez-vous d ’inscrire votre appareil en ligne au w w w.
-
Page 30: Mises En Garde Importantes
VEUILLEZ LIRE ET CONSERVER CE GUIDE D’ENTRETIEN ET D’UTILISATION. MISES EN GARDE IMPORTANTES. Lorsqu’on utilise des appareils électriques, il faut toujours respecter certaines règles de sécurité fondamentales, notamment les suivantes : • Utiliser l’appareil uniquement aux fins pour par le fabricant de l’appareil présente des lesquelles il a été... -
Page 31: Familiarisation Avec La Cafetière
FA MIL I AR I SATI ON AVE C L A C AFE T I È RE THER MI Q UE DE 8 TASSE S PO UR I NSTA LL AT I ON SOUS U NE A R M OIR E Panier filtre Couvercle du réservoir (n°... -
Page 32: Quincaillerie D'installation
QUIN CAI LLER IE D ’IN STA L LAT I O N RONDELLES D’ESPACEMENT RONDELLES • Pièces de fixation Vous aurez également besoin : (Nº de pièce • de ruban gommé; SDC-MOUNTING KIT) • d’une règle 16 rondelles d’espacement ⁄ "... -
Page 33: Installer Votre Spacemaker
INSTAL LER VOTR E S PAC E M AK E R POU R CO M MENC ER • Déballer délicatement la cafetière et retirer tous les matériaux d’emballage, les étiquettes et/ou les autocollants de l’appareil, ainsi que la bande de plastique entourant la fi che. •... - Page 34 INSTALLATION STANDARD POUR LES ARMOIRES À DESSOUS PLAT SEULEMENT Important : Toujours porter des lunettes ou des lunettes de protection pour éviter les blessures lors du perçage. Important : Ne pas aligner les trous de vis du gabarit avec la cloison qui sépare les armoires, puisque cela vous empêcherait d’installer l’appareil correctement.
- Page 35 Important : Toujours s’assurer de percer à angle droit, vers le haut ou vers le bas, à travers les trous de fi xation indiqués sur le gabarit. Percer avec une inclinaison peut nuire à l’installation adéquate et risque d’endommager les armoires si la mèche perce la cloison.
-
Page 36: Programmation De La Cafetière
Remarque : Toujours serrer les vis suffi samment pour fi xer correctement l’appareil à l’armoire afi n qu’il ne bouge pas et ne vibre pas pendant le fonctionnement. 13. Sortir le cordon du range-cordon, derrière l’appareil, et le brancher dans une prise de courant standard. -
Page 37: Activation De L'heure De L'infusion Automatique Différée
AC TIVATI ON DE L’HEURE DE L’ INFUSIO N AU TOM AT I QUE DIFFÉRÉE Vérifier que l’heure de l’infusion automatique différée a été programmée (pour obtenir de l’aide, voir la section « RÉGLAGE DE L’HEURE DE L’INFUSION AUTOMATIQUE DIFFÉRÉE »). Appuyer une fois sur le bouton AUTO. -
Page 38: Infusion Du Café
INFU SI O N D U C A F É Remplir le réservoir à eau avec la quantité voulue d’eau froide toute fraîche en se fiant à l’indicateur de niveau d’eau sur la fenêtre du réservoir. Ne pas excéder la marque du niveau de remplissage maximal. -
Page 39: Entretien Et Nettoyage
E N TR ETI EN ET N E TTOYAGE NETTOYAGE : Suivre les instructions ci-dessous pour nettoyer votre cafetière après chaque utilisation. 1. Veiller à ce que la cafetière soit débranchée et refroidie. 2. Ouvrir le couvercle du panier-filtre de la cafetière et retirer le panier d’infusion. 3. -
Page 40: Dépannage
DÉ PA N N AG E PROBLÈME CAUSE POSSIBLE SOLUTION La cafetière ne L'appareil n'est Vérifier si l’appareil est se met pas en pas branché. branché à une prise de marche. courant fonctionnelle et que l'interrupteur Marche/arrêt (I/O) a été enfoncé. La cafetière fuit. -
Page 41: Information Sur La Garantie Et Le Service À La Clientèle
BE SO I N D ’AI D E? Pour communiquer avec les services d’entretien ou de réparation, ou pour adresser toute question relative au produit, composer le numéro sans frais approprié indiqué sur la page couverture. Ne pas retourner le produit où il a été acheté. Ne pas poster le produit au fabricant ni le porter dans un centre de service. - Page 42 Por favor llame al número correspondiente que aparece en la lista a continuación para solicitar que se haga efectiva la garantía y donde Ud. puede solicitar servicio, reparaciones o partes en el país donde el producto fué comprado. Argentina México Servicio Técnico Articulo 123 # 95 Local 109 y 112 Monroe 3351...
- Page 43 Sello del Distribuidor: Código de fecha / Date Code / Le code de date: Fecha de compra: Modelo: SCM200BD - 900 W 120 V~ 60 Hz Comercializado por: Venta de Refacciones y Accesorios Rayovac de México S.A de C.V 01 800 714 2503 Autopista México Querétaro Importado por / Imported by: No 3069-C Oficina 004...
- Page 44 www.BlackAndDeckerAppliances.com © 2014 The Black & Decker Corporation and Spectrum Brands, Inc., Middleton, WI 53562 Made in People’s Republic of China Fabricado en la República Popular de China Fabriqué en République populaire de Chine BLACK+DECKER and the BLACK+DECKER logo are trademarks of The Black & Decker Corporation and are used under license.
Need help?
Do you have a question about the SPACEMAKER SCM2000BD and is the answer not in the manual?
Questions and answers