Alde Compact 3020 HE Operating Instructions Manual
Hide thumbs
Also See for Compact 3020 HE:
- Operating instructions manual (44 pages) ,
- Installation instructions manual (32 pages) ,
- Operating and installation instructions (24 pages)
Table of Contents
Advertisement
Quick Links
FIT T E D E Q UIP ME N T
ALDE Compact 3020 ........................................................................................................... 104
ALDE Compact 3020 Control Panel operating instructions ................................................... 112
Dometic absorption refrigerators ........................................................................................... 123
Cooker 3 burner and hotplate ............................................................................................... 143
Microwave oven ................................................................................................................... 148
Thetford C260 cassette toilet ................................................................................................ 151
Caravans with external BBQ point ........................................................................................ 158
Caravans with external shower point ..................................................................................... 159
Caravans with TV inlet in battery box .................................................................................... 160
CD/MP3 tuner ....................................................................................................................... 161
Status directional TV and FM radio antenna ......................................................................... 161
Bedding ................................................................................................................................ 162
Softrollo Blinds (Seitz) ........................................................................................................... 163
Doorscreen ........................................................................................................................... 164
Exterior door key/operation .................................................................................................. 164
Windows .............................................................................................................................. 165
Roof lights ............................................................................................................................ 165
Mini Heki rooflight ................................................................................................................. 166
Midi Heki rooflight ................................................................................................................. 167
Heki-2 roof light (Bessacarr Cameo models) .......................................................................... 168
Heki 4 remote control ........................................................................................................... 168
MPK rooflight ........................................................................................................................ 170
Care/use of laminate tops, tables, furniture and doors .......................................................... 172
Shower care points .............................................................................................................. 173
Fixing of awnings .................................................................................................................. 173
Paint colour reference ........................................................................................................... 173
Front locker and sunroof ....................................................................................................... 173
Bonded Roof ........................................................................................................................ 173
Step on hitch cover ............................................................................................................... 174
Cycle racks ........................................................................................................................... 174
Caravan motor mover ............................................................................................................ 174
Omni-vent ............................................................................................................................. 175
Rear view camera ................................................................................................................. 177
Service door operation .......................................................................................................... 182
103
Advertisement
Table of Contents

Related Manuals for Alde Compact 3020 HE


Summary of Contents for Alde Compact 3020 HE
- Page 1 FIT T E D E Q UIP ME N T ALDE Compact 3020 ......................104 ALDE Compact 3020 Control Panel operating instructions ........... 112 Dometic absorption refrigerators ................... 123 Cooker 3 burner and hotplate ....................143 Microwave oven ........................148 Thetford C260 cassette toilet ....................
-
Page 2: Alde Compact 3020
If you remain in any doubt, please contact your supplying dealer. In the unlikely event that your boiler develops a fault, switch off the boiler and contact Alde, or Notice: In the interest of safety, replacement your dealer or installer. - Page 3 Domestic Hot Water Being a combi-type boiler, the Alde 3020 Electric Heating Compact HE has an integrated, stainless steel When electric heating is set to 1, 2 or 3 kW, hot water cylinder that holds approximately 8.4...
- Page 4 ALD E H EAT IN G OP ERATI N G IN ST RU C TION S When the hot water cylinder is in continuous Draining Freshwater use, it should be drained and refilled once a 1. Switch off the water pump. month.
- Page 5 VAG G12++ and G13 spec antifreeze (purple/magenta) is compatible with both. Failure to fill with suitable HTF may result in severe damage to your Alde system, and is not covered under warranty.
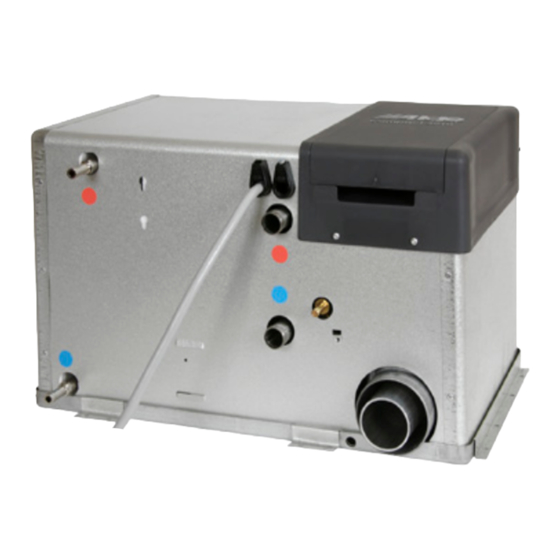
- Page 6 Follow the flow pipe from the boiler, and bleed the system at each bleed point. If Alde bleed points have been fitted, these are metal bleed screws mounted on black EPDM rubber connectors (Fig 4). Have a cloth in hand.
- Page 7 LPG is heavier than air. Should a gas 230 V ELECTRIC leak occur the fitted floor vents allow the The Alde 3020 Compact HE boiler has two gas to escape from the caravan. For this 230 V electric heating elements, outputting...
- Page 8 LPG hoses should be regularly checked for consider carrying spare parts in the event signs of damage and should be replaced, at of an emergency. Alde recommends a 12 V maximum, after 5 years of use. circulation pump for the expansion tank (with cabling), a PCB, and 4–5 litres of ready to use...
- Page 9 • The system may not need to use gas heating, if also using electric heating. If your Alde boiler develops a fault, your first action should be to contact your dealer or • The fluids in the boiler may already be at installer, as they will be familiar with your operating temperature.
- Page 10 Instruction on the control panel. The Splash Screen is displayed and green LED is lit. The boiler will The Alde 3020 Compact HE control panel now start with the previously saved settings has two hard buttons and a non-capacitive, (factory settings by default).
- Page 11 What’s Activated Menu. [Not displayed if no Domestic Hot Water activated functions are detected.] The Alde boiler stores 8.4 litres of hot water as b. Settings Menu standard. If the hot water cylinder is empty, the air is heated but no damage can result.
- Page 12 1 kW fluctuate. Gas Heating The Alde boiler is hard-wired to use power economically. The gas burner has two stages, shifting dynamically between low or full flame. There are times when it may use no power at...
- Page 13 Delayed Start/Cycle is enabled, but may or may not be active, depending on the time and day. Alde Smart-Control or daisy- 1. Press the Flame button to select gas chained, third party control heating. Green is on, blue is off.
- Page 14 If 12 V power be recalibrated. is lost, the clock will reset. Return The optional Alde 3010-414 battery Return to the previous menu. backup uses two AA batteries and allows the clock memory to be stored even if 12 V power is lost.
- Page 15 NB: The Select which circulation pump to use Alde 3010-219 adaptor lead is available for for the central heating, depending on connecting an external switch. what pumps are installed.
- Page 16 AL D E HEAT IN G OP ERATI N G I N ST RU CT ION S Settings Menu Error Log Press the Tool Button to access the Settings Press the Warning button to access the Error Menu from the Main Menu. Lower level Log from the Service Menu.
- Page 17 LED is unlit. The system is off. Installed Accessories Menu After fitting an accessory to the Alde 3020 Compact HE, it must be installed in the control panel software by ticking the box for that accessory in the Installed Accessories Menu, unless otherwise noted.
- Page 18 AL D E HEAT IN G OP ERATI N G I N ST RU CT ION S • Remote controlled 12 V inline circulation Setup Antimicrobial function pump To actively kill Legionella, setup the • 230 V inline circulation pump Antimicrobial function.
- Page 19 • Check the circuit breaker and any 230 V • Moisture is trapped in the control panel. fuses. • Remove the Alde control panel from • Check that any 230 V isolator switches are the vehicle and air in a warm, dry place on (they will often have an LED indicator and overnight.
- Page 20 “3rd Party Panel C. Fail” • Break in comms between Alde control panel and third party control panel. • Check the cable between the Alde control panel and third party control panel.
-
Page 21: Dometic Absorption Refrigerators
DO ME T IC R E FR IGE RAT OR Dometic absorption refrigerator Limitation of liability All information and guidance in these operating Before you start using the refrigerator,please instructions were prepared after taking into read the operating instructions carefully. consideration the applicable standards and These instructions provide you with the regulations as well as the current state of... -
Page 22: Safety Instructions
D OM ET IC REF RI G ERATOR Safety instructions natural compound of hydrogen and nitrogen) is used in the cooling unit as a coolant. Application according to regulations Non-ozone-hazardous cyclopentane is used as a propellant for manufacturing PU foam This refrigerator is designed for installation insulation. - Page 23 DO ME T IC R E FR IGE RAT OR Safety instructions when WARNING: Never open the absorber storing foodstuffs cooling unit! It is under high pressure. There is a danger of injury. Instructions for storing food in a refrigerator: Information on coolant No refrigerator of any kind can improve the quality of the food;...
- Page 24 D OM ET IC REF RI G ERATOR • Wash your hands before and after handling an absorption system responds slowly to any food. changes made by the thermostat controller, by loss of cooling energy through opening • Regularly clean the inside of the refrigerator. the door storing food.
- Page 25 DO ME T IC R E FR IGE RAT OR Description of refrigerator (Appearance is model specific) 1 - Operating controls 2 - Door locking button 3 - Freezer compartment (removable) 4 - Insertable grid shelf (available as op- tion, to be used when freezer compart- ment is removed) 5 - Post-evaporator for cooling compart- ment...
- Page 26 D OM ET IC REF RI G ERATOR 1 - Freezer compartment 2 - Operating controls 3 - Post evaporator for cooling compart- ment 4 - Condensation water drain channel 5 - Data plate 6 - Vegetable bin 7 - Upper door shelf with flap, egg shelf available as option may be inserted.
- Page 27 DO ME T IC R E FR IGE RAT OR Refrigerator operation • The gas burner must be inspected and cleaned as necessary at least once a year. The refrigerator is equipped to operate on When using liquefied petroleum gas (tank three power modes: or refill cylinders) the maintenance interval is reduced to half-yearly or quarterly.
- Page 28 D OM ET IC REF RI G ERATOR 12V DC operation (vehicle’s battery) Note: The flame extinguishes after • Select “Battery voltage” by pressing reaching the preset cooling compartment button (4) temperature and ignites again if the cooling compartment temperature increases again. •...
- Page 29 DO ME T IC R E FR IGE RAT OR Gas operation with internal Inserting / changing the batteries batteries (optional) • Switch off the refrigerator, as described in An optional battery compartment in the section ‘Shutting of the refrigerator’ electronics case for internal (self-contained) power supply of the electronics is available for the model variants RM 8xx1 and RM 8xx5...
- Page 30 D OM ET IC REF RI G ERATOR Explanation of operating controls 8 - Temperature level display The control panel buttons are not accessible 9 - Indicator LED failure / Reset button when the refrigerator door is closed. Open the GAS FAILURE bottom door to reach the operating buttons.
- Page 31 DO ME T IC R E FR IGE RAT OR Gas operation Additional features • The brightness of the display reduces after a few seconds if no other buttons are pressed. The indicator lights again if a button is pressed. Press the button again to activate the required function.
- Page 32 D OM ET IC REF RI G ERATOR If the battery voltage is too low, an acoustic Frame heating (fridge freezer models only) signal (whistle tone) sounds every 15 seconds. All fridge freezer models are equipped with a frame heating (12VDC/3,5W) around the Then replace the batteries in the battery freezer compartment.
- Page 33 DO ME T IC R E FR IGE RAT OR WARNING: In order to prevent discharge of the onboard battery, change the frame heater from continuous operation to another operating time or switch it off. Note: The frame heater is active for 30 minutes after switching on and then switches itself off and on again at time intervals of 5 minutes.
-
Page 34: Winter Operation
D OM ET IC REF RI G ERATOR Positioning the storage racks Winter operation Fig. 29 Fig. 35 Fig. 27 Fig. 31 In winter, check that the ventilation grilles and The storage racks may be pulled out by the exhaust duct system (1) have not been smoothly lifting them and may be positioned blocked by snow, leaves, etc. - Page 35 DO ME T IC R E FR IGE RAT OR • Products must be packed - best of all in closed containers, wrapped in aluminium foil or similar - and stored separately from each other, in order to prevent drying out or odours.
- Page 36 D OM ET IC REF RI G ERATOR Refrigerator compartments WARNING: Do not remove these storage racks. Thus children have no space to be entrapped in the refrigerator. If it is necessary to remove these storage racks (i.e. for cleaning) loosen the locking pins (2) at first as shown, by means of a suitable screw driver.
- Page 37 DO ME T IC R E FR IGE RAT OR Shutting off the refrigerator Fig. 35 Fig. 41 CAUTION! Fig. 36 Fig. 37 Fig. 42 Fig. 43 • Switch off MES and AES models by pressing button (2). Keep button (2) pressed for 3 seconds.
-
Page 38: Troubleshooting
D OM ET IC REF RI G ERATOR Troubleshooting Failure: The refrigerator does not cool sufficiently. Possible cause Action you can take Inadequate ventilation to the unit Check that the ventilation grilles are not covered Thermostat setting is too low Set thermostat to a higher level The condenser is heavily frosted Check that the refrigerator door closes... - Page 39 DO ME T IC R E FR IGE RAT OR Failure: The refrigerator does not cool in 230 V operation. Possible cause Action you can take On-board fuse defective Fit new fuse Vehicle not connected to mains supply Make a connection to a mains power supply voltage AES: Gas operation despite connection to the Appliance switches to gas operation due to...
- Page 40 D OM ET IC REF RI G ERATOR Operation with on-board 12 v power supply Indicator Fault Remedy (2) and (8) 230 V mode: Check mains power connection, mains voltage, "230V" not fuse flashing and available or voltage acoustic signal 20s too low (4) and (8) 12 V mode:...
- Page 41 DOM ETI C RE F RIGE RAT OR /COOK E R Operation with batteries (internal power supply) Indicator Fault Remedy (3) and (8) Flame not ignited Check gas supply (gas bottle, gas valve) flashing brightly Press the (8) button after clearing the fault (3) and (7) Burner defective Check burner, burner nozzles, if necessary...
- Page 42 C OO K ER 3. To light: Push in the control knob and turn Before using your hotplate for the first time, we to full rate – see Fig.1. Hold a lighted match recommend that you prime and then season it. or taper to the burner and push the control To prime the Hotplate knob in and hold.
- Page 43 COOKE R Important If the burner goes out, repeat procedure holding control knob for slightly longer. • Your appliance is fitted with a glass lid shut- off system, which cuts off the power to all 3. For models fitted with Spark Ignition the hotplate burners (gas and electric) if the lid procedure is similar except that the burner is closed.
- Page 44 C OO K ER 10. To turn off: turn the control knob until the is also fitted with a raised bar to prevent line on the control knob is aligned with the trays or dishes making contact with the dot on the control panel. Always make back of the oven.
- Page 45 COOKE R Operation Leaks Cooking Guidelines If a smell of gas becomes apparent, the Best results will be obtained by the shelf supply should be turned off at the cylinder positions in this guide. It is not necessary to IMMEDIATELY. Extinguish naked lights preheat the oven but advisable for a range of including cigarettes and pipes.
-
Page 46: Microwave Oven
MIC R O WAV E Microwave oven general user Important safety guidance instructions WARNING: To prevent fire, burns, Always refer to the microwave operating electric shock and other warnings: instructions supplied with the vehicle Listed below are, as with all appliances, Precautions to avoid possible exposure to certain rules to follow and safeguards to excessive microwave energy... - Page 47 MICR OWAV E 10. Do not pop popcorn longer than the To reduce the risk of Injury to persons: manufacturer’s directions. (Popping time a. Do not overheat the liquid. is generally below 3 minutes). Longer b. Stir the Iiquid both before and halfway cooking does not yield more popped through heating it.
- Page 48 MIC R O WAV E 8. The oven should be cleaned regularly and any food deposits removed; 9. Failure to maintain the oven in a clean condition could lead to deterioration of the surface that could adversely affect the life of the appliance and possibly result in a hazardous situation.
-
Page 49: Thetford C260 Cassette Toilet
CA S S E T T E T OILE T Thetford C260 Cassette Toilet Quick Guide Preparing waste holding tank... - Page 50 C AS S ETT E TOI L ET Emptying waste-holding tank...
- Page 51 CA S S E T T E T OILE T Standard 11. Sliding cover 1. Cover 2. Seat 12. Blade opener 3. Swivelling toilet bowl 13. Waste holding tank mechanism 14. Wheel 4. Blade handle to open/close blade 5. Control panel (position is different on C263 15.
- Page 52 C AS S ETT E TOI L ET Introduction Electric ventilator (if applicable) This Thetford Cassette Toilet is a high quailty Open the service door and remove the product. It is user-friendly, meets high quality waste holding tank. Then remove the filter standards and gives you all the convenience housing cover and place the new filter of home.
- Page 53 CA S S E T T E T OILE T Use of your toilet Note: Ordinary toilet paper can cause clogging. Use Aqua Soft toilet paper instead. Turning the bowl This toilet paper is super soft, dissolves You can turn this bowl to a quickly, prevents clogging and makes it desired position (max.
- Page 54 C AS S ETT E TOI L ET Remove seat and cover Note: Our ‘green’ products Aqua Kem To clean your toilet thoroughly, Green, Aqua Kem Natural and Aqua Rinse remove the seat and cover. (test ISO 11734) are absolutely safe to First push the seat and cover empty into a septic tank or small biological together to the right then lift...
- Page 55 CA S S E T T E T OILE T For correct and efficient support, please Electric Ventilator (if applicable) ensure all relevant product type information is After approximately 4 weeks of use, the filter available. loses its absorption power. Remove the filter Spare parts housing cover and place the new filter into the new housing.
- Page 56 C AS S ETT E TOI LET / EX TERN AL BB Q PO IN T 2. Components replaced during repair under guarantee become the property of Thetford. 3. This warranty does not prejudice current consumer protection laws. 4. This warranty is not valid in the case of products that are for, or are used for, commercial purposes.
- Page 57 EXTE RN A L S H OW E R P OIN T External shower point The coupling K-valve is designed such that the quick acting valve can only be opened if (when fitted) the connection has been made via the plug- in connection.
-
Page 58: Caravans With Tv Inlet In Battery Box
T V INLET/C D/M P 3 TU N ER Caravans with TV inlet in allow the decoder and dish to communicate correctly) battery box (when fitted) a. Connect the dish to the socket (or flying Models equipped with TV points in the battery lead) in the battery box with a suitable lead. -
Page 59: Cd/Mp3 Tuner
TV I N L ET /CD/ MP 3 T U N E R CD/MP3/TUNER WITH The RED spot on the bottom of the mast indicates the front of the Antenna. AUXILIARY INPUT 2. When receiving vertically polarized signals, Provision has been made in the furniture for rotate the winder anti-clockwise to cant your dealer to install a provided head unit the antenna through 90°. -
Page 60: Bedding
BED D IN G /B L IN D S Bedding configurations Sleeping bags and duvets can be compressed into small spaces and can be ready to use in minutes. Fig. C Lift-up bunks 1. Grasp the bunk and pull carefully upwards and towards you. - Page 61 B E DDING/ BLIN DS Operating instructions for softrollo blinds Fig. D Hold the operating aluminium bar in the middle and raise or lower the blind and flyscreen independently, operating together will require excessive force in operation. Care instructions: Clean the blind only with a damp sponge.
-
Page 62: Doorscreen
D O O R S CR EEN / R OOF L I G HTS / EX TERI OR DOOR Doorscreen Exterior Door Operating Instructions The door flyscreen is tracked top and bottom. When drawing or releasing the doorscreen, To un-lock the door, insert the key and turn care should be taken to always pull the clockwise ensuring the key is removed before doorscreen close to the centre. -
Page 63: Windows
W IN DO WS / ROL LE R B LINDS R OOF LIGH T S Heki care instructions WARNING: The door retainer is Clean the blind only with a damp sponge. designed to hold the door in normal Clean on a regular basis to avoid dust/ dirt conditions. -
Page 64: Mini Heki Rooflight
R OO FLIG HTS Mini Heki rooflight (when fitted) Two extra opening angles apart from the one in which the dome is fully opened can be chosen. The intermediate position can be fixed with a To open depress the button (Fig. A). slide marked with the arrows. -
Page 65: Midi Heki Rooflight
ROOF LIGH T S Midi-Heki rooflight Opening the Dome Closing the Dome (drive and rest position) Push the bar with both hands on the right and the left side in such a way that the hook bolt (1) the dome on the left and the right side and the bar lies on the push button (2). -
Page 66: Heki 4 Remote Control
R OO FLIG HTS Red Control Lamp Heki-2 roof light (when fitted) The lift/tilt roof light can be set in 3 positions by means of pneumatic springs. Position 1 lifts the pane 12mm without allowing rain to enter the caravan. Position 2 sets the pane to a 150mm opening and locks with a bar. - Page 67 R OOFLIGH T S Rain Sensor EMERGENCY PROCEDURE In event of power failure the dome can be closed manually as follows: • Switch off the power supply from the vehicle to the HEKI • Remove the ventilation grilles and the covers for the lights.
-
Page 68: Mpk Rooflight
R O O FLI GHTS MPK Rooflight (when fitted) Care instructions: The rooflight should only be washed by hand, using a sponge with plenty of clean water WARNING: to avoid scratching. Caustic detergents and Never stand on the dome of the rooflight! solvents may attack the plastic and make it brittle or disintegrate. - Page 69 ROOF LIGH T S Safety precautions: - repairs should be carried out only by trained personnel - inform an approved dealer in case of defects and malfunctions - before starting off, check the rooflight for damage in the acrylic dome (tension cracks) and the opening mechanism which could arise owing to, for example, branches and other natural causes.
-
Page 70: Table Storage
D O O R S /TAB L ES Care of laminate tops, tables, Tables furniture and doors Slide the top of the chest of drawers forward to form a convenient table. Lift the rear portion Do not use abrasives, chemically treated to slide the top away. -
Page 71: Shower Care Points
SHOW ER/AWN I N G/S U N ROOF /R OOF Tables stored in the table storage Specific awning sizes must be confirmed compartment must be securely clipped into with the dealer or awning manufacturer prior place whilst in transit. to purchase. Shower care points TV Brackets (when fitted) •... -
Page 72: Step On Hitch Cover
S T EP O N HITC H/C YC LE RACK Step on hitch cover The Swift Group only recommends a Thule cycle carrier which will conveniently clip in to Where a step on hitch cover is fitted, the pre-installed mounting rail. The maximum customers are reminded only to stand on the weight which can be mounted on the carrier designated areas, identified with black anti-slip... -
Page 73: Omni-Vent
OM NIV E N T • By pushing on the switch S1 (extract) or Omni-vent (when fitted) S3 (intake), the airflow can be adjusted in 6 steps. See table 19. *MIN = 3,7 m /min (2 W - 0,17 A) *MAX = 24 m /min (86 W - 7,20 A) •... - Page 74 O M NIV ENT • For reasons of security, the ventilator, the ventilator stops when the tension is too high (19,5 V) or too low (11,1 V) or when the fan is blocked. For trouble shooting see fig 21. Maintenance The ventilator grid can be removed for cleaning.
-
Page 75: Rear View Camera
RE A R V ISION CA ME R A Digital Reversing System • Check that the camera lens is clean as dirt can obscure the view. (when fitted) • Never use a power washer or water jet to The Caravan Reversing Camera Kit features clean the camera or transmitter. - Page 76 R EAR VI S I ON CAM ERA • Do not leave the monitor in a visible place Initial WIFI set-up when the vehicle is unattended. Note this will usually have been completed by your dealer before • The monitor has no serviceable parts. Do not delivery.
- Page 77 RE A R V ISION CA ME R A If something goes wrong with this process the Use this button to record the transmitter can be reset back to the factory video being displayed settings. To do this access the transmitter (see note) (located above the number plate under the black panel) and with the transmitter powered...
- Page 78 R EAR VI S I ON CAM ERA • Select Destination, Find address Using the separate App on your Android or Apple iOS phone • Press on Town, then if the keyboard looks If you don’t want to use the supplied monitor incorrect, press More, select the English you can use the separate App on an Android keyboard (either ABC, or QWERTY format)
- Page 79 RE A R V ISION CA ME R A Product Specification - Caravan Camera Kit Transmission Frequency 2400MHz – 2483.5MHz Unobstructed Effective Range 100m (approx.) Operating Temperature 0oC – 60oC Storage Temperature 25oC Frame Rate 30fps Video Compression H.264 Encryption: WPA2 Operating Humidity: 20% –...
- Page 80 S ER V I CE DOORS Seitz Service door operating To close the door push the spring stay in to fold away (when fitted fig 4.) and instructions (when fitted) close the door applying pressure to the To open the door put the key in the lock hatch until you hear the locks click in to fig 1.
Need help?
Do you have a question about the Compact 3020 HE and is the answer not in the manual?
Questions and answers