Table of Contents
Advertisement
Advertisement
Table of Contents

Related Manuals for Ubiquiti airGateway-LR


Summary of Contents for Ubiquiti airGateway-LR
- Page 1 Indoor Access Point with External Antenna Model: airGateway-LR...
-
Page 2: Package Contents
Introduction Thank you for purchasing the Ubiquiti Networks airGateway ™ ™ This Quick Start Guide is designed to guide you through the installation, and show you how to access the airOS ® Configuration Interface. This Quick Start Guide also includes the warranty terms and is for use with the airGateway LR. -
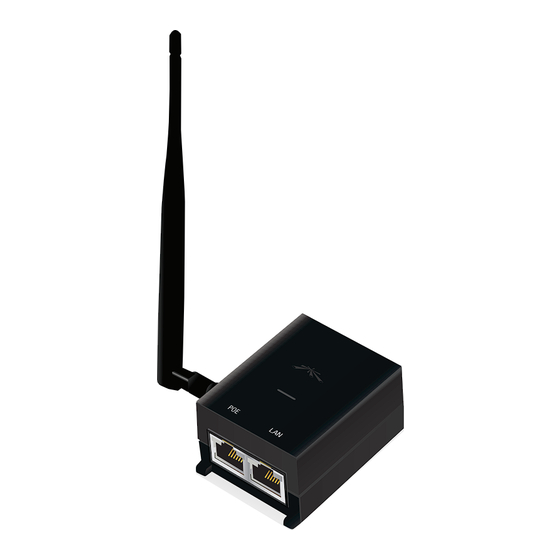
Page 3: Hardware Overview
Hardware Overview RJ45 Connector (Male) Antenna Connector Port Port Steady White Indicates bootup/initializition/power-on. Steady Blue Indicates the airGateway is working properly and an active connection is detected. Alternating Blue/White Indicates the device is busy; do not move or unplug. - Page 4 Bottom Reset Reset Mounting Tabs Reset Resets the airGateway to factory defaults. To reset the airGateway, press and hold the Reset button for more than five seconds while the airGateway is powered on. Reset Ext Resets the airMAX CPE device connected to ®...
-
Page 5: Installation Requirements
Installation Requirements The airGateway is powered by and integrates exclusively with Ubiquiti Networks PoE adapters. A wall mount kit is included. • Ubiquiti Networks PoE Adapter (24V, 0.5A) • Ubiquiti Networks airMAX CPE device • CAT5/6 cable • 6 mm drill bit and drill •... - Page 6 2. Insert the male RJ45 Connector of the airGateway into the Ethernet port labeled POE on the PoE Adapter. Push the two units together until they connect. 3. Connect the Ethernet cable that was disconnected from the POE port in step 1 to the POE port on the airGateway. *720-00066-01* 720-00066-01...
- Page 7 4. Connect the Ethernet cable that was disconnected from the LAN port in step 1 to the LAN port on the airGateway. 5. Connect the External Antenna to the Antenna Connector on the airGateway.
-
Page 8: Wall Mounting
Wall Mounting 1. Position the Wall Mount Bracket at the desired location on the wall with the bubble level at the bottom. Use the bubble level to ensure the bracket is plumb. 2. Mark the two holes with a pencil. - Page 9 3. Drill the holes in the wall using a 6 mm drill bit. 4. Insert a Screw Anchor into each hole. Secure the Wall Mount Bracket to the wall by inserting a Screw into each Screw Anchor.
- Page 10 5. Attach the airGateway and PoE Adapter assembly to the Wall Mount Bracket: a. Insert the two Mounting Tabs on the airGateway into the slots located at the top of the Wall Mount Bracket. b. Rotate the PoE Adapter into the Wall Mount Bracket until it snaps in place.
-
Page 11: Connecting Via Wi-Fi
Connecting via Wi-Fi To configure the airGateway, you must access it via Wi-Fi from a computer. 1. Connect to the wireless network (SSID) named www.ubnt.com. 2. Launch your web browser and type https://192.168.1.1 in the address field. Press enter (PC) or return (Mac). Note: Your computer needs to be on the 192.168.1.x subnet. - Page 12 4. Change the default airGateway administrator password. Enter a new password in the New Password and Verify Password fields and click Next. 5. Enter a name for your wireless network (SSID) and a password (passphrase) for your wireless network. Click Next.
- Page 13 6. Verify your settings and click Finish or click Previous to change the settings. The airGateway is ready to use. Connect wireless clients as described below: Windows 1. Go to Connect to Network. Windows 8 Click the Network icon. Windows 7 Right-click the Network icon.
-
Page 14: Specifications
Specifications airGateway-LR Dimensions airGateway: 54 x 44 x 30 mm Mount: 154 x 49 x 39 mm Weight 83 g (with mount) Networking Interface (2) 10/100 Ethernet Ports Buttons (1) Reset airGateway (1) Reset External airMAX Device Enclosure Polycarbonate Frequency 2.412 - 2.484 GHz... -
Page 15: Safety Notices
Safety Notices Read, follow, and keep these instructions. Heed all warnings. Only use attachments/accessories specified by the manufacturer. WARNING: Do not use this product in location that can be submerged by water. WARNING: Avoid using this product during an electrical storm. -
Page 16: Limited Warranty
(VI) has no original Ubiquiti MAC label, or is missing any other original Ubiquiti label(s). (VII) has not been received by Ubiquiti within 30 days of issuance of the RMA. -
Page 17: Limitation Of Liability
SUBJECT TO LIMITATIONS, INTERRUPTIONS, DELAYS, CANCELLATIONS AND OTHER PROBLEMS INHERENT IN THE USE OF COMMUNICATIONS FACILITIES. UBIQUITI NETWORKS, ITS AFFILIATES AND ITS AND THEIR THIRD PARTY PROVIDERS ARE NOT RESPONSIBLE FOR ANY INTERRUPTIONS, DELAYS, CANCELLATIONS, DELIVERY FAILURES, DATA LOSS, CONTENT CORRUPTION, PACKET LOSS, OR OTHER DAMAGE RESULTING FROM ANY OF THE FOREGOING. - Page 18 Note Some countries, states and provinces do not allow exclusions of implied warranties or conditions, so the above exclusion may not apply to you. You may have other rights that vary from country to country, state to state, or province to province. Some countries, states and provinces do not allow the exclusion or limitation of liability for incidental or consequential damages, so the above limitation may not apply to you.
-
Page 19: Industry Canada
Industry Canada This Class A digital apparatus complies with Canadian ICES-003. To reduce potential radio interference to other users, the antenna type and its gain should be so chosen that the equivalent isotropically radiated power (e.i.r.p.) is not more than that permitted for successful communication. -
Page 20: Australia And New Zealand
Australia and New Zealand Warning: This is a Class A product. In a domestic environment this product may cause radio interference in which case the user may be required to take adequate measures. CE Marking CE marking on this product represents the product is in compliance with all directives that are applicable to it. - Page 21 Español La Directiva 2002/96/CE de la UE exige que los equipos que lleven este símbolo en el propio aparato y/o en su embalaje no deben eliminarse junto con otros residuos urbanos no seleccionados. El símbolo indica que el producto en cuestión debe separarse de los residuos domésticos convencionales con vistas a su eliminación.
-
Page 22: Declaration Of Conformity
UBIQUITI NETWORKS device, megfelel a vonatkozó alapvetõ [Hungarian] követelményeknek és az 1999/5/EC irányelv egyéb elõírásainak. Íslenska Hér me l sir UBIQUITI NETWORKS yfir ví a UBIQUITI NETWORKS device, er í samræmi vi grunnkröfur og a rar kröfur, sem ger ar eru í [Icelandic] tilskipun 1999/5/EC. -
Page 23: Online Resources
NETWORKS device, è conforme ai requisiti essenziali ed alle altre [Italian] disposizioni pertinenti stabilite dalla direttiva 1999/5/CE. Latviski Ar o UBIQUITI NETWORKS deklar , ka UBIQUITI NETWORKS device, atbilst Direkt vas 1999/5/EK b tiskaj m pras b m un citiem ar to saist [Latvian] tajiem noteikumiem. - Page 24 . u b n t . c o m ©2013 Ubiquiti Networks, Inc. All rights reserved. airGateway™, airMAX®, Ubiquiti Networks™, and the Ubiquiti logo® are trademarks or registered trademarks of Ubiquiti Networks, Inc. in the United States and in other countries. RRPH110413...
Need help?
Do you have a question about the airGateway-LR and is the answer not in the manual?
Questions and answers