
Subscribe to Our Youtube Channel
Related Manuals for Schweigen CL6272


Summary of Contents for Schweigen CL6272
- Page 1 RANGEHOOD & INSTALLATION GUIDE CL6272 For Household Outdoor Use Only Revision V5 HOME APPLIANCES www.schweigen.com.au...
-
Page 2: Table Of Contents
Flexible Ducting __________________________________________________________________________ 17 Back Draft Fins ____________________________________________________________________________ 17 Installation Advice ________________________________________________________________________ 18 8. Maintenance Condensation Information ________________________________________________________________ 20 Troubleshooting _____________________________________________________________________________________________ 22 Technical Specifications __________________________________________________________________ 22 Faulty Installation _________________________________________________________________________ 23 9. Specification CL6272 _______________________________________________________________________________________________________ 24 10. Disclaimer ___________________________________________________________________________________________________ 25 Page 2... -
Page 3: Welcome
The guide contains important information on the use and maintenance of the unit, as well as important safety notes. This will ensure your personal safety and the lasting value of your rangehood. We trust that you will enjoy your new Schweigen rangehood. Please always retain your proof of purchase to aid in any warranty queries. -
Page 4: Your Safety
2. Your Safety WARNING Please read this section thoroughly before attempting to operate the appliance. Inspect your product upon receipt. Any damages or defects MUST be reported within 48 hours of purchase, or no claim will be recognised. DO NOT INSTALL THIS APPLIANCE IF IT IS FOUND TO BE DAMAGED. If this product is installed damaged, neither the supplier, nor the retailer, will be responsible for any costs associated with the repair, replacement, removal or re-installation of the appliance. -
Page 5: Before Installation
18. If the unit is not adequately covered or sheltered from the outside elements the warranty will be null and void. Before Installation We recommend this appliance be installed or repaired by a qualified Schweigen Home Appliances technician. Please see our website www.schweigen.com.au for a list of our recommended installers. -
Page 6: Product Use
2. Your Safety Product Use This product is designed for household use and should not be used for commercial applications. After use, always ensure that all controls are in the “OFF” position. When frying with a gas flame, take particular care not to allow the oil or grease in the pan to catch fire. -
Page 7: Tips And Suggestions
3. Tips & Suggestions The Rangehood has one mode of operation: Air extraction: The air is drawn in and cleaned by the grease filters and directed outside. Please check the cleaning and maintenance section for the filters’ cleaning periods. For Users 1. -
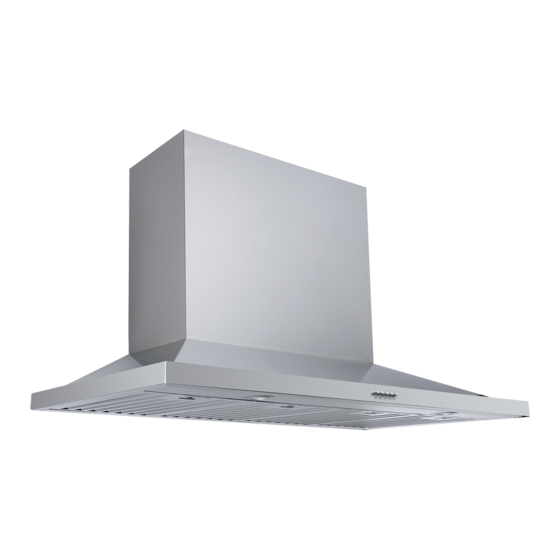
Page 8: Description
4. Description Main Rangehood Mounting Bracket Extension Flue Main Flue Male Plug (Main Power 240V) Two 150mm Outlet Two Drip Trays (attached to the bottom of the motors) Filters Lamp (For GU10 fittings, please twist to remove) NOTE: Filter and light quantity may vary from model to model. -
Page 9: Operation
5. Operation Push Button Control Panel Turn on/off the rangehood High speed setting Medium speed setting Low speed setting Turn on/off the lamp Page 9... -
Page 10: Cleaning And Maintenance
6. Cleaning & Maintenance WARNING Always switch off and disconnect power before cleaning. Surfaces Wash with warm soapy water and a soft sponge. Never use abrasive detergent, scouring pads, steel wool or solvents on any part of this appliance, Always make sure to dry the appliance after cleaning and never leave wet, as this will cause irreparable damage. -
Page 11: Cleaning The Interior
6. Cleaning & Maintenance WARNING • If the grease filters are very dirty, the motor will extract only a small quantity of air, which reduces its efficiency; • The grease deposits that build up on the filter are highly flammable and COULD EASILY CATCH FIRE. - Page 12 6. Cleaning & Maintenance Cleaning the Exterior We recommended using a soft cloth, warm water and a liquid soap to clean the exterior. Rinse with clean water and ensure that the appliance is completely dry after cleaning. For better results, you can use high quality cleaning and protection products (eg.
-
Page 13: Replacing The Light Bulb
6. Cleaning & Maintenance Replacing the Light Bulb DANGER Always switch off and disconnect the power cord before replacing any light bulbs. Failure to do so may cause serious injury. Please be aware that the light bulb will retain heat for a short period of time after being switched off. Step 1 Step 2 Step 3... -
Page 14: Installation
7. Installation DANGER Always switch off and disconnect power before installing the rangehood. Failure to do so may cause serious injury. *IMPORTANT: Please check all State and Federal Laws in relation to the minimum - maximum heights, regulations concerning the expelling of air and install your rangehood in accordance with local laws and regulations. -
Page 15: Wall Mount Installation
7. Installation WARNING If the user decides to install the rangehood at a distance of less than minimum height above the cooking surface, the company declines responsibility for damages See Mounting Laws suffered by the rangehood due to and Regulations excess heat or damage to objects, people and others caused directly or indirectly by a malfunction,... -
Page 16: Installation Guide
7. Installation Step 1 Secure rangehood to the wall using only primary mounting points. Check the level of the rangehood and adjust accordingly if necessary. Once level, continue to secure the rangehood via the secondary mounting points. Step 2 Feed through aluminium flexi duct from the outlet block to the kitchen ceiling. -
Page 17: Bbq Installation
7. Installation BBQ Installation When installing the rangehood over a BBQ , please be aware that the lid will obstruct the rangehoods effectiveness to extract smoke, steam and odours. Where possible, remove the lid of the BBQ unit when in use to allow for effective rangehood extraction. Flexible Ducting / Ducting Please do not crush or kink any of the ducting, this will reduce the air flow and may cause noise throughout the system. -
Page 18: Installation Advice
7. Installation Installation Advice • Never reduce flue diameter right next to the rangehood outlet fitting, refer to figure 1. • Never fit reductions next to curves or bends in the installations. They must always be in straight sections and as far as possible from the rangehood, refer to figure 2. •... - Page 19 7. Installation Figure 1 Figure 2 Figure 3 Figure 4 Figure 5 Page 19...
-
Page 20: Maintenance
8. Maintenance Condensation Information The induction cooktop is designed to provide rapid heating, improved thermal efficiency and greater heat consistency. For some customers with an induction cooktop, condensation can form on their rangehood filters while using their cooktop. The induction cooktops’ heat source is contained in the conductive base of the pot. When compared with a gas, electric or wok burner, the heat is not isolated or contained to one area and therefore gradually rises up on all sides of the pot or frypan. - Page 21 8. Maintenance User advice to avoid condensation in the rangehood: • The rangehood should be switched on approx. 10 minutes prior to cooking and the delay shut down timer set after cooking has stopped in order to clear the fumes held in the flue. These steps will help clear the flue out fully.
-
Page 22: Troubleshooting
Rangehood air suction is weak Rangehood does not direct air out (through chimney) Loud noise from the rangehood Technical Specifications Model CL6272 Feeding Voltage 220-240V 50Hz Lamp Power — Halogen (W) 2 x 35W (supplied) Lamp Power — LED (W) 2 x 1.8-7W (optional) -
Page 23: Faulty Installation
It is not the responsibility of Schweigen Home Appliances to rectify any incorrect installations. A service call out fee will be charged for any Schweigen technician that attends a call, whereby it’s established that the fault is due to an incorrect installation or non-manufacturing fault. Should the appliance be installed in such a way that the service agent is unable to gain access to the appliance, the person/s who own the premises or the appliance where the appliance resides —... -
Page 24: Specification
9. Specification Page 24... -
Page 25: Disclaimer
All information supplied is to be used for general reference purposes only and is on the understanding that Schweigen Home Appliances will not be liable for any loss, liability or damage of whatever kind arising as a result of any reliance upon such information. - Page 26 Notes Page 26...
- Page 27 Page 27...
- Page 28 HOME APPLIANCES Unit 102/45 Gilby Road, Distributed by: Mt Waverley 3149 Victoria. 1300 881 693 (EST) www.schweigen.com.au...
Need help?
Do you have a question about the CL6272 and is the answer not in the manual?
Questions and answers