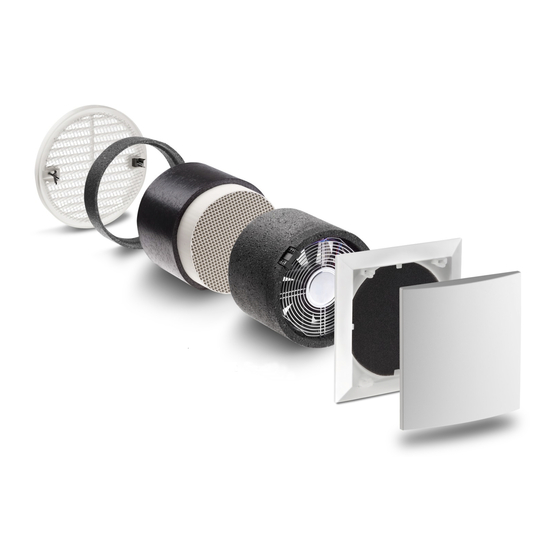
Lunos e2 mini Mounting Instructions
Decentralized ventilation system with heat recovery type
Hide thumbs
Also See for e2 mini:
- Installation manual (18 pages) ,
- Operation manual (5 pages) ,
- User information (6 pages)
Advertisement
Quick Links
Decentralized Ventilation System with Heat Recovery Type
Contents
About these instructions, Safety instructions, Technical data, Disposal
Dimension drawings, Mounting position
Scope of application, Shipping units
Assembly: Mounting tube, Outer grille
Assembly: Electrical installation and Electrical connection
Assembly: Heat exchanger unit and interior screen
Filter change, Cleaning, Additional and Spare parts
About these Instructions
Read these instructions carefully and completely before executing assembly work! General safety
instructions and the safety symbols with respective notes in text form must be observed.
These instructions are to be passed on to the user after completing assembly work (tenant, own-
er, building administration etc.).
Symbols in these instructions
This symbol warns of a risk of injury.
This symbol warns of a risk of injury from electricity
Safety Instructions
Caution! All terminals must be completely disconnected from the power supply before com-
mencing assembly work! The fan is insulated pursuant to Protection Class II, connection pro-
tection does not apply!
Attention! Electrical connections must be carried out by authorized qualified staff in accord-
ance with applicable VDE 0100!
Attention! This device must not be operated by children or persons (filter change/cleaning)
who are not able to operate it safely on account of their physical, sensory or mental capacity or
due to their inexperience or lack of skills. Children must be supervised to ensure they do not
play with the device.
Technical Data
Supply voltage:
Device voltage:
Protection Class:
Flow rate:
Disposal
Dispose of packaging correctly sorted. If you wish to dispose of the device, observe applica-
ble conditions. Your local disposal center will provide relevant information.
Mounting Instructions
e² mini
- Please pass on to User-
Page:
1
2
3
4
5
6
7
230 VAC 50 Hz
12 VDC SELV
IP 22
5m³/h; 10m³/h; 20m³/h
1
Advertisement

Related Manuals for Lunos e2 mini


Summary of Contents for Lunos e2 mini
- Page 1 Mounting Instructions Decentralized Ventilation System with Heat Recovery Type e² mini - Please pass on to User- Contents Page: About these instructions, Safety instructions, Technical data, Disposal Dimension drawings, Mounting position Scope of application, Shipping units Assembly: Mounting tube, Outer grille Assembly: Electrical installation and Electrical connection Assembly: Heat exchanger unit and interior screen Filter change, Cleaning, Additional and Spare parts...
-
Page 2: Installation Position
Dimension drawing (all dimensions in mm) □ min. 167 Assembly tube DI 100 mm, DA 104 mm Dimensions in mm Installation Position Decentralized fans with heat recovery of the type e² mini only function in pairs in alternating operation. One device operates for 50 s in supply air mode, the other for 50 s in exhaust air mode at the respec- tive flow rate set. - Page 3 Scope of application Temperature range: - 15°C to + 40°C Can be used at a relative humidity of up to 65% inside the apartment. Low condensate formation may occur during the heating period. If limits are exceeded, switch off the device and close the interi- or screen.
- Page 4 Tighten the claws with screws using the integrated claws (tighten the screws). The solid plastic out- side covers provided by Lunos en- sure high resistance to driving rain and can be used in the Stress Group III pursuant to DIN 4108-3 (2012-04).
- Page 5 Assembly – Electrical Installation and Electrical Connection Safety Instructions Caution! All assembly work on the fan must only be carried out when power has been disconnected from all terminals! Make sure all connection lines are de-energized before connecting the fan to the power supply ! (disconnection from power supply with at least 3 mm contact opening, e.g.
- Page 6 Assembly – Heat exchanger unit and Interior screen ⑦ Remove the inside plaster protec- tive cover and insert the heat ex- changer unit into the assembly tube, observe 15 mm distance. Using the loop on the inside of the heat exchanger unit, the unit can be adjusted by pulling out, if required.
- Page 7 I III II rocking the rocker switch W1 once. Functionality of the filter change display in connection with the TAC and LUNOS-KNX control is de- scribed in the respective instruc- tions. LED lights up beneath switch Please record the filter changes made below:...
- Page 8 Notes Deutschland LUNOS Lüftungstechnik GmbH Tel.: 0 30 / 36 20 01 - 0 für Raumluftsysteme Fax: 0 30 / 36 20 01 - 89 Wilhelmstr. 31 email: info@lunos.de 13593 Berlin Internet: http://www.lunos.de...
Need help?
Do you have a question about the e2 mini and is the answer not in the manual?
Questions and answers