Table of Contents
Advertisement
Quick Links
Download this manual
See also:
User Manual
Advertisement
Table of Contents

Related Manuals for Vimar 02905


Summary of Contents for Vimar 02905
- Page 1 Instructions manual Thermostat 02905 Installer Manual...
-
Page 3: Table Of Contents
Table of Contents 1. Timer-Thermostat 02905 ………………………………………………………………………………………… 2 2. Field of application ……………………………………………………………………………………………… 2 3. Installation ………………………………………………………………………………………………………… 2 4. Connections ………………………………………………………………………………………………………… 2 4.1 Relay connection ……………………………………………………………………………………………… 2 4.2 Multi-function input …………………………………………………………………………………………… 3 5. Inserting new / replacement batteries ………………………………………………………………………… 4 . -
Page 4: Timer-Thermostat 02905
1. Thermostat 02905 Wall-mounting, battery-powered thermostat with interface with capacitive keys. Equipped with user-friendly functions to facilitate energy saving. Designed to control heating and air-conditioning via C, NC, NO relay output. Equipped with multi-function input for remote control. 2. Field of application This device is designed to control room temperature by acting on the control circuit of the burner or circulation pump (heating) or on the control circuit of the air conditioner (air conditioning), ensuring an ideal temperature. -
Page 5: Multi-Function Input
4.2 Multi-function input Depending on how it is configured, the multi-function input can be used to activate various functions of the timer-thermostat (see par. 7.8 and 7.9). It is on when the two terminals of the figure are closed by a dry contact; vice versa if they are open, the input is off. -
Page 6: Inserting New / Replacement Batteries
5. Inserting new / replacement batteries When replacing batteries, remove the front panel by raising it with a screwdriver. Replace the batteries with Alkaline 1.5V "AA" batteries. CAUTION! In case of replacement, dispose of batteries in the specific differentiated collection bins Fig. -
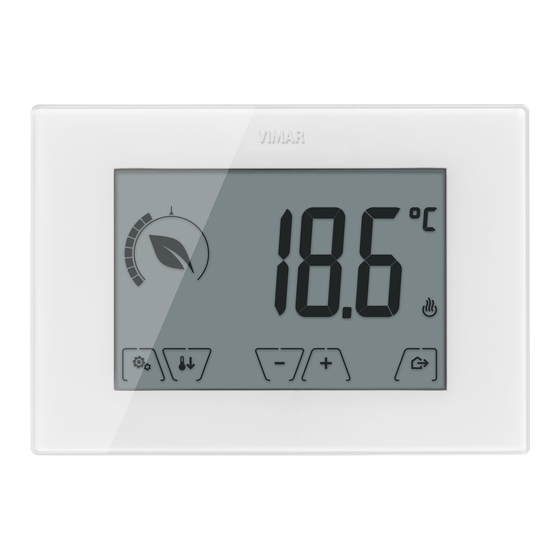
Page 7: Display
6. Display The touchscreen display allows you to control the system using the following buttons and icons: Fig. 5: Graphical interface and buttons A: Battery charge status B: Operating mode C: Away D: Confirm E-F: Menu navigation and setting parameters G: Back H: Nighttime reduction I: Settings menu... -
Page 8: Functions Of The Buttons
6.1 Functions of the buttons : increases the numerical values. When it "disappears" from the display it means that the value cannot be increased any more. : decreases the numerical values. When it "disappears" from the display it means that the value cannot be decreased any more. -
Page 9: Ecometer
6.3 Ecometer Energy saving Ring for the level of consumption indicator Fig. 6: Set of ECOMETER icons On the left-hand side of the display there is a set of icons called the "ECOMETER" that provide an overview of the expected consumption as an aid to energy saving. The information displayed is based on a consumption forecast obtained by comparing the currently set temperature setpoint and the estimated average consumption (which therefore has nothing to do with the current room temperature). -
Page 10: Operating Mode
7. Operating mode The thermostat 02905 is able to adjust the temperature according to the following operating modes: • Switched off (OFF): switches the system off without making any adjustments • Manual (ON): lets you set the required temperature set-point manually •... -
Page 11: Manual
7.2 Manual (ON) This is the "traditional" operating mode. The thermostat controls the room temperature and takes it to the value set by the user (manual adjustment setpoint). Fig. 9: Typical screen for Manual mode The set point can always be changed via In the course of setting, the set point flashes and the circular ring fills up accordingly;... -
Page 12: Away
7.3 Away This mode is useful to achieve energy savings quickly and effectively whenever the user leaves the reg- ulated room. In "Away" mode the system makes the adjustment according to the "away temperature" setpoint (see para. 9.4.2). The Away mode can only be activated in manual mode by touching The display will show the "away temperature"... -
Page 13: Nighttime Reduction
7.4 Nighttime reduction This is the typical mode to use at night to reduce system consumption significantly. In "Nighttime reduction" mode the device reduces the consumption of the system, taking the room tem- perature to a lower value (or higher, if on air-conditioning) than the Manual mode by degrees (see par. -
Page 14: Antifreeze
7.5 Antifreeze This mode, which can only be activated when the system is operating in heating mode, lets you set a minimum temperature value ( setpoint) to avoid damage to the pipework or to keep it from falling below a certain safety level when you are away for lengthy periods in the winter. The "antifreeze"... -
Page 15: Remote Reduction
7.6 Remote reduction Remote reduction is a useful way to "centralize" energy saving if there are multiple 02905 thermostats in different rooms of the same house. It is similar to Nighttime reduction mode with the only difference being that activation is by remote control. -
Page 16: Remote Activation
7.7 Remote activation This mode is typically used in applications where you want to remotely enable or disable temperature control of a room and limit the functions that can be performed by the user. For example, this is a typical mode in hotel room management. This mode comes into operation when the multi-function input is activated (see par. -
Page 17: Selecting User Menu Type And Resetting Default Parameters
8. Selecting user menu type and resetting default parameters Switch off the thermostat by removing the batteries and switch back on by replacing them; for approximately 3 s, the display will show the firmware version and the icon • Easy Menu Within 3 secs, touch and, using , select EASY and then YES confirming with... -
Page 18: Settings Of The Normal Menu
9. Settings of the normal menu From the settings menu you can configure all the features of the thermostat. On the main screen (see Fig. 3) tap the icon. From the main menu, using will display the following (flashing) symbols in succession, which provide access to the corresponding submenus: operating mode setting unit of measurement setting... -
Page 19: Heating/Air-Conditioning Setting
9.3 Heating/air-conditioning setting This menu lets you set the operation of the device depending on the season (winter/summer): • heating • air-conditioning Using select the required operation and confirm with 9.4 Temperature set point setting This menu lets you set the temperatures and hystereses necessary for defining the temperature control set-point used in the different operating modes. -
Page 20: Away Temperature
9.4.2 Away temperature This menu, via , lets you increase/decrease the value of the away temperature The away temperature, preset by the user, is an intermediate temperature geared to obtain sub- stantial energy savings during periods when the user is away. The away temperature differs depending on whether you are in the heating or air-conditioning mode. -
Page 21: Hysteresis Of The Device
9.4.6 Hysteresis of the device This menu, via , lets you set the temperature range of the heating/air-condition- ing system between "ON" and "OFF". This value can also be changed via the submenu for ON/OFF operation. The parameter cannot be changed if the thermostat is set as PID operation. For example: Heating, with setpoint on 20.0°C, : 0.5°C ... -
Page 22: Onoff/Pid Setting
9.7 OnOff/PID setting This menu lets you select the way in which the ambient temperature will be controlled. you can select the following options: • (OnOff control): this is the traditional "threshold" control so that, on exceeding the set tem- perature increased by (vice versa for air-conditioning), the heating is switched off to then be turned back on when the room temperature drops below the set temperature. -
Page 23: Info
9.8 Info The menu lets you view information related to the thermostat. Using you can select: • : displays the number of hours that the thermostat relay has been on (the same as the number of hours of operation of the system). The counter can be reset, for example at changes in season to differentiate between heating and air-conditioning, by pressing and holding the button. -
Page 24: Summary Table Of Thermostat Parameters
10. Summary table of thermostat parameters Reso- Function Parameters Value range Default value lution [Off, Nighttime Reduction, Multi-function input IN selection Activation, Heating/Air-Con.] Nighttime Reduction [1,..,6]°C 0.1°C 4°C δ (red. offset) Selection Temperature control mode [Heat., Air-con.] Heating TempCtrl Control algorithm Algorithm [ON/OFF, PID] ON/OFF... -
Page 25: Cleaning The Device
11. Cleaning the device The device features a touchscreen display with capacitive buttons and therefore requires you to be gentle during the cleaning phase. Avoid using aggressive products. Clean the display with a special cloth for cleaning lenses. 12. Installation rules Installation should be carried out in compliance with the current regulations regarding the installation of electrical systems in the country where the products are installed. - Page 26 Viale Vicenza, 14 - 36063 Marostica VI - Italy Tel. +39 0424 488 600 - Fax (Italy) +39 0424 488 188 02905 installer 01 1406 Fax (Export) +39 0424 488 709 VIMAR - Marostica - Italy www.vimar.com...
Need help?
Do you have a question about the 02905 and is the answer not in the manual?
Questions and answers