Vimar 02906 Instruction Manual
Gsm thermostat
Hide thumbs
Also See for 02906:
- Installer/user quick manual (4 pages) ,
- Installer/user quick manual (6 pages)
Table of Contents
Advertisement
Advertisement
Table of Contents

Related Manuals for Vimar 02906


Summary of Contents for Vimar 02906
- Page 1 Instructions manual 02906 GSM thermostat Installer Manual...
-
Page 3: Table Of Contents
Table of Contents 1. GSM thermostat 02906 …………………………………………………………………………………………… 2 2. Field of application ……………………………………………………………………………………………… 2 3. Installation ………………………………………………………………………………………………………… 2 4. Connections ………………………………………………………………………………………………………… 4 4.1 Relay connection ……………………………………………………………………………………………… 4 4.2 External temperature probe …………………………………………………………………………………… 5 5. GSM function ……………………………………………………………………………………………………… 7 4.1 Fitting and replacing the SIM card …………………………………………………………………………… 7 6. -
Page 4: Gsm Thermostat 02906
1. 02906 GSM thermostat Mains powered wall-mounted thermostat with interface with capacitive keys, with GSM remote control func- tion. Equipped with user-friendly functions to facilitate energy saving. Designed to control heating and air-con- ditioning via C, NC, NO relay output. Input for management of an external temperature probe (e.g. art. 02965). - Page 5 2 3 0 0 H z 5 0 /6 2 3 0 5 ( 2 ) 1 . C IT A – T 4 0 2 9 2 3 0 0 H z 5 0 /6 2 3 0 5 ( 2 ) 1 .
-
Page 6: Connections
4. Connections 4.1 Relay connection art. 02965 C NC NO N L V I M A R S p A Fig. 1 - Connections with circulation pumps, burners and solenoid valves APRE-OPENS OUVERTE-ÖFFNEN ABRIR-ΑΝΟΙΓΜΑ art. 02965 CHIUDE-CLOSES FERMÉE-SCHLIESSEN CERRAR-ΚΛΕΙΣΙΜΟ C NC NO N L V I M A R S p A Fig. -
Page 7: External Temperature Probe
4.2 External temperature probe Depending on how it is configured, the external temperature probe can be used to accomplish several functions (see par. 9.6); it does NOT have polarity so you can connect the 2 wires in the 2 terminals without any particular order. - Page 8 02695 used for adjustment (of a remote environment) 02695 used for limiting the temperature of underfloor heating IMPORTANT: During installation, take care not to damage the insulation of the probe while laying the screed. Perform the installation in such a way that the probe is accessible for any maintenance work.
-
Page 9: Gsm Function
5. GSM function By sending and receiving SMSs with the appropriate encryption, the thermostat can be switched on, off and queried for viewing data on the room and it can perform various other functions; interaction with the device for remote control is via the By-clima smartphone app that automatically creates the encrypted SMSs. Using these features you can then: •... -
Page 10: Fitting And Replacing The Sim Card
• Disable the PIN code from the SIM card (install the SIM in a mobile phone and when switching on disable the PIN code prompt). • Turn off the power supply to the thermostat 02906. • Remove the front panel by inserting a screwdriver into the slot in the bottom and pushing the release tab upwards and, at the same time, pull out the front of the product. -
Page 11: Switching On A Resetting Parameters
6. Switching on and resetting parameters When switching on, in the first 3 seconds of power-up the thermostat displays the firmware version. Fig. 4: Start up screen If in this phase you touch the icon, a screen appears on the display where you can reset the device parameters: Fig. -
Page 12: Display
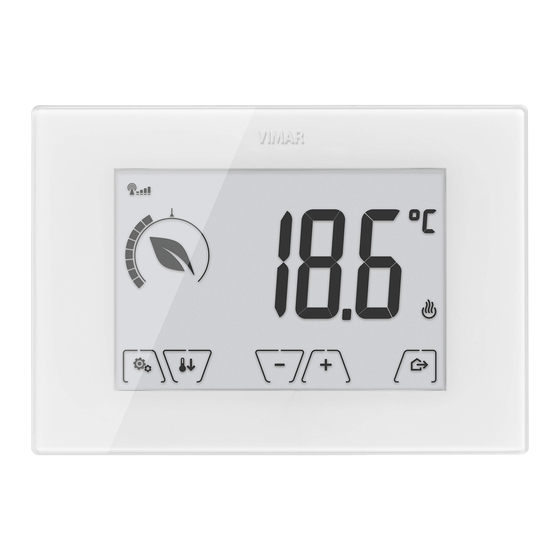
7. Display The touchscreen display allows you to control the system using the following buttons and icons: Fig. 6: Graphical interface and buttons A: GSM network signal B: Operating mode C: Away D: Confirm E-F: Menu navigation and setting parameters G: Back H: Nighttime reduction I: Settings menu... -
Page 13: Functions Of The Buttons
7.1 Functions of the buttons : increases the numerical values. When it "disappears" from the display it means that the value cannot be increased any more. : decreases the numerical values. When it "disappears" from the display it means that the value cannot be decreased any more. -
Page 14: Ecometer
7.3 Ecometer Energy saving indicator Ring for the level of consumption Fig. 7: Set of ECOMETER icons On the left-hand side of the display there is a set of icons called the "ECOMETER" that provide an overview of the expected consumption as an aid to energy saving. The information displayed is based on a consumption forecast obtained by comparing the currently set temperature setpoint and the estimated average consumption (which therefore has nothing to do with the current room temperature). -
Page 15: Operating Mode
8. Operating mode The thermostat 02906 is able to adjust the temperature according to the following operating modes: • Switched off (OFF): switches the system off without making any adjustments • Manual (ON): lets you set the required temperature set-point manually •... -
Page 16: Manual
8.2 Manual (ON) This is the "traditional" operating mode. The thermostat controls the room temperature and takes it to the value set by the user (manual adjustment setpoint). Fig. 10: Typical screen for Manual mode The set point can always be changed via In the course of setting, the set point flashes and the circular ring fills up accordingly;... -
Page 17: Away
8.3 Away This mode is useful to achieve energy savings quickly and effectively whenever the user leaves the reg- ulated room. In "Away" mode the system makes the adjustment according to the "away temperature" setpoint (see para. 9.3.1). The Away mode can only be activated in manual mode by touching The display will show the "away temperature"... -
Page 18: Nighttime Reduction
8.4 Nighttime reduction This is the typical mode to use at night to reduce system consumption significantly. In "Nighttime reduction" mode the device reduces the consumption of the system, taking the room tem- perature to a lower value (or higher, if on air-conditioning) than the Manual mode by degrees (see par. -
Page 19: Antifreeze
8.5 Antifreeze This mode, which can only be activated when the system is operating in heating mode, lets you set a minimum temperature value ( setpoint) to avoid damage to the pipework or to keep it from falling below a certain safety level when you are away for lengthy periods in the winter. The "antifreeze"... -
Page 20: Settings Menu
9. Settings menu From the settings menu you can configure all the features of the thermostat. On the main screen (see Fig. 6) tap the icon. From the main menu, using will display the following (flashing) symbols in succession, which provide access to the corresponding submenus: operating mode setting air-conditioning/heating setting temperature setpoint setting... -
Page 21: Heating/Air-Conditioning Setting
9.2 Heating/air-conditioning setting This menu lets you set the operation of the device depending on the season (winter/summer): • heating • air-conditioning Using select the required operation and confirm with 9.3 Temperature set point setting This menu lets you set the temperatures and hystereses necessary for defining the temperature control set-point used in the different operating modes. -
Page 22: Antifreeze Temperature
9.3.2 Antifreeze temperature This menu, via , lets you increase/decrease the value of the antifreeze temper- ature Antifreeze mode is used to set a minimum temperature level to avoid damage to the pipework or keep the room temperature from falling below a safety level (see par. 8.5). 9.3.3 Nighttime reduction thermal delta This menu, via , lets you set the difference between the Nighttime temperature... -
Page 23: Calibration Setting
9.5 Calibration setting This menu lets you "calibrate" the temperature read by the thermostat. Using , you can add or subtract (at intervals of 0.1°) a fixed amount from the temperature detected by the thermostat to make it equal, for example, to that of a sample thermometer. CAUTION: For correct calibration it is recommended to wait until the thermostat has been on for at least 1 hour in a room at constant temperature. -
Page 24: Buzzer Setting
• (P.I.D. control): this is an evolved algorithm that is able to keep the temperature in the envi- ronment more stable, increasing comfort; this algorithm switches the system on and off appropriately so there will be a gradual increase or decrease in the thermal (or refrigerating) power of the system itself. To take full advantage of its performance it needs to be suitably calibrated according to the type of envi- ronment and heating system;... -
Page 25: Gsm Settings
9.10 GSM settings All the GSM functions are set exclusively via a special smartphone App which communicates by SMS with the thermostat and not via the actual thermostat; the latter is used to enable all the functions described in paragraphs 9.10.1 and 9.10.2. 9.10.1 Switching on/off the GSM radio This option is used to switch the GSM radio transmitter on of off (for example, to check that the thermostat is set only locally and that it cannot be remotely enabled/modified by any other... -
Page 26: Summary Table Of Thermostat Parameters
10. Summary table of thermostat parameters Reso- Function Parameters Value range Default value lution [Off, View, External temperature probe Temperature EXT Probe selection management mode Control, Limitation] Nighttime Reduction [1,..,6]°C, 0.1°C 4°C δ (red. offset) Limitation (Temp. limit) [30,..,50]°C 0.1°C 35°C Selection Temperature control mode... -
Page 27: Cleaning The Device
11. Cleaning the device The device features a touchscreen display with capacitive buttons and therefore requires you to be gentle during the cleaning phase. Avoid using aggressive products. Clean the display with a special cloth for cleaning lenses. 12. Installation rules Installation should be carried out in compliance with the current regulations regarding the installation of electrical systems in the country where the products are installed. - Page 28 Viale Vicenza, 14 - 36063 Marostica VI - Italy Tel. +39 0424 488 600 - Fax (Italy) +39 0424 488 188 02906 installer 01 1407 Fax (Export) +39 0424 488 709 VIMAR - Marostica - Italy www.vimar.com...
Need help?
Do you have a question about the 02906 and is the answer not in the manual?
Questions and answers