Table of Contents
Advertisement
Advertisement
Table of Contents

Related Manuals for Vimar Idea 16577


Summary of Contents for Vimar Idea 16577
- Page 1 ME GI VE SA DO...
- Page 2 Electronic chronothermostat for the ambient air temperature control...
-
Page 3: Table Of Contents
Index 1. Description 1. Description The electronic chronothermostat for the ambient air temperature .................. control art. 16577 is one among the 200 functions of the idea series 2. Data display and external controls ........3. Internal controls for flush installation................ -
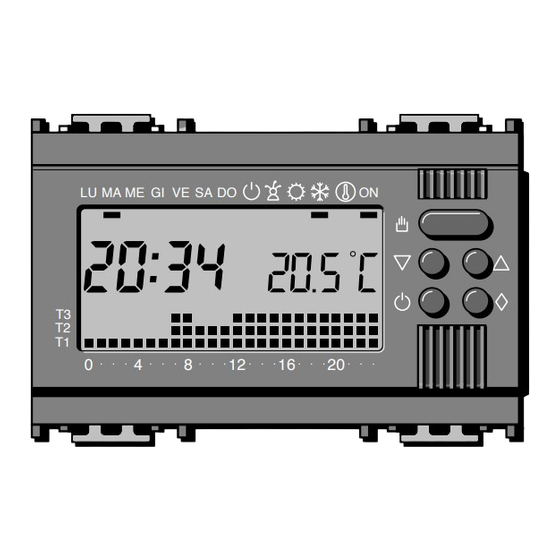
Page 4: Data Display And External Controls
2. Data display and external controls Data display When the figures of the present time and temperature blink, the batteries capacity is no longer sufficient 10 11 12 13 ÷ Day of the week 6*: Days of the week Exclusion of the installation LU Monday ME GI VE SA DO MA Tuesday... -
Page 5: Internal Controls
3. Internal controls To insert the equipment again, press the two side lugs (1) on the To access to the internal controls panel, seize the equipment by symbol and push it thoroughly (2), until it comes to the stop both sides (picture 3.1) and take it out to the stop. (picture 3.2). -
Page 6: Setting The Present Time And Day
Controls Restart Setting the present time and day Setting and displaying of the temperature levels T1-T2-T3 Setting the hysteresis (the maximum gap between the ambient air temperature and the assigned value) Selection of the HEATING or AIR-CONDITIONING program © ® LU DO Time decrease on the daily program diagram Time increase on the daily program diagram... - Page 7 4. Setting of the present time and day Take out the body of the equipment. Press the pushbutton : the Press the pushbutton minutes figures blink. Press the indicator of the day of the pushbutton to set the week blinks. Press the ME GI VE SA DO the minutes value...
-
Page 8: Preset Standard Programs
Insert again the body of the equipment. 5.1.1 HEATING program Note thermic cycle from Monday ME GI VE SA DO The figures displayed increase or decrease in single units at to Friday. every pression on the pushbutton Temperature levels: To increase the speed of the display, keep the pushbutton T1 16 °C pressed. -
Page 9: Manual Operation
6. MANUAL operation 5.2 AIR-CONDITIONING program The AIR-CONDITIONING program provides a single thermic cycle Use the MANUAL operation if you wish a temperature different for the whole week. from the preset one, without any other change of the program in use. 5.2.1 6.1 MANUAL operation AIR CONDITIONING... -
Page 10: Time-Delay Manual Operation
7.1.2 7. TIME-DELAY MANUAL operation Press the pushbutton you wish to restore the If you wish to keep the manual temperature for a certain time (hours AUTOMATIC operating or days), you can use the TIME-DELAY MANUAL operation: once ME GI VE SA DO mode before the end of the the desired time has been set, the equipment starts a countdown... -
Page 11: Own Setting Of The Temperature Levels Values
7.2.2 8.1 HEATING program Press the pushbutton you wish to restore the Take out the body of the equipment. AUTOMATIC operating 8.1.1 ME GI VE SA DO mode before the end of the Press the pushbutton countdown. and select the HEATING program ME GI VE SA DO... - Page 12 To change the value of T2 and T3, repeat the instructions indicated in 8.2.2 paragraph 8.1.2. Press the pushbutton : the range of temperatures of T1 At the end of the settings of the temperature levels, the daily program and the temperature value to diagram will be displayed again.
-
Page 13: Own Setting Of The Daily Program
9. Own setting of the DAILY PROGRAM Take out the body of the equipment. Select the desired Press the pushbutton temperature level pressing and put the day indicator the pushbutton of the display on the LU ME GI VE SA DO ME GI VE SA DO position (Monday). - Page 14 Repeat the operations indicated in paragraphs 9.3 and 9.4 until 23 o’clock. The program setting for Monday is now ended. At the end of the settings, If the set program is also press the pushbutton : the suitable for the next days, present time and day will be press the pushbutton ME GI...
-
Page 15: Jolly Program
10. JOLLY Program The equipment is provided with a JOLLY program, suitable for Proceed, if you wish, with the own settings, as indicated in holidays or festivities during the week, etc. This program can be paragraphs 8 and 9 (excluding 9.5 and 9.6). started at any moment of the day and kept in operation till the end of that day, or else it can be scheduled for any day of the week. -
Page 16: Antifreeze Program
Proceed, if you wish, with the own setting of the Jolly program, as 11. ANTIFREEZE program indicated in paragraphs 8 and 9 (excluding 9.5 and 9.6). The ANTIFREEZE operating mode is used either to maintain a 10.3 temperature level that prevents the water mains from damages, or Press the pushbutton not to let the temperature arrive under a security level. -
Page 17: Time-Delay Antifreeze Operation
12.1.2 12. TIME-DELAY ANTIFREEZE operation Press the pushbutton you wish to restore the The time-delay antifreeze operation is used to maintain a safety AUTOMATIC operating temperature for a certain time (hours or days): once the desired time ME GI VE SA DO mode before the end of the has been set, the equipment starts a countdown and after that the countdown. -
Page 18: Installation Working Time
12.2.2 13.2 Press the pushbutton To reset the timer and start you wish to restore the a new count, press the AUTOMATIC operating pushbutton while the ME GI VE SA DO mode before the end of the ME GI VE SA DO figures of the installation countdown. -
Page 19: Exclusion Of The Installation
Repeat the operation indicated in paragraph 14.1 to display the 15. Exclusion of the installation levels values of T2 and T3. The chronothermostat can also be used only as a thermometer and a Press the pushbutton to end the operation. clock, excluding any control on the heating or on the air-conditioning installation. -
Page 20: Time-Delay Exclusion Of The Installation
15.2 Exclusion of the installation during the AIR-CONDITIONING 16. Time-delay exclusion of the installation program 15.2.1 The time-delay exclusion operation is used to exclude the installation Press once the for a certain time (hours or days): once the desired time has been pushbutton : instead of set, the equipment starts a countdown and after that the... - Page 21 16.1.1.2 16.1.2.2 Press the pushbutton Press the pushbutton to restore the AUTOMATIC to restore the operating mode before the AUTOMATIC operating ME GI VE SA DO ME GI VE SA DO end of the countdown. mode before the end of the countdown.
-
Page 22: Cancellation Of The Own Programs
18. Restart 17. Cancellation of the own programs Anomalies in the operation maintenance or technical troubles may If you wish to restore the equipment to its starting set of data and require the restart of the microprocessor. To restart, act as follows: programs, act as follows: Take out the body of the equipment. -
Page 23: Hysteresis
19. Hysteresis 20. Batteries replacement The hysteresis, the maximum gap between the ambient air temperature and the assigned value, can be set between ±0.1 °C The blinking of the time and temperature figures indicates that the and ±0.9 °C. batteries capacity is no longer sufficient and they must be replaced. The equipment is delivered with a factory preset hysteresis of To replace them, act as follows: ±... - Page 24 Press the two sides lugs (1) on the symbol and take the body of the equipment completely out (2) (picture 20.2). picture 20.3 Insert again the body of the equipment. picture 20.2 ATTENTION Take out the flat batteries and replace them with 3 1.5 V LR03 AAA An incorrect insertion of the batteries will seriously damage the alkaline batteries.
-
Page 25: Technical Characteristics
21. Technical characteristic • Self-extinguishing polycarbonate enclosure • Screw terminals for the clamping of rigid or flexible conductors up to 1.5 mm • Supply: through 3 1.5 V LR03 AAA alkaline batteries • Batteries life: about 1 year • Power reserve for the batteries replacement: about 2 minutes •...
Need help?
Do you have a question about the Idea 16577 and is the answer not in the manual?
Questions and answers