Advertisement
Table of Contents
- 1 Notice to Employer and Safety Director
- 2 Notice to Operators, Maintenance and Cleanup Personnel
- 3 Parts List
- 4 And Accessories
- 5 Specifications
- 6 Installation Instructions
- 7 General Safety Instructions
- 8 Operation Instructions
- 9 Maintenance Instructions
- 10 Blade Removal
- 11 Blade Installation
- 12 General Disassembly
- Download this manual
See also:
Operator's Manual
NOT FOR HOME USE
Owner's Manual For:
Table Of Contents:
•Notice to Employer and Safety Director
•Notice to Operators, Maintenance and Cleanup Personnel
•Parts Diagram
•Parts List
•Installation Instructions
•General Safety Instructions
•Operation Instructions
•Maintenance Instructions
JARVIS
6205005:::.
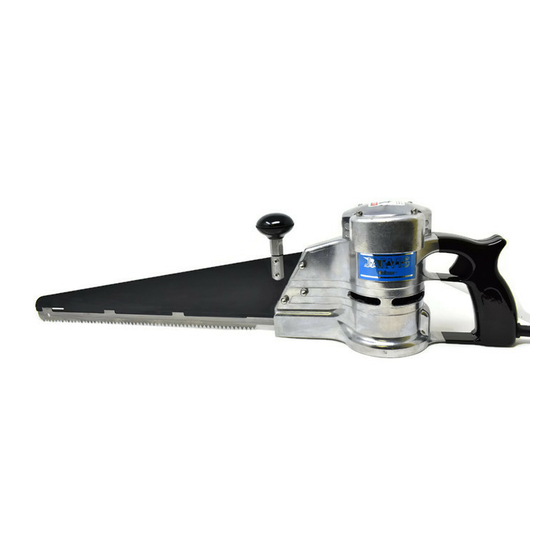
PORTABLE POWER SAW
MODEL 400
. . . . . . . . . . . . . . . . . . . . . . . . . . . . . . . . . . . . . . . . .
. . . . . . . . . . . . . . . . . . . . . . . . . . . . . . . . . . . . . . . . . . . . . . . .
. . . . . . . . . . . . . . . . . . . . . . . . . . . . . . . . . . . . . . . . . . . . . . . . . . . .
. . . . . . . . . . . . . . . . . . . . . . . . . . . . . . . . . . . . . . . .
. . . . . . . . . . . . . . . . . . . . . . . . . . . . . . . . . . . . .
. . . . . . . . . . . . . . . . . . . . . . . . . . . . . . . . . . . . . . . . .
. . . . . . . . . . . . . . . . . . . . . . . . . . . . . . . . . . . . . .
®
. . . . . . . . . . . . . . . . . . . . . . . . . .
PRODUCTS CORPORATION
33 ANDERSON ROAD, MIDDLETOWN, CONNECTICUT 06457--4926
UNITED STATES OF AMERICA
FAX 860--347--6978
TEL. 860--347--7271
Page
2
. . . . . . . . .
3
4
5
6
7
8
10
arvis.products.corp@snet.net
E--MAIL. j
jarvisproducts.com
WWW.
Advertisement
Table of Contents

Related Manuals for Jarvis Wellsaw 400


Summary of Contents for Jarvis Wellsaw 400
- Page 1 ........JARVIS PRODUCTS CORPORATION ®...
-
Page 2: Notice To Employer And Safety Director
10. Avoid injury. Do not permit the tool to be misused. 11. If you resell or distribute a Jarvis product, you must provide the purchaser with the appropriate safe- ty sheets and tool brochure. Additional copies of safety sheets and tool brochures will be provided upon request. -
Page 3: Notice To Operators, Maintenance And Cleanup Personnel
13. Always use both hands when starting and operating the tool to avoid the risk of possible “kick back” or “recoil.” Continue holding the tool with both hands until the saw blade comes to a complete stop. JARVIS PRODUCTS CORPORATION ®... - Page 4 MODEL 400 pg 4 of 12 JARVIS PRODUCTS CORPORATION ® 33 ANDERSON ROAD, MIDDLETOWN, CONNECTICUT 06457--4926 arvis.products.corp@snet.net UNITED STATES OF AMERICA E--MAIL. j 6205005:::. jarvisproducts.com FAX 860--347--6978 TEL. 860--347--7271 WWW.
-
Page 5: Parts List
MODEL 400 pg 5 of 12 JARVIS JARVIS PART NO. PART NO. PART NAME PART NO. PART NO. PART NAME 1 1063112 501022--005 Brush Cap 1063109 100647 Grommet 2 1063111 501022--004 Brush and Spring 1016213 501001--005 Housing 3 1063110 501022--003 Brush Holder... -
Page 6: Specifications
MODEL 400 pg 6 of 12 SPECIFICATIONS wire to a live terminal. If your Jarvis Wellsaw is the 115 Motor Power 1 hp 745 W volt model, it has a plug that looks like figure ”A”. If your Jarvis Wellsaw is the 230 volt model, it has a plug Operating Volt/Amp 230V/7.5A, 1 phase, 50/60 Hz... -
Page 7: General Safety Instructions
USE THE RIGHT TOOL AND ATTACHMENTS. Select the proper tool to do the job. The Jarvis Wellsaw is designed for meat and bone • cutting; wood cutting; non- -woven and geo- -textile cutting. Do not use the Jarvis Wellsaw for non- -intended purposes. -
Page 8: Operation Instructions
D. NOT FOR CUTTING METAL: 8. Never allow the saw blade to float into material 1. Due to the blade speed and design, your Jarvis while cutting. Wellsaw is not for cutting metal. - Page 9 G. ALWAYS KEEP A SHARP BLADE ON THE TING: SAW: 1. For heavy or continuous wood cutting, lubricate the blade grove with oil or Jarvis Wellsaw lubri- 1. Cutting with a dull or badly worn blade can cant 1062023. overload the saw and cause damage from over- heating.
-
Page 10: Maintenance Instructions
Always disconnect the saw from its power supply before performing any maintenance. C. BLADE REMOVAL: NOTE: Your Jarvis Wellsaw is equipped with a Item numbers: refer to the parts diagram on page 4. hex key (item 20) for removing the blade. This wrench is located in the housing directly behind A. -
Page 11: General Disassembly
(item 51) by using a center punch mature. (Pinion gear - - item 12 - - on armature to tap the armature until its bearing is fully has a left hand thread). seated. JARVIS PRODUCTS CORPORATION ® 33 ANDERSON ROAD, MIDDLETOWN, CONNECTICUT 06457--4926 arvis.products.corp@snet.net UNITED STATES OF AMERICA E--MAIL. - Page 12 USE THE RIGHT TOOL AND ATTACHMENTS. Select the proper tool to do the job. The Jarvis Wellsaw is designed for meat and bone • cutting; wood cutting; non- -woven and geo- -textile cutting. Do not use the Jarvis Wellsaw for non- -intended purposes.
Need help?
Do you have a question about the Wellsaw 400 and is the answer not in the manual?
Questions and answers