Table of Contents
Advertisement
Quick Links
®
/MD
MODEL/ MODÈLE BVSTECMP55
Instruction Manual and Quick Start Guide
Oster
Espresso & Cappuccino Maker
®
READ ALL INSTRUCTIONS BEFORE USING THIS APPLIANCE
Notice d'emploi et guide de démarrage
Machine à expresso et à cappuccino Oster
®
LISEZ TOUTES LES INSTRUCTIONS AVANT L'UTILISATION
WWW.OSTER.CA
Advertisement
Table of Contents

Related Manuals for Oster BVSTECMP55


Summary of Contents for Oster BVSTECMP55
- Page 1 Instruction Manual and Quick Start Guide Oster Espresso & Cappuccino Maker ® READ ALL INSTRUCTIONS BEFORE USING THIS APPLIANCE Notice d’emploi et guide de démarrage Machine à expresso et à cappuccino Oster ® LISEZ TOUTES LES INSTRUCTIONS AVANT L’UTILISATION WWW.OSTER.CA...
-
Page 2: Important Safeguards
6. DO NOT operate any appliance with a damaged cord or plug or after the appliance malfunctions or has been damaged in any manner. Return this appliance only to the nearest authorized OSTER Service Center for ® examination, repair or adjustment. - Page 3 14. Always be sure to place the water reservoir tightly back in the unit with its lid closed and fill with water on or above the minimum before turning appliance on. 15. DO NOT remove the brew basket while brewing coffee. Please make sure the control knob is in the OFF position before you remove the brew basket to make additional coffee.
- Page 4 In order to avoid possible burns to body parts and/or other injury from hot steam and water or damages to the unit, never remove the water reservoir or the brew Basket while your OSTER espresso/cappuccino maker is brewing coffee ®...
- Page 5 Quick Start Guide ® (ONLY NEEDS TO BE DONE BEFORE USING FOR THE FIRST TIME) STEP Add water to the water Place a cup underneath reservoir. the brew head and turn the control knob to the Turn the ON/OFF Switch “...
- Page 6 Quick Start Guide ® When the Brew/Steam Indicator Light is ON ( OFF/ARRÊT ® ARRÊT MARCHE Green), turn the control “ ” knob to the BREW position. When the cup is filled to STEP the desired level, turn the knob to the OFF position. If you are done with you espresso maker then turn Brewing...
-
Page 7: Diagram Of Parts
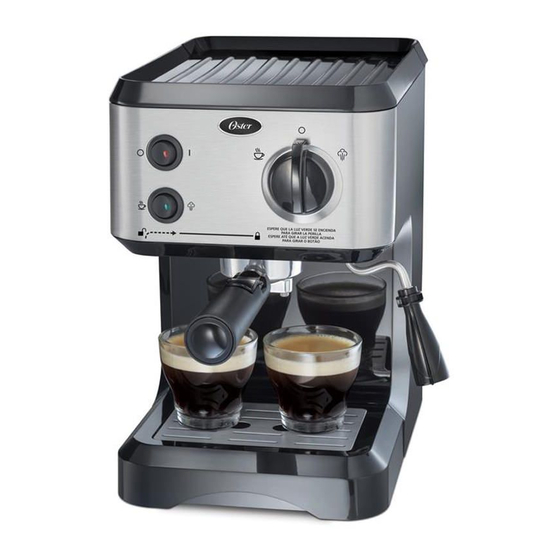
DIAGRAM OF PARTS ater eServOir emOvaBLe arge witch Lear ater eServOir Ower ndicatOr ight team OntrOL witch team ndicatOr ight reen rOthing aSket iLter OLder rOthing emOvaBLe ray and ilTers easuring 1 & 2 deMiTasses coop aMper TeaM NOTE: Demitasse cups pictured are not included. - Page 8 INTRODUCTION Congratulations! You have selected a quality OSTER ® Espresso/Cappuccino Maker. This unique appliance has been designed to provide you with delicious espresso/ cappuccino quickly and conveniently. Espresso is a unique method of coffee brewing in which hot water is forced through finely ground coffee. Popular in Europe, it is a far richer and more full-bodied brew than regular American coffee.
- Page 9 2. Do not remove the brew basket at any time during the brewing process. 3. Use caution when removing the brew basket. The metal parts may still be very hot. Also, there may be hot water floating on the top of the filter. Hold it only by its handle and dispose the brewed coffee grounds by using the filter retention clip.
- Page 10 BEAN GRINDING TIPS This is a vital step in the espresso making process and takes practice. The coffee must be of a fine grind. • The correct grind should look like salt. • If the grind is too fine, the water will not flow through the coffee even under pressure.
- Page 11 IMPORTANT To prime the pump before the initial brew, run brewing cycle for 30 seconds following the steps below: 1. Add water to the water reservoir. 2. Turn the ON/OFF Switch ON. 3. Press the Brew/Steam Switch to the BREW “ ”.
- Page 12 PREPARING THE COFFEE 1. Place the filter in the brew basket. Select from the two filters that come with your unit depending on the amount of cups you wish to prepare (1 or 2 demitasses). The recommended recipe is to use the small 7 gram filter to make a one-ounce shot of espresso.
- Page 13 2. Fill the selected filter with fresh, fine ground espresso coffee. Clean any excess coffee from the rim of the filter holder. This will assure proper fit under the brew head. ATTENTION: Tamp or compress coffee using the tamper as show below. Do not overfill the filter. This might cause clogging or overflow.
-
Page 14: Brewing Espresso
BREWING ESPRESSO ATTENTION: If you are planning to make cappuccino, please refer to the next section “how to make cappuccino.” 1. Make sure the drip grid is in place on the drip tray. Place the drip tray in the unit. 2. -
Page 15: How To Make Cappuccino
7. Once you have prepared the desired amount of espresso, turn the ON/OFF Switch to the OFF position and unplug the unit. Allow the unit to cool down before removing parts and accessories prior to cleaning. 8. After the unit has cooled down, remove the brew basket from the brew head. - Page 16 PREPARATION: Gather the following prior to brewing • Fine espresso ground coffe • Tap water (or, preferably your favorite bottled water) • Milk (2% is recommended for best frothing results) • Frothing pitcher • Teaspoon • Your favorite cups/demitasses • A kitchen thermometer (optional) placed into the frothing pitcher will help enhance your tasting experience by optimizing the steamed milk...
- Page 17 5. When the milk has doubled in volume, or if you are using a beverage thermometer, when the milk has reached 38°C (100°F), insert the frothing tube deeper into the milk so that the top of the frothing tube cap is just under the surface of the milk.
-
Page 18: Cappuccino Maker
CLEANING YOUR ESPRESSO/ CAPPUCCINO MAKER 1. Turn the control knob to the OFF position and the ON/ OFF Switch to the OFF position and unplug the power cord from the electrical outlet. 2. The frothing tube may still be hot. Do not touch it with your hands until it has cooled. - Page 19 The frequency of cleaning depends upon the hardness of the water used. The following table gives the suggested cleaning intervals. SUGGESTED CLEANING INTERVAL TYPE OF WATER CLEANING FREQUENCY Soft Water (Filtered Water) Every 80 Brew Cycles Hard Water (Tap Water) Every 40 Brew Cycles YOUR ESPRESSO/CAPPUCCINO MAKER MAY BE DELIMED USING...
- Page 20 2. Make sure all controls are in the OFF position and the power cord is disconnected from the electrical outlet. (See Section “CAUTION” on Pages 3 and 7). Fill the reservoir with white vinegar above the minimum level into reservoir. 3.
-
Page 21: Problems And Causes
PROBLEMS AND CAUSES PROBLEM CAUSES SOLUTIONS Coffee • No water in • Add water. does not reservoir. come out • Coffee grind is too • Grind coffee fine. medium ground. • Too much coffee in • Fill filter with less the filter. - Page 22 PROBLEMS AND CAUSES PROBLEM CAUSES SOLUTIONS • Water reservoir is • Fill reservoir with steam is empty. correct amount of generated water. See Page 10. • Appliance is not • Turn on unit turned on. and follow the operating instructions. •...
- Page 23 RECIPE IDEAS THAT YOU WILL LOVE TO TRY CAFÉ MOCHA CAFÉ LATTE 30 ml (1oz.) of 1/4 espresso and 3/4 steamed chocolate syrup, one milk, pour both in a mug at the shot of espresso, 237 ml same time (1 cup) frothed milk CAFÉ...
-
Page 24: Warranty Information
WARRANTY INFORMATION 1-YEAR LIMITED WARRANTY Sunbeam Products, Inc. doing business as Jarden Consumer Solutions or if in Canada, Sunbeam Corporation (Canada) Limited doing business as Jarden Consumer Solutions (collectively “JCS”) warrants that for a period of one year from the date of purchase, this product will be free from defects in material and workmanship. - Page 25 implied warranty or condition of merchantability or fitness for a particular purpose is limited in duration to the duration of the above warranty. JCS disclaims all other warranties, conditions or representations, express, implied, statutory or otherwise. JCS shall not be liable for any damages of any kind resulting from the purchase, use or misuse of, or inability to use the product including incidental, special, consequential or similar damages or loss of profits, or for any breach...
- Page 26 Corporation (Canada) Limited faisant affaire sous le nom de Jarden Consumer Solutions, 20 B Hereford Street, Brampton (Ontario) L6Y 0M1. Canada: 1 800 667-8623 US/États-Unis: 1-800-334-0759 Visit us at/Visitez notre site au: www.oster.ca Printed in China/Imprimé en Chine P.N. 163151 Rev A...
Need help?
Do you have a question about the BVSTECMP55 and is the answer not in the manual?
Questions and answers