Table of Contents
Advertisement
Available languages
Available languages
Advertisement
Table of Contents

Related Manuals for Oster BVSTECMP65


Summary of Contents for Oster BVSTECMP65
- Page 1 BVSTECMP65 & MODELO/ BVSTECMP65R MODEL Manual de Instrucciones CAFETERA PARA ESPRESSO Y CAPPUCCINO LEA TODAS LAS INSTRUCCIONES ANTES DE USAR ESTE APARATO Instruction Manual ESPRESSO AND CAPPUCCINO MAKER PLEASE READ ALL INSTRUCTIONS BEFORE USING THIS APPLIANCE...
-
Page 2: Precauciones Importantes
Devuelva el artefacto al Centro de Servicio Autorizado Oster más cercano para su revisión, reparación o ajuste. El uso de accesorios que no sean recomendados por el fabricante pueden provocar daños o lesiones. -
Page 3: Instrucciones Especiales Para El Cable Eléctrico
La preparación de un café espresso o de una bebida basada en café espresso es diferente a la preparación del café filtrado común. Las diferencias se encuentran en los granos de café y en la máquina que se utiliza para prepararlo. Su cafetera para espresso y cappuccino Oster funciona ®... -
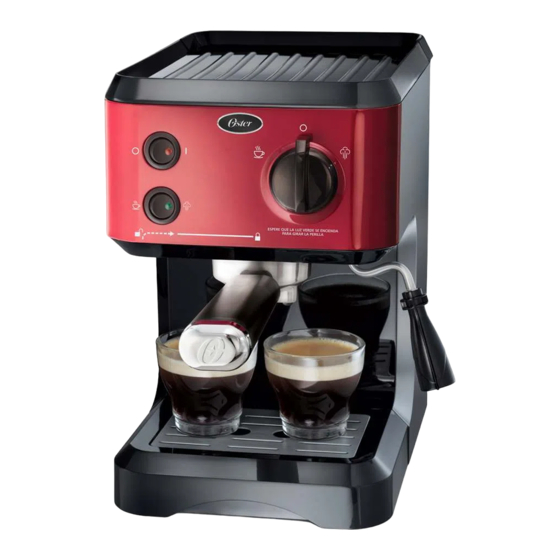
Page 4: Des Cr I P Ci Ó N D El Arte Fa C To
DES CR I P CI Ó N D EL ARTE FA C TO 7b 7c Encendido/ Colar Vapor Apagado Guía de Íconos 1. Interruptor de encendido/ apagado “ / ” b. Espresso doble c. Adaptador para cápsula 2. Luz indicadora de encendido (roja) OriginalLine de Nespresso 3. - Page 5 C ON O C I EN DO S U A RTE FA C TO PRECAUCIÓN Por favor siga las siguientes precauciones importantes de seguridad antes de utilizar su Cafetera para Espresso y Cappuccino Oster ® 1. Antes de retirar cualquiera de las partes y accesorios, asegúrese de que la unidad esté...
-
Page 6: Cómo Preparar Café Espresso
3. Si el molido es muy grueso, el agua fluye a través del café demasiado rápido, lo que impide una extracción completa del sabor. Asegúrese de utilizar un molinillo de calidad como las de la marca Oster para obtener una consistencia uniforme. - Page 7 SELECCIONANDO EL PORTA-FILTRO Seleccione el porta-filtro según el filtro que vas a usar: a. Para filtros de café molido b. Para cápsula OriginalLine de Nespresso ® PREPARANDO ESPRESSO CON CAFÉ MOLIDO 1. Coloque el filtro en el portafiltro. Seleccione uno de los dos filtros que vienen con su unidad dependiendo de la cantidad de tazas que desee preparar (1 o 2 tazas pequeñas).
- Page 8 PREPARANDO ESPRESSO CON CÁPSULA OriginalLine DE NESPRESSO ® Levante la tapa del filtro para las cápsulas OriginalLine de Nespresso *. Coloque ® la cápsula OriginalLine de Nespresso * dentro del filtro y cierre la tapa. Cuando ® haya terminado, inserte el filtro para la cápsula OriginalLine de Nespresso * en el ®...
- Page 9 NOTA: Al preparar café espresso utilizando las Cápsulas OriginalLine de Nespresso: a. Escurra el agua que haya quedado en la parte superior del adaptador en la bandeja de goteo. b. Deje que el adaptador se enfríe antes de retirar la cápsula. Después de que la unidad se haya enfriado, retire el portafiltro del cabezal de preparación.
- Page 10 4. Usted está ahora listo para espumar la leche. Presione el botón encendido/ apagado a la posición de encendido “ ”, gire la perilla de colar/espumar a la posición de espumar “ ”, espere hasta que la luz indicadora se ilumine en verde sólido.
- Page 11 • Limpie la superficie de su cafetera con un paño húmedo y suave. No utilice limpiadores abrasivos o esponjas abrasivas, ya que éstos podrían rallar la unidad. • No guarde el portafiltro en el cabezal de preparación de su cafetera. Esto podría afectar adversamente el sellador entre el cabezal y el portafiltro mientras está...
- Page 12 PARA DESCALCIFICAR LAS PARTES INTERNAS: 1. Verifique que usted haya descalcificado el interior del depósito de agua primero, siguiendo los pasos de la sección anterior “Descalcificación”. 2. Verifique que todos los controles estén apagados y que el cable eléctrico esté desconectado del tomacorriente.
-
Page 13: Problemas Y Soluciones
PROBLEMAS Y SOLUCIONES PROBLEMA CAUSAS SOLUCIONES El café no sale. • No ha utilizado la unidad en un • Cebar la bomba. largo tiempo, o no se ha cebado la bomba. • Agregue el agua en el depósito de agua. •... -
Page 14: Important Safeguards
Take this appliance to the nearest Authorized Service Center for examination, repair or adjustment. 8. The use of accessory attachments not recommended for Oster products may cause hazards or injuries. 9. DO NOT use outdoors. -
Page 15: Special Cord Set Instructions
WARNING! To avoid the risk of fire, electric shock and personal injury, do not misuse the coffee maker and follow the instructions in this manual. INTRODUCTION Congratulations! You have selected a quality Oster Espresso and Cappuccino ® Maker. This unique appliance has been designed to provide you with delicious espresso, cappuccino and much more, quickly and conveniently. -
Page 16: Description Of The Appliance
DES CR I P T I ON O F T HE A PPLIA NC E 7b 7c On/Off Brew Steam Icon Guide 1. On/Off “ / ” Switch c. Adapter for Original Line 2. Power Indicator Light (red) Nespresso * capsule ®... - Page 17 LE ARN I N G A B O U T YOUR A PPLIA NC E CAUTION Please follow these important safety instructions while using your Oster Espresso ® and Cappuccino Maker: 1. Before removing any of the parts and accessories, make sure the unit is switched off, the control knob is in the off “...
-
Page 18: How To Brew Espresso
BEFORE BREWING YOUR FIRST ESPRESSO 1. Make sure the unit is switched off, the control knob is in the off “ ” position and it is unplugged from the electrical outlet. 2. First remove and then wash the water reservoir, lid, filter holder and filters in a mixture of mild detergent and water. - Page 19 SELECTING THE FILTER HOLDER Select the filter holder according to the type of filter you are planning to use: a. For filters for ground coffee b. For OriginalLine Nespresso * capsule ® PREPARING ESPRESSO WITH GROUND COFFEE 1. Place the filter in the filter holder. Select from the two filters that come with your unit depending on the amount of cups you wish to prepare (1 or 2 demitasses).
-
Page 20: Brewing Espresso
PREPARING ESPRESSO WITH OriginalLine NESPRESSO * CAPSULE ® Lift the lid of the OriginalLine Nespresso * capsule filter. Place the OriginalLine ® Nespresso * capsule inside the filter and then close the lid. Once finished, insert the ® OriginalLine Nespresso * capsule filter into the OriginalLine Nespresso * capsule ®... -
Page 21: How To Make Cappuccino
After the unit has cooled down, remove the filter holder from the brew head. Turn the filter holder upside down to remove the used espresso grounds. Rinse the filter and filter holder with water. If you wish to brew additional espresso, repeat the process by following the steps in the “HOW TO BREW ESPRESSO”... -
Page 22: Cleaning Your Espresso/ Cappuccino Maker
position. Hold the pitcher for about 50 seconds (for 120 mL /4 oz. of milk) or longer if warmer milk is desired. REMEMBER: The milk and the pitcher should be very cold prior to frothing. When the milk has doubled in volume, or if you are using a beverage thermometer, when the milk has reached 38°C (100°F), insert the frothing tube deeper into the milk so that the top of the frothing tube aid is just under the surface of the milk. -
Page 23: Suggested Cleaning Interval
DESCALING Mineral deposits built-up in the espresso maker will affect the operation of the appliance. Your espresso maker must be descaled when you begin to notice an increase in the time required to brew espresso, or when there is excessive steaming. Also, you may notice a build-up of white deposits on the surface of the brew head. -
Page 24: Problems And Causes
7. To clean the frothing tube internally, place a cup with cold water under the tip of the frothing tube. Turn the Brew/Steam Switch to the steam “ ” position, wait until the Brew/Steam Indicator Light becomes solid green. Insert the frothing tube into the water, turn the control knob to the steam “... - Page 25 * Nespresso® es una marca registrada de Societé des Produits Nestlé S.A. Los productos que llevan esta marca no tienen ninguna relación con Sunbeam Products, Inc. Nespresso® no ha endosado esta máquina de la marca Oster, o sus accesorios, para su uso con sus cápsulas de café. El propietario de la marca de las cápsulas no ha endosado esta máquina de la marca Oster o sus accesorios para su uso con sus cápsulas de café.
Need help?
Do you have a question about the BVSTECMP65 and is the answer not in the manual?
Questions and answers