Table of Contents
Advertisement
/MD
BVSTEM6701 Series
MODELS
Série BVSTEM6701
MODÈLES
Instruction Manual
AUTOMATIC ESPRESSO, CAPPUCCINO & LATTE MAKER
READ ALL INSTRUCTIONS BEFORE USING THIS APPLIANCE
Notice d
emploi
'
MACHINE AUTOMATIQUE À EXPRESSO, CAPPUCCINO ET CAFÉ LATTÉ
LIRE TOUTES LES INSTRUCTIONS AVANT D'UTILISER CET APPAREIL
P.N. 191979
w w w. o st e r. c a
Advertisement
Table of Contents

Related Manuals for Oster BVSTEM6701 Series


Summary of Contents for Oster BVSTEM6701 Series
- Page 1 BVSTEM6701 Series MODELS Série BVSTEM6701 MODÈLES Instruction Manual AUTOMATIC ESPRESSO, CAPPUCCINO & LATTE MAKER READ ALL INSTRUCTIONS BEFORE USING THIS APPLIANCE Notice d emploi ’ MACHINE AUTOMATIQUE À EXPRESSO, CAPPUCCINO ET CAFÉ LATTÉ LIRE TOUTES LES INSTRUCTIONS AVANT D’UTILISER CET APPAREIL P.N.
-
Page 2: Important Safeguards
Return this appliance only to the nearest Authorized Oster Service Center for examination, repair or adjustment. ® 6. The use of accessory attachments not recommended for Oster products may result ® in fire, electric shock or injury to persons. -
Page 3: Polarized Plug
20. If coffee does not drip, the filter is blocked. Turn off the appliance and allow it to cool down. The blockage may be caused by the coffee being too finely ground. See the “PROBLEMS AND CAUSES” section. 21. WHEN CLEANING THE FROTHED MILK DISPENSING TUBE: Place a large cup under the frothed milk dispensing tube. -
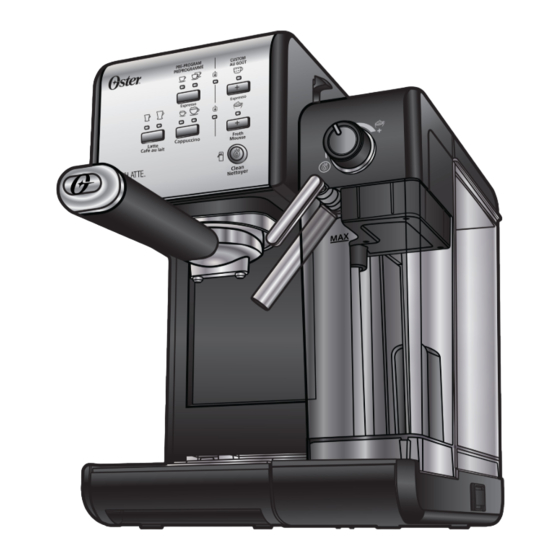
Page 4: Description Of The Appliance
DESCRIPTION OF THE APPLIANCE Brew Head Indicator Lights d. Small and Large Latte Button with Porta-Filter: Indicator Lights a. Porta-Filter for Ground Coffee and e. Manual Milk Frothing Button with E.S.E. pods (45mm) Indicator Light Height Adjusting Slot for Small Cups f. - Page 5 I N TR ODU CT I ON Congratulations! You have selected the new and innovative Oster Automatic Espresso, ® Cappuccino, and Latte Maker. This unique appliance has been designed to help you prepare delicious espressos, cappuccinos and lattes quickly, conveniently, and automatically with the touch of a button.
- Page 6 BE FO RE US IN G YOU R AP PLIAN CE FO R THE FI RS T T IME CLEANING AND PRIMING THE UNIT PRIOR TO FIRST USE Please refer to the “Description of the Appliance” section to familiarize yourself with the product and identify all parts.
-
Page 7: S Ele Ct In G Th E R Ig Ht C Off Ee
HOW TO SELECT THE RIGHT CUP Please make sure to select your cup according to the following chart: SUGGESTED BEVERAGE Single ( Espresso 40 ml Double ( 80 ml Small ( Cappuccino 220 ml Large ( 450 ml Small ( ) Latte 400 ml Large (... - Page 8 OP E RATING INST RU CT IO NS FILLING THE WATER RESERVOIR Fill the water reservoir with water (see figure 1). You may use either a jar to fill it up or remove it from the unit Figure 1 and then fill it up under the tap. Fill the reservoir with the desired amount of water below the “MAX”...
- Page 9 PLACING THE FILTER ON THE PORTA-FILTER Figure 3 Insert the filter into the porta-filter, making sure to align the filter dimple to the porta-filter notch (see figure 3). Turn the filter to the left or right to lock it in place (see figure 4). NOTE: To remove the filter for cleaning, turn the filter to the left or right to align the filter dimple to the porta-filter notch and proceed to remove.
- Page 10 PLACING THE PORTA-FILTER Position porta-filter underneath the brew head. Position handle so that the handle lines up with the open lock icon “ ” on the unit and fits into the groove. Then, slowly turn it to the right until the handle is aligned with the closed lock symbol “...
-
Page 11: Select The Function
SELECT THE FUNCTION PREPARING ESPRESSO Press the Espresso Button “ ” once to brew a single shot. The indicator light for a single shot of espresso will turn on. It will start blinking; indicating that a single shot of espresso is brewing. Press the Espresso Button “... -
Page 12: Preparing Latte
The unit will start brewing cappuccino according to your selection. The unit will stop automatically after the brewing process and the light will become solid, indicating that the cycle has been completed. Your delicious cappuccino is now ready to be enjoyed! PREPARING LATTE Prior to preparing your latte, adjust the level of frothed milk according to your preference by turning the Froth Control Knob to the right for more foam (cappuccino) and to the left... - Page 13 PREPARING FROTHED MILK The Oster Automatic Espresso, Cappuccino, and Latte Maker also allows you to prepare ® frothed milk alone. Press the Manual Foam “Froth” Button “ ” if you wish to add more foam to your beverage or to prepare frothed milk for any other beverage, e.g. macchiato, hot chocolate, chai latte, etc.
- Page 14 CLEANING YOUR AUTOMATIC ESPRESSO, CAPPUCCINO, AND LATTE MAKER CLEANING THE MILK RESERVOIR AND FROTHING TUBE Although you can store the milk reservoir with leftover milk in the refrigerator, it is important to clean the reservoir and frothing tube regularly to avoid clogging and residue build-up. In order to clean the milk reservoir, please follow the instructions listed below: Remove the milk reservoir from the unit by lifting up on the milk reservoir release button and simultaneously sliding milk reservoir out, grabbing milk reservoir by lid.
- Page 15 CLEANING THE WATER RESERVOIR Dispose of the remaining water by removing the reservoir and turning it upside down over the sink. It is recommended to empty the water reservoir between uses. Wash the water reservoir and its lid thoroughly with warm soapy water. Make sure to rinse and dry them well.
-
Page 16: Cleaning Procedure
the Clean “ ” button to activate the clean function. Let the cleaning cycle run until you no longer see any milk coming out of the tube, or let the cycle run until it stops automatically. Repeat Steps 1 – 6 as necessary using only tap water to rinse any remaining traces of vinegar out of the machine. -
Page 17: Pr Oble M S, C Ause S An D S Ol U Ti On S
PR OBLE M S, C AUSE S AN D S OL U TI ON S PROBLEM CAUSES SOLUTIONS Coffee does not • No water in reservoir. • Add water. come out. • Coffee grind is too fine. • Grind medium ground coffee. Too much coffee in the filter. -
Page 18: Year Limited Warranty
1-YE AR LIMITE D WA R R A NT Y Sunbeam Products, Inc. doing business as Jarden Consumer Solutions or if in Canada, Sunbeam Corporation (Canada) Limited doing business as Jarden Consumer Solutions (collectively “JCS”) warrants that for a period of one year from the date of purchase, this product will be free from defects in material and workmanship.
Need help?
Do you have a question about the BVSTEM6701 Series and is the answer not in the manual?
Questions and answers