Advertisement
Available languages
Available languages
Quick Links
Advertisement

Related Manuals for Oster BVSTEM5501B


Summary of Contents for Oster BVSTEM5501B
- Page 1 MODELOS BVSTEM5501B , BVSTEM5501R MODELS Manual de Instrucciones CAFETERA PARA ESPRESSO Y CAPPUCCINO OSTER® LEA TODAS LAS INSTRUCCIONES ANTES DE USAR ESTE APARATO Instruction Manual OSTER® ESPRESSO AND CAPPUCCINO MAKER PLEASE READ ALL INSTRUCTIONS BEFORE USING THIS APPLIANCE...
-
Page 2: Precauciones Importantes
PR EC AUC I ONE S I MP O RTA NTES Al utilizar aparatos eléctricos, siempre se deben seguir las precauciones básicas de seguridad para disminuir el riesgo de incendios, descargas eléctricas y / o lesiones personales, incluyendo las siguientes: 1. - Page 3 IMPORTANTE Siga estas instrucciones importantes mientras usa su Cafetera para Espresso y Cappuccino Oster ® 1. Para mejores resultados, prepare el espresso antes de vaporizar la leche. 2. No prepare espresso inmediatamente después de espumar la leche. Esto causará...
- Page 4 (*) MOLIDO CON AZÚCAR “INSTRUCCIONES DE LIMPIEZA”. IN TR O DUC CIÓ N ¡Felicidades! Ha elegido la nueva Cafetera para Espresso y Cappuccino Oster . Este ® electrodoméstico único ha sido diseñado para ayudarlo a preparar deliciosas tazas de café...
-
Page 5: Des C Ri Pc Ió N Del Artefacto
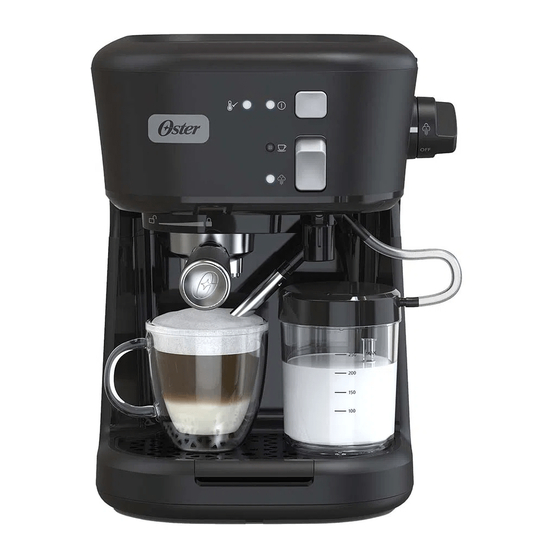
DES C RI PC IÓ N DEL ARTEFACTO Sistema Dispensador de Leche 1. Botón de encendido/apagado 2. Luz indicadora de encendido (blanca) 3. Luz de temperatura lista (blanca) 4. Interruptor selector de preparación espresso/leche espumada 5. Luz indicadora de preparación espresso 6. - Page 6 A N TE S DE USAR E L A RT EFACTO P OR PR IM ER A VE Z PASO 1: LIMPIEZA DE LA UNIDAD ANTES DEL PRIMER USO Consulte la sección “Descripción del aparato” para familiarizarse con el producto e identificar todas las piezas.
- Page 7 IN S TRU CC IO N E S PA R A EL FU N C IO N AM I EN TO CÓMO LLENAR EL DEPÓSITO DE AGUA 1. Llene el depósito de agua con agua (consulte la figura 1). Puede usar un frasco para llenarlo o sacarlo de la unidad y luego llenarlo debajo del grifo.
- Page 8 COLOCANDO EL FILTRO ADENTRO DEL PORTA FILTRO Figura 4 1. Inserte el filtro en el portafiltro, asegurándose de alinear la muesca del filtro en la hendidura del porta-filtro (ver figura 4). 2. Gire el filtro hacia la izquierda o hacia la derecha para asegurarlo en su lugar (ver figura 5).
- Page 9 CÓMO PREPARAR ESPRESSO PREPARACIÓN: Reúna lo siguiente antes de preparar • Café espresso fino molido. • Agua del grifo (o, preferiblemente, su agua embotellada favorita). • Taza y cuchara. 1. Asegúrese de que la unidad esté apagada y que la perilla de control esté en la posición de apagado “...
- Page 10 10. Para obtener instrucciones de limpieza, consulte la sección de limpieza de su Cafetera para Espresso y Cappuccino Oster ® CÓMO HACER CAPPUCCINO NOTAS IMPORTANTES: 1. Para lograr los mejores resultados de rendimiento, se recomienda preparar espresso primero y luego espumar la leche. NO COLE ESPRESSO INMEDIATAMENTE DESPUÉS ESPUMAR LA LECHE AL.
- Page 11 Figura 1 Figura 2 Figura 3 Figura 4 Figura 5 PREPARACIÓN: Reúna lo siguiente antes de preparar la bebida. • Café espresso fino molido. • Agua del grifo (o, preferiblemente, su agua embotellada favorita). • Leche preferida (se recomienda la leche entera para obtener mejores resultados de espuma).
- Page 12 RECETAS Volumen de Tipo de bebida Volumen de café (ml) recomendado (seg) leche (ml) espresso sencillo espresso doble Americano 8-12 Cappuccino 100-130 espresso: 15 | leche: 30-40 Latte 150-180 espresso: 15 | leche: 90-115 LIMPIEZA DE SU CAFETERA CONSEJO IMPORTANTE DE LIMPIEZA: Cuando haya terminado de espumar la leche, siga las instrucciones a continuación para eliminar cualquier resto de leche del cuerpo espumador.
- Page 13 Cualquier servicio más allá de lo descrito en la sección de limpieza debe ser realizado únicamente por un representante de servicio autorizado. Consulte la tarjeta de garantía para comunicarse con un centro de servicio autorizado de Oster ® Es p añ ol-12...
- Page 14 P R OBL EM AS, C AU SA S Y SO LUCIO NES PROBLEMAS CAUSAS SOLUCIONES No sale café. • No se ha usado o cebado la • Asegúrese que se haya unidad en mucho tiempo. cebado. • No hay agua en el depósito. •...
- Page 15 PROBLEMAS CAUSAS SOLUCIONES No se genera • El sistema dispensador de • Agregue agua al tanque de espuma leche necesita limpieza. agua. • El sistema dispensador • Asegurese que el sistema de leche no esta instalado dispensador de leche este correctamente.
- Page 16 N OTA...
-
Page 17: Important Safeguards
IM P ORTANT SAF E GUA R D S When using electrical appliances, basic safety precautions should always be followed to reduce the risk of fire, electric shock, and/or injury to persons including the following: 1. Read all instructions. 2. Do not touch hot surfaces. Use handles or knobs. 3. - Page 18 2. Do not operate the appliance with an empty water reservoir. 3. Keep the area above the appliance clear during use, as hot steam will escape the appliance. IMPORTANT Please follow these important instructions while using your Oster Espresso and ® Cappuccino Maker: 1.
- Page 19 A drink made with about 1/4 espresso and 3/4 steamed milk. IMPORTANT: Please read ALL of the instructions, precautions, notes and warnings included in this instruction manual carefully before you begin to use this appliance. Proper care and maintenance will ensure the long life of the Oster Espresso and ®...
-
Page 20: Description Of The Appliance
DESCRI PTIO N OF T HE A PPLIANC E Milk Dispensing System 1. On/Off Button 2. Power Indicator Light (white) 3. Temperature Ready light (white) 4. Brew/Steam Selector Switch 5. Brew Indicator Light (White) 6. Steam Indicator Light (White) 7. Brew/Steam Control knob 8. - Page 21 B EF O RE U S IN G YOU R A P PL IAN C E FO R THE F IRST T IM E STEP 1: CLEANING THE UNIT PRIOR TO FIRST USE Please refer to the “Description of the Appliance” section to familiarize yourself with the product and identify all parts.
- Page 22 OP ER ATIN G I NST RU CT ION S FILLING THE WATER RESERVOIR 1. Fill the water reservoir with water (see figure 1). You may use either a jar to fill it up or remove it from the unit and then fill it up under the tap. Fill the reservoir with the desired amount of water below the “MAX”...
- Page 23 PLACING THE FILTER ON THE PORTA-FILTER 1. Insert the filter into the porta-filter, making sure to align the Figure 4 filter dimple to the porta-filter notch (see figure 4). 2. Turn the filter to the left or right to lock it in place (see figure 5). NOTE: To remove the filter for cleaning, turn the filter to the left or right to align the filter dimple to the porta-filter notch, proceed to remove.
- Page 24 9. If you wish to brew additional espresso, repeat the process by following the steps in the “BREWING ESPRESSO” section. CAUTION: The metal parts of the porta-filter might still be very hot. Cool these parts by running under cold water. 10. For cleaning instructions, refer to cleaning your Oster Espresso and Cappuccino ® maker section.
- Page 25 HOW TO MAKE CAPPUCCINO IMPORTANT NOTES: 1. To achieve best performance resuls it is recommended to brew espresso first and then froth the milk. DO NOT BREW ESPRESSO IMMEDIATELY AFTER STEAMING MILK. Please cool down the unit. IMPORTANT NOTE: COOLING DOWN THE UNIT: Do not brew espresso immediately after steaming milk.
- Page 26 Figure 3 Figure 4 Figure 5 PREPARATION: Gather the following prior to brewing • Fine espresso ground coffee • Tap water (or, preferably your favorite bottled water) • Preffered Milk (Whole milk is recommended for best frothing results) • Teaspoon and cup 1.
- Page 27 CLEANING THE FROTHER BODY: • Fill the milk reservoir with WATER ONLY, using the “Max” marks as guidance or you can also sumerge the frother connector tube into a cup full of clean water. • Press the Brew/Steam Switch and make sure it is on the Steam “ ”...
- Page 28 7. Repeat Steps 1 – 6 as necessary using only tap water to rinse any remaining traces IMPORTANT: This appliance has no user serviceable parts. Any servicing beyond that described in the Cleaning Section should be performed by an Authorized Service Representative only. See warranty card for contacting an autorized Oster service ®...
- Page 29 PR OB LE MS, C A U SE S A ND SO LU T IONS PROBLEM CAUSES SOLUTIONS Coffee does not • Haven’t used unit in a long • Run priming. come out. time, or haven’t primed it. • Add water to water reservoir. •...
- Page 30 PROBLEM CAUSES SOLUTIONS No froth is • Frother body needs • Add water to water reservoir. generated. cleaning. • Ensure frother body is properly • Frother body is not installed installed. correctly. • Clean the frother body. • Ran out of steam. •...
- Page 31 N OTE...
- Page 32 XXX where X is any number between 0 and 9 or any letter between A and Z. La siguiente información es para México solamente. The following information is intended for Mexico only. CAFETERA PARA ESPRESSO Y CAPPUCCINO OSTER ® MODELOS: BVSTEM5501B , BVSTEM5501R LEA EL INSTRUCTIVO ANTES DE USAR EL APARATO IMPORTADOR: NEWELL BRANDS DE MEXICO S.A.
Need help?
Do you have a question about the BVSTEM5501B and is the answer not in the manual?
Questions and answers