
Related Manuals for Monarch 9414


Summary of Contents for Monarch 9414
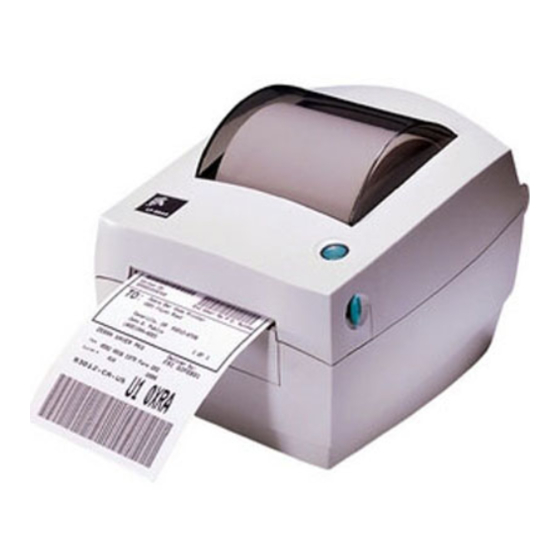
- Page 1 ® Monarch ™ 9414 Printer TC9414EM 7/99 Rev. AB ©1999 Monarch Marking Systems, Inc. All rights reserved.
- Page 2 Each product and program carries a respective written warranty, the only warranty on which the customer can rely. Monarch reserves the right to make changes in the product, the programs, and their availability at any time and without notice. Although Monarch has...
-
Page 3: Table Of Contents
TA B L E O F C O N T E N T S GETTING STARTED ......... 1-1 Introduction. - Page 4 ii Table of Contents...
-
Page 5: Getting Started
G E T T I N G S TA R T E D The Monarch® 9414™ is a low cost, desktop thermal direct printer. It is designed for printing labels, tags or receipts (with or without bar codes) from any MS-DOS®, Windows®... - Page 6 9414 printer Power Supply Equipment Manual Cleaning Pen. If any items are missing, contact Monarch for replacement parts. Keep all packaging material in case you need to move or return the printer. C o n n e c t i n g t h e P o w e r S u p p l y...
- Page 7 2. Place the power supply in a suitable location, preferably on the floor, near an electrical outlet. 3. Turn the printer off. Press (O) to turn off and (I) to turn on. 4. Plug the power supply cable into the socket at the rear of the printer.
- Page 8 C o n n e c t i n g t h e C o m m u n i c a t i o n C a b l e Before the printer can accept print jobs from the host, you must connect the communication cable to the printer and the host.
- Page 9 F o r s e r i a l c o m m u n i c a t i o n : 1. Turn the printer off before connecting the cable. 2. Connect a serial printer cable from the host to the DB-9 RS-232C serial port at the back of the printer.
-
Page 10: Serial Interface Cable Wiring
S e r i a l I n t e r f a c e C a b l e W i r i n g The figure below displays the cable wiring required to use the printer’s serial interface. 1-6 Getting Started... -
Page 11: Reading The Indicator Light
R e a d i n g t h e I n d i c a t o r L i g h t The indicator light helps you check the printer’s status. Indicator Light Description GREEN Printer is on. Supply has run out or is not loaded. - Page 12 1-8 Getting Started...
-
Page 13: Loading Supplies
L O A D I N G S U P P L I E S This chapter describes how to load a roll of labels or tags. a roll of labels for peel mode. fan-fold supplies. Loading Supplies 2-1... -
Page 14: Loading Labels Or Tags
L o a d i n g L a b e l s o r Ta g s Your printer can print on thermal direct paper, labels and tags. If you run out of labels while printing, do not turn the printer off when reloading the labels. - Page 15 3. Adjust the supply guides to their widest position by turning the dial. 4. Open the supply holders to their widest position by pushing out the supply holder tabs. Loading Supplies 2-3...
- Page 16 5. Load the supply roll. 6. Press the supply under the the supply guides and adjust the supply guides so they just touch the edges of the backing paper. 2-4 Loading Supplies...
- Page 17 7. Close the cover until the cover locks in place. 8. Press the FEED button. The indicator light should be GREEN. Loading Supplies 2-5...
-
Page 18: Loading For Peel Mode
L o a d i n g f o r P e e l M o d e Peel mode separates the label from the backing paper while printing. Your printer may have this option. 1. Press the cover release buttons (on both sides of the printer) towards the front of the printer. - Page 19 4. Open the supply holders to their widest position by pushing out the supply holder tabs. 5. Hold open the supply holders while loading the supply roll. Release the supply holders until the supply core fits on the supply holders. Loading Supplies 2-7...
- Page 20 6. Open the peel bar cover by pushing down. Print Mode Switch 7. Change print modes to peel by switching the print mode switch to the (1) position. 1=Peel Mode O=Non-peel Mode 8. Remove the first two labels from the backing paper and cut the corners of the backing paper.
- Page 21 9. Feed the backing paper over the peel bar and under the peel roller. Peel Bar Peel Roller 10. Press the supply under the supply guides and adjust the supply guides so they just touch the edges of the backing paper. Loading Supplies 2-9...
- Page 22 11. Close the peel bar cover by pushing up until it locks. 12. Close the cover until the cover locks in place. 13. Press the FEED button to advance a peeled label. The indicator light should be GREEN. 2-10 Loading Supplies...
-
Page 23: Loading Fan-Fold Supplies
L o a d i n g F a n - F o l d S u p p l i e s 1. Place a stack of fan-fold supplies behind to the printer, label side up. You may have to move the printer to allow room for the supply. - Page 24 7. Feed the fan-fold supply through the fan-fold slot. Fan-Fold Slot 8. Press the supply under the supply guides and adjust the supply guides so they just touch the edges of the backing paper. 9. Close the cover until the cover locks in place. 10.
-
Page 25: Care & Maintenance
C A R E & M A I N T E N A N C E This chapter tells you how to clear label jams. clean the printhead. C l e a r i n g L a b e l J a m s When you are printing and a jam occurs, the indicator light turns ORANGE. - Page 26 C l e a n i n g t h e P r i n t h e a d Clean the printhead every time you load a new label roll into the printer. 1. Turn the printer off. 2. Press the cover release buttons (on both sides of the printer) towards the front of the printer.
-
Page 27: Cleaning The Printhead
T R O U B L E S H O O T I N G Problem Action Indicator light is off Check the power connections from the when the printer is power supply to printer and AC outlet. turned on. See Chapter 1, "Connecting the Power Supply."... - Page 28 Problem Action Printing stops and Adjust the label gap sensor. indicator light turns 1. Turn the printer off. ORANGE. 2. Load labels for non-peel mode. See Chapter 2, "Loading Labels or Tags." 3. Press and hold the FEED button while turning the printer on. 4.
-
Page 29: Specifications & Accessories
S P E C I F I C AT I O N S & A C C E S S O R I E S P r i n t e r S p e c i f i c a t i o n s Height: 6.6"... -
Page 30: Printer Accessories
P r i n t e r A c c e s s o r i e s Use these part numbers when ordering parts. Call Monarch at 1-800-543-6650 to order. Description Part Number Parallel Interface Cable, 6’ 300016-006 300016-010 Interface Cable, 10’... -
Page 31: Sensing The Supplies
S E N S I N G T H E S U P P L I E S This chapter describes how to set your printer to use the sensors to find the top of each label. The sensors are: Gap Sensor - finds the top of each label by sensing the space between labels on the backing paper. - Page 32 7. Save file. Send format to your printer. For more information, refer to the programmer’s manual. The online version of the programmer’s manual can be downloaded off of Monarch’s Web Site (www.monarch.com/service/service_front.htm) as an Adobe Acrobat file. C-2 Sensing the Supplies...
- Page 33 To c h a n g e y o u r p r i n t e r f r o m b l a c k m a r k t o g a p s e n s o r : 1.
- Page 34 "Troubleshooting" for more information on adjusting the gap sensor. For more information, refer to the programmer’s manual. The online version of the programmer’s manual can be downloaded off of Monarch’s Web Site (www.monarch.com/service/service_front.htm) as an Adobe Acrobat file. C-4 Sensing the Supplies...
- Page 35 TIME OF PRINTER PURCHASE. Warranty Period - The limited warranty starts on the day the product is shipped from Monarch and ends after a period of one (1) year or when the product’s life has been exceeded, whichever occurs first.
Need help?
Do you have a question about the 9414 and is the answer not in the manual?
Questions and answers