Table of Contents
Advertisement
Quick Links
Advertisement
Table of Contents

Related Manuals for Fortinet FortiFone


Summary of Contents for Fortinet FortiFone
- Page 1 FortiFone™ User Guide for FON-260i...
- Page 2 , and FortiGuard , are registered trademarks of Fortinet, Inc., and other Fortinet names herein may also be trademarks of Fortinet. All other product or company names may be trademarks of their respective owners. Performance metrics contained herein were attained in internal lab tests under ideal conditions, and performance may vary.
-
Page 3: Table Of Contents
SIP Configuration, Line Configuration ............. 12 SIP Server Address ..................12 Proxy Port ....................12 Display Name ..................... 13 User Name ....................13 Authentication User Name ................. 14 Authentication Password ................14 Registration Status..................14 Contents Page iii FortiFone™ User Guide for FON-260i... - Page 4 Loading a Contact List using a Web Browser ..........25 To add entries to the Phone Book using the telephone interface ....26 Editing a Contact ..................26 Deleting a Phone Book Record..............27 Deleting All Records................... 27 Contents Page iv FortiFone™ User Guide for FON-260i...
- Page 5 Multicast Paging ....................44 Priority Paging Group..................44 General Paging Group ..................44 Programmable Keys ..................... 45 Call Log ......................... 46 Network Time Configuration ................. 47 Configurable Parameters ................. 47 Upgrade Configuration ..................49 Contents Page v FortiFone™ User Guide for FON-260i...
- Page 6 Regulatory and Safety Notices..............62 Radio Frequency Emissions .................. 62 FCC Compliance Statement ................62 Canadian Compliance Statement ..............62 European Union Declarations of Conformity ........... 62 Product Safety Instructions ................... 63 Contents Page vi FortiFone™ User Guide for FON-260i...
- Page 7 E-911 and use with Multi-Line Telephone Systems ..........63 Privacy ........................63 Limited Warranty .................... 64 Contents Page vii FortiFone™ User Guide for FON-260i...
-
Page 8: Introduction
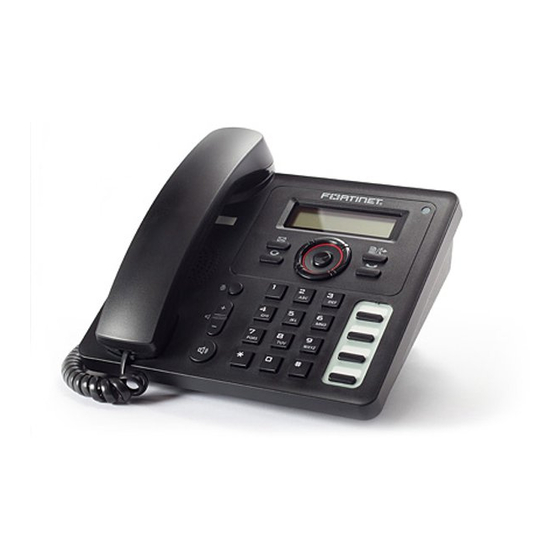
• Power Source: • Use only the power supply designed for the region you intend to use the product. This adapter is rated with an output of 5.1v DC at 0.7 A. Introduction Page 1 FortiFone™ User Guide for FON-260i... - Page 9 Figure 1: Phone front Display Handset Message waiting indicator Speaker Microphone OK button Navigation buttons Voicemail Configuration/Transfer Redial Hold/Retrieve Dial pad Mute Programmable/ Volume control Flexible keys Speakerphone Introduction Page 2 FortiFone™ User Guide for FON-260i...
- Page 10 IP phone configuration. Hold/Retrieve — place or retrieve a call on hold. Programmable/Flexible keys — program as function and speed dial keys. Introduction Page 3 FortiFone™ User Guide for FON-260i...
-
Page 11: Installation
Optionally connect your desktop PC to the PC port on the phone with an Ethernet cable (not supplied). Power Connect the power adapter to the power jack on phone. Handset Connect the handset cord to the handset and the handset jack on the phone. Installation Page 4 FortiFone™ User Guide for FON-260i... -
Page 12: Provisioning The Phone
If the phone still says “Not Registered” after 30 seconds, see “Troubleshooting” on page If you encounter problems, ensure the appropriate ports are forwarded from the firewall to the FortiVoice system. For more information, see the FortiVoice User Guide. Installation Page 5 FortiFone™ User Guide for FON-260i... -
Page 13: Personalizing Your Phone
Call Preferences menu. • Press to enter the Access Code Prefix menu. • Enter the hunt group you normally use to place outgoing calls (example: 9), then press the OK button. Personalizing your Phone Page 6 FortiFone™ User Guide for FON-260i... -
Page 14: Configuration Overview
• Select the Network Mode then press the OK button to save your selection. • Move to another parameter with the navigation buttons and continue the session or press button to exit the configuration session. Personalizing your Phone Page 7 FortiFone™ User Guide for FON-260i... -
Page 15: Ip Address
• Input the Primary DNS Address using the dial pad and press the OK button to save your entry. • Move to another parameter with the navigation buttons and continue the session or press button to exit the configuration session. Personalizing your Phone Page 8 FortiFone™ User Guide for FON-260i... -
Page 16: Secondary Dns Address
Changing the VLAN parameters requires a reboot of the IP phone. When you exit the menu, you will receive a reboot notice. The phone must be rebooted to use the new values. Personalizing your Phone Page 9 FortiFone™ User Guide for FON-260i... -
Page 17: Vlan Priority (Lan)
Press the OK button to reboot. The IP phone must reboot to utilize the new values entered. To disable VLANs, assign the VLAN ID as zero (0). Personalizing your Phone Page 10 FortiFone™ User Guide for FON-260i... -
Page 18: Vlan Priority (Pc)
Press the OK button to reboot. The IP phone must reboot to utilize the new values entered. To disable VLANs, assign the VLAN ID as zero (0). Personalizing your Phone Page 11 FortiFone™ User Guide for FON-260i... -
Page 19: Sip Configuration
Changing the Proxy Port requires a reboot of the phone. When you exit the menu, you will receive a reboot notice. Press the OK button to reboot. The IP phone must reboot to utilize the new values entered. Personalizing your Phone Page 12 FortiFone™ User Guide for FON-260i... -
Page 20: Display Name
To enter alphanumeric characters select the button. Refer to “Appendix B. Character Table for Dial Pad Mode” on page 61 for the character mapping of dial pad digits. Personalizing your Phone Page 13 FortiFone™ User Guide for FON-260i... -
Page 21: Authentication User Name
• The status is actually shown next to the menu title. • Move to another parameter with the navigation buttons and continue the session or press button to exit the configuration session. Personalizing your Phone Page 14 FortiFone™ User Guide for FON-260i... -
Page 22: Sip Configuration, General Parameters
Changing the Outbound Proxy Port requires a reboot of the IP phone. When you exit the menu, you will receive a reboot notice. Press the OK button to reboot. The IP phone must reboot to utilize the new values entered. Personalizing your Phone Page 15 FortiFone™ User Guide for FON-260i... -
Page 23: Backup Proxy Address
Changing the Local UDP Port requires a reboot of the IP phone. When you exit the menu, you will receive a reboot notice. Press the OK button to reboot. The IP phone must reboot to utilize the new values entered. Personalizing your Phone Page 16 FortiFone™ User Guide for FON-260i... -
Page 24: Rtp Start Port
Changing the Proxy Registration requires a reboot of the IP phone. When you exit the menu, you will receive a reboot notice. Press the OK button to reboot. The IP phone must reboot to utilize the new values entered. Personalizing your Phone Page 17 FortiFone™ User Guide for FON-260i... -
Page 25: Registration Expiry
The IP phone must reboot to utilize the new values entered. To enter alphanumeric characters select the button. Refer to “Appendix B. Character Table for Dial Pad Mode” on page 61 for the character mapping of dial pad digits. Personalizing your Phone Page 18 FortiFone™ User Guide for FON-260i... -
Page 26: Stun Server
2 — Ring Settings 3 — Disable Ringer 4 — Flexible Key Settings 5 — Time Configuration 6 — Firmware Update 7 — Speed Dial Number 8 — Key Tone 9 — Language Personalizing your Phone Page 19 FortiFone™ User Guide for FON-260i... -
Page 27: Lcd Contrast
• Using the navigation buttons, select Yes to turn the ringer off, or No to leave the ringer enabled. Press the OK button. • Move to another parameter with the navigation buttons and continue the session or press button to exit the configuration session. Personalizing your Phone Page 20 FortiFone™ User Guide for FON-260i... -
Page 28: Flexible Key Settings
When enabled, dialing an empty Speed Dial Number terminates the call and the empty status of the Speed Dial Number displays for approximately 2 seconds. Personalizing your Phone Page 21 FortiFone™ User Guide for FON-260i... -
Page 29: Key Tone
• Using the navigation buttons, select On to enable Call Waiting, or Off to disable Call Waiting. Press the OK button. • Move to another parameter with the navigation buttons and continue the session or press button to exit the configuration session. Personalizing your Phone Page 22 FortiFone™ User Guide for FON-260i... -
Page 30: Call Waiting Tone
• Press the Back softkey or the button to exit the menu. • Move to another parameter with the navigation buttons and continue the session or press button to exit the configuration session. Personalizing your Phone Page 23 FortiFone™ User Guide for FON-260i... -
Page 31: Auto Answer
To simplify the addition of many contacts to the Phone Book, a comma delimited contact list file can be uploaded directly to the phone using the web interface. A template is available within the Phone Book section of the web interface. Personalizing your Phone Page 24 FortiFone™ User Guide for FON-260i... -
Page 32: Loading A Contact List Using A Web Browser
• Check all entries to ensure they are properly imported. If the file did not upload, please check the file contents to ensure no conditions exist that might cause the phone to reject the file. Personalizing your Phone Page 25 FortiFone™ User Guide for FON-260i... -
Page 33: To Add Entries To The Phone Book Using The Telephone Interface
Dial Pad Mode” on page 61 for the character mapping of dial pad digits. If no ring tone is defined for a Phone Book entry, the default ring tone is used. Personalizing your Phone Page 26 FortiFone™ User Guide for FON-260i... -
Page 34: Deleting A Phone Book Record
• Press the button while the phone is idle. • Select a contact to dial using the Up/Down navigation buttons, then press the OK button. • Select Dial using the Up/Down navigation buttons, then press the OK button. Personalizing your Phone Page 27 FortiFone™ User Guide for FON-260i... -
Page 35: Call Log
LAN, reboot the phone again by pressing the button, select 9. Reboot. Press the OK button to reboot the phone. Returning the phone to factory defaults deletes all previous customized settings. Personalizing your Phone Page 28 FortiFone™ User Guide for FON-260i... -
Page 36: Lock/Unlock Config
Any parameter changes will only update after the next reboot. Personalizing your Phone Page 29 FortiFone™ User Guide for FON-260i... -
Page 37: Using Web Manager For Configuration
. Upon a successful attempt, the following page will be visible. • Click LOGIN • Enter admin for the User name and 23646 for the password to gain access. Using Web Manager for Configuration Page 30 FortiFone™ User Guide for FON-260i... - Page 38 The Site Map page is divided into 2 sections: the left hand navigation menu and page content on the right side for the various sections. Select the desired page from either the navigation menu or the site map. Using Web Manager for Configuration Page 31 FortiFone™ User Guide for FON-260i...
-
Page 39: Voip Configuration
VoIP Configuration If the phone is provisioned with a FortiVoice system, the Line Setting values will automatically be assigned. Using Web Manager for Configuration Page 32 FortiFone™ User Guide for FON-260i... -
Page 40: Line Based Parameters
3-parties. A URL is required for centralized conference. FortiVoice does not use centralized conference. • Options Timer: This timer sets the SIP options interval. • STUN Server Address: If required, enter a STUN server IP address or FQDN. Using Web Manager for Configuration Page 33 FortiFone™ User Guide for FON-260i... -
Page 41: Lan Configuration
The MAC address is fixed and cannot be modified. The IP address, subnet mask, etc. can only be changed if the static Network Mode is assigned. Changing any values on the LAN page requires a reboot. Using Web Manager for Configuration Page 34 FortiFone™ User Guide for FON-260i... -
Page 42: Call Preferences
(9, 81-88) that you would like the phone to use as a prefix to place calls using the specified hunt group. If direct line access is enabled for the extension, then leave blank. Using Web Manager for Configuration Page 35 FortiFone™ User Guide for FON-260i... -
Page 43: Call Forwarding
To modify parameters on the Call Preferences screen: • Select the desired parameter and enter or select the new values. • When complete, select the Save button to save the new values to the phone. Using Web Manager for Configuration Page 36 FortiFone™ User Guide for FON-260i... -
Page 44: Dial Plan
• Pre: Defines the digits to insert in front of the number (including if truncated). • Post: Defines the digits to insert at the end of the number (including if truncated). Using Web Manager for Configuration Page 37 FortiFone™ User Guide for FON-260i... -
Page 45: Simple Dial Plan
• Enter the digits in the Digit Map (Process) boxes. • Select the Save button. To delete a Digit Map process: • Select the DEL checkbox. • Select the Save button. Using Web Manager for Configuration Page 38 FortiFone™ User Guide for FON-260i... -
Page 46: Phone Information
• When complete, press the Save button. To change the password: • Enter the existing password. • Enter the new password then confirm. • When complete, press the Save button. Using Web Manager for Configuration Page 39 FortiFone™ User Guide for FON-260i... -
Page 47: Phone Settings
• Active Call Timer: This setting is not used by the FortiVoice system. • Pause Dial Tone: Configure the duration of the pause character in your phone book or speed dial. Using Web Manager for Configuration Page 40 FortiFone™ User Guide for FON-260i... -
Page 48: Functions
• Click the Add button and enter the new values. Information is purely an optional field. For example, you might enter company names or e-mail addresses if desired. • When complete, select the Save button to store the record. Using Web Manager for Configuration Page 41 FortiFone™ User Guide for FON-260i... -
Page 49: Loading A Contact List Using A Web Browser
• An optional header can be included at the beginning of the CSV file as shown above. It is not required. • The Ring Type options are 1 through 4, off and default. Using Web Manager for Configuration Page 42 FortiFone™ User Guide for FON-260i... -
Page 50: Downloading The Phone Book To A File On A Pc Using A Web Browser
5. For column values, select Text format for the column containing the phone number. Once imported, the phone numbers with leading zeros should be in the proper format. Using Web Manager for Configuration Page 43 FortiFone™ User Guide for FON-260i... -
Page 51: Multicast Paging
General Paging Group The phone support up to 10 general paging groups. Program the dial code, name, multicast IP address and port. Using Web Manager for Configuration Page 44 FortiFone™ User Guide for FON-260i... -
Page 52: Programmable Keys
To delete the functions assigned to all flexible keys: • Select the ClearAll button. Selecting ClearAll will immediately clear all programmed keys on the phone so ensure this is an intended action. Using Web Manager for Configuration Page 45 FortiFone™ User Guide for FON-260i... -
Page 53: Call Log
• Click the Dial button associated with the desired Call log record. If an Access Code Prefix, such as a Hunt Group, has been programmed into the phone, then it will automatically be inserted when dialed. Using Web Manager for Configuration Page 46 FortiFone™ User Guide for FON-260i... -
Page 54: Network Time Configuration
• DST (Daylight Savings Time): Enable DST if applicable in your region. Ensure DST configuration parameters are properly configured for the start and end of the DST cycle. Using Web Manager for Configuration Page 47 FortiFone™ User Guide for FON-260i... - Page 55 • To modify parameters on the Network Time screen, select the desired parameter and enter new values or select values from the drop-down menus. When complete, press the Save button. Using Web Manager for Configuration Page 48 FortiFone™ User Guide for FON-260i...
-
Page 56: Upgrade Configuration
In addition, the following parameters can be modified: • TFTP/HTTPS: Select the protocol that will be used to connect to the server where configuration and software files are stored. Using Web Manager for Configuration Page 49 FortiFone™ User Guide for FON-260i... - Page 57 The radial button next to the provisioning server type (TFTP or HTTPS), must be checked. If no type is selected, file download is disabled. Changes made to the Upgrade section require a reboot of the phone. Using Web Manager for Configuration Page 50 FortiFone™ User Guide for FON-260i...
-
Page 58: Qos Configuration
Note that large values may delay voice packet processing and smaller values may produce more packet loss but quicker voice packet processing. We recommend you use the default settings. Using Web Manager for Configuration Page 51 FortiFone™ User Guide for FON-260i... -
Page 59: Load Default
• Select the Load button. Note: All settings will be lost! • The phone will load the default configuration and automatically reboot. Reboot To reboot the phone: • Select the Reboot button. • The phone will reboot. Using Web Manager for Configuration Page 52 FortiFone™ User Guide for FON-260i... -
Page 60: Using The Phone
• When connected to the remote party, the LCD displays the elapsed call time. To end a call: • Hang up the handset. If using the speakerphone, press the button. Using the Phone Page 53 FortiFone™ User Guide for FON-260i... -
Page 61: Putting A Call On Hold
To transfer a call without announcing the transfer • Press the button. • Dial the extension or phone number + • To complete the transfer, hang up the handset. • To cancel a transfer, press the button. Using the Phone Page 54 FortiFone™ User Guide for FON-260i... -
Page 62: 3-Party Conference
• For privacy prior to placing the call, lift the handset. Using the Phone Page 55 FortiFone™ User Guide for FON-260i... -
Page 63: Dialing Using A Speed Dial Number
The latter provides time to access a system feature or line as might be required. Note that with Hotline configured, speed dial, redial and other automated dialing features will not operate. Using the Phone Page 56 FortiFone™ User Guide for FON-260i... -
Page 64: Using Your Phone With Fortivoice
Blind transfer Press the button + <extension> (or outside number) + , then hang up. Voicemail transfer Press the button + + <extension> + , then hang up. Using your Phone with FortiVoice Page 57 FortiFone™ User Guide for FON-260i... -
Page 65: Voicemail
. The system will respond with a parking orbit. Retrieve a parked caller Dial + orbit + Two-way intercom/group paging to FortiFone telephones Dial (Intercom) + (Paging) + <extension> + Attach account code to last call At dial tone, dial . -
Page 66: Troubleshooting
IP addresses (SIP servers, TFTP server, and SNTP server), results of the last file download attempt, boot version, and hardware and firmware version. This information may be useful if calling Fortinet Support. • Press the button, select 8. -
Page 67: Appendix A. Specifications
AC/DC Adapter Input: 100–240V AC, 50/60 Hz. 0–50°C Operation Temperature 32–122°F -20–60°C Storage Temperature -4–140°F Operation Humidity 0–85% RH, non-condensing Audio Acoustic Echo Canceller and Voice Active Detection Codecs G.711, G.729a/b Appendix A. Specifications Page 60 FortiFone™ User Guide for FON-260i... -
Page 68: Appendix B. Character Table For Dial Pad Mode
. , ? ! . , ? ! . , ? ! Space (‘ ‘) Space (‘ ‘) # [ ] Appendix B. Character Table for Dial Pad Mode Page 61 FortiFone™ User Guide for FON-260i... -
Page 69: Regulatory And Safety Notices
2. This device must accept any interference received, including interference that may cause undesired operation. European Union Declarations of Conformity Fortinet declares that the equipment specified in this document, which bears the “CE” mark, conforms to the European Union Radio and Telecommunications Terminal Equipment Directive (R&TTE 1999/5/EC) including, •... -
Page 70: Product Safety Instructions
911, and compliance with state and/or federal E-911 MLTS laws is the sole responsibility of the purchaser of this phone. Privacy This phone implements security and encryption technologies. However, privacy of communications may not be ensured when using this telephone. Regulatory and Safety Notices Page 63 FortiFone™ User Guide for FON-260i... -
Page 71: Limited Warranty
• Outside North America, contact your sales representative for return instructions. You will be responsible for shipping charges, if any. When you return this telephone for warranty service, you must present proof of purchase. Limited Warranty Page 64 FortiFone™ User Guide for FON-260i...