Danfoss FP975 Installation & User's Instructions
7-day electronic programmer
Hide thumbs
Also See for FP975:
- User manual ,
- Installation manual (16 pages) ,
- User instructions (2 pages)
Advertisement
Table of Contents
- 1 Table of Contents
- 2 Installation Instructions
- 3 DIL Switch Settings
- 4 New Installation
- 5 Existing Installation
- 6 Wiring
- 7 What Is a Programmer
- 8 Your Programmer
- 9 Before You Start
- 10 Accepting the Preset Programmes
- 11 Programming the Hot Water
- 12 Running Your Programme
- 13 Temporary Overrides
- Download this manual
Advertisement
Table of Contents

Related Manuals for Danfoss FP975


Summary of Contents for Danfoss FP975
- Page 1 FP975 7-day electronic programmer Installation & User Instructions Certification Mark...
-
Page 2: Table Of Contents
Index Installation Product specifi cation DIL switch settings New Installation Existing Installation Wiring 10-11 Wiring Conversion 12-19 User What is a programmer? Your programmer Preset programmes Before you start AM/PM or 24hr display Setting the Time and Day 22-23 Accepting the preset programmes Changing the preset programmes Programming heating - 5/2 day 25-26... -
Page 3: Installation Instructions
Installation Instructions Please Note: This product should only be installed by a qualifi ed electrician or heating installer, and should be in accordance with the current edition of the IEEE wiring regulations. Product specifi cation Specifi cation Power supply 230 Vac ± 15%, 50/60 Hz Switching action 2 x SPDT voltage free, Type 1BS Switch rating... -
Page 4: Dil Switch Settings
RIGHT LEFT MK.9 or SET The FP975 is supplied fi tted with a Danfoss Randall SET wallplate. However the FP975 will also mount directly onto a Danfoss Randall MK.9 wallplate without the need for wiring changes. However when used with existing MK.9 wallplates the left hand switch must be set in the MK.9 position to re-confi... -
Page 5: New Installation
2. Surface cables can only enter from below the unit. If mounted on a plaster box, cables can enter from the rear through the aperture in the wallplate. 3. The FP975 offers direct plug-in replacement to the following models (see overleaf ):... - Page 7 IMPORTANT NOTE If the timeswitch to be replaced is listed below it may be worth considering a FP715 as an alternative to the FP975. The FP715 offers wallplate compatablility for those models listed below, although some re-wiring may be required.
- Page 8 6. A small blanking plug is supplied to blank the unused recessed bottom fi xing screw. 7. Before setting the programmes the unit should be RESET by pressing the recessed button marked R/S. Ensure the mains power to the control circuit is switched on, and check the circuits as follows.
-
Page 9: Existing Installation
If the existing wallplate is of the SET pattern, follow instruction 5-9 from the “New Installations” sections. Should the existing product be a Danfoss Randall MK.9 time control the instructions below should be followed: Remove and discard the white test point cover fi tted to the top of the MK.9 wallplate. -
Page 10: Wiring
NOTES: tables FOR SET2E LINK see pages TERMINALS 1 & 12-19 FP975 ON A WALLPLATE For 230 Vac systems link L, 2 & 5 Always switch off mains fi rst and never fi t programmer to a live wallplate. 230 Vac Fully Pumped System - Two 2-port Zone Valves with Aux. - Page 11 230 Vac Controlled Gravity Hot Water - Pumped Heating System PUMPED switch selection MAINS fused 3A Earths not shown. HP28C Ensure continuity throughout. BOILER PUMP 230 Vac Fully Pumped System - 3-port Mid-position Valve PUMPED switch selection MAINS fused 3A Earths not shown.
- Page 12 WIRING CONVERSIONS to be used when replacing the following programmers with the FP975. Some time controls are connected differently depending on the type of system they are controlling. Consult the column Table A MAINS WATER DANFOSS RANDALL FP975 (SET MODE)
- Page 13 headed “NOTE This conversion ...” to determine whether Table A (pages 12-15) or Table B (pages 16-19) should be used. If in any doubt, contact our Technical Services Department before proceeding with the replacement. An additional terminal block may be required HEATING NOTE where these...
- Page 14 Table A cont.. MAINS WATER DANFOSS RANDALL FP975 (SET MODE) VENNER CHC/W2 (WITH STAT) N,2,4 VENNER CHC/W2 (AIR STAT LINKED) N,2,4 VENNER VENOTROL 80M & 80PM (WITH AIR STAT) VENNER VENOTROL 80M & 80PM (AIR STAT LINKED)
- Page 15 An additional terminal block may be required HEATING NOTE where these This conversion applies only if..disconnected leads (or pairs) should be terminated LINK L - 2 - 5 A/S 3 Used in a system having indepen- dent control of water and heating A/S 5...
- Page 16 L,1,3 HORSTMANN 424 DIAMOND L,1,3 BOILER HORSTMANN CORAL 423 & 424 POTTERTON EP2000, EP3000 DANFOSS RANDALL 3060 & 3020P RANDALL 701 SANGAMO M5 410 FORM 4 SANGAMO S409 FORMS 1 & 4 N,1,3 SANGAMO (EARLY MODEL) S410 FORM 4 SATCHWELL LIBRA SMITHS IND.
- Page 17 An additional terminal NOTE block may be required HEATING This conversion where these disconnected applies only if..leads (or pairs) should be terminated LINK L - 2 - 5 AIR STAT Programme selectors LINKED 1 & 3 are LINKED Programme selectors LINKED Programme selectors LINKED...
- Page 18 Table B cont..MAINS WATER DANFOSS RANDALL FP975 (SET MODE) VENNER VENOTROL N,A,M L,L1 N,1, VENNER VENOTROL 80 (AIR STAT) N,1, VENNER VENOTROL 80 (AIR STAT LINKED) VENNER CHC/W2 (WITH STAT) N,2,4 VENNER CHC/W2 (AIR STAT LINKED) N,2,4 VENNER VENOTROL 80P (WITH AIR STAT)
- Page 19 An additional terminal HEATING NOTE block may be required This conversion where these disconnected applies only if..leads (or pairs) should be terminated LINK L - 2 - 5 A/S, A/S, Used in a system having control of WA- TER ONLY or WATER & HEATING TOGETHER A/S,...
-
Page 20: What Is A Programmer
The text below has been edited and approved by the Plain English Campaign, who has issued a Crystal Mark to be displayed with it. What is a programmer? ... an explanation for householders. Programmers allow you to set ‘On’ and ‘Off’ time periods. Some models switch the central heating and domestic hot water on and off at the same time, while others allow the domestic hot water and heating to come on and go off at... -
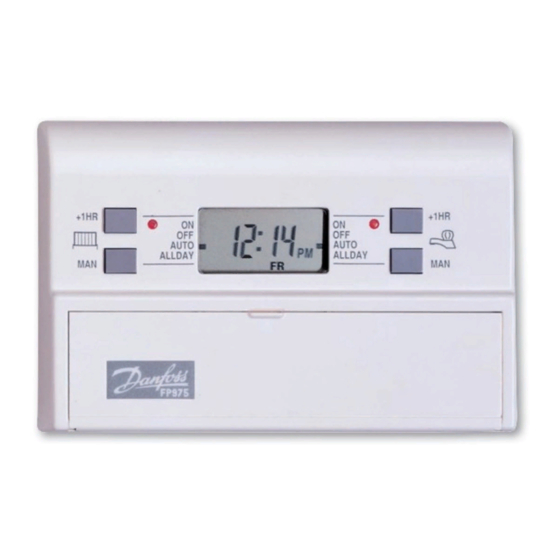
Page 21: Your Programmer
User Instructions Your programmer The FP975 allows you to switch your heating and hot water on and off at times that suit you. You can programme up to 3 ON/OFF times per day for the heating and the hot water and the two systems can be operated independently. -
Page 22: Before You Start
Before you start Open the fl ap on the front of the clock. Press the RESET (R/S) button using a non-metallic object (e.g. pencil/matchstick) until you hear a click and the red light on the front of the unit fl ashes once. -
Page 23: Accepting The Preset Programmes
SETTING THE DAY Press DAY repeatedly until the correct day of the week is displayed. MO is Monday, TU is Tuesday etc. Accepting the preset programmes If you are happy to use the preset programmes on page 21, you don’t need to do anything else. To accept the factory presets just press the PROG button until the time appears &... - Page 24 Before you change the preset programmes Your installer will have set your unit to operate in one of the following modes: 5/2 day - one set of programmes for weekdays and another for weekends (page 25-26). 7 day - different settings for each day of the week (page 27-28).
- Page 25 Programming the heating in 5/2 day mode Press PROG until SET CH ON TIME appears at the top of the display and MOTUWETHFR appears at the bottom of the display. Use the + and - buttons to set the time you would like your heating to fi...
- Page 26 Press the DAY button once and SASU will appear at the bottom of the display. Either press COPY to keep the same settings for Saturday and Sunday as you have programmed for Monday to Friday. Alternatively, programme new ON/OFF times by pressing the NEXT ON/OFF button to move to the next setting and using the + and - buttons to set the...
- Page 27 Programming the heating in 7 day mode Press PROG until SET CH ON TIME appears at the top of the display and MO appears at the bottom of the display. Use the + and - buttons to set the time you want your heating to fi...
- Page 28 Continue programming the rest of the week by pressing: a) NEXT ON/OFF button to move to the next setting, b) + and - buttons to amend the time, c) DAY to advance to the next day. Alternatively press COPY to keep the same settings as the day before.
-
Page 29: Programming The Hot Water
Programming the hot water To set the hot water programme press the PROG button until SET HW ON TIME appears on the display. Set the hot water programme in the same way as the heating programme, using: + and - buttons to alter the time, b) pressing the NEXT ON/OFF button to move to the next... -
Page 30: Running Your Programme
Running your Programme To run the central heating programme: press the SELECT button next to the radiator symbol. To run the hot water programme: press the SELECT button next to the tap symbol. As you press the SELECT button the display will change between ON, OFF, ALLDAY and AUTO. -
Page 31: Temporary Overrides
Sometimes you may need to change the way you use your heating temporarily, i.e. due to unusually cold weather. The FP975 has two convenient overrides which can be selected without affecting the set programme. The grey buttons next to the radiator symbol are the Heating override buttons. - Page 32 Changing clocks forward & back Open the fl ap on the front of the unit to reveal the programming buttons. To change from Summer to Winter (clocks back) - press and hold - button. To change from Winter to Summer (clocks forward) - press and hold + button.
- Page 36 Call our technical department 0845 121 7505 (8.45-5.15 Mon-Thurs, 8.45-4.45 Fri) For a large print version of these instructions please contact the Marketing Services Department on 0845 121 7400. Danfoss Randall Ltd Ampthill Road Bedford MK42 9ER Tel: 01234 364621 Fax: 01234 219705...