Table of Contents
Advertisement
Advertisement
Table of Contents

Related Manuals for Singer futura ce-100


Summary of Contents for Singer futura ce-100
- Page 1 ™ CE-100 INSTRUCTION MANUAL MANUEL D’INSTRUCTION MANUAL DE INSTRUCCIONES...
-
Page 2: Important Safety Instructions
Use Matsushita Electric, Model 4C-333B or Yamamoto Electric, Model YC-485 with this sewing machine. This appliance complies with EEC Directive 89/336/EEC covering the electromagnetic compatibility. ® SINGER is a registered trademark of The Singer Company Ltd or its affiliates. ©... - Page 3 Avec cette machine à coudre, utilisez le modèle 4C-333B de Matsushita Electric ou modèle YC-485 de Yamamoto Electric. Cet appareil est conforme à la directive CEE 89/336 EEC concernant les normes électromagnétiques. ® SINGER est une marque déposée de The Singer Company Ltd ou de ses filiales. © 2005...
- Page 4 Use el modelo 4C-333B de Matsushita Electric o modelo YC-485 de Yamamoto Electric con esta máquina de coser. Este instrumento se conforma con directivo de CEE 89/336/EEC cubriendo supresión contra interferencia de radio. ® SINGER es una marca registrada de The Singer Company Ltd o sus afiliados. © 2005...
-
Page 5: Table Of Contents
TABLE OF CONTENTS 1. KNOWING YOUR SEWING MACHINE Continuous patterns -------------------------------------------------- 54 - 55 Decorative embroidery designs ----------------------------------- 56 - 57 Machine identification --------------------------------------------------- 6 - 7 Tips on design stitching Accessories ----------------------------------------------------------------- 8 - 9 Novelty patterns -------------------------------------------------------- 56 - 57 Setting up your machine -------------------------------------------- 10 - 11 Buttonhole making ---------------------------------------------------- 58 - 63 Operation switches ---------------------------------------------------- 12 - 13... - Page 6 TABLE DES MATIERES 1. VOTRE MACHINE À COUDRE Motifs continus ---------------------------------------------------------- 54 - 55 Motifs décoratifs -------------------------------------------------------- 56 - 57 Description de la machine --------------------------------------------- 6 - 7 Conseils pour les points fantaisie Accessoires ----------------------------------------------------------------- 8 - 9 Motifs spécials ---------------------------------------------------------- 56 - 57 Préparation de la machine ----------------------------------------- 10 - 11 Confection des boutonnières -------------------------------------- 58 - 63 Touches de fonctionnement ---------------------------------------- 12 - 13...
- Page 7 CONTENID 1. PRINCIPALES PARTES DE LA MAQUINA Patrones continuos ---------------------------------------------------- 54 - 55 Diseños de bordados decorativos ------------------------------- 56 - 57 Identificación de la máquina ------------------------------------------ 6 - 7 Tipos de puntadas decorativas Accesorios ------------------------------------------------------------------ 8 - 9 Patrones actuales ----------------------------------------------------- 56 - 57 Preparación de la máquina ---------------------------------------- 10 - 11 Confección de ojales ------------------------------------------------- 58 - 63 Interrupteurs de fonctionnemento -------------------------------- 12 - 13...
-
Page 8: Knowing Your Sewing Machine Machine Identification
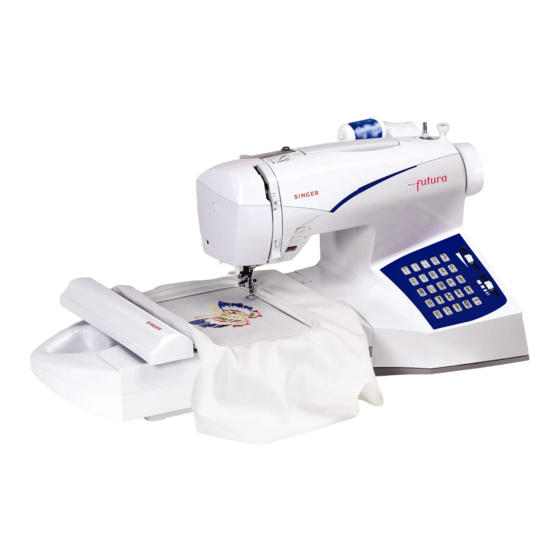
1. KNOWING YOUR SEWING MACHINE MACHINE IDENTIFICATION 1. Thread guide 2. Thread take-up 3. Thread tension control 4. Face cover 5. Thread cutter 6. Extension table (Accessory box) 7. Feed dog control 8. Bobbin winder shaft 9. Bobbin winder stop 10. -
Page 9: Votre Machine À Coudre
1. VOTRE MACHINE À COUDRE 1. PRINCIPALES PARTES DE LA MAQUINA DESCRIPTION DE LA MACHINE IDENTIFICATION DE LA MAQUINA 1. Guía hilo 1. Guide-fil 2. Tria- hilos 2. Releveur de fil 3. Control tensión hilo 3. Réglage tension du fil supérieur 4. -
Page 10: Accessories
ACCESSORIES FOR SEWING MACHINE 1. Needles 2. Bobbins 3. Spool pin felt discs 4. Spool pin cap (small) 5. Spool pin cap (large) 6. Buttonhole opener/Brush 7. Screwdriver for needle plate (large) 8. Screwdriver (large) 9. Screwdriver (small) 10. Buttonhole foot 11. -
Page 11: Accessoires
ACCESSOIRES ACCESORIOS POUR LA MACHINE À COURE PARA MAQUINA DE COSER 1. Aiguilles 1. Agujas 2. Canettes 2. Canillas 3. Rondelle feutre 3. Disco del pasador carrete 4. Chapeau pour petite bobine 4. Tapa del pasador carrete (pequeño) 5. Chapeau pour grande bobine 5. -
Page 12: Setting Up Your Machine
SETTING UP YOUR MACHINE Set power/light switch at Be sure to wipe off any surplus oil from needle “OFF” plate area before using your machine the first Mettez l’interrupteur moteur/ time. lumière sur “OFF”. Poner el Interruptor de corriente/ POWER LINE CORD/FOOT CONTROL luz de velocidad en “OFF”... -
Page 13: Préparation De La Machine
PRÉPARATION DE LA MACHINE PRÉPARACION DE LA MAQUINA Installez votre machine sur une surface bien plane. Asegurarse de limpiar cualquier aceite sobrante del área de la Votre machine à coudre a été huilée à fond par l’usine. plancha de aguja, antes de usar, por primera vez, la máquina. ll est donc indispensable, avant de commencer à... -
Page 14: Operation Switches
OPERATION SWITCHES Needle up/down switch Positionnement haut/bas de l’aiguille NEEDLE UP/DOWN SWITCH Interruptor agja arriba/abajo When the needle up/down switch is pushed, the needle moves and stops at its lowest position. If the switch is pushed once Reverse stitch switch more, the needle moves and stops at its highest position. -
Page 15: Touches De Fonctionnement
TOUCHES DE FONCTIONNEMENT INTERRUPTORES DE FUNCIONAMIENTO POSITIONNEMENT HAUT/BAS DE L’AIGUILLE ARRANCANDO/PARANDO LA MÁQUINA Lorsque vous appuyez sur la touche élévation/abaissement de Cuando se presiona el interruptor de aguja arriba/abajo, la aguja l’aiguille, l’aiguille se déplace et s’arrête en position basse. Si se mueve y para en su posición más baja. -
Page 16: Spool Pins
SPOOL PINS HORIZONTAL SPOOL PIN for normal thread Spool Spool pin Bobine spool Porte-bobine Carrete Pasador carrete Place thread spool on the pin and secure with a spool cap to Spool pin cap ensure smooth flow of thread. Couvre-fil Tapa del pasador carrete VERTICAL SPOOL PIN for large thread Thread guide pole spool... -
Page 17: Porte-Bobine
PORTE-BOBINE PORTA CARRETES PORTE-BOBINE HORIZONTAL pour la PASADOR DE CARRETE HORIZONTAL para bobine normale carrete de hilo normal Coloque el carrete de hilo en el pasador y asegúrelo con una Placez la bobine sur la broche et fixez-y un couvre-fil pour assurer tapa de carrete para asegurarse la salida suave de hilo. -
Page 18: Presser Foot Lifter, Feed Dog Control
PRESSER FOOT LIFTER There are three positions for your presser foot. 1. Lower the presser foot to sew. 2. Raise the lifter to the middle position to insert or remove fabric. 3. Lift it to its highest position to change the presser foot or to remove thick fabric. -
Page 19: Levier Du Pied Presseur, Abaisse-Griffes D'entraînement
LEVIER DU PIED PRESSEUR PALANCA PIE PRENSATELAS Il y a 3 positions: Su prensatelas tiene tres posiciones. 1. Abaisser le levier pour coudre. 1. Bajar el prensatelas para coser. 2. Soulever le levier en position moyenne pour insérer ou 2. Levantar la palanca a la posición media para insertar o mover enlever le tissu. -
Page 20: Converting To Free-Arm Sewing, Leveling Machine
CONVERTING TO FREE-ARM SEWING Your machine can be used either as a flat- bed or as a free-arm model. With the extension table in position, it provides a large working surface as a standard flat-bed model. To remove the extension table, hold it firmly with both hands and pull it off to the left as shown. -
Page 21: Utilisation Du Bras Libre, Équilibrer La Machine
UTILISATION DU BRAS LIBRE CONVERSION PARA LA COSTURA CON BRAZO Cette machine peut s’utiliser aussi bien sous la forme d’une base plane que celle d’un bras libre. En conservant la table de La máquina tanto se puede utilizar como base plana o una rallonge en place, vous disposez d’une grande table de travail. -
Page 22: Winding Bobbin
WINDING BOBBIN 1. Place a spool of thread on the spool pin, and secure it with the spool pin cap. Pull the thread out from the spool through thread guide. 2. Pull end of thread through hole in bobbin as shown. 3. -
Page 23: Préparation De La Canette
PRÉPARATION DE LA CANETTE DEVANADO DE LA CANILLA 1. Placez une bobine de fil sur le porte-bobine, et fixez-la à 1. Coloque un carrete de hilo en el pasador de carrete, y l’aide du couvre-fil (petit). Tirez le fil hors de la bobine par le asegúrelo con la tapa de pasador de carrete (pequeña). -
Page 24: Threading The Bobbin Thread
THREADING THE BOBBIN THREAD 1. Raise the needle to its highest position by rotating the hand wheel toward you. 2. Remove the bobbin cover plate by pushing the release button to the right while pushing the left corner of plate. 3. -
Page 25: Enfilage Du Fil De Canette
ENFILAGE DU FIL DE CANETTE ENHEBRADO DEL HILO DE LA CANILLA 1. Relevez l’aiguille en position haute en tournant manuellement 1. Eleve la aguja hasta su posición más alta girando el volantd. le volant vers vous. 2. Retirez la plaque de canette en poussant le bouton de 2. -
Page 26: Threading The Top Thread
THREADING THE TOP THREAD A. Raise the presser foot lifter. Always be sure to raise the presser foot lifter before threading the top thread. (If the presser foot lifter is not raised, correct thread tension cannot be obtained.) B. Turn the hand wheel toward you until the needle is in its highest position and the thread take-up is visible. -
Page 27: Enfilage Du Fil Supérieur
ENFILAGE DU FIL SUPÉRIEUR ENHEBRADO DEL HILO SUPERIOR A. Elevez le pied presseur. Veillez à toujours élever le pied A. Levante el prensatelas. Siempre asegúrese de levantar el presseur avant d’enfiler le fil supérieur. (Si le pied presseur prensatelas antes de bobinar el hilo superior. (Si no se levanta n’est pas élevé, vous ne pourrez pas obtenir une tension de el prensatelas, no se podrá... -
Page 28: Using Automatic Needle Threader
USING AUTOMATIC NEEDLE THREADER Raise the needle to its highest position by rotating the hand wheel towards you. 1. Hook thread to thread guide as illustrated. 2. Pull down threader lever until the hooked end passes through the needle eye. Guide thread into hooked end and pull it upward. -
Page 29: Utilisation De L'enfileur De Chas D'aiguille
UTILISATION DE L’ENFILEUR DE CHAS EMPLEO DEL ENHEBRADOR AGUJA D’AIGUILLE Levantar la aguja a la posición más elevada girando el volante de la máquina hacia uated. Elever l'aiguille en position haute en toumant le volant vers vous. 1. Passer le fil dans le crochet de l’enfileur. 1. -
Page 30: Picking Up Bobbin Thread
PICKING UP BOBBIN THREAD 1. Raise the presser foot lifter. 2. Holding needle thread loosely with your left hand, turn hand wheel toward you with your right hand first lowering the needle and continuing until the needle comes to its highest position. -
Page 31: Rappel Du Fil Inférieur
RAPPEL DU FIL INFÉRIEUR RECOGIDA DEL HILO DE LA CANILLA 1. Relever le pied presseur. 1. Alzar la palanca del pie prensatelas. 2. Tenir le fil de l’aiguille et tourner le volant vers vous en faisant 2. Manteniendo flojo el hilo de la aguja con la mano izquierda, remonter l’aiguille à... -
Page 32: Changing The Needle
11/80,14/90, Nylon 16/100 * Do not use on stretch fabrics. * For best sewing results, always use a Singer Branded Needle. Always disconnect the machine from power supply by removing the plug from the wall-outlet. Changing the needle 1. Raise the needle bar to its highest position by turning the hand wheel toward you. -
Page 33: Tableau Des Aiguilles, Fiils Et Tissus
* Pour obtenir les meilleurs résultats de couture, utilisez Jersey 14/90, 16/100 Tricot toujours une aiguille de marque Singer. * No usar sobre el material estirado. * Para los mejores resultados de costura, use siempre agujas marca Singer. D é b r a n c h e z t o u j o u r s . L a m a c h i n e d e Siempre desconecte la máquina de la fuente de... -
Page 34: Adjusting Top Thread Tension
ADJUSTING TOP THREAD TENSION Under side Côté de dessous STRAIGHT STITCHING Reverso The good looking appearance of your stitching is largely Well balanced determined by the balanced tension of both top and bobbin Correct threads. The tension is well balanced when these two threads Bien equilibrada ‘lock’... -
Page 35: Réglage De La Tension Du Fil Supérieur
RÉGLAGE DE LA TENSION DU FIL AJUSTE DE LA TENSION DEL HILO SUPÉRIEUR SUPERIOR POINT DROIT COSTURA RECTA L’aspect de votre point droit dépend surtout du bon équilibre El buen aspecto de la costura generalmente está determinado entre la tension supérieure et la tension inférieure. Elle est por la tensión equilibrada de ambos hilos superior e inferior. -
Page 36: Control Panel Function
CONTROL PANEL FUNCTIONS *Pattern selection buttons Turn on power switch and push a desired button until it is lit. LED indicator Témoin a diode Indicador LED *Mirror button If mirror image is available for selected pattern, push the mirror Stitch width/ button until it is lit. -
Page 37: Fonctions Du Panneau De Commande
FONCTIONS DU PANNEAU DE COMMANDE FUNCIONES DEL PANEL DE CONTROL *Touches de sélection de point *Botones de selección de puntada Reglez l’interrupteur d’alimentation sur la position de marche et Presione el interruptor principal y presione el botón deseado appuyez sur une touche voulue jusqu’à ce qu’elle s’allume. hasta que quede encendido. -
Page 38: Starting To Sew
2. STARTING TO SEW 2. COMMENCEZ À COUDRE 2. EMPEZER A COSER QUICK REFERENCE TABLEAU DE RÉFÉRENCE CUADRO DE REFERENCIA TABLE OF STITCH RAPIDE DES LONGUEURS ET RAPIDA DE LARGO Y ANCHO LENGTH AND WIDTH LARGEURS DE POINTS DE PUNTADA - - 0 . - Page 39 - - 0 . - - 0 . - - 0 . - - 0 . - - 5 . - - 0 . - - 0 . - - 0 . - - 0 . - - 0 . - - 0 .
-
Page 40: Straight Stitching
STRAIGHT STITCHING Straight stitch is most frequently used for every aspect of sewing. Let’s learn how to sew following the steps below. 1. SETTINGS Presser foot - Zigzag foot Thread tension control - S A. Thread tension control B. Needle up/down switch C. -
Page 41: Point Droit
POINT DROIT PUNTADA RECTA Ceci est le point le plus utilisé pour toute genre de Punto recto se usa más frecuentemente para coser couture. Apprenez à vous servir correctement de votre cualquier cosa. Aprenda el uso correcto de su máquina. machine, en suivant les étapes ci-dessous. -
Page 42: Turning A Square Corner
TURNING A SQUARE CORNER Needle up/down switch 1. To turn a square corner 5/8” (16 mm) from the fabric edge, Positionnement haut/bas Cornering guide de l’aiguille stop the machine and push the needle up/down switch to Guide d’angle move the needle to its lowest position when reaching the Interruptor agja arriba/abajo Guía de esquinas cornering guide as shown. -
Page 43: Exécution Du Point De Matelassage
RÉALISATION D’UN ANGLE DROIT GIRO EN ESQUINAS EN ANGULO RECTO 1. Pour faire un angle droit à 16 mm du bord du tissu, arrêtez la 1. Para girar en una esquina en ángulo recto a 16 mm. del couture en laissant l’aiguille dans le tissu, quand vous arrivez borde del tejido, parar la costura con la punta de la aguja atravesando el tejido, cuando se está... -
Page 44: Zigzag Stitching
ZIGZAG STITCHING Under side Côté de dessous SETTINGS :Presser foot - Zigzag foot Reverso :Thread tension control - S - E The top thread may appear on the bottom depending on the thread, fabric, type of stitch and sewing speed, but the bobbin thread must never appear on the top of the fabric. -
Page 45: Point Zigzag
POINT ZIGZAG PUNTADA ZIG-ZAG RÉGLAGES :Pied presseur - Pied zigzag AJUSTES :Pie prensatelas - Pata para zigzag :Réglage tension du fil supérieur - S - E :Control tensión hilo - S - E Le fil supérieur peut paraître sur l’envers, en fonction du fil, du El hilo superior puede aparecer en la parte inferior, según el tissu et de la vitesse de couture, mais le fil de la canette ne doit hilo, tejido, tipo de puntada y velocidad de costura, pero el hilo... -
Page 46: Blind Stitch, Shell Stitch
Blindhem Stitch (Mirror image) SETTINGS :Presser foot - Zigzag foot :Thread tension control - S - E Medium to heavyweight fabric Material de peso medio a pesado - Regular blind stitch for normal fabrics Tissus moyens et lourds - Elastic blind stitch for soft, stretchable fabrics Under side Under side Reverso... -
Page 47: Point Invisible, Point De Lingerie
POINT INVISIBLE PUNTADA INVISIBLE ( Image miroir ) ( Imagen en espejo ) RÉGLAGES :Pied presseur - Pied zigzag AJUSTES :Pie prensatelas - Pata para zigzag :Réglage tension du fil supérieur - S - E :Control tensión hilo - S - E - Point invisible pour les tissus tissés Puntada invisible regular para las telas normales Puntada invisible super elástico para las telas... -
Page 48: Multi-Stitch Zigzag
MULTI-STITCH ZIGZAG SETTINGS :Presser foot - Zigzag foot :Thread tension control - S - E This is a strong stitch because as its name implies, it makes three short stitches where the normal zig-zag makes only one. For this reason it is highly recommended for overcasting all types of fabrics. -
Page 49: Zigzag Multi-Point
ZIGZAG MULTI-POINT ZIG-ZAG DE TRES PUNTADAS RÉGLAGES :Pied presseur - Pied zigzag AJUSTES :Pie prensatelas - Pata para zigzag :Réglage tension du fil supérieur - S - E :Control tensión hilo - S - E Pour réparer des déchirures droites ou en angle placez le tissu Esta es una puntada fuerte, ya que como su nombre implica, avec le début de l’accroc sous la partie centrale du pied. -
Page 50: Stretch Stitches
STRETCH STITCHES SETTINGS :Presser foot - Zigzag foot :Thread tension control - S - E Stretch stitches are mainly for use on knit, or stretchable fabrics, but can also be used on ordinary woven materials. STRAIGHT STRETCH STITCH Straight stretch stitch is far stronger than an ordinary straight stitch because it locks three times - forwards, backwards and forwards. -
Page 51: Points Extensible
POINTS EXTENSIBLE PUNTADAS ELASTICAS RÉGLAGES :Pied presseur - Pied zigzag AJUSTES :Pie prensatelas - Pata para zigzag :Réglage tension du fil supérieur - S - E :Control tensión hilo - S - E Les points extensible sont généralement utilisés pour les tissus Las puntadas elásticas se utilizan principalmente en géneros de élastiques, mais peuvent ètres utilisès sur tissus tissés. -
Page 52: Honeycomb Stitch
HONEYCOMB STITCH 1. Make several rows of gathers across the fabric that you wish to smock. 2. With a narrow strip of fabric directly under the line of gathering, stitch over the gathers. The design will be a series of small diamonds. - Page 53 POINT NID D’ABEILLE PUNTADA PANAL 1. Piquez au point droit, des lignes de fronces séparées de ± 8 1. Realiza una línea recta de fruncidos a través del tejido que mm. Tirez sur le fil inférieur et froncez le tissu jusqu’à obtenir se desea adornar con nido de abeja.
-
Page 54: Turkish Stitch
ENTREDEUX STITCH Useful for decorative stitching on borders and and for use in heirloom sewing. TURKISH STITCH The turkish stitch has three main uses. It is perfect for attaching flat elastic when making or repairing lingerie; and for overcasting and for seaming and overcasting in one operation on slightly stretch fabrics and non-stretch ones such as linen, tweed, and medium to heavy-weight cotton. -
Page 55: Puntada Turco
POINT PUNTADA BARANDA ENTREDEUX Ce point s’utilise pour les bords, ainsi que pour la couture victorien. POINT TURC PUNTADA TURCO Point spécial pour réaliser ou réparer de la lingerie ou du tricot. Overlock doble tiene tres principal usos. Es perfecto juntar Convient particulièrement bien pour assembler et surfiler en elástico plano al hacer o reparar lencería;... -
Page 56: Continuous Patterns
CONTINUOUS PATTERNS SETTINGS :Presser foot - Zigzag foot :Thread tension control - S - E These are the optimum patterns for sewing continuous patterns. Use whichever patterns suit your preference. -
Page 57: Motifs Continus
MOTIFS CONTINUEL PATRONES CONTINUOS RÉGLAGES :Pied presseur - Pied zigzag AJUSTES :Pie prensatelas - Pata para zigzag :Réglage tension du fil supérieur - S - E :Control tensión hilo - S - E Ces motifs conviennent parfaitement à la couture des motifs Estos son los patrones ideales para costura de patrones continuels. -
Page 58: Decorative Embroidery Designs
DECORATIVE DESIGNS SETTINGS :Presser foot - Zigzag foot :Thread tension control - S - E * You should carry out a test sewing on a cut-off strip of the fabric being sewn to check the pattern to be used. * Before starting to sew, check that there is enough thread wound onto the bobbin to make sure that the thread will not run out during sewing. -
Page 59: Motifs Décoratifs
MOTIFS DÉCORATIFS DISEÑOS DE BORDADOS DECORATIVOS RÉGLAGES :Pied presseur - Pied zigzag AJUSTES :Pie prensatelas - Pata para zigzag :Réglage tension du fil supérieur - S - E :Control tensión hilo - S - E * Effectuez une couture d’essai sur une bande découpée du * Puede realizar una costura de prueba en un recorte de tissu que vous utilisez pour la couture pour vérifier le motif à... -
Page 60: Buttonhole Making
BUTTONHOLE MAKING Tab B USING BUTTONHOLE FOOT Languette B Tab A Lengüeta B Languette A 1. Insert a button in between tab A and tab B. Lengüeta A 2. Buttonholes can be sewn to match the size of the button. PROCEDURE * Use an interfacing in the area of the garment where buttonholes are placed. -
Page 61: Confection Des Boutonnières
CONFECTION DES BOUTONNIÈRES CONFECCION DE OJALES UTILISATION DU PIED BOUTONNIÈRE USO DEL PIE DE OJALADORA 1. Introduisez un bouton entre les butées A et B. 1. Inserte un botón entre la lengüeta A y la lengüeta B. 2. Les boutonnières peuvent être cousues de manière à 2. - Page 62 5. Carefully mark the position of buttonhole on your garment. 6. Place the fabric under the foot. Pull out the bobbin thread underneath the fabric to a length of about 4 inches to the rear. 7. Align the buttonhole mark on the fabric with the mark on the buttonhole foot, and then lower the buttonhole foot.
- Page 63 5. Marquez soigneusement la position de la boutonnière sur le 5. Marque cuidadosamente la posición del ojal en la vestimenta. vêtement. 6. Coloque el material debajo del pie. Tire del hilo de la bobina 6. Placez le tissu sous le pied. Tirez le fil de la bobine sous le debajo del material a un largo de aproximadamente 10 cm tissu sur une longueur d’environ 10 centimètres vers l’arrière.
-
Page 64: Corded Buttonholes
CORDED BUTTONHOLES Hook filler cord (crochet thread or buttonhole twist) over the spur Spur and pull both ends of the cord forward under the foot. Saliente Sew buttonhole so that zigzag stitches cover the cord. Tige When completed, release the cord from foot and snip off extra length. - Page 65 BOUTONNIÈRES GANSEES OJALES CON CORDON (RENFORCEES) Enganchar el cordón de relleno al saliente de la guía y estirar ambos extremos del cordón hacia adelante, por debajo de la Accrocher le cordonnet (fil de passe ou fil de soie) sur la tige du guía.
-
Page 66: Embroidering
3. EMBROIDERING BEFORE ATTACHING EMBROIDERY UNIT ATTACHING EMBROIDERY FOOT Foot holder Support du pied Sujetador prensatelas Always be sure to turn off power to machine before changing presser foot. CAUTION Screw * Raise presser foot lifter. Guia * Turn hand wheel toward you until needle is in its highest position. -
Page 67: Broderie
3. BRODERIE 3. BORDANDO ANTES DE COLOCAR LA UNIDAD DE AVANT DE FIXER L’UNITÉ DE BRODERIE BORDADO FIXATION DU PIED BRODERIE COLOCANDO EL PIE DE BORDADO Veillez à toujours couper l’alimentation électrique Asegúrese siempre de desconectar la máquina de la machine avant de changer le pied presseur. ATTENTION antes de cambiar el prensatelas. -
Page 68: Threading Bobbin Thread
THREADING BOBBIN THREAD Refer to page 22 - 23. * A large amount of thread is required for embroidering, so be sure to use full bobbin. THREADING TOP THREAD Refer to page 24 - 25. NOTE: It is recommended to do the threading before data transferring. - Page 69 ENFILAGE DU FIL DE CANETTE ENHEBRADO DEL HILO DE LA CANILLA Reportez-vous aux pages 22 - 23. Consulte las páginas 22 - 23. * Une grande quantité de fil est nécessaire pour effectuer la * Se necesita una gran cantidad de hilo para bordar, por lo broderie;...
-
Page 70: Attaching Embroidery Unit
FEED DOG CONTROL Feed dog control * Lower feed dogs by moving feed dog control toward the Abaisse-griffe d’entraînement direction (A). Control de dientes * When using machine for general sewing, raise feed dogs by moving feed dog control toward the direction (B). If you do not raise feed dog, material will not feed. -
Page 71: Fixer Le Pied De Broderie, Enfilage Du Fil De Canette, Enfilage Du Fil Supérieur, Rappel Du Fil Inférieur, Plateau De Rallonge, Abaisse-Griffes D'entraînement Fixer L'unité De Broderie
ABAISSE-GRIFFES D'ENTRAÎNEMENT CONTROL DE DIENTES * Abaissez les griffes d’entraînement en déplaçant la * Baje los alimentadores moviendo el control de alimentador commande des griffes d’entraînement dans vers (A). hacia la dirección (A). * Lorsque vous utilisez la machine pour la couture générale, * Al usar la máquina para costuras generales, levante los élevez les griffes d’entraînement en déplaçant la commande alimentadores moviendo el control de alimentador hacia la... -
Page 72: Preparation For Embroidery Sewing
PREPARATION FOR EMBROIDERY SEWING SECURING MATERIAL IN EMBROIDERY HOOP 1. Loosen hoop adjusting screw on outer frame and remove inner frame. Place material between inner and outer frame. 2. Slightly tighten the hoop adjusting screw and pull material edges to remove slack. Fit the two frames together by pressing down on the inner frame. -
Page 73: Préparatifs Pour La Broderie
PRÉPARATIFS POUR LA BRODERIE PREPARACION PARA BORDADO FIXATION DU TISSU DANS LE CERCEAU ASEGURANDO EL MATERIAL EN EL ARO DE BRODERIE DE BORDADO 1. Desserrez la vis de réglage du cerceau sur le cadre extérieur 1. Afloje el tornillo de ajuste de aro en el marco exterior y retire et retirez le cadre intérieur. -
Page 74: Using The Material And Stabilizer
USING THE MATERIAL AND STABILIZER MATERIAL Use stabilizer to produce better results when embroidering on the following fabrics or items. Materials which lack firmness or stability such as ligthweight cotton. Thin, soft materials such as hankerchief linens. Because materials such as this lack firmness or stability, embroidery stitches may pull in, which can result in problems such as shrinkage and puckering of the material around the embroidery area. -
Page 75: Utilisation Du Tissu Et De L'entoillage
UTILISATION DU TISSU ET DE L’ENTOILAGE USANDO EL MATERIAL Y ESTABILIZADOR TISSU MATERIAL Use el estabilizador para lograr terminaciones de bordado más Utilisez l’entoilage pour produire des finitions de broderie plus atractivas cuando usa materiales como los siguientes. attrayantes lorsque vous utilisez des tissus tels que les suivants. Materiales que no tienen firmeza como algunas camisas Tissus trop mous, tels que les cotton léger Materiales delgados y suaves como pañuelos... - Page 76 If embroidering onto material which is smaller than the Embroidery surface at material edge hoop size, or when embroidering close to the edge of Surface de broderie sur le bord du tissu material, attach the stabilizer as illustrated. Superficie de bordado en el borde del material WHEN EMBROIDERING ALONG THE EDGE OF MATERIAL SUCH AS A HANDKERCHIEF Stabilizer...
- Page 77 Si vous effectuez la broderie sur un tissu de taille plus Si se está bordando sobre material que es más pequeño petite que celle du cerceau, ou si vous brodez à proximité que el tamaño del aro, o cuando se borda cerca del borde du bord du tissu, fixez le stabilisateur comme indiqué...
-
Page 78: Preparing The Machine Before Installing The Hoop
PREPARING THE MACHINE BEFORE INSTALLING THE HOOP 1. Turn hand wheel toward you until needle comes to its highest position. 2. Connect your PC to the FUTURA sewing machine with USB cable. 3. Turn on power to machine. (Refer to page 10 - 12.) NOTE: If the USB cable is unconnected, an error message “PC”... -
Page 79: Préparation De La Machine Avant D'installer Le Cerceau
PRÉPARATION DE LA MACHINE AVANT PREPARANDO LA MAQUINA ANTES DE D’INSTALLER LE CERCEAU INSTALAR EL ARO 1. Tournez le volant jusqu’à ce que l’aiguille soit à sa position la 1. Gire el volante hacia delante hasta que la aguja llegue a su plus haute. -
Page 80: Attaching And Removing Embroidery Hoop
ATTACHING AND REMOVING EMBROIDERY HOOP ( A ) 1. Raise presser foot and needle, and push up lever (A) of embroidery foot with your finger and pass embroidery hoop under it. To remove, pull the hoop forward to slide it out from underneath the embroidery foot. -
Page 81: Fixation Et Retrait Du Cerceau De Broderie
FIXATION ET RETRAIT DU CERCEAU DE COLOCANDO Y RETIRANDO EL ARO PARA BRODERIE BORDAR 1. Élevez le pied presseur et l’aiguille et poussez le levier (A) 1. Levante el prensatelas y la aguja, y empuje la palanca (A) du pied broderie vers le haut avec le doigt, et passez le del pie de bordado con su dedo y pase el aro de bordado por cerceau de broderie sous le pied. -
Page 82: Removing Embroidery Unit
REMOVING EMBROIDERY UNIT Release lever Always be sure to turn off power to machine before Support de cerceau installing embroidery unit. CAUTION Palanca de liberación * Turn off power to machine. * Remove embroidery hoop from machine. (Refer to page 72 - 73.) 1. -
Page 83: Retrait De L'unité De Broderie
RETRAIT DE L’UNITÉ DE BRODERIE RETIRANDO LA UNIDAD DE BORDADO A s e g ú r e s e s i e m p r e d e d e s c o n e c t a r l a Veillez toujours à... -
Page 84: Operation Switches When Embroidery Unit Is Attached
OPERATION SWITCHES WHEN EMBROIDERY UNIT IS ATTACHED Needle up/down switch Positionnement haut/bas de l’aiguille OPERATION SWITCHES Interruptor agja arriba/abajo Reverse stitch switch START/STOP MACHINE Touche couture arrière When start/stop switch is pushed, machine starts slowly, and Interruptor de puntadas when the switch is pushed once more, the needle moves and hacia atrás stops at its highest position. -
Page 85: Touches De Fonctionnement
TOUCHES DE FONCTIONNEMENT INTERRUPTORES DE CONTROL LORSQUE L’UNITÉ DE BRODERIE EST CUANDO LA UNIDAD DE BORDADO FIXÉE ESTA INSTALADA TOUCHES DE FONCTIONNEMENT INTERRUPTEURS DE FONCTIONNEMENTO DÉMARRAGE/ARRÊT DE LA MACHINE ARRANCANDO/PARANDO LA MAQUINA Lorsque vous appuyez sur la touche de marche/arrêt, la machine Cuando se presiona el pulsador de comienzo/parada, la démarre progressivement, et lorsque vous appuyez à... -
Page 86: Troubleshooting
TROUBLESHOOTING SKIPPED STITCHES AND THREAD BREAKAGES OCCUR Needle tip is broken. Thread path is incorrect. Refer to pages 24 - 25. Replace needle. Needle is bent. Thread is tangled around spool holder. Replace needle. Refer to pages 24 - 25. Needle is not installed correctly. -
Page 87: Dépannage
DÉPANNAGE LOCALIZACION DE AVERIAS SE SALTAN PUNTADAS Y SE ROMPE DES POINTS SAUTÉS ET LE FIL SE CASSE EL HILO La pointe de l’aiguille La punta de la Le fil est enfilé El hilo está mal est épointée incorrectement. aguja está rota. pasado. - Page 88 EMBROIDERY PATTERN IS MIS-ALIGNED MACHINE SIDE HOOP SIDE No stabilizer Embroidering is attached when using continuing when light or stretch thread is tangled. material. If the thread remains Attach interfacing to tangled, the material the material. may pucker and spoil Refer to pages 68 - the embroidery finish.
- Page 89 LE MOTIF DE BRODERIE EST MAL ALIGNÉ PATRON DE BORDADO DESALINEADO CÔTÉ MACHINE CÔTÉ CERCEAU LADO DE LA MAQUINA LADO DEL ARO Aucun entoilage Estabilizador sin La broderie continue Se continúa n’est fixé quand vous colocar cuando usa lorsque le fil est bordando cuando el utilisez un tissu léger la luz o se estira el...
- Page 90 IF STITCHES ARE MISSING Embroidered section If the embroidery machine detects that the thread has Embroidering direction Section brodée broken, it may continue to embroider up to about eight Direction de broderie Sección bordada stitches without any thread (blank stitches) before it Dirección de bordado automatically stops.
- Page 91 S’IL MANQUE DES POINTS SI FALTAN PUNTADAS Si la machine à broder détecte une rupture du fil, elle pourra Si la máquina de bordar detecta que el hilo se ha roto, continuer à broder environ huit points au maximum sans podría continuar bordando hasta aprox.
-
Page 92: Error Messages
ERROR MESSAGES EM-01 EM-06 If the start/stop switch or the reverse stitch switch is pushed, when the sewing machine is not set up correctly, or if an incorrect operation is made, the sewing machine will not operate, and a buzzer will sound and an error message will be displayed. When an error message is displayed, fix the problem following the instructions in the message. -
Page 93: Message D'erreur
MESSAGE D’ERREUR MENSAJE DE ERROR Si vous appuyez sur la touche marche/arrêt ou sur la touche Si se presiona el interruptor de comienzo/parada o el interruptor couture arrière, ou si vous appuyez sur le rhéostat lorsque la de puntadas hacia atrás, o si se presiona el control del pedal machine à... -
Page 94: Caring For Your Machine
4. CARING FOR YOUR MACHINE CLEANING HOOK AREA AND FEED DOGS Always disconnect the machine from power supply by removing the plug from the wall-outlet. CAUTION To ensure the best possible operation of your machine, it is necessary to keep the essential parts clean at all times. 1. -
Page 95: Entretien De Votre Machine
4. ENTRETIEN DE VOTRE MACHINE 4. CUIDE SU MAQUINA NETTOYAGE DES GRIFFES ET DU LIMPIAR EL AREA DEL CROCHET TRANSPORTADOR Y LA LANZADERA Siempre desconecte la máquina de la fuente de Débranchez toujours la machine de l’alimentation a l i m e n t a c i ó n r e t i r a n d o e l e n c h u f e d e l électrique en retirant la fiche de la prise murale. -
Page 96: Changing Light Bulb
CHANGING LIGHT BULB 1, 5 Face cover Plaque frontale Screw Cubierta frontal Always disconnect the machine from power supply by removing the plug from the wall-outlet. CAUTION Guia 1. Remove the screws, and face cover. 2. While holding the socket, move it back and forth gently to Socket remove it from the bracket. -
Page 97: Remplacement De L'ampoule D'éclairage
REMPLACEMENT DE L’AMPOULE CAMBIO DE LA BOMBILLA D’ÉCLAIRAGE Siempre desconecte la máquina de la fuente de Débranchez toujours la machine de l’alimentation a l i m e n t a c i ó n r e t i r a n d o e l e n c h u f e d e l électrique en retirant la fiche de la prise murale. -
Page 98: Performance Checklist
5. PERFORMANCE CHECKLIST GENERAL PROBLEMS Machine does not sew. * Power switch is turned off.- Turn on the switch. Machine jams/knocks. * Thread is caught in hook.- Clean hook (see page 96 - 97). * Needle is damaged.- Replace needle (see page 30 - 31). Fabric does not move. -
Page 99: Vérification Des Petits
5. VÉRIFICATION DES PETITS 5. CUADRO DE VERIFICACION DE PROBLÈMES DE COUTURE RENDIMIENTO PROBLÈMES GENERAUX PROBLEMAS GENERALES La machine ne coud pas: Machine does not sew. *L’interrupteur est hors fonction. Activé le. * El interruptor de energía no está conectado. - Ponerio en la La machine est coincer: posición LOW o HIGH. - Page 100 ENGLISH / FRANÇAIS / ESPAÑOL © Part No. 77153 3/04...