Table of Contents
Advertisement
Advertisement
Table of Contents
Troubleshooting

Related Manuals for Gateway Tower


Summary of Contents for Gateway Tower
- Page 1 Your Gateway Computer user'sguide Troubleshooting Customizing...
-
Page 3: Table Of Contents
Desktop to tower conversion ........ - Page 4 Do More With Gateway ........
- Page 5 Identifying drive types ..........95 Inserting a CD or DVD .
- Page 6 Power management ..........159 Using power saving modes .
- Page 7 Replacing the system board ........239 Upgrading the Gateway Micro Tower Case ......243 Opening the case .
- Page 8 Replacing the system board ........261 Upgrading the Gateway New Micro Tower Case ......263 Opening the case .
- Page 9 Self-help ........... . . 318 Tutoring .
- Page 10 viii...
-
Page 11: Checking Out Your Gateway Computer
Your Gateway Computer This chapter introduces you to the basic features of your Gateway computer. Read this chapter to learn: How to identify the features of your Gateway computer How to locate your computer’s model and serial number How to locate the Microsoft Certificate of Authenticity... -
Page 12: Identifying Your Computer Case Style
Chapter 1: Checking Out Your Gateway Computer Identifying your computer case style Use the following descriptions to identify your computer case style. Gateway Tower Gateway Mid Tower Gateway Micro Tower Gateway New Micro Tower The Gateway Tower The Gateway Mid... -
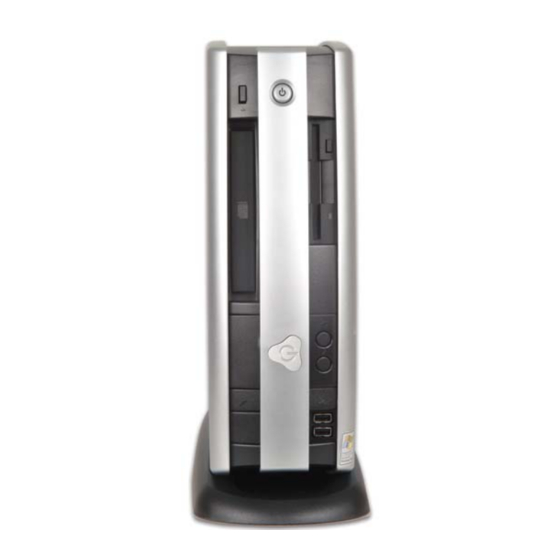
Page 13: Gateway Tower Front
Gateway Tower Front Gateway Tower Front Your computer may contain any of the following components. CD/DVD/recordable drive CD/DVD eject button 5.25-inch drive bay cover 5.25-inch drive bay cover Diskette drive (optional) Diskette eject button IEEE 1394 port (optional) USB ports 3.5-inch drive bay cover... - Page 14 Chapter 1: Checking Out Your Gateway Computer Component Icon Description CD/DVD/recordable Use this drive to listen to audio CDs, install games and drive programs, watch DVDs, and store large files onto recordable CDs and DVDs (depending on drive type). For more information, see “Using the CD or DVD drive”...
-
Page 15: Gateway Tower Back
Gateway Tower Back Gateway Tower Back Your computer may contain any of the following components. Product label Power connector Voltage switch Kensington lock slot Case cover shipping screw Microsoft Certificate of Authenticity PS/2 mouse port PS/2 keyboard port USB ports... - Page 16 Chapter 1: Checking Out Your Gateway Computer Component Icon Description Product label Your computer’s serial and model number. Power connector Plug the power cable into this connector. Voltage switch Before turning on your computer, make sure that this switch is in the correct position for the correct voltage. The switch is preset at the factory with the correct voltage for your area.
- Page 17 Gateway Tower Back Component Icon Description IEEE 1394 port Plug an IEEE 1394 (also known as Firewire or i.Link) (optional) device (such as a scanner or hard drive) into this 6-pin IEEE 1394 port. Rear out (Line out 2) Plug powered, analog rear speakers or an external jack amplifier into this jack.
-
Page 18: Gateway Mid Tower Front
Chapter 1: Checking Out Your Gateway Computer Gateway Mid Tower Front Your computer may contain any of the following components. Access door 5.25-inch drive bay cover CD/DVD/Recordable drive CD/DVD eject button 3.5-inch drive bay cover IEEE 1394 port (optional) Diskette drive (optional) - Page 19 Gateway Mid Tower Front Component Icon Description Access door Open this door to access your drives and other components. 5.25-inch drive bay Remove this cover to install an additional 5.25-inch drive. cover CD/DVD/Recordable Use this drive to listen to audio CDs, install games and...
-
Page 20: Gateway Mid Tower Back
Chapter 1: Checking Out Your Gateway Computer Gateway Mid Tower Back Your computer may contain any of the following components. Power connector Kensington lock slot Voltage switch Case cover shipping screw PS/2 mouse port Microsoft Certificate of PS/2 keyboard port... - Page 21 Gateway Mid Tower Back Component Icon Description Power connector Plug the power cable into this connector. Voltage switch Before turning on your computer, make sure that this switch is in the correct position for the correct voltage. The switch is preset at the factory with the correct voltage for your area.
- Page 22 Chapter 1: Checking Out Your Gateway Computer Component Icon Description Modem jack (optional) Plug a modem cable into this jack. Kensington™ lock slot Secure your computer to an object by connecting a Kensington cable lock to this slot. Case cover shipping Remove this screw before opening the case.
-
Page 23: Gateway Micro Tower Front
Gateway Micro Tower Front Gateway Micro Tower Front Your computer may contain any of the following components. CD/DVD eject Power button button Diskette eject button Diskette drive CD/DVD/Recordable (optional) drive Cover release handle IEEE 1394 port USB ports (optional) Removable base... - Page 24 Chapter 1: Checking Out Your Gateway Computer Component Icon Description CD/DVD eject button Press this button to open the CD or DVD drive tray. For more information, see “Using the CD or DVD drive” on page CD/DVD/Recordable Use this drive to listen to audio CDs, install games and...
-
Page 25: Gateway Micro Tower Back
Gateway Micro Tower Back Gateway Micro Tower Back Your computer may contain any of the following components. Voltage switch Power connector Microsoft PS/2 mouse port Certificate of Authenticity PS/2 keyboard port System USB ports label Serial port Parallel port Monitor port... - Page 26 Chapter 1: Checking Out Your Gateway Computer Component Icon Description Voltage switch Before turning on your computer, make sure that this switch is in the correct position for the correct power available. The switch is preset at the factory with the correct voltage for your area.
- Page 27 Gateway Micro Tower Back Component Icon Description Telephone jack (optional) If your modem has a telephone jack, plug the cable for a telephone into this jack. Microsoft Certificate of Contains your Windows product key. For more information, Authenticity “Microsoft Certificate of Authenticity” on page System label Includes your computer’s model and serial number.
-
Page 28: Desktop To Tower Conversion
Chapter 1: Checking Out Your Gateway Computer Desktop to tower conversion You can convert your Gateway Micro Tower case from desktop to tower configuration using the accessory base included with your system. For more information, see “Upgrading the Gateway Micro Tower Case” on page 243. -
Page 29: Gateway New Micro Tower Front
Gateway New Micro Tower Front Gateway New Micro Tower Front Your computer may contain any of the following components. Power button CD/DVD eject button CD/DVD/Recordable drive Zip drive eject button IEEE 1394 port Zip drive (optional) USB ports Diskette drive (optional) Diskette eject button www.gateway.com... - Page 30 Chapter 1: Checking Out Your Gateway Computer Component Icon Description CD/DVD eject button Press this button to open the CD or DVD drive tray. For more information, see “Using the CD or DVD drive” on page CD/DVD/Recordable Use this drive to listen to audio CDs, install games and...
-
Page 31: Gateway New Micro Tower Back
Gateway New Micro Tower Back Gateway New Micro Tower Back Your computer may contain any of the following components. PS/2 keyboard port PS/2 mouse port USB ports Kensington lock slot Case cover Serial port shipping screw Parallel port Monitor port... - Page 32 Chapter 1: Checking Out Your Gateway Computer Component Icon Description PS/2 keyboard port Plug a PS/2 keyboard into this port. USB ports USB v2.0 Plug USB (Universal Serial Bus) devices (such as a mouse, keyboard, or printer) into these ports.
- Page 33 Gateway New Micro Tower Back Component Icon Description Headphone/speakers Plug powered, analog front speakers, an external (Line out) jack amplifier, or headphones into this jack. This jack is color-coded green. Voltage switch Before turning on your computer, make sure that this switch is in the correct position for the correct voltage.
-
Page 34: Desktop To Tower Conversion
Chapter 1: Checking Out Your Gateway Computer Desktop to tower conversion You can convert your Gateway New Micro Tower case from desktop to tower configuration using the rotating foot included with your system. www.gateway.com... -
Page 35: Identifying Your Model
The label on the back of your computer case contains information that identifies your computer model. The label also contains your serial number. Gateway Technical Support will need this information if you call for assistance. Gateway serial number You can locate the Gateway serial number: Printed on a white sticker on the front or top of your computer case. -
Page 36: Microsoft Certificate Of Authenticity
Chapter 1: Checking Out Your Gateway Computer Microsoft Certificate of Authenticity The Microsoft Certificate of Authenticity label found on the back or side of your computer case includes the product key code for your operating system. www.gateway.com... -
Page 37: Finding Your Specifications
HelpSpot or visit Gateway’s My Computer Info eSupport page at support.gateway.com. The eSupport page also has links to additional Gateway documentation and detailed specifications. In Windows XP, view your computer’s serial number or check your... - Page 38 Chapter 1: Checking Out Your Gateway Computer You can also find out more about your computer at the Gateway eSupport site. Visit support.gateway.com. For more information, see “Using eSupport” on page www.gateway.com...
-
Page 39: Accessories
Accessories Accessories Gateway offers various accessories that can help you make the most of using your computer. To order accessories, visit the Accessory Superstore at accessories.gateway.com. Networking kit With a networking kit, you can network (link) two or more computers. After... - Page 40 Chapter 1: Checking Out Your Gateway Computer Storage Devices If you need additional storage space or you want to back up your files, you can add storage devices to you computer. With a recordable CD or DVD drive, you can free up hard drive space by backing up files, then removing them from your hard drive.
-
Page 41: Setting Up Your Computer
Setting Up Your Computer This chapter provides basic information about your Gateway computer. Read this chapter to learn how to: Use your computer safely Start and turn off your computer Restart (reboot) your computer... -
Page 42: Protecting From Power Source Problems
UPS, a UPS lets you run your computer long enough to save your work and shut down your computer normally. For more information, see “Setting up an uninterruptible power supply” on page 165. www.gateway.com... -
Page 43: Working Safely
Use soft, indirect lighting in your work area. Do not use your computer in a dark room. Avoid focusing your eyes on your computer screen for long periods of time. Look away from your computer occasionally, and try to focus on distant objects. www.gateway.com... -
Page 44: Setting Up Your Computer Desk And Chair
Place your keyboard and mouse at a comfortable distance. You should be able to reach them without stretching. Set paper holders at the same height and distance as the monitor. www.gateway.com... -
Page 45: Sitting At Your Computer
Avoiding discomfort and injury from repetitive strain Vary your activities to avoid excessive repetition. Take breaks to change your position, stretch your muscles, and relieve your eyes. Find ways to break up the work day, and schedule a variety of tasks. www.gateway.com... -
Page 46: Starting Your Computer
If you are starting your computer for the first time, follow the on-screen instructions to set up your computer. Turn on any peripheral devices, such as printers or scanners, and see the documentation that came with the device for setup instructions. www.gateway.com... -
Page 47: Turning Off Your Computer
. Windows shuts down and turns off your computer. Turn Off Important If for some reason you cannot use the Turn Off Computer option in Windows to turn off your computer, press and hold the power button for about five seconds, then release it. www.gateway.com... -
Page 48: Restarting (Rebooting) Your Computer
End Task If your computer does not respond, turn it off, wait ten seconds and turn it on again. Important If your computer does not turn off, press and hold the power button for about five seconds, then release it. www.gateway.com... -
Page 49: Multifunction Keyboard
(Explorer utility). Application key Access shortcut menus and help assistants in Windows. Directional keys Move the cursor up, down, right, or left. Numeric keypad Use these keys to type numbers when the numeric keypad ( ) is turned on. www.gateway.com... -
Page 50: Special-Function Buttons
Stop the play of CD or DVD. Next Move to the next CD track or DVD chapter. Volume down Decrease the volume. Volume up Increase the volume. Mute Turn off all sound. My Documents Opens the My Documents folder. Help Open online help. www.gateway.com... - Page 51 Multifunction keyboard Icons Press to... Special-function buttons E-mail Open your e-mail program. Search Open online search. Internet Open your Web browser. www.gateway.com...
-
Page 52: Mouse
You can use the left and right buttons on your mouse to select objects on the screen. You can use the scroll wheel on the mouse to move through a document. This feature is not available in all programs. www.gateway.com... -
Page 53: Using The Mouse
For instructions on how to adjust the double-click speed, pointer speed, right-hand or left-hand configuration, and other mouse settings, see “Changing the mouse settings” on page 156. For instructions on how to clean the mouse, see “Cleaning the mouse” on page 204. www.gateway.com... -
Page 54: Installing A Printer, Scanner, Or Other Peripheral Device
Serial Bus (USB), serial, and parallel. You use these ports to connect peripheral devices such as printers, scanners, and digital cameras to your computer. For more information about port locations, see “Checking Out Your Gateway Computer” on page IEEE 1394 and USB ports support plug-and-play and hot-swapping, which means that your computer will usually recognize such a device whenever you plug it into the appropriate port. -
Page 55: Getting Help
Getting Help This chapter tells you about additional information resources available to help you use your computer. Read this chapter to learn how to access: HelpSpot™ Do More With Gateway Online help Gateway Web site... -
Page 56: Helpspot
HelpSpot to answer questions about Windows and to help you quickly discover and use the many features of your Gateway computer. HelpSpot also has an area called Who to contact for help that helps you find the right resource at Gateway to answer your questions or help solve your problems. - Page 57 HelpSpot You can find help information by clicking a link, performing a search, or browsing the index. To learn about using your Gateway computer, your mouse, and other tasks, click the link on the HelpSpot main Using your Gateway computer page.
-
Page 58: Searching For A Topic
You must be Search connected to the Internet to search for and access these topics. Gateway.com Search - These topics are located on the Gateway Web site and contain the words you entered in the box. You must be Search connected to the Internet to search for and access these topics. -
Page 59: Helpspot Videos
HelpSpot contains several short videos to help introduce you to new concepts or show you how to perform various tasks. To play a HelpSpot video: To watch a video in HelpSpot, click on the Video and online tutorials HelpSpot home page, then click a video title. The video plays. www.gateway.com... -
Page 60: Do More With Gateway
Chapter 3: Getting Help Do More With Gateway Your computer may include Do More With Gateway, a tool that provides additional information about using your Gateway computer for digital music, digital photography, digital video, gaming, and other programs. To access Do... -
Page 61: Online Help
Help button. Help You can search for information by viewing the help contents, checking the index, searching for a topic or keyword, or browsing through the online help. www.gateway.com... -
Page 62: Gateway Web Site
Chapter 3: Getting Help Gateway Web site Gateway's online support is available 24 hours per day, 7 days per week and provides the most current drivers, product specifications, tutorials, and personalized information about your system. Visit the Gateway eSupport Web site at support.gateway.com. -
Page 63: Using Esupport
Contact Us tab The Contact Us tab contains links to technical support with a live technician, including chat and e-mail. Click to get a list of Gateway telephone Call Us numbers for both sales and support. For more information, see “Telephone... - Page 64 Chapter 3: Getting Help www.gateway.com...
-
Page 65: Windows Basics
Windows Basics Read this chapter to learn how to: Use the Windows desktop Manage files and folders Work with documents Use shortcuts... -
Page 66: About The Windows Environment
Your desktop may be different from this example, depending on how your computer is set up. Help and For more information about the Windows XP desktop, click Support Start, then click Help and Support. Type the keyword Windows desktop in the HelpSpot Search box , then click the arrow. www.gateway.com... -
Page 67: Using The Desktop
The Recycle Bin is where files, folders, and programs that you discarded are stored. You must empty the Recycle Bin to permanently delete them from your computer. For instructions on how to use the Recycle Bin, see “Deleting files and folders” on page www.gateway.com... -
Page 68: Using The Start Menu
When you move the mouse pointer over any menu item that has an arrow next to it, another menu, called a submenu, opens and reveals related files, programs, or commands. Click a file or program to open it. www.gateway.com... -
Page 69: Adding Icons To The Desktop
Desktop (create shortcut) program appears on the desktop. Help and For more information about desktop icons in Windows XP, Support click Start, then click Help and Support. Type the keyword desktop icons in the HelpSpot Search , then click the arrow. www.gateway.com... -
Page 70: Identifying Window Items
When you double-click the icon for a drive, folder, file, or program, a window opens on the desktop. This example shows the Local Disk (C:) window, which opens after you double-click the icon in the My Computer window. Local Disk (C:) Title bar Close Menu bar Maximize Minimize www.gateway.com... - Page 71 Clicking an item on the menu bar starts an action such as Print or Save. Help and For more information about windows in Windows XP, click Support Start, then click Help and Support. Type the keyword window in the HelpSpot Search box , then click the arrow. www.gateway.com...
-
Page 72: Working With Files And Folders
Disk (C:) for the hard drive and 3½ Floppy (A:) for the diskette drive. You may also have more drives such as a CD, DVD, or recordable drive. To view the drives on your computer: In Windows XP, click , then click on the Start menu. Start My Computer Drives www.gateway.com... -
Page 73: Creating Folders
Folders are much like the folders in a file cabinet. They can contain files and other folders. Files are much like paper documents—letters, spreadsheets, and pictures—that you keep on your computer. In fact, all information on a computer is stored in files. Folders Files www.gateway.com... - Page 74 For more information about creating files and folders in Support Windows XP, click Start, then click Help and Support. Type the keyword creating files and folders in the HelpSpot Search box , then click the arrow. For information about renaming folders, see “Shortcuts” on page www.gateway.com...
-
Page 75: Copying And Moving Files And Folders
A pop-up menu opens on the desktop. Click on the pop-up menu. Copy Open the destination folder. With the pointer inside the destination folder, right-click. Click . A copy of the file or folder appears in the new location. Paste www.gateway.com... - Page 76 For more information about copying files and folders or Support moving files and folders in Windows XP, click Start, then click Help and Support. Type the keyword copying files and folders or moving files and folders in the HelpSpot Search box , then click the arrow. www.gateway.com...
-
Page 77: Deleting Files And Folders
Click the files or folders that you want to restore. For instructions on how to select multiple files and folders, see “Shortcuts” on page Click , then click . Windows returns the deleted files or folders File Restore to their original locations. www.gateway.com... -
Page 78: Browsing For Files And Folders
(usually many more levels than a file cabinet, in fact). So you usually will have to search through levels of folders to find the file or folder that you need. This is called browsing. www.gateway.com... - Page 79 Help and For more information about browsing for files and folders Support in Windows XP, click Start, then click Help and Support. Type the keyword files and folders in the HelpSpot Search box , then click the arrow. www.gateway.com...
-
Page 80: Searching For Files
Time period in which it was created or modified You can also combine search criteria to refine searches. Files and folders found using this utility can be opened, copied, cut, renamed, or deleted directly from the list in the results window. www.gateway.com... -
Page 81: Using The Windows Search Utility
If you type all of the name, Search will list all files and folders of that name. If you type part of the name, Search will list all of the file and folder names containing the letters you typed. www.gateway.com... - Page 82 Search can find files meeting more criteria than file name. You can narrow your search by selecting the search options that you want. You can search by the: Date the file was created or modified. Size of the file. Type of file, such as a program or a text document. www.gateway.com...
-
Page 83: Working With Documents
To create a new document: Click , then click . Microsoft Start All Programs Accessories WordPad WordPad starts and a blank document opens. Begin composing your document. Use the menus and toolbar buttons at the top of the window to format the document. www.gateway.com... -
Page 84: Saving A Document
Type a new file name in the box. File name Click Save Help and For more information about saving documents in Support Windows XP, click Start, then click Help and Support. Type the keyword saving in the HelpSpot Search box , then click the arrow. www.gateway.com... -
Page 85: Opening A Document
Double-click the document file name. The document opens. Help and For more information about opening documents in Support Windows XP, click Start, then click Help and Support. Type the keyword opening files in the HelpSpot Search , then click the arrow. www.gateway.com... -
Page 86: Printing A Document
Set the print options, then click . The document prints. Help and For more information about printing documents in Support Windows XP, click Start, then click Help and Support. Type the keyword printing in the HelpSpot Search box , then click the arrow. www.gateway.com... -
Page 87: Shortcuts
Press running program Help and For more information about Windows keyboard shortcuts Support in Windows XP, click Start, then click Help and Support. Type the keyword Windows keyboard shortcuts in the HelpSpot Search box , then click the arrow. www.gateway.com... - Page 88 Chapter 4: Windows Basics www.gateway.com...
-
Page 89: Using The Internet
Using the Internet This chapter provides information about the Internet and the World Wide Web. Read this chapter to learn how to: Set up and access an Internet account using ® America Online Connect to a Web site using a browser Download files from the Internet Send and receive e-mail using America Online... -
Page 90: Learning About The Internet
Internet Servers store information so other computers can access it from the Internet. ISP Servers Your computer let you connect to connects to the the Internet and Internet through access your e-mail an ISP. messages. www.gateway.com... -
Page 91: Setting Up An Internet Account
After completing the setup, you are ready to access the Internet. To set up an Internet account with America Online: Click , then click Start All Programs America Online Follow the on-screen instructions. After setting up your account, you can connect to the Internet and access your e-mail services. www.gateway.com... -
Page 92: Accessing Your Internet Account
Help and For general information about using Internet accounts in Support Windows XP, click Start, then click Help and Support. Type the keyword ISP in the HelpSpot Search box , then click the arrow. www.gateway.com... -
Page 93: Using The World Wide Web
You can identify a link by moving the mouse pointer over it. If the pointer changes to a hand, the item is a link. To learn more about using the Web browser features, click in the menu bar. Help Link page Linked Web page www.gateway.com... -
Page 94: Connecting To A Web Site
To go to a different Web site, type the address (called a URL for “Universal Resource Locator”) in the browser address bar (for example www.gateway.com), then click on the browser address bar. - OR - On the current Web page, click a link to a Web site. -
Page 95: Downloading Files
Web site to run or install the program. Help and For more information about downloading files in Support Windows XP, click Start, then click Help and Support. Type the keyword downloading files in the HelpSpot Search box , then click the arrow. www.gateway.com... -
Page 96: Using E-Mail
Type the e-mail address of the recipient you want to send e-mail to in the box. Send To Type the subject of your e-mail in the box. Subject Type the e-mail message. When finished, click . Your e-mail is sent over the Internet to the Send Now e-mail address you specified. www.gateway.com... -
Page 97: Checking Your E-Mail
Help and For general information about using e-mail in Windows XP, Support click Start, then click Help and Support. Type the keyword e-mail in the HelpSpot Search box , then click the arrow. www.gateway.com... - Page 98 Chapter 5: Using the Internet www.gateway.com...
-
Page 99: Using Drives And Multimedia
Using Drives and Multimedia This chapter provides information on using the multimedia capabilities of your computer. Read this chapter to learn how to: Use the diskette drive Use the CD or DVD drive Record your own CDs and DVDs... -
Page 100: Adjusting The Volume
. The Control Panel window opens. If your Start Control Panel Control Panel is in Category View, click Sounds, Speech, and Audio Devices Click/Double-click the Adjust the system volume Sounds and Audio . The Sounds and Audio Devices Properties dialog box opens. Devices www.gateway.com... - Page 101 . The Control Panel window opens. If your Start Control Panel Control Panel is in Category View, click Sounds, Speech, and Audio Devices Click/Double-click the Adjust the system volume Sounds and Audio . The Sounds and Audio Devices Properties dialog box opens. Devices www.gateway.com...
- Page 102 Drag the volume level and balance sliders for the device you want to adjust. For more information about the volume controls, click in the window. Help Click X in the top-right corner of the window to close it. www.gateway.com...
-
Page 103: Using The Diskette Drive
The diskette drive uses 3.5-inch diskettes (sometimes called floppy disks). Diskettes are useful for storing files or transferring files to another computer. Warning Do not expose diskettes to water or magnetic fields. Exposure could damage the data on the diskette. Diskette drive Eject button Activity light www.gateway.com... - Page 104 , then click Start . Double-click the drive letter (for example, the A: drive), then Computer double-click the file name. To remove the diskette, make sure that the drive activity light is off, then press the diskette eject button. www.gateway.com...
-
Page 105: Using The Cd Or Dvd Drive
“Creating CDs and DVDs” on page 115. DVD+RW Install programs, play audio CDs, play DVDs, access data, and record video and data to DVD+R, or DVD+RW discs. For more information, see “Creating CDs and DVDs” on page 115. www.gateway.com... -
Page 106: Inserting A Cd Or Dvd
Chapter 6: Using Drives and Multimedia Inserting a CD or DVD CD or DVD drive Eject button Important Some music CDs have copy protection software. You may not be able to play these CDs on your computer. www.gateway.com... - Page 107 If the disc has two playable sides, place the disc so the name of the side you want to play is facing up. Press the eject button again. The CD or DVD drive tray closes. www.gateway.com...
-
Page 108: Listening To Cds
If a dialog box opens with a list of CD players, click Windows Media Player The Windows Media Player opens. - OR - If a dialog box does not open with a list of CD players, click , then Start click . The Windows Media Player opens. Windows Media Player www.gateway.com... - Page 109 If you do not hear sound or you want to change the volume, see “Adjusting the volume” on page Help and For more information about playing CDs in Windows XP, Support click Start, then click Help and Support. Type the keyword playing CDs in the HelpSpot Search , then click the arrow. www.gateway.com...
-
Page 110: Recording And Playing Audio
Use the following instructions to make an audio recording by speaking into a microphone. To make an audio recording: Plug a microphone into one of the Microphone jacks on your computer. For the location of the Microphone jacks, see “Checking Out Your Gateway Computer” on page Click , then click Start... - Page 111 For more information about making or playing an audio Support recording in Windows XP, click Start, then click Help and Support. Type the keyword recording audio or playing audio in the HelpSpot Search box , then click the arrow. www.gateway.com...
-
Page 112: Playing Audio And Video Files With The Windows Media Player
Windows Media Player, click Help To play a file using the Windows Media Player: In Windows XP, click , then click Start All Programs Windows Media Player The Windows Media Player opens. Video file information Video screen Play Stop www.gateway.com... - Page 113 Help and For more information about playing audio and video using Support the Windows Media Player in Windows XP, click Start, then click Help and Support. Type the keyword Media Player in the HelpSpot Search , then click the arrow. www.gateway.com...
-
Page 114: Using Musicmatch
For more information on using MusicMatch, see its online help. Playing CDs You can use the MusicMatch program to play music CDs. Important Some music CDs have copy protection software. You may not be able to play these CDs on your computer. www.gateway.com... - Page 115 Insert the music CD into the CD or DVD drive on your computer. The Audio CD dialog box opens. Click , then click . MusicMatch Play Audio CD using MUSICMATCH Jukebox opens, the CD begins playing, and the names of the music tracks appear in the playlist area. www.gateway.com...
-
Page 116: Creating Mp3 Music Files
. The MusicMatch window opens. Jukebox - OR - If a dialog box does not open, click , then Start All Programs MusicMatch click . The MusicMatch window opens. MusicMatch Jukebox Record If the CD is playing, click Stop www.gateway.com... - Page 117 Click to clear the check box for any track you do not want to record. Click Record When a message appears that tells you the CD drive needs to be configured, click . A progress bar appears next to each track as it is recorded. www.gateway.com...
-
Page 118: Editing Track Information
In the library window, right-click the file, then click . The Edit Track Tag(s) Edit Track Tag(s) dialog box opens. Enter information such as track title, lead artist, album, and genre. Click . The new track information appears in the MusicMatch playlist, music library, and recorder window. www.gateway.com... -
Page 119: Building A Music Library
Internet, MP3 files that you download are automatically added to your music library. Caution During the download process, MP3 files may become corrupt. If you are having trouble listening to, or working with, a downloaded file, try downloading the file again. www.gateway.com... -
Page 120: Changing The Music Library Display Settings
. The Settings window Options Settings opens. Click the tab. Music Library Click an arrow button to open a column list, then click the category that you want to display in the column. When you have finished selecting categories, click www.gateway.com... -
Page 121: Listening To Internet Radio
Broadcast Stations click the arrow in the play this station box. MusicMatch connects to the station and plays the audio. If you do not see , drag the Broadcast Radio scroll bar on the left. www.gateway.com... -
Page 122: Using Advanced Features
Chapter 6: Using Drives and Multimedia Using advanced features You can also use MusicMatch to create your own music CDs and to download MP3 files to your portable MP3 player. For more information, see the MusicMatch online help. www.gateway.com... -
Page 123: Playing A Dvd
Windows Media Player. For more information about playing DVDs, click Help in the DVD player program. To play a DVD: Make sure that the speakers are turned on or headphones are plugged in and that the volume is turned up. Turn off your screen saver and standby timers. www.gateway.com... - Page 124 DVD player, see its online help. Help and For more information about playing DVDs in Windows XP, Support click Start, then click Help and Support. Type the keyword playing DVDs in the HelpSpot Search , then click the arrow. www.gateway.com...
-
Page 125: Creating Cds And Dvds
If you are uncertain about your rights, contact your legal advisor. Important Some CDs have copy protection software. You cannot create MP3 files from these CDs and you may not be able to listen to these CDs on your computer. www.gateway.com... -
Page 126: Copying A Cd Or Dvd
Chapter 6: Using Drives and Multimedia Copying a CD or DVD To copy a music CD, data CD, or data DVD: Click , then click Start All Programs Burn a CD or Data DVD Nero Programs . Nero Express opens. Nero Express www.gateway.com... - Page 127 Source drive contains your source disc. Click the arrow to open the list, then click your recordable Destination drive drive. If you have two CD or DVD drives, click to select the check box. Quick copy www.gateway.com...
- Page 128 Chapter 6: Using Drives and Multimedia Click . The Nero’s Title and CD Database dialog box opens. Burn www.gateway.com...
- Page 129 Nero Express copies the files from your hard drive to the writable CD or DVD. When a message tells you that the recording is complete, click Click to return to the main Nero Express screen. Next Click Exit www.gateway.com...
-
Page 130: Creating A Data Cd Or Dvd
Insert a blank, writable CD or DVD into your recordable drive. If a dialog box opens, click , then click Take no action Move your pointer over , then click . The Disc Content screen Data Data Disc opens. www.gateway.com... - Page 131 Location click folders in the list. Press and hold the C key to select multiple Name files. Click . You can continue to select files and click After you select all your files, click Finished www.gateway.com...
- Page 132 Click . The Burning Process screen opens and Nero Express burns the Burn files to the CD. When a message tells you that the recording is complete, click Click to return the main Nero Express screen. Next Click Exit www.gateway.com...
-
Page 133: Copying Music Tracks
Nero Express Insert the music CD that has the tracks you want to copy into your CD drive. If an Audio CD dialog box opens, click , then click Take no action Click . The Nero Toolbar opens. More www.gateway.com... - Page 134 Chapter 6: Using Drives and Multimedia Click the icon. The Nero’s Title and CD Database dialog box Save Tracks opens. Wait until the dialog box closes. - OR - Click Cancel www.gateway.com...
- Page 135 To record all the tracks, click . The recording process begins. - OR - To record selected tracks, hold down the C key, click the tracks you want, then click . The recording process begins. After the recording is complete, click Close www.gateway.com...
-
Page 136: Creating A Music Cd
CD using MP3 files. You can play the CD on your MP3 Disc computer or a player that supports MP3 files. to create a CD using WMA files. You can play the CD on WMA disc your computer or a player that supports WMA files. www.gateway.com... - Page 137 Creating CDs and DVDs The screen you use to add files opens. www.gateway.com...
- Page 138 Location click folders in the list. Press and hold the C key to select multiple Name files. Click . You can continue to select files and click After you select all your files, click Finished www.gateway.com...
- Page 139 Click . The Burning Process screen opens and Nero Express burns the Burn files to the CD. When a message tells you that the recording is complete, click Click to return the main Nero Express screen. Next Click Exit www.gateway.com...
-
Page 140: Advanced Features
Programs For more information, see the online help in the programs and the online user’s guides. To access the user’s guides, click Start All Programs Burn a CD or Data , then click the guide you want. User’s Guides www.gateway.com... -
Page 141: Using Phonetools
Using PhoneTools PhoneTools lets you make and receive telephone calls, use your computer as an answering machine, and send and receive faxes using the modem. Read this chapter to learn how to: Make telephone calls Set up quick dial memory keys Set up a telephone book Use voice mail Record an answering machine message... -
Page 142: Using Telephone Features
Telephone book button Dialer Quick Dial Quick Dial memory entries memory keys From the Phone controls, you can: Make telephone calls Set up and use Quick Dial memory keys Set up and use telephone book entries www.gateway.com... -
Page 143: Making A Telephone Call
PhoneTools may be set up to re-dial a telephone number if the line was busy. To prevent PhoneTools from re-dialing your call, click Setup, then click General Setup. Click the Communication tab, then set the number of transmission attempts to none. www.gateway.com... -
Page 144: Using Quick Dial Memory Keys
Name entry. In the box, type the telephone number associated with this Number memory entry, then click . The entry you created appears in the Quick Dial memory entries list. www.gateway.com... - Page 145 To remove a Quick Dial memory key entry: If PhoneTools is not open, click , then click Start All Programs PhoneTools PhoneTools If the Phone controls are not visible, click Phone Right-click the memory entry that you want to remove, then click Delete Click www.gateway.com...
-
Page 146: Using Telephone Book Entries
If the Phone controls are not visible, click Phone Click (telephone book). Double-click the entry that you want to call. If you have more than one telephone number associated with the entry, double-click the number you want to dial. Click www.gateway.com... - Page 147 - OR - Make the call on the telephone handset by picking up the handset, then clicking on the handset on the screen. You must have a telephone connected to your computer. To end the call, click (hangup). www.gateway.com...
-
Page 148: Using Voice Mail
If PhoneTools is not open, click , then click Start All Programs PhoneTools PhoneTools If the Voice Mail controls are not visible, click Voice Mail In the list, double-click the message that you want Received Voice Messages to hear. The message plays. www.gateway.com... -
Page 149: Recording A Greeting
Greeting & Record. If you do not want to use the pre-recorded greetings, you can record your own greeting. To record a greeting: If PhoneTools is not open, click , then click Start All Programs PhoneTools PhoneTools If the Voice Mail controls are not visible, click Voice Mail Click Set-up www.gateway.com... - Page 150 To listen to your greeting, click (start). Click Next Select how you will use the greeting. Options include: Greeting & Record—issues a greeting message, then records the caller’s message Greeting Only—issues a greeting message, then hangs up Click Finish www.gateway.com...
-
Page 151: Sending And Receiving Faxes
Important Your modem cable must be installed before you can send and receive faxes. You cannot use your standard telephone modem to connect to the Internet while sending and receiving faxes. www.gateway.com... - Page 152 20 characters in the text box. We suggest using eight characters for your identifier name, followed by 12 characters for your telephone number. Important Some fax machines cannot use special characters such as hyphens. We suggest using spaces instead of hyphens in telephone and fax numbers. Click www.gateway.com...
- Page 153 If you want to replace the PhoneTools logo with one of your own, click the import button then select a picture for the logo. The picture must be saved in a supported format (.BMP, .DGR, .GIF, .JPG, .PCX, .T31, or .TIF) and be small enough to fit in the logo box. Click www.gateway.com...
-
Page 154: Sending A Fax
Chapter 7: Using PhoneTools Sending a fax To send a fax: If PhoneTools is not open, click , then click Start All Programs PhoneTools PhoneTools If the Fax controls are not visible, click Click . The Send Fax Wizard opens. Send Fax www.gateway.com... - Page 155 Finish Click . PhoneTools dials the fax number and sends your fax. Send Important If for any reason you receive a failed transmission message, click Send, then click Outbox. Right-click the fax that was not sent to modify it. www.gateway.com...
-
Page 156: Faxing From Programs
. When PhoneTools is open, it detects incoming faxes and stores them in the In Box. To view a fax, click , then double-click the fax you want to view. Fax Inbox The fax viewer opens, where you can view and print the fax. www.gateway.com... -
Page 157: Customizing Your Computer
Customizing Your Computer This chapter provides information about customizing your computer by changing settings in Windows. Read this chapter to learn how to: Change screen and display settings Change the background and screen saver Adjust the mouse settings Program the multi-function buttons on the keyboard Add, change, and switch user accounts in Windows XP Adjust power management settings... -
Page 158: Adjusting The Screen And Desktop Settings
To change the color depth: In Windows XP, click , then click . The Control Panel Start Control Panel window opens. If your Control Panel is in Category View, click Appearance and Themes Click/Double-click the icon. The Display Properties dialog box opens. Display www.gateway.com... -
Page 159: Adjusting The Screen Resolution
You can increase the screen resolution to fit more icons on your desktop, or you can decrease the resolution to make reading the display easier. The higher the resolution, the smaller individual components of the screen (such as icons and menu bars) appear. www.gateway.com... - Page 160 , then click Help and For more information about adjusting screen resolution in Support Windows XP, click Start, then click Help and Support. Type the keyword changing screen resolution in the HelpSpot Search box , then click the arrow. www.gateway.com...
-
Page 161: Changing The Colors On Your Windows Desktop
In Windows XP, click , then click . The Control Panel Start Control Panel window opens. If your Control Panel is in Category View, click Appearance and Themes Click/Double-click the icon. The Display Properties dialog box opens. Display Click the tab. Appearance www.gateway.com... -
Page 162: Changing The Desktop Background
In Windows XP, click , then click . The Control Panel Start Control Panel window opens. If your Control Panel is in Category View, click Appearance and Themes Click/Double-click the icon. The Display Properties dialog box opens. Display Click the tab. Desktop www.gateway.com... - Page 163 Click Help and For more information about changing the desktop Support background in Windows XP, click Start, then click Help and Support. Type the keyword changing desktop background in the HelpSpot Search box , then click the arrow. www.gateway.com...
-
Page 164: Selecting A Screen Saver
Appearance and Themes Click/Double-click the icon. The Display Properties dialog box opens. Display Click the tab. Screen Saver Click the arrow button to open the list, then click the screen Screen Saver saver you want. Windows previews the screen saver. www.gateway.com... - Page 165 Wait Click Help and For more information about selecting a screen saver in Support Windows XP, click Start, then click Help and Support. Type the keyword screen savers in the HelpSpot Search , then click the arrow. www.gateway.com...
-
Page 166: Changing The Mouse Settings
If your Control Panel is in Category View, click Printers and Other Hardware Click/Double-click the icon. The Mouse Properties dialog box opens. Mouse Click one of the tabs to change your mouse settings. Click to save changes. www.gateway.com... -
Page 167: Adding And Modifying User Accounts
Follow the on-screen instructions to add, delete, or modify a user account. Help and For more information about user accounts in Windows XP, Support click Start, then click Help and Support. Type the keyword user accounts in the HelpSpot Search , then click the arrow. www.gateway.com... - Page 168 Log Off box opens. Click . The Windows Welcome screen opens. Switch User Click the user account that you want to use. When you switch between user accounts, any programs that were running for the previous user continue to run. www.gateway.com...
-
Page 169: Power Management
The next time you turn on your computer, it reads the memory information from the hard drive and opens the programs and documents that were open when you activated Hibernate mode. For more information, “Activating and using Hibernate mode” on page 164. www.gateway.com... -
Page 170: Using Power Saving Modes
You can select one of the defined power schemes or create a custom power scheme. Advanced power settings let you assign different power saving modes to the power button. www.gateway.com... -
Page 171: Changing The Power Scheme
In Windows XP, click , then click . The Control Panel Start Control Panel window opens. If your Control Panel is in Category View, click Performance and Maintenance Click/Double-click the icon. The Power Options Properties Power Options dialog box opens. www.gateway.com... -
Page 172: Changing Advanced Power Settings
In Windows XP, click , then click . The Control Panel Start Control Panel window opens. If your Control Panel is in Category View, click Performance and Maintenance Click/Double-click the icon. The Power Options Properties Power Options dialog box opens. www.gateway.com... - Page 173 Click Help and For more information about changing the power Support management settings in Windows XP, click Start, then click Help and Support. Type the keyword power management in the HelpSpot Search box , then click the arrow. www.gateway.com...
-
Page 174: Activating And Using Hibernate Mode
Click the check box, then click . Hibernate mode Enable hibernation Apply is now an option you can select in the Power Schemes and Advanced tabs and in the Turn Off Computer or Shut Down Windows dialog box. Click www.gateway.com... -
Page 175: Setting Up An Uninterruptible Power Supply
In Windows XP, click , then click . The Control Panel Start Control Panel window opens. If your Control Panel is in Category View, click Performance and Maintenance Click/Double-click the icon. The Power Options Properties Power Options dialog box opens. www.gateway.com... - Page 176 Help and For more information about setting up an uninterruptable Support power supply in Windows XP, click Start, then click Help and Support. Type the keyword uninterruptable power supply in the HelpSpot Search box , then click the arrow. www.gateway.com...
-
Page 177: Networking Your Computer
Networking Your Computer Connecting your home, small office, or home office computers lets you share drives, printers, and a single Internet connection among the connected computers. Read this chapter to learn about: Benefits of using a network in your home, small office, or home office Types of network connections Purchasing additional network equipment... -
Page 178: Benefits Of Networking
Help and For more information about sharing network drives in Support Windows XP, click Start, then click Help and Support. Type the keyword sharing network drives in the HelpSpot Search box , then click the arrow. www.gateway.com... -
Page 179: Sharing Peripheral Devices
San Francisco. Help and For more information about playing multi-player games in Support Windows XP, click Start, then click Help and Support. Type the keyword games or network games in the HelpSpot Search box , then click the arrow. www.gateway.com... -
Page 180: Selecting A Network Connection
Selecting a network connection The biggest decision you need to make when creating your network is what type of connection you will use. Gateway supports both wired and wireless Ethernet networks. Use the following criteria as a guide when selecting a network connection. -
Page 181: Using A Wired Ethernet Network
Install an Ethernet PC Card in each of your notebooks (if your notebooks do not already have built-in Ethernet jacks) Install an Ethernet router, switch, or hub Tips & Tricks If you are connecting just two computers, you can eliminate the router, switch, or hub and use a special crossover cable. www.gateway.com... -
Page 182: Example Wired Ethernet Network
To add the ability to access a wireless Ethernet network to your wired Ethernet network, connect an access point to the router, switch, or hub. For more information about accessing a wireless Ethernet, see “Using a wireless Ethernet network” on page 174. www.gateway.com... -
Page 183: Equipment You Need For A Wired Ethernet Network
Ethernet (10 Mbps), Fast Ethernet (100 Mbps or 10/100), or Gigabit Ethernet (1000 Mbps or 10/100/1000). A mixture of components rated at different speeds will result in your network running at the speed of the slowest rated component. www.gateway.com... -
Page 184: Using A Wireless Ethernet Network
Signal strength is affected by the distance between your wireless network devices, by radio interference, and by interference from natural obstructions such as walls, floors, and doors. The two most common types of wireless Ethernet networks are access point and peer-to-peer. www.gateway.com... -
Page 185: Example Access Point Wireless Ethernet Network
If you want to access a wireless Ethernet network from your wired Ethernet network, connect an access point to the router, switch, or hub. For more information about accessing a wired Ethernet, see “Using a wired Ethernet network” on page 171. www.gateway.com... -
Page 186: Equipment You Need For An Access Point Wireless Ethernet Network
IEEE 802.11a and IEEE 802.11b use different radio frequencies. All wireless Ethernet components should use the same frequency. A combination of IEEE 802.11a and IEEE 802.11b components will not work. Some wireless devices can broadcast and receive signals on both frequencies. www.gateway.com... -
Page 187: Example Peer-To-Peer Wireless Ethernet Network
This type of network does not include access into a wired network or the Internet. You can create this type of network to quickly move files from one computer to another. www.gateway.com... -
Page 188: Equipment You Need For A Peer-To-Peer Wireless Ethernet Network
For more information For more information about purchasing equipment for your home or office Ethernet network, discuss your particular needs with your Gateway store representative. In addition, several books and Internet sites are dedicated to networking. See these sources for more information about networking your home or office with wired or wireless Ethernet. -
Page 189: Moving From Your Old Computer
Moving from Your Old Computer If your new computer is replacing an old computer, you may have personal data files, Internet settings, a printer or other peripheral devices, and other unique computer settings that you want to move from your old computer to your new one. -
Page 190: Using The Windows Xp Files And Settings Transfer Wizard
Help and For more information about using the Files and Settings Support Transfer Wizard in Windows XP, click Start, then click Help and Support. Type the keyword using transfer wizard in the HelpSpot Search box , then click the arrow. www.gateway.com... -
Page 191: Transferring Files
Step Double-click the drive icon. Double-click the folder. The My Documents window opens My Documents and displays many of your saved personal data files. Copy your personal data files to removable media or to another computer on your network. www.gateway.com... - Page 192 For more information about finding files in Windows XP, Support click Start, then click Help and Support. Type the keyword searching for files in the HelpSpot Search box , click the arrow, then click the Full-text Search Matches button. www.gateway.com...
-
Page 193: Transferring Internet Settings
Configure your Internet settings by following the on-screen instructions. Help and For more information about setting up an Internet Support connection in Windows XP, click Start, then click Help and Support. Type the keyword Internet connection in the HelpSpot Search box , then click the arrow. www.gateway.com... -
Page 194: Transferring Your E-Mail And Address Book
Transferring your Internet shortcuts You can export and import your old Netscape Navigator bookmarks or Microsoft Internet Explorer favorites. For more information, see your Internet browser program’s online help. www.gateway.com... -
Page 195: Installing Your Old Printer Or Scanner
Turn on your printer, then turn on your computer. If Windows detects your printer, install your printer by following the on-screen instructions. You are finished. - OR - If Windows does not detect the printer, go to the next step. www.gateway.com... - Page 196 Type the keyword installing a printer in the HelpSpot Search box , then click the arrow. See your peripheral device’s user guide for installation information and tips. Because most installation software is periodically updated, you should also check the manufacturer’s Web site for software updates. www.gateway.com...
-
Page 197: Installing Your Old Programs
System Restore. Help and For more information about restoring your computer’s Support previous settings in Windows XP, click Start, then click Help and Support. Type the keyword System Restore in the HelpSpot Search box , then click the arrow. www.gateway.com... - Page 198 Chapter 10: Moving from Your Old Computer www.gateway.com...
-
Page 199: Maintaining Your Computer
Maintaining Your Computer This chapter provides basic information about maintaining your computer hardware and software. Read this chapter to learn how to: Care for your computer Protect your computer from viruses Manage hard drive space Back up files Clean your computer... -
Page 200: Caring For Your Computer
Check for viruses page 191 Manage hard drive space page 194 Clean up hard drives page 195 Scan hard drive for errors page 196 Defragment hard drive page 198 Back up files page 200 Clean computer page 202 www.gateway.com... -
Page 201: Protecting Your Computer From Viruses
Periodically updating the Norton AntiVirus program to protect against the latest viruses. Help and For more information about protecting your computer Support against viruses in Windows XP, click Start, then click Help and Support. Type the keyword viruses in the HelpSpot Search box , then click the arrow. www.gateway.com... - Page 202 Start All Programs Norton AntiVirus Norton AntiVirus 2003 Norton AntiVirus opens. Scan for viruses Click Scan for Viruses Scan Click the type of scan you want to make in the Scan for Viruses area, then under Actions, click Scan www.gateway.com...
- Page 203 , then click Start All Programs Norton AntiVirus LiveUpdate - Norton . The LiveUpdate wizard opens. AntiVirus Follow the on-screen instructions to update your Norton AntiVirus program with the latest virus protection files. When the program has finished, click Finish www.gateway.com...
-
Page 204: Managing Hard Drive Space
To check hard drive space: In Windows XP, click , then click . The My Computer Start My Computer window opens. Right-click the drive that you want to check for available file space, then click . Drive space information appears. Properties www.gateway.com... -
Page 205: Using Disk Cleanup
Right-click the hard drive that you want to delete files from, for example Local Disk (C:), then click . The Properties dialog box opens at the Properties General tab. Click . The Disk Cleanup dialog box opens. Disk Cleanup www.gateway.com... -
Page 206: Checking The Hard Drive For Errors
In Windows XP, click , then click . The My Computer Start My Computer window opens. Right-click the hard drive that you want to check for errors, for example Local Disk (C:), then click . The Properties dialog box opens. Properties www.gateway.com... - Page 207 Help and For more information about checking the hard drive for Support errors in Windows XP, click Start, then click Help and Support. Type the keyword checking for disk errors in the HelpSpot Search box , then click the arrow. www.gateway.com...
-
Page 208: Defragmenting The Hard Drive
In Windows XP, click , then click . The My Computer Start My Computer window opens. Right-click the hard drive that you want to defragment, for example Local Disk (C:), then click . The Properties dialog box opens. Properties www.gateway.com... - Page 209 Disk Close Defragmenter window. Help and For more information about defragmenting the hard drive Support in Windows XP, click Start, then click Help and Support. Type the keyword defragmenting in the HelpSpot Search box , then click the arrow. www.gateway.com...
-
Page 210: Backing Up Files
“Creating CDs and DVDs” on page 115. If you do not have a high-capacity backup device and you want to purchase one, you can contact Gateway’s Add-on Sales department or visit the Accessories Store at accessories.gateway.com. Help and For more information about backing up files in Support Windows XP, click Start, then click Help and Support. - Page 211 Help and For more information about using the Scheduled Tasks Support Wizard in Windows XP, click Start, then click Help and Support. Type the keyword Scheduled Task Wizard in the HelpSpot Search box , then click the arrow. www.gateway.com...
-
Page 212: Cleaning Your Computer
With your computer turned off and unplugged, brush the dust away from the vents with a damp cloth. Be careful not to drip any water into the vents. Do not attempt to clean dust from the inside your computer. www.gateway.com... -
Page 213: Cleaning The Keyboard
If your monitor is not a flat panel display, use a soft cloth and glass cleaner to clean the monitor screen. Squirt a little cleaner on the cloth (never directly on the screen), and wipe the screen with the cloth. www.gateway.com... -
Page 214: Cleaning The Mouse
To clean your trackball mouse: Turn the mouse upside down. Rotate the retaining ring on the bottom of the mouse counter-clockwise, then remove the retaining ring and mouse ball. Remove any dust, lint, or dirt from the mouse ball with a soft cloth. www.gateway.com... - Page 215 Help and For a video tutorial about cleaning the mouse in Support Windows XP, click Start, then click Help and Support. Type the keyword Video tutorials in the HelpSpot Search , then click the arrow. Click Cleaning the mouse. www.gateway.com...
- Page 216 Chapter 11: Maintaining Your Computer www.gateway.com...
-
Page 217: Restoring Software
Restoring Software Read this chapter to learn how to: Reinstall device drivers Update device drivers Reinstall programs Reinstall Windows... -
Page 218: Using The Restoration Cds
Chapter 12: Restoring Software Using the Restoration CDs Use the Gateway Restoration CDs to reinstall device drivers, your operating system, and other programs that were preinstalled at the factory. Important Before you try to fix a problem by reinstalling software from... -
Page 219: Reinstalling Device Drivers
CD or DVD drives, and modems. Drivers translate information between computer devices and programs. Drivers for your original computer hardware are installed at Gateway. If you install a new device, you need to install the drivers provided by the device manufacturer. - Page 220 Help and For more information about reinstalling device drivers in Support Windows XP, click Start, then click Help and Support. Type the keyword drivers in the HelpSpot Search box , then click the arrow. www.gateway.com...
-
Page 221: Updating Device Drivers
If this is the first time you have inserted the CD, accept the End User License Agreement (EULA) by clicking , then clicking Yes, I accept it Continue If you are prompted to select your Gateway computer type, click , then click Personal / Home Use Continue Click the tab. -
Page 222: Reinstalling Programs
If this is the first time you have inserted the CD, accept the End User License Agreement (EULA) by clicking , then clicking Yes, I accept it Continue If you are prompted to select your Gateway computer type, click , then click Personal / Home Use Continue Select a single program to reinstall. - Page 223 In the Currently Installed Programs list, click the program you want to uninstall, then click and follow the on-screen instructions. Change/Remove Insert the program CD into the CD or DVD drive. Complete the program reinstallation by following the instructions included with the program CD. www.gateway.com...
-
Page 224: Reinstalling Windows
Back up your personal files before you use this option. All files on your computer will be deleted! Insert the red Drivers CD into the CD or DVD drive. Restart your computer. Select 2. Boot from CD-ROM Select a language option. Select 1. Delete all files (Automated Fdisk/Format) www.gateway.com... - Page 225 NOT press any key to boot from CD. Follow the on-screen instructions to set your Regional and Language Options If you are prompted to select your Gateway computer type, click , then click Personal / Home Use...
- Page 226 Chapter 12: Restoring Software www.gateway.com...
-
Page 227: Upgrading Your Computer
Upgrading Your Computer This chapter provides information about upgrading and replacing components in your computer. Read this chapter to learn how to: Identify your case style Open and close the computer case Remove and install drives and components Remove and install add-in cards Remove and install system boards Add memory Change the battery... -
Page 228: Selecting A Place To Work
Has enough room to place all the computer parts Is near a grounded outlet so you can test your computer after installation Is near a telephone (in case you need help from Gateway Technical Support). The telephone must be directly connected to a telephone jack... -
Page 229: Preventing Static Electricity Discharge
Always hold expansion cards by their edges or their metal mounting brackets. Avoid touching the edge connectors and components on the cards. Never slide expansion cards or components over any surface. www.gateway.com... -
Page 230: Identifying Your Computer Case Style
Tower The Gateway Tower The Gateway Mid The Gateway Micro The Gateway New does not have an Tower case has an Tower can be set Micro Tower has a access door on the access door on the vertically into its rotating base and front. -
Page 231: Upgrading The Gateway Tower And Mid Tower Cases
Upgrading the Gateway Tower and Mid Tower Cases Upgrading the Gateway Tower and Mid Tower Cases The Gateway Tower and Mid Tower cases provides toolless access to internal components. Opening the case Warning To avoid exposure to dangerous electrical voltages and moving parts, turn off your computer, then unplug the power cord and modem cable before opening the case. - Page 232 Chapter 13: Upgrading Your Computer Push in on the cover release handle. www.gateway.com...
- Page 233 Upgrading the Gateway Tower and Mid Tower Cases Pull the side panel away from the case. www.gateway.com...
-
Page 234: Closing The Case
To close the computer case: Make sure that all of the internal cables are arranged inside the case so they will not be pinched when you close the case. Align the door tabs into the case notches. Case notches www.gateway.com... -
Page 235: Adding Or Replacing A Cd, Dvd, Or Diskette Drive
Upgrading the Gateway Tower and Mid Tower Cases Swing the side panel toward the case until the release handle locks. If you removed a case cover shipping screw, replace the screw. Reconnect the cables and power cord. Adding or replacing a CD, DVD, or diskette drive Use these instructions to add or replace 5.25-inch drives, such as CD or DVD... - Page 236 - OR - If you are replacing a drive, disconnect the drive cables, noting their locations and orientation. (You will reconnect the cables after you install the new drive.) See the drive documentation for further instructions. Power cable Data ribbon cable www.gateway.com...
- Page 237 Upgrading the Gateway Tower and Mid Tower Cases If there is a shipping screw installed next to the release lever, remove the screw, then slide the release lever toward the back of the case. www.gateway.com...
- Page 238 Pin 1 and corresponds with Pin 1 on the drive (typically on the side closest to the power supply connection). See the drive documentation for further instructions. Close the case by following the instructions in “Closing the case” on page 224. www.gateway.com...
-
Page 239: Adding Or Replacing A Hard Drive
Upgrading the Gateway Tower and Mid Tower Cases Adding or replacing a hard drive Use these instructions to add or replace hard drives. To add or replace a hard drive: Identify your computer case style. For more information, see “Identifying your computer case style”... - Page 240 Chapter 13: Upgrading Your Computer Slide the release lever toward the open side of the case. www.gateway.com...
- Page 241 Upgrading the Gateway Tower and Mid Tower Cases If you are replacing a drive, slide the drive out of the drive bay. Set the jumpers on the drive. See the drive documentation for further instructions. Slide the new drive in, then slide the release lever toward the inside of the case.
-
Page 242: Adding Or Replacing Add-In Cards
If you are replacing a card, disconnect any cables that are attached to the card, noting their locations and orientation. (You will reconnect the cables after you install the new card.) See the add-in card documentation for further instructions. www.gateway.com... - Page 243 Upgrading the Gateway Tower and Mid Tower Cases Remove the retention thumbscrew that secures the card retention cover to the case, then flip the add-in card retention cover open. www.gateway.com...
- Page 244 Warning Do not touch the contacts on the bottom part of the add-in card. Touching the contacts can cause electrostatic damage to the card. www.gateway.com...
-
Page 245: Replacing The Power Supply
Upgrading the Gateway Tower and Mid Tower Cases Install the new card into the add-in slot. You can slightly seesaw the card end-to-end to help insert the card, but do not bend the card sideways. Push the add-in card retention cover inward, then secure the add-in card retention cover with the retention thumbscrew. - Page 246 Disconnect the power supply cables from all components (such as, hard drives, CD/DVD/Recordable drives, and the system board), noting their locations and orientation. (You will reconnect the cables after you install the new power supply.) www.gateway.com...
- Page 247 Upgrading the Gateway Tower and Mid Tower Cases Flip the power supply retention clip out. www.gateway.com...
- Page 248 Reconnect the power supply cables using your notes from Step 4. See the power supply documentation for further instructions. Close the case by following the instructions in “Closing the case” on page 224. www.gateway.com...
-
Page 249: Replacing The System Board
Upgrading the Gateway Tower and Mid Tower Cases Replacing the system board To replace the system board: Identify your computer case style. For more information, see “Identifying your computer case style” on page 220. Open the case by following the instructions in “Opening the case”... - Page 250 Chapter 13: Upgrading Your Computer Remove the thumbscrew using a screwdriver, coin, or your fingers. Thumbscrew (approximate location) www.gateway.com...
- Page 251 Upgrading the Gateway Tower and Mid Tower Cases Slide the system board toward the front of the case, then up and out of the case. The system board standoffs slide out of the keyhole slots. Standoff Keyhole slot Slide the new system board into the keyhole slots and lock it into place with the thumbscrew.
- Page 252 5. See the system board documentation for further instructions. Reinstall the add-in cards by following the instructions in “Adding or replacing add-in cards” on page 232. Close the case by following the instructions in “Closing the case” on page 224. www.gateway.com...
-
Page 253: Upgrading The Gateway Micro Tower Case
Upgrading the Gateway Micro Tower Case Upgrading the Gateway Micro Tower Case The Gateway Micro Tower case provides toolless access to internal components. Opening the case Warning To avoid exposure to dangerous electrical voltages and moving parts, turn off your computer, then unplug the power cord and modem cable before opening the case. - Page 254 If your computer is standing in the base, lift up on the front of the computer case, then pull the case forward and off the base. For more stability, place your computer on its side with the rubber feet resting on your workspace. Push in on the cover release handle. www.gateway.com...
- Page 255 Upgrading the Gateway Micro Tower Case Lift the side panel up. www.gateway.com...
- Page 256 Chapter 13: Upgrading Your Computer Lift the side panel away from the case. www.gateway.com...
-
Page 257: Closing The Case
Upgrading the Gateway Micro Tower Case Closing the case To close the Gateway Micro Tower case: Make sure that all of the internal cables are arranged inside the case so they will not be pinched when you close the case. - Page 258 If you removed a case cover shipping screw, replace the screw. Return the case to its normal position. If you removed the computer case from the base, lower the case onto the base, then push the case back, into the base. Reconnect the cables and power cord. www.gateway.com...
-
Page 259: Adding Or Replacing A Diskette, Cd, Or Dvd Drive
Upgrading the Gateway Micro Tower Case Adding or replacing a diskette, CD, or DVD drive Use these instructions to replace 5.25-inch drives such as CD or DVD drives and 3.5-inch drives such as diskette drives. To add or replace a CD, DVD, or diskette drive: Identify the computer case style. - Page 260 If you are replacing a drive, disconnect the drive cables, noting their locations and orientation. (You will reconnect the cables after you install the new drive.) See the drive documentation for further instructions. Drive Data ribbon Power cable cable www.gateway.com...
- Page 261 Upgrading the Gateway Micro Tower Case Slide the release lever back toward the rear of the case. www.gateway.com...
- Page 262 Insert the left-side bezel tab into the slot on the left side of the computer case, then swing the right side of the bezel in, towards the case, until the right-side bezel release tab locks into place. Close the case using the instructions in “Closing the case” on page 247. www.gateway.com...
-
Page 263: Replacing A Hard Drive
Upgrading the Gateway Micro Tower Case Replacing a hard drive Use these instructions to replace a hard drive. To replace a hard drive: Identify the computer case style. For more information, see “Identifying your computer case style” on page 220. - Page 264 Chapter 13: Upgrading Your Computer Slide the release lever toward the rear of the case. Lift the old drive out of the drive bay. Set any jumpers on the new drive to match the old drive. See the drive documentation for further instructions. www.gateway.com...
- Page 265 Upgrading the Gateway Micro Tower Case Insert the new drive, then slide the release lever toward the front of the case to lock it into place. Reconnect the drive cables using your notes from Step 3. The red-striped edge on the data ribbon cable indicates Pin 1 and corresponds with Pin 1 on the drive (typically on the side farthest from the power supply connection).
-
Page 266: Adding Or Replacing Add-In Cards
(You will reconnect the cables after you install the new card.) See the add-in card documentation for further instructions. Remove the retention thumbscrew that secures the card retention cover to the case. Retention thumbscrew www.gateway.com... - Page 267 Upgrading the Gateway Micro Tower Case Swing the add-in card retention cover open. If you are replacing an add-in card, remove the old add-in card. You can slightly seesaw the card end-to-end to loosen the card, but do not bend the card sideways.
-
Page 268: Replacing The Power Supply
Replacing the power supply To replace a power supply: Identify the computer case style. For more information, see “Identifying your computer case style” on page 220. Open the case using the instructions in “Opening the case” on page 243. www.gateway.com... - Page 269 Upgrading the Gateway Micro Tower Case Disconnect the power supply cables from all components (such as hard drives, CD, DVD, or recordable drives, and the system board), noting their locations and orientation. (You will reconnect the cables after you install the new power supply.)
- Page 270 Install the new power supply into the case, then rotate the power supply retention clip toward the power supply. Reconnect the power supply cables using your notes from Step 3. See the power supply documentation for more information. Close the case using the instructions in “Closing the case” on page 247. www.gateway.com...
-
Page 271: Replacing The System Board
Upgrading the Gateway Micro Tower Case Replacing the system board To replace the system board: Identify the computer case style. For more information, see “Identifying your computer case style” on page 220. Open the case using the instructions in “Opening the case” on page 243. - Page 272 Step 4. For more information, see the system board documentation. Install the add-in cards using the instructions in “Adding or replacing add-in cards” on page 256. Close the case using the instructions in “Closing the case” on page 247. www.gateway.com...
-
Page 273: Upgrading The Gateway New Micro Tower Case
Upgrading the Gateway New Micro Tower Case Upgrading the Gateway New Micro Tower Case The Gateway New Micro Tower case provides toolless access to internal components. Opening the case Warning To avoid exposure to dangerous electrical voltages and moving parts, turn off your computer, then unplug the power cord and modem cable before opening the case. - Page 274 Chapter 13: Upgrading Your Computer Pull up on the cover release handle. Lift the side panel up. www.gateway.com...
- Page 275 Upgrading the Gateway New Micro Tower Case Lift the side panel away from the case. www.gateway.com...
-
Page 276: Closing The Case
Chapter 13: Upgrading Your Computer Closing the case To close the Gateway New Micro Tower case: Make sure that all of the internal cables are arranged inside the case so they will not be pinched when you close the case. -
Page 277: Adding Or Replacing A Cd, Dvd, Or Diskette Drive
Upgrading the Gateway New Micro Tower Case Adding or replacing a CD, DVD, or diskette drive Use these instructions to add or replace 5.25-inch drives, such as CD or DVD drives, and 3.5-inch drives, such as diskette drives. To add or replace a CD, DVD, or diskette drive: Identify your computer case style. - Page 278 If you are replacing a drive disconnect the drive cables, noting their locations and orientation. (You will reconnect the cables after you install the new drive.) See the drive documentation for further instructions. www.gateway.com...
- Page 279 Upgrading the Gateway New Micro Tower Case Unlock the release lever. www.gateway.com...
- Page 280 Reconnect the drive cables using your notes from Step 5. The red-striped edge of the data ribbon cable indicates Pin 1 and corresponds with Pin 1 on the drive (typically on the side farthest from the power supply connection). See the drive documentation for further instructions. www.gateway.com...
- Page 281 Upgrading the Gateway New Micro Tower Case Insert the right-side bezel tabs into the slots on the right side of the computer case, then swing the left side of the bezel in, towards the case, until the left-side bezel release tab locks into place.
-
Page 282: Replacing The Hard Drive
Open the case by following the instructions in “Opening the case” on page 263. Remove the front bezel by following the instructions in “Adding or replacing a CD, DVD, or diskette drive” on page 267. Lift up on the drive cage assembly. www.gateway.com... - Page 283 Upgrading the Gateway New Micro Tower Case Disconnect the drive cables, noting their locations and orientation. (You will reconnect the cables after you install the new drive.) See the drive documentation for further instructions. Pivot the hard drive cage away from the drive cage assembly.
- Page 284 Pin 1 and corresponds with Pin 1 on the drive (typically on the side farthest from the power supply connection). See the drive documentation for further instructions. Close the case by following the instructions in “Closing the case” on page 266. www.gateway.com...
-
Page 285: Adding Or Replacing Add-In Cards
Upgrading the Gateway New Micro Tower Case Adding or replacing add-in cards An add-in card is a card used in the computer to add functionality to the system. Use the following instructions to replace, add, or reseat an add-in card. - Page 286 Warning Do not touch the contacts on the bottom part of the add-in card. Touching the contacts can cause electrostatic damage to the card. www.gateway.com...
-
Page 287: Replacing The Power Supply
Upgrading the Gateway New Micro Tower Case Install the new card into the add-in slot. You can slightly seesaw the card end-to-end to help insert the card, but do not bend the card sideways. Push the add-in card retention cover inward. - Page 288 Rotate the power supply retention clip away from the power supply. Slide the power supply toward the front of the case, then up. Install the new power supply into the case, then rotate the power supply retention clip toward the power supply. www.gateway.com...
-
Page 289: Replacing The System Board
Upgrading the Gateway New Micro Tower Case Reconnect the power supply cables using your notes from Step 4. See the power supply documentation for further instructions. Close the case by following the instructions in “Closing the case” on page 266. - Page 290 Chapter 13: Upgrading Your Computer Press down on the two cooling fan release clips. Lift up on the cooling fan, unplug the power cable from the system board, then remove the cooling fan. www.gateway.com...
- Page 291 Upgrading the Gateway New Micro Tower Case Remove the thumbscrew using a screwdriver, coin, or your fingers. Thumbscrew (approximate location) www.gateway.com...
- Page 292 4. See the system board documentation for further instructions. Reinstall the add-in cards by following the instructions in “Adding or replacing add-in cards” on page 275. Close the case by following the instructions in “Closing the case” on page 266. www.gateway.com...
-
Page 293: Installing Memory
To install or replace DIMM memory: Identify your computer case style. For more information, see “Identifying your computer case style” on page 220. Open the case by following the instructions for your case style. Find the memory module banks on your system board. www.gateway.com... - Page 294 Chapter 13: Upgrading Your Computer If your system board has single-channel memory, fill the memory DIMM 0 slot. When adding memory, fill the memory slot. DIMM 1 DIMM 0 DIMM 1 - OR - www.gateway.com...
- Page 295 DIMMs. Matching DIMMs are the same size, density, and technology. When adding memory, fill the memory slot AND the Channel A/DIMM 1 memory slot with matching DIMMs. Channel B/DIMM 1 Channel A/DIMM 0 Channel A/DIMM 1 Channel B/DIMM 0 Channel B/DIMM 1 www.gateway.com...
- Page 296 In Windows XP, click , then click Start Control Panel Performance and (if in Category view). Click/Double-click . The amount Maintenance System of memory in your computer is shown at the bottom of the System Properties dialog box in the General tab. www.gateway.com...
-
Page 297: Replacing The System Battery
220. Open the case by following the instructions for your case style. Locate the old battery on the system board and note its orientation. You will need to install the new battery the same way. www.gateway.com... - Page 298 Reconnect all external cables and the power cord. Turn on your computer. Open the BIOS Setup utility. In the BIOS Setup utility, restore any settings that you wrote down in Step Save all your settings and exit the BIOS Setup utility. www.gateway.com...
-
Page 299: Using The Bios Setup Utility
Using the BIOS Setup Utility This chapter provides information about the BIOS Setup utility. Read this chapter to learn how to: Open the BIOS Setup utility Update the BIOS Set the BIOS configuration jumper... -
Page 300: Opening The Bios Setup Utility
If you are having problems, you may need to wait for the monitor to warm up, then restart your computer. If you are trying to enter the BIOS Setup utility, press before the monitor warms up. www.gateway.com... - Page 301 Use the descriptions and the navigation keys displayed in the Item Specific Help area of the BIOS Setup utility screen to move through the BIOS menus and make selections. If available, press F1 to get more help about options. www.gateway.com...
-
Page 302: Updating The Bios
Updating the BIOS If you need a new version of the BIOS, you can download the BIOS update from the technical support area on the Gateway Web site (support.gateway.com) and install the new version from a diskette. To update the BIOS you need to perform the following tasks in sequence: Write down any custom BIOS settings. -
Page 303: Troubleshooting
Troubleshooting This chapter provides some solutions to common computer problems. Read this chapter to learn how to: Troubleshoot typical hardware and software problems Get telephone support Use automated troubleshooting systems Get tutoring and training If the suggestions in this chapter do not correct the problem, see “Getting Help”... -
Page 304: Safety Guidelines
To avoid bodily injury, do not attempt to troubleshoot your computer problem if: Power cords or plugs are damaged Liquid has been spilled into your computer Your computer was dropped The case was damaged Instead, unplug your computer and contact a qualified computer technician. www.gateway.com... -
Page 305: First Steps
Make sure that your hard drive is not full. If an error message appears on the screen, write down the exact message. The message may help Gateway Technical Support in diagnosing and fixing the problem. If an error occurs in a program, see the program’s printed documentation or the online help. -
Page 306: Software Support Tools
PC Doctor is a comprehensive hardware diagnostic and system information tool that can test your computer and determine its configuration. PC Doctor provides 85 professional diagnostic tests directly from your computer. This support tool is available from HelpSpot or by clicking Start All Programs then clicking Gateway Utilities www.gateway.com... -
Page 307: Troubleshooting
Make sure that the drive is configured correctly by following the instructions in the drive documentation. Open your computer case and make sure that the cables are connected correctly to the CD or DVD drive and the IDE connector on the system board or controller card. www.gateway.com... - Page 308 CD or DVD drive is terminated. For more information about SCSI device configurations, see the drive documentation or download the documentation from the Gateway Web site. Reinstall the device driver. For more information, see “Reinstalling device drivers”...
-
Page 309: Cleaning Cds And Dvds
Open the computer case and make sure that the power supply cable is connected correctly to the system board. Open the computer case and make sure that the power button cable is connected correctly to the system board. www.gateway.com... -
Page 310: Diskette Drive
The diskette may be full. Delete unnecessary files on the diskette and try again. Not all diskettes are IBM-compatible. Make sure that the diskette you are using is IBM-compatible. Try a different diskette. Occasionally diskettes are flawed and cannot be read by the diskette drive. www.gateway.com... -
Page 311: File Management
A file was accidentally deleted If the file was deleted at a DOS prompt or in Windows while holding down the S key, the file cannot be restored. HIFT To restore files that were deleted in Windows: Double-click the icon. Recycle Bin www.gateway.com... -
Page 312: Hard Drive
“Checking the hard drive for errors” on page 196. The hard drive cannot be accessed, or you see a “General failure reading drive C” error message If a diskette is in the diskette drive, eject it and restart your computer. Press C to restart your computer. www.gateway.com... - Page 313 Make sure that the last device on the SCSI cable is correctly terminated. For more information about SCSI device configurations, see the hard drive documentation or download the documentation from the Gateway Web site. Change the drive’s SCSI address to one that is not being used by your computer.
-
Page 314: Internet
Many factors can affect Internet performance: The condition of the telephone lines in your residence or at your local telephone service The condition of the Internet computers to which you connect and the number of users accessing those computers www.gateway.com... -
Page 315: Keyboard
If you spilled liquid in the keyboard, turn off your computer and unplug the keyboard. Clean the keyboard and turn it upside down to drain it. Let the keyboard dry before using it again. If the keyboard does not work after it dries, you may need to replace it. www.gateway.com... -
Page 316: Memory
Make sure that the modem cable is plugged into the modem jack and not the Ethernet network jack. See the back view section for your case in “Checking Out Your Gateway Computer” on page Make sure that your computer is connected to the telephone line and the telephone line has a dial tone. - Page 317 If you can connect on this line, call your telephone service. Try connecting with the modem at a lower connection speed. If reducing the connection speed lets you connect, call your telephone service. The telephone line may be too noisy. www.gateway.com...
- Page 318 48K. Your ISP may not support 48K uploads. You can check modem connection speeds and dial-up network (DUN) connections by accessing the gateway.your.way dial-up server. The server also contains drivers, patches, and updates for current Gateway hardware and software.
- Page 319 Help and For more information about modem troubleshooting in Support Windows XP, click Start, then click Help and Support. Type the keyword modem troubleshooting in the HelpSpot Search box , then click the arrow. www.gateway.com...
-
Page 320: Monitor
Change the screen resolution from the Display Properties dialog box. Help and For more information about changing the screen resolution Support in Windows XP, click Start, then click Help and Support. Type the keyword screen resolution in the HelpSpot Search box , then click the arrow. www.gateway.com... - Page 321 The aperture grille allows more light to pass through the screen for brighter colors and greater luminescence. The damper wire is a critical part of the overall monitor design and does not negatively affect the monitor's function. www.gateway.com...
-
Page 322: Mouse
If you have a trackball mouse, see “Cleaning the mouse” on page 204. Help and For a video tutorial about cleaning the mouse, click Start, Support Help and Support, Video tutorials, Maintaining your computer, then click Cleaning the mouse. www.gateway.com... -
Page 323: Power
Right-click the name of the printer you want to be the default printer, then click Set as Default Printer Make sure that the cable between the printer and your computer is connected securely to the correct port. www.gateway.com... - Page 324 You see a “Printer is out of paper” error message After adding paper, make sure that the printer is online. Many printers have an online/offline button that you need to press after adding paper. www.gateway.com...
-
Page 325: Sound
If you are using external speakers, see the speaker setup poster to check your speaker connections. Help and For more information about sound troubleshooting in Support Windows XP, click Start, then click Help and Support. Type the keyword sound troubleshooter in the HelpSpot Search box , then click the arrow. www.gateway.com... -
Page 326: Telephone Support
If you have recently installed hardware or software, make sure that you have installed it according to the instructions provided with it. If you did not purchase the hardware or software from Gateway, see the manufacturer’s documentation and technical support resources. -
Page 327: Telephone Support
Telephone support Telephone support Gateway offers a wide range of customer service, technical support, and information services. Automated troubleshooting system Service description How to reach Use an automated menu system and your 800-846-2118 (US) telephone keypad to find answers to common 877-709-2945 (Canada) problems. -
Page 328: Tutoring And Training
Type the keyword practice in the HelpSpot Search box , then click the arrow. Tutoring For help on using hardware or software that came with your Gateway computer, contact Gateway's fee-based tutorial hotline: 800-229-1103 (rate charged per minute; charged to a major credit card) 900-555-4695 (rate charged per minute;... -
Page 329: Training
Online Training More than 450 online courses are available www.learnatgateway.com/ from from Learn@Gateway. All you have to do is go Learn@Gateway online and log in. You select the subject matter, and the learning format (self-paced tutorials or virtual classrooms), all from the comfort of your computer. - Page 330 Chapter 15: Troubleshooting www.gateway.com...
-
Page 331: A Safety, Regulatory, And Legal Information
Legal Information Important safety information Your Gateway system is designed and tested to meet the latest standards for safety of information technology equipment. However, to ensure safe use of this product, it is important that the safety instructions marked on the product and in the documentation are followed. - Page 332 If your system is fitted with a TV Tuner, cable, or satellite receiver card, make sure that the antenna or cable system is electrically grounded to provide some protection against voltage surges and buildup of static charges. www.gateway.com...
- Page 333 The system was dropped or the cabinet is damaged. The system performance changes. Replacement parts and accessories Use only replacement parts and accessories recommended by Gateway. Important Do not use Gateway products in areas classified as hazardous locations. Such areas include patient care areas of medical and dental facilities, oxygen-laden environments, or industrial facilities.
-
Page 334: United States Of America
FCC rules. FCC declaration of conformity Responsible party: Gateway Companies, Inc. 610 Gateway Drive, North Sioux City, SD 57049 (605) 232-2000 Fax: (605) 232-2023 Product: (Where X, Y, or Z are any alpha numeric character or blank.) GPX XXXXX... - Page 335 Regulatory compliance statements Caution Changes or modifications not expressly approved by Gateway could void the FCC compliance and negate your authority to operate the product. Telecommunications per FCC part 68 (applicable to products fitted with USA modems) Your modem complies with Part 68 of the Federal Communications Commission (FCC) rules. On the computer or modem card is a label that contains the FCC registration number and Ringer Equivalence Number (REN) for this device.
- Page 336 The termination on an interface may consist of any combination of devices subject only to the requirement that the sum of the Ringer Equivalence Numbers of all the devices does not exceed 5. www.gateway.com...
- Page 337 TV/cable TV tuner cards) External television antenna grounding If an outside antenna or cable system is to be connected to your Gateway PC, make sure that the antenna or cable system is electrically grounded to provide some protection against voltage surges and static charges.
- Page 338 Contact with them could be fatal. Antenna and satellite grounding Reference Grounding component Electric service equipment Power service grounding electrode system (NEC Art 250, Part H) Ground clamps Grounding conductors (NEC Section 810-21) Antenna discharge unit (NEC Section 810-20) Ground clamp Antenna lead-in wire www.gateway.com...
- Page 339 For the latest product updates, consult the Gateway Web site at www.gateway.com. In no event will Gateway be liable for direct, indirect, special, exemplary, incidental, or consequential damages resulting from any defect or omission in this manual, even if advised of the possibility of such damages.
- Page 340 Appendix A: Safety, Regulatory, and Legal Information www.gateway.com...
-
Page 341: Index
Index playing playing with MusicMatch AC power connector See also CD access point network audio file accessories streaming safety precautions audio in jack accounts AVI file America Online user background activity indicators backing up files See indicators battery ad hoc networking replacing add-in card BIOS... - Page 342 opening mouse clicking adding tracks to your library clipboard cleaning close button controlling play with keyboard closing copying computer case creating audio program creating data unresponsive program creating label window creating music color drive changing depth editing track information changing number of eject button changing scheme playing audio with MusicMatch...
- Page 343 Accounting troubleshooting Sales using Warranty display customizing changing resolution cutting using screen saver files and folders Do More With Gateway text and graphics documentation eSupport Gateway Web site default printer help defragmenting hard drive HelpSpot deleting online help files and folders...
- Page 344 opening creating data printing creating label saving drive double-clicking eject button downloading files inserting dragging playing drivers troubleshooting reinstalling DVD drive updating adding drives eject button 3.5-inch bay cover identifying 5.25-inch bay cover location backing up files replacing testing CD-RW testing speed troubleshooting checking for errors...
- Page 345 Gateway copying eSupport cutting model number deleting serial number downloading Technical Support finding Web address moving Web site opening gateway.your.way dial-up server pasting gigabit Ethernet recovering renaming...
- Page 346 digital camera digital video camera hard drive diskette drive backing up files drivers checking for errors drives checking for free space defragmenting DVD drive deleting files and folders DVD+RW drive replacing DVD/CD-RW drive scanning for errors DVD-RAM/-RW/CD-RW drive troubleshooting headphone jack expansion cards help hard drive...
- Page 347 using screen saver See Internet service provider lights See indicators line in jack jacks line out jack See connections links jumper lock slot configuration Kensington cable settings maintenance Kensington cable lock backing up files lock slot checking for drive errors keyboard checking hard drive space buttons...
- Page 348 MIDI file settings from old computer minimize button MP3 file model number creating modem editing track information cable playing streaming jack MPEG file protecting from power surge Multifunction keyboard troubleshooting features monitor multimedia changing resolution adjusting volume cleaning playing audio CD controls playing DVD port...
- Page 349 network jack Pad Lock indicator networking parallel port access point pasting ad hoc files and folders computers text and graphics data transfer speed PC Doctor Ethernet peer-to-peer networking games peripheral devices peer-to-peer PhoneTools selecting connection type play button sharing devices playing sharing drives audio CD...
- Page 350 surge protector recordable drive troubleshooting adding turning off computer eject button turning on computer identifying drive using UPS location voltage switch replacing power button troubleshooting power supply using replacing recording uninterruptible audio file previous button CD tracks printer telephone greeting default recovering files and folders inkjet...
- Page 351 Internet connection printer safety See also networking avoiding repetitive strain shortcut menus caring for computer accessing general precautions shortcuts guidelines for troubleshooting adding to desktop posture closing programs reducing eye strain closing windows setting up computer copying static electricity cutting saving documents deleting files and folders scanner...
- Page 352 Gateway Learning Libraries tape backup drive Learn@Gateway taskbar transferring Technical Support files from Internet technical support files from old computer automated troubleshooting Internet settings from old computer...
- Page 353 Web browser tutoring button fee-based Web page TV jack Web site connecting to downloading files uninterruptible power supply (UPS) Gateway window updating close button BIOS closing device drivers maximize button updating Norton AntiVirus menu bar upgrading minimize button...
- Page 354 reinstalling drivers Search utility updating drivers Windows key Windows Media Player wired Ethernet network equipment list example wireless Ethernet network access point equipment list access point example ad hoc equipment list ad hoc example peer-to-peer equipment list peer-to-peer example Wordpad working safely World Wide Web (WWW) downloading files...
- Page 356 MAN SYS US DT USR GDE R9 7/03...