Table of Contents

Related Manuals for Jensen JiMS-198i


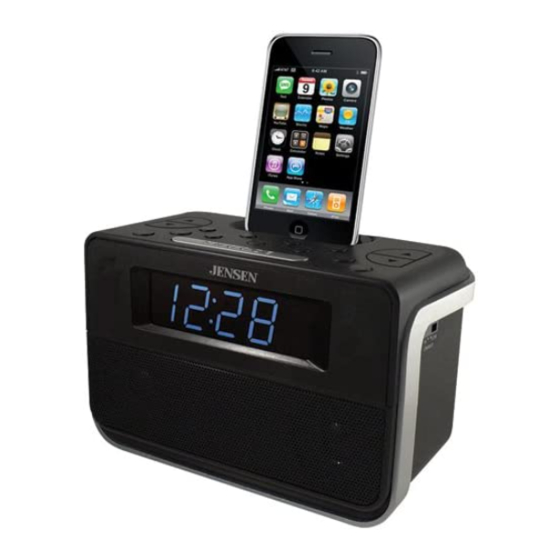
Summary of Contents for Jensen JiMS-198i
- Page 1 DOCKING MUSIC SYSTEM FOR iPod ® and iPhone ALARM 1 ALARM 2 OWNER’S MANUAL JiMS-198i (iPod/iPhone Not Included) PLEASE READ THIS OPERATING MANUAL COMPLETELY BEFORE OPERATING THIS UNIT AND RETAIN THIS BOOKLET FOR FUTURE REFERENCE. FM STEREO...
-
Page 2: Dear Jensen ® Customer
DEAR JENSEN ® CUSTOMER Selecting fine audio equipment such as the unit you've just purchased is only the start of your musical enjoyment. Now it's time to consider how you can maximize the fun and excitement your equipment offers. This manufacturer and the Electronic Industries Association's Consumer Electronics Group want you to get the most out of your equipment by playing it at a safe level. -
Page 3: Important Safety Instructions
IMPORTANT SAFETY INSTRUCTIONS When used in the directed manner, this unit has been designed and manufactured to ensure your personal safety. However, improper use can result in potential electrical shock or fire hazards. Please read all safety and operating instructions carefully before installation and use, and keep these instructions handy for future reference. -
Page 4: Important Notes
Use only with the cart, stand, tripod, bracket, or table specified by the manufacturer, or sold with the apparatus. When a cart is used, use caution when moving the cart/apparatus combination to avoid injury from tip-over. The MAINS plug is used as the disconnect device, the disconnect device shall remain readily operable. -
Page 5: Compliance With Fcc Regulations
COMPLIANCE WITH FCC REGULATIONS This device complies with Part 15 of the FCC Rules. Operation is subject to the following two conditions: (1) this device may not cause harmful interference, and (2) this device must accept any interference received, including interference that may cause undesired operation This equipment has been tested and found to comply with the limits for a Radio Receiver, pursuant to Part 15 of the FCC Rules. -
Page 6: Power Source
POWER SOURCE AC-DC ADAPTOR CONNECTION The unit is powered by an external AC - DC Power Adaptor with an output of 10V DC - 1400mA (included). (1) Firmly and securely plug the adaptor's AC plug into a household AC wall adaptor. (2) Insert the adaptor's DC output plug into the DC -IN jack on the back of the unit. -
Page 7: Battery Installation
BATTERY INSTALLATION Open the battery compartment door on the bottom of the cabinet. Insert 2 “AA” size batteries into the battery compartment according to the polarity diagram engraved inside the compartment. Replace the battery compartment Door. IMPORTANT:Be sure that the batteries are installed correctly. Wrong polarity may damage the unit. -
Page 8: Location Of Controls And Indicators
LOCATION OF CONTROLS AND INDICATORS 8 10 11 1 12 6 16 3 15 7 9 1. SHUFFLE / PRESET- BUTTON 10. SLEEP BUTTON 2. REPEAT / PRESET+ BUTTON 11. ON / OFF BUTTON 12. FUNCTION(FM / AM / iPod / AUX IN) BUTTON 3. - Page 9 LOCATION OF CONTROLS AND INDICATORS ALARM 1 ALARM 2 1. ALARM 1 INDICATOR 8. HEADPHONE OUTPUT JACK 2. ALARM 2 INDICATOR 9. TIME ZONE SWITCH 3. MULTI FUNCTION DISPLAY 10. AM LOOP ANTENNA JACK 11. AUX IN JACK 4. FM STEREO INDICATOR 12.
- Page 10 OPERATING INSTRUCTIONS AUTO TIME SET This unit features an Automatic Time Set system powered by 2 X “AA” batteries (3V DC) (Included), so you will not need to set the clock time when first plugged in. After the unit is plugged in, the LED display will show the time automatically.
-
Page 11: Setting The Clock
SETTING THE CLOCK In case the back-up batteries are accidentally removed. You will need to set the clock manually. If the LED display is blinking 1. In standby mode, press the UP button to increase or press the DOWN button to decrease the minutes setting. - Page 12 FM STEREO / MONO RECEPTION 1. This unit provides FM STEREO and FM MONO settings. In stereo mode, the unit will automatically switch to stereo when a FM stereo broadcast is received. The FM ST indicator turns on. 2. To receive a weak (noisy) FM station, press the MONO/STEREO button once to switch the FM mode to “MONO”.
- Page 13 LISTENING TO iPod AND iPhone PLAYBACK 1. To play your iPod, insert the adaptor included with your iPod into the docking bay area. To play your iPhone, insert the included adaptor into the docking bay area. Your iPod / iPhone can now be docked by placing the connector on the bottom of the iPod / iPhone onto the connector in the docking bay.
-
Page 14: Using Headphones (Not Included)
USING HEADPHONES (NOT INCLUDED) Insert the plug of your headphones (not included) into the Headphone jack, on the back of the unit and you can now listen in private. When using headphones, the speakers will be disconnected automatically. NOTE: READ THIS IMPORTANT INFORMATION BEFORE USING YOUR HEADPHONES 1. -
Page 15: Wake To Buzzer
NOTE: The last radio station you listen to will be the same station you will wake to. 3. The radio will automatically turn on and the ALARM indicator will flash when the alarm time is reached. The volume starts softly and becomes gradually louder. 4. -
Page 16: Snooze Operation
SNOOZE OPERATION You may active the SNOOZE function manually after the alarm sounds by pressing the SNOOZE button. The snooze time can be adjusted from 1 ~ 30 minutes. The default snooze time setting is 9 minutes. SNOOZE TIME SETTING: 1. -
Page 17: Auxiliary Input
SLEEP TIEMR OPERATION The Sleep Timer allows you to set the unit automatically power off after a selected sleep time duration is set. Sleep time function can be set from 1 minute to 120 minutes. 1. In unit power ON mode, press the SLEEP button to enter SLEEP setting. LED flashing and showing “90”. -
Page 18: Care And Maintainance
Note: If you connected the Line Out Jack of your external device then you only need to adjust the volume control of this system. If you connected the Headphone Jack of your external device then you may need to adjust both the volume control of your external device and the volume control of this system to find the most desirable volume setting. -
Page 19: Troubleshooting Guide
TROUBLESHOOTING GUIDE Symptom Possible Problem AC Adaptor is not plugged into a wall outlet or the connector is not plugged into the power supply jack on the back of the unit. The unit does Wall outlet is not functioning. not respond (no power) iPod / iPhone does not install properly. -
Page 20: Specifications
SPECIFICATIONS Power Supply Power Adaptor (included): Input: AC120V ~60Hz Output: DC10V, 1400mA Battery Back-up for Clock: 2 X DC1.5V ‘AA’ (UM-3) Frequency Range AM 520 – 1710 kHz, 10 kHz tuning step FM 87.5 – 108 MHz, 0.1 MHz tuning step "Made for iPod"...