
Related Manuals for Jensen JiMS-60


Summary of Contents for Jensen JiMS-60
- Page 1 ® DOCKING MUSIC SYSTEM FOR iPOD OWNER’S MANUAL JiMS-60 (iPod Not Included) PLEASE READ THIS OPERATING MANUALCOMPLETELY BEFORE OPERATING THIS UNIT AND RETAIN THIS BOOKLET FOR FUTURE REFERENCE...
-
Page 2: Dear Jensen® Customer
The serial number of this product is found on its bottom cover. You should note the serial number of this unit in the space provided as a permanent record of your purchase to aid in identification in the event of theft of loss. Model Number: JiMS-60 Serial Number:... -
Page 3: Important Safety Instructions
TO PREVENT FIRE OR SHOCK HAZARD, DO NOT USE THIS PLUG WITH AN EXTENSION CORD, RECEPTACLE OR OTHER OUTLET UNLESS THE BLADES CAN BE FULLY INSERTED TO PREVENT BLADE EXPOSURE. TO PREVENT FIRE OR SHOCK HAZARD, DO NOT EXPOSE THIS APPLIANCE TO RAIN OR MOISTURE. -
Page 4: Important Notes
unused for long periods of time. 14. Refer all servicing to qualified service personnel. Servicing is required when the apparatus has been damaged in any way, such as power-supply cord or plug is damaged, liquid has been spilled or objects have fallen into the apparatus, the apparatus has been exposed to rain or moisture, does not operate normally, or has been dropped. -
Page 5: Compliance With Fcc Regulations
COMPLIANCE WITH FCC REGULATIONS This device complies with Part 15 of the FCC Rules. Operation is subject to the following two conditions: (1) this device may not cause harmful interference, and this device must accept any interference received, including interference that may cause undesired operation. -
Page 6: Power Source
This unit is designed to operate on normal household AC power rated at 120V/60Hz. Operating this unit from any other power source may cause damage to the unit, and such damage is not covered by your warranty. It is also equipped with a battery back-up system for the clock that is powered by an optional 9V 006P battery (type 6F22 or equivalent –... -
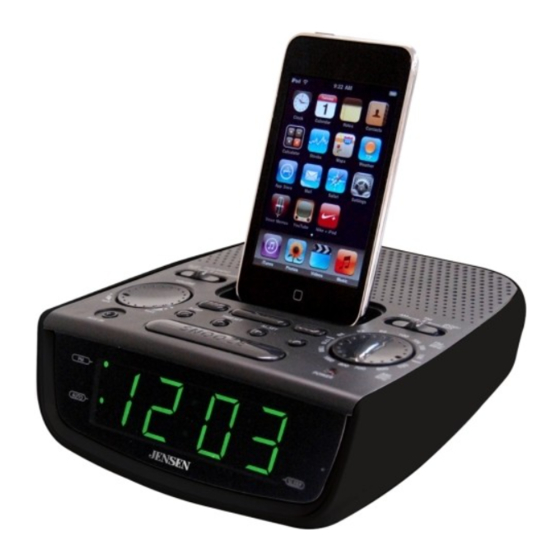
Page 7: Location Of Controls And Indicators
LOCATION OF CONTROLS AND INDICATORS 1. AC POWER CORD 2. DIMMER SWITCH 3. WAKE UP SOURCE SELECTOR 4. iPod SKIP BACKWARD HOUR BUTTON 5. VOLUME CONTROL KNOB 6. AUX IN JACK 7. SLEEP BUTTON 8. TIME SET BUTTON 9. CLOCK DISPLAY 10. -
Page 8: Clock Settings
11. FM ANTENNA When you plug the radio to an AC outlet for the first time the clock display will begin flashing "12:00". The flashing will stop when you set the time. 1. In standby mode, press and hold the TIME SET button and repeatedly press the HOUR button to set the correct Hour. -
Page 9: Ipod Operation
1.) Use the iPod adapter included with your iPod and insert it into the docking area. Your iPod can now be docked by placing the connector on the bottom of the iPod onto the connector in the docking bay. Note: Please be careful when docking the iPod onto the 30-pin connector in the docking bay. - Page 10 CHECKING THE WAKE UP TIME Whenever you want to check the wake up time, simply press and hold the ALARM SET button. The display will change from current time to wake up time. Release the ALARM SET button to return to current time. WAKE TO iPod 1.
- Page 11 3. To stop the alarm, press the ALARM SET button. The alarm will stop but the alarm remains set and will turn on the unit again at the same time on the following day. 4. If you do not want the alarm on the following day, set the WAKE UP SOURCE selector to the “ALARM OFF”...
-
Page 12: Auxiliary Input
This unit provides an auxiliary audio signal input for connecting external audio devices such as an MP3 player or TV. Use an audio cable with 3.5 mm stereo plug (not included) to connect the external device to the AUX IN Jack located on the back of the unit. 1.) Connect the 3.5mm AUX IN stereo plug to the line out jack or Headphone jack of your external audio device 2.) Press the ON/STANDBY button to turn on the unit. -
Page 13: Troubleshooting Guide
1. Do not subject the unit to excessive force, shock, dust or extreme temperature. 2. Do not tamper the internal components of the unit. 3. Clean your unit with a dry cloth. Solvent or detergent should never be used. 4. Avoid leaving your unit in direct sunlight or in hot, humid or dusty places. -
Page 14: Specifications
iPod is not installed properly. iPod is locked up/ frozen. iPod battery has problem. The reception at the set location is poor. AM band is too noisy. iPod is docked or near the unit Volume level is set too high. Sound is distorted. - Page 15 Apple is not responsible for the operation of this devise or its compliance with safety and regulatory standards. iPod is a trademark of Apple Inc., registered in the U.S. and other countries. 90 DAY LIMITED WARRANTY AND SERVICE SPECTRA MERCHANDISING INTERNATIONAL, INC. warrants this unit to be free from defective materials or factory workmanship for a period of 90 days from the date of original customer purchase and provided the product is utilized within the U.S.A.
- Page 16 It is recommended that you contact SPECTRA first at 1-800-777-5331 or by email at custserv@spectraintl.com for updated information on the unit requiring service. In some cases the model you have may be discontinued, and SPECTRA reserves the right to offer alternative options for repair or replacement. SPECTRA MERCHANDISING INTERNATIONAL, INC.