
Related Manuals for Jensen JiMS-210


Summary of Contents for Jensen JiMS-210
- Page 1 DOCKING DIGITAL MUSIC SYSTEM WITH ® CD FOR iPod OWNER'S MANUAL JiMS-210 ® (iPod Not Included) PLEASE READ THIS OPERATING MANUAL COMPLETELY BEFORE OPERATING THIS UNIT AND RETAIN THIS BOOKLET FOR FUTURE REFERENCE...
-
Page 3: Table Of Contents
DEAR JENSEN CUSTOMER ® IMPORTANT SAFETY INSTRUCTIONS COMPLIANCE WITH FCC REGULATIONS PRODUCT FEATURES INSTALLATION LOCATION OF CONTROLS RADIO OPERATIONS iPod DOCKING CD OPERATIONS DISPLAY MESSAGE AT CD MODE AUXILIARY INPUT CLOCK SETTING ALARM OPERATIONS SLEEP TIMER CARE AND MAINTENANCE TROUBLESHOOTING GUIDE... -
Page 4: Dear Jensen Customer
Model Number: JiMS-210 IMPORTANT SAFETY INSTRUCTIONS When used in the directed manner, this unit has been designed and manufactured to ensure your personal safety. - Page 5 IMPORTANT SAFETY INSTRUCTIONS 5.Power Cord Protection Power supply cords should be routed so that they are not likely to be walked on or pinched by items placed upon or against them. It is always best to have a clear area from where the cord exits the unit to where it is plugged into an AC outlet.
-
Page 6: Compliance With Fcc Regulations
IMPORTANT SAFETY INSTRUCTIONS ON PROTECTION AGAINST LASER ENERGY EXPOSURE As the laser beam used in this compact disc player is harmful to the eyes, do not attempt to disassemble the casing. Stop operation immediately if any liquid or solid object should fall into the cabinet. Do not touch the lens or poke at it. -
Page 7: Product Features
JiMS-210 is an iPod Docking Music System which incorporates the following features : iPod, iPod mini, iPod classic, iPod touch and iPod nano Player/Re-charger A CD player playback music with Audio CD / MP3 format AM / FM Stereo receiver with digital read out on LCD... -
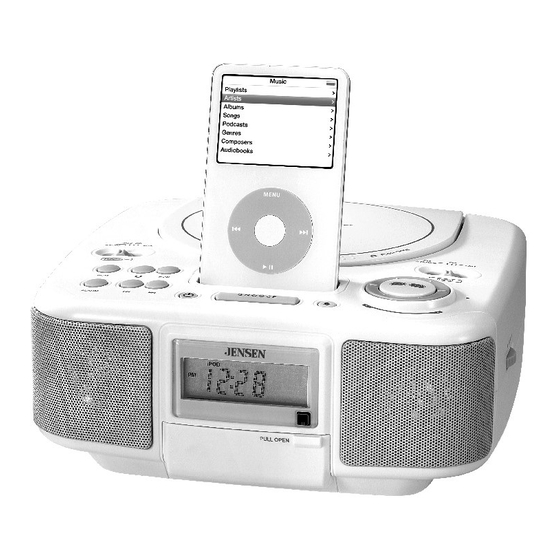
Page 8: Location Of Controls
Main Unit Top view iPod docking station iPod docking connector 3. POWER On/Off button ----- Turns the unit on or off 4. Function switch ----- Select RADIO / iPOD / CD / AUX modes. 5. Band switch ----- Select between FM STEREO / FM (mono) / AM radio bands. 6. - Page 9 25. AUX IN jack : Auxiliary audio signal input 26. Headphone Jack 27. DC-in jack : For the connection of external DC power supply 28. BACKLIGHT switch ----- Select Back-lit Off / Dim / Bright. 29. FM Antenna wire 30. RESET button ----- For resetting the unit. 31.
-
Page 10: Radio Operations
FM Antenna Unwrap and fully extend the FM Antenna wire for best FM radio reception. Radio Tuning 1. Press the POWER On/Off 2. Slide the FUNCTION (#4) switch to select Radio mode. 3. Slide the BAND (#5) switch to select AM or FM radio band. 4. -
Page 11: Cd Operations
CD player supports CD/CD-R / CD-RW discs recorded CD Playback 1. With the unit power is OFF, press the Push Open compartment. 2. Place a CD onto spindle with printed side facing up. 3. Close the CD cover. 4. Press the POWER On/Off 5. - Page 12 (c) To playback CD tracks in random order, press P-MODE button three times. "RAN" indicator appears on LCD. (d) Toplayback and repeat all CD tracks in random order, press P-MODE button four times. "RAN" and indicators appears on LCD. pressed, the CD play mode will be cancelled. NOTE: If CD STOP CD Program Playback This feature allows you to program up to 10 tracks (files) to play in a desired order.
-
Page 13: Display Message At Cd Mode
DISPLAY MESSAGE AT CD MODE Multi-Function Display NOTE: If the disc is dirty, damaged or unreadable, the “DISC” or “Err” will appear in the display. If this occurs, clean the disc, insert the disc correctly or try another disc. Notes on CD-R/RW Discs 1. -
Page 14: Clock Setting
Setting Clock Time The clock can be set in Power Off mode. 1. Press and hold the CLK SET button until the "minute" digits flashes on display. 2. Press the button to set the minute. 3. Press the CLK SET button again, the "hour" digits flashes on display. 4. -
Page 15: Sleep Timer
Wake to Radio -- The radio will automatically turn on when the alarm time is reached. -- The radio alarm will keep for 60 minutes and then automatically shut off. -- To stop the radio alarm sound immediately, press the ALARM button once. Wake to iPod -- Your docked... -
Page 16: Care And Maintenance
- Do not subject the unit to excessive force, shock, dust or extreme temperature. - Do not tamper the internal components of the unit. - Clean your unit with a damp (never wet) cloth. Solvent or detergent should never be used. - Avoid leaving your unit in direct sunlight or in hot, humid or dusty places.