Garmin Gpsmap 196 Quick Start Manual
Garmin gpsmap 196 quick start guide
Hide thumbs
Also See for Gpsmap 196:
- Pilot's manual (132 pages) ,
- Pilot's manual & reference (124 pages) ,
- Getting started (4 pages)
Table of Contents
Advertisement
Quick Links
Advertisement
Table of Contents

Related Manuals for Garmin Gpsmap 196


Summary of Contents for Garmin Gpsmap 196
- Page 1 GPSMAP 196 Quick Start Guide...
-
Page 2: Packing List
Please contact your Garmin dealer, should anything be missing from the GPSMAP 196 package. Illustrations of the items that should be included in the GPSMAP 196 package (with the exception of the batteries, the certifi cate for a free Jeppesen update, the Pilot’ s Guide and Reference manual and the Quick Start Guide) are provided for your convenience on pages 2 and 3 of this manual. - Page 3 Short Clamp Quick Start Adjustment Knob Packing List Allen Wrench Yoke Mount GA26C Remote Antenna Remote Antenna Suction Cup Mount PC Interface Cable Dash Mount Mounting Bracket Dash Mount (Back View) Mounting Bracket (Front View) Cigarette Lighter Adapter Dash Mount Dash Mount Mounting Base Adhesives...
-
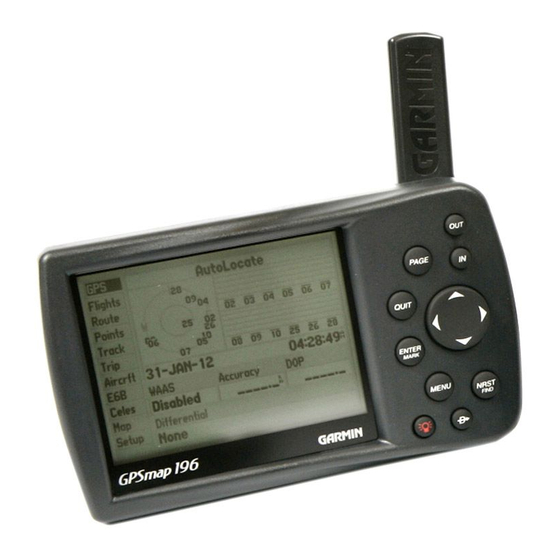
Page 4: Unit Overview
To install the remote GPS antenna: after detaching the removable GPS antenna from the Quick Start unit (as described in the instructions below), plug in the remote GPS antenna BNC connector by pushing it down onto the antenna connector and rotating it clockwise to lock it in place. Unit Overview Remote GPS Antenna BNC Connector Removable GPS Antenna... -
Page 5: Battery Installation
D-ring 1/4 turn clockwise. The GPSMAP 196 uses 4 AA batteries (Alkaline, rechargeable, Lithium or Ni-Cad). Immediately after NOTE: The GPSMAP 196 saves routes, user-created installing new batteries, turn the unit on and the check battery level indicator at the bottom of the Position waypoints and your other settings in non-volatile memory and page (see page 8). -
Page 6: Installation Instructions
(provided as an alternative to the long clamp adjustment knob) and an Allen wrench. Please verify that all items are included and contact your Garmin dealer, should anything be missing. Yoke Mount... - Page 7 If you intend to use the GPSMAP 196 primarily in an aircraft, Garmin recommends that the cigarette lighter cable (or any optional power/data cable) be secured with the cable clamp located along the top Cable Clamp of the yoke mount.
- Page 8 Once the yoke mount is confi gured to your application, attach the yoke mount to the aircraft controls and place the GPSMAP 196 into the mount. Quick Start To attach the yoke mount to the aircraft yoke shaft or control arm: 1.
- Page 9 Do not mount the GPSMAP 196 over airbag panels or in the fi eld of airbag de ployment.
- Page 10 This adhesive also provides maximum support if spread to conform to the footprint of the mounting base. Replacement adhesive disks of both types are available from any Garmin dealer. To install the mounting bracket on the GPSMAP 196: 1.
- Page 11 To attach the GPSMAP 196 to the mounting base: 1. Ensure that the locking lever is in the unlocked position and depress the release tab. Quick Start 2. Slide the disk located at the bottom of the mounting bracket into the base until it clicks into place.
-
Page 12: Keypad Usage
key — adjusts the map scale to show a smaller area with more detail (zooms in). Quick Start key — adjusts the map scale to show a larger area with less detail (zooms out). PAGE key — cycles the unit through the main display pages in sequence and returns Keypad Usage the display from a submenu page. -
Page 13: Turning The Unit On/Off
If you press any key while the unit is acquiring satellites, the automatic sequencing from the GPS Status page to the Map page will not occur. At the end of the day, when you are fi nished using the GPSMAP 196, the same red POWER key that Accuracy you use to turn the unit on also turns the unit off. -
Page 14: Operating Modes
GPSMAP 196 can be customized. For example, speed can be displayed in knots, miles per hour, or kilometers per hour. The GPSMAP 196 provides the fl exibility to have separate settings for each mode and saves these settings in memory so they do not have to be re-entered every time the mode is switched. - Page 15 Features and Data Entry The following screen features and terms are referred to both in this Quick Start Guide and through- Quick Start out the Pilot’ s Guide. CURSOR — A highlighted area on the screen (white text on black background) which can be moved Features and Data Entry up/down/left/right with the ARROW KEYPAD in order to select individual fi...
-
Page 16: Main Page Sequence
The above sequence illustrates the pages for the ‘Aviation’ mode. As you become more familiar with the GPSMAP 196, you will fi nd that using both the PAGE and QUIT keys allows you to quickly select the desired page. For example, to quickly jump from the Map page to the Panel page, press the PAGE key;... -
Page 17: Aviation Mode
3. Use the ARROW KEYPAD to enter the identifi er, facility name or city — As you scroll through the characters, the GPSMAP 196 displays any database entries which match the characters that have already been keyed in (if more than one entry exists in the database for the characters entered, a duplicate waypoint window will appear, listing the country/region for each entry. - Page 18 Nearest Airports and Navaids To view the nearest airports and navaids (‘Aviation’ mode): Quick Start 1. Press the NRST/FIND key and use the ARROW KEYPAD to select the desired fi le tab along the top of the page. Viewing Nearest Airports and Navaids The nearest airports are displayed by selecting the ‘Airport’...
- Page 19 ‘Goto’ Destination (‘Land’ and ‘Water’ Modes) In the ‘Land’ and ‘Water’ modes, use the NRST/FIND key to search for user-created waypoints, Quick Start cities, highway exits, or tide stations. In addition, if you are using optional MapSource City Select or MetroGuide data, you can search for points of interest, street addresses, street intersections (crossroads) Selecting a ‘Goto’...
-
Page 20: Map Page
The Map Page Selectable Quick Start Nearby Data Fields Intersection Map Page Course Line Map scale info appearing at the bottom of the page: Interstate Highway Current Using Built-In Basemap Position Nearby Airport Map Scale The Map page graphically displays your position relative to nearby airports, navaids, airspace Using MapSource Data boundaries, lakes, rivers, coastlines, cities and highways. -
Page 21: Map Panning
Map Panning The panning function allows you to move the pointer away from your present position on the map Quick Start and scroll to other map areas around the world. As you pan past the edge of the current map display, the screen actively scrolls to provide continuous map coverage (the current position symbol moves with Map Panning the scrolling map and thus may not be visible on the display screen). - Page 22 Map Decluttering In congested areas, some map detail can be removed without permanently affecting the current Quick Start map settings. There are four declutter settings which will respectively display everything (albeit with a de-emphasized background), remove the background detail (lakes/rivers/highways), remove airspace Map Decluttering boundaries, and —...
-
Page 23: Additional Reading
In addition to its use for data entry, the ENTER key can also be used to capture your present Quick Start position and save it as a user-created waypoint. In order to use this feature, the GPSMAP 196 must be receiving a suffi cient number of satellites so as to display an accurate position fi x. - Page 24 For the latest free software updates throughout the life of your Garmin products, visit the Garmin web site at www.garmin.com. © 2002-2003 Garmin Ltd. or its subsidiaries Garmin International, Inc. 1200 East 151 Street, Olathe, Kansas 66062, U.S.A. Garmin (Europe) Ltd.