Napoleon 1600C-1 Installation And Operating Instructions Manual
Hide thumbs
Also See for 1600C-1:
- Installation and operation instructions manual (28 pages) ,
- Installation and operating instructions manual (36 pages) ,
- Installation and operating instrictions (31 pages)
Table of Contents
Advertisement
Quick Links
INSTALLER: LEAVE THIS MANUAL WITH THE APPLIANCE.
CONSUMER: RETAIN THIS MANUAL FOR FUTURE REFERENCE.
CERTIFIED UNDER U.S. ENVIRONMENTAL PROTECTION AGENCY (E.P.A.) JULY 1990 AND THE OREGON DEPARTMENT OF ENVIRONMENTAL QUALITY (D.E.Q.)
PARTICULATE EMISSION STANDARDS BY E.E.M.C. THESE STOVES HAVE BEEN TESTED AND LISTED BY WARNOCK HERSEY LTD. TO STANDARDS : UL 1482 / ULC-S627.
MODEL
1600C-1
SAFETY INFORMATION
WARNING
!
If the information in these instructions are not followed exactly, a
fi re or explosion may result causing property damage, personal
injury or death.
Please read entire manual before you install and use your heater.
This heater has not been tested with an unvented gas log set. To
reduce risk of fi re or injury, do not install an unvented gas log set
into the heater.
- This heater can be very hot when burning.
- Combustible materials such as fi rewood, wet clothing, etc. placed too
close can catch fi re.
- Children and pets must be kept from touching the heater when it is
hot.
- The chimney must be sound and free of cracks. Before installing
this unit, contact the local building or fi re authority and follow their
guidelines.
- Operate only with the doors tightly closed.
- Burn wood behind the log retainer directly on the fi rebricks.
- Do not use an elevated grate or otherwise raise the fi re.
- This heater is designed to burn natural wood only. Higher effi ciencies
and lower emissions generally result when burning air dried seasoned
hardwoods, as compared to softwoods or to green or freshly cut
hardwoods.
- Do not start a fi re with chemicals or fl uids such as gasoline, engine
oil, etc.
- Do not burn treated wood, coal, charcoal, coloured paper, cardboard,
solvents or garbage.
- Do not let the heater become hot enough for any part to glow red.
- KEEP THE STOVE TOP TEMPERATURE BELOW 700°F (371°C).
Attempts to achieve heat output rates that exceed design
specifi cations can result in steel distortion and damage.
Phone (705)721-1212 • Fax (705)722-6031 • www.napoleonfi replaces.com • ask@napoleon.on.ca
$10.00
OPERATING INSTRUCTIONS
MODEL 1600C-1 HAS BEEN TESTED AND LISTED FOR INSTALLATION IN MOBILE HOMES.
Wolf Steel Ltd., 24 Napoleon Rd., Barrie, ON, L4M 4Y8 Canada /
103 Miller Drive, Crittenden, Kentucky, USA, 41030
INSTALLATION AND
1.11
W415-0721 / 05.06.09
1
Advertisement
Table of Contents

Related Manuals for Napoleon 1600C-1


Summary of Contents for Napoleon 1600C-1
-
Page 1: Safety Information
CERTIFIED UNDER U.S. ENVIRONMENTAL PROTECTION AGENCY (E.P.A.) JULY 1990 AND THE OREGON DEPARTMENT OF ENVIRONMENTAL QUALITY (D.E.Q.) PARTICULATE EMISSION STANDARDS BY E.E.M.C. THESE STOVES HAVE BEEN TESTED AND LISTED BY WARNOCK HERSEY LTD. TO STANDARDS : UL 1482 / ULC-S627. MODEL 1600C-1 HAS BEEN TESTED AND LISTED FOR INSTALLATION IN MOBILE HOMES. MODEL... -
Page 2: Table Of Contents
TABLE OF CONTENTS INTRODUCTION WARNINGS & SAFETY PRECAUTIONS WARRANTY DIMENSIONS SPECIFICATIONS INSTALLATION OVERVIEW GENERAL INFORMATION GENERAL INSTRUCTIONS CALIFORNIA PROP 65 INSTALLATION CLEARANCE TO COMBUSTIBLES WITHOUT REAR SHIELD 2.1.1 ALCOVE INSTALLATION 2.1.2 STOVE INSTALLATION CHIMNEY 2.2.1 CHIMNEY CONNECTION 2.2.2 ADDING CHIMNEY SECTIONS 2.2.3 TYPICAL THROUGH THE CEILING 2.2.4... -
Page 3: Introduction
1.0 INTRODUCTION WARNINGS & SAFETY PRECAUTIONS Before installing this unit, contact the Operate only with the doors tightly local building or fire authority and closed. follow their guidelines. This appliance can be very hot when burning. This appliance must be installed by a Children and pets must be kept from qualified installer. -
Page 4: Warranty
WARRANTY NAPOLEON® products are manufactured under the strict Standard of the world recognized ISO 9001 : 2000 Quality Assurance Certifi cate. NAPOLEON® products are designed with superior components and materials, assembled by trained craftsmen who take great pride in their work. The complete fi replace is again thoroughly inspected by a qualifi... -
Page 5: Dimensions
6.000” O heat shield*** Rear Shield 24.000” 28.000” 18.500” 18.750” 24.000” SPECIFICATIONS SPECIFICATIONS MODEL 1600C-1 WIDTH X DEPTH 27.000" X 24.000" HEIGHT 28.000" REAR FLUE HEIGHT 27.750" CHAMBER (D.W.H.) 11.900" X 20.400" X 10.400" CAPACITY (CUBIC FEET) 1.460 FT³ APP. AREA HEATED * 600-1200 FT²... -
Page 6: Installation Overview
INSTALLATION OVERVIEW See the section “INSTALLATION - CHIMNEY” See the section “EPRS OPTIONAL REAR SHEILD INSTALLATION” See the section “EP65 OPTIONAL BLOWER INSTALLATION” See the section “ASH FENDER INSTALLATION” See the section “DRAFT” See the section “OPTIONAL OUTSIDE AIR INSTALLTION” Ash Pan Door See the section “ASH REMOVAL”... -
Page 7: General Information
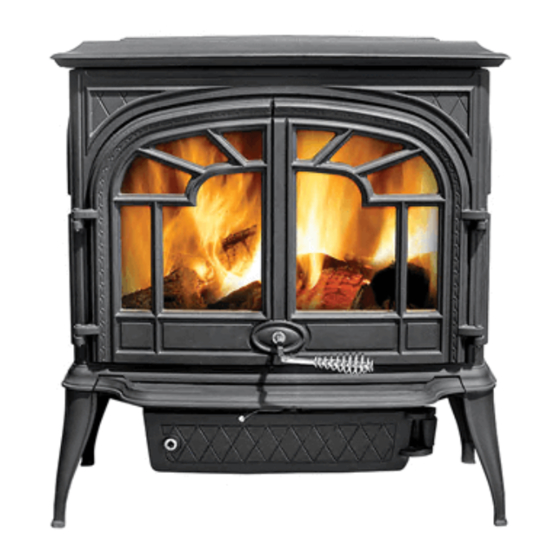
(supplied with the appliance) to install the heat shield to the base of the appliance. The 1600C-1 is designed to be operated with both the main and ash door closed. The heat produced is mainly transmitted through the window and the body of the appliance. -
Page 8: General Instructions
GENERAL INSTRUCTIONS • Before beginning your installation, consult with your local building code agency or fi re offi cials and insurance representative to ensure compliance. • Non-toxic smoke will be emitted during the paint curing process, to help dissipate the smoke open a window near the appliance. -
Page 9: Clearance To Combustibles Without Rear Shield
EP63, see "CLEARANCE TO COMBUSTIBLES WITH REAR SHIELD INSTALLATION" section. 2.1.1 ALCOVE INSTALLATION Model 1600C-1 may be installed into an alcove having a depth of not more than 4 feet and a height of at least 16”... -
Page 10: Chimney
CHIMNEY WARNING Never install a single wall slip section or smoke pipe in a chase structure. The higher temperature of this single wall pipe may radiate sufficient heat to combustible chase materials to cause a fire. Do not connect this appliance to a chimney system serving another appliance. To avoid danger of fire, all instructions must be strictly followed, including the provision of air space clearance between chimney system and enclosure. -
Page 11: Adding Chimney Sections
2.2.2 ADDING CHIMNEY SECTIONS Add chimney sections, according to the manufacturers installation instructions, securely, to the required height. The chimney must extend at least, 3 feet above its point of contact with the roof and at least 2 feet higher than any wall, roof or building within 10 feet. -
Page 12: Typical Through The Ceiling
2.2.3 TYPICAL THROUGH THE CEILING Move the stove into position with the fl ue centered, midpoint between two joists to prevent having to cut them. Use a plumb bob to line up the center. Cut and frame an opening in the ceiling to provide a 2” clearance between the outside of the chimney and any combustible material. -
Page 13: Typical Through The Wall
2.2.4 TYPICAL THROUGH THE WALL If possible, design the installation so that the connector does not pass through a combustible wall. If during your installation you must pass through a combustible wall, check with your building inspector before you be- gin. -
Page 14: Typical Existing Masonry
2.2.5 TYPICAL EXISTING MASONRY You can also install your appliance using your existing masonry chimney. To do so, follow the guidelines below. You may want to use a factory- built thimble, or construct your own brick thimble. If you are using a masonry chimney, it is important that it be built in compliance with the specifi... -
Page 15: Ash Fender Installation
ASH FENDER INSTALLATION To avoid damage during transport, the ash fender has been stored behind the main door. Pivot the ash fender onto tab “A” and lower into place. HEAT SHIELD INSTALLATION The heat shield stored in the appliance must be installed under the appliance with the 2 provided screws. -
Page 16: Ep65 Optional Blower Installation
(blowers, doors, louvres, trims, gas components, vent components, etc.) could result in a safety hazard and will void the limited lifetime warranty. The 1600C-1 may only be operated with the doors open when spark screen EP90-K is used and installed properly. -
Page 17: Optional Outside Air Kit Installation
Do not install the appliance in any way that might compromise the structural integrity of the mobile home fl oor, walls, ceiling, or roof. MODEL 1600C-1 IS APPROVED FOR INSTALLATION IN MOBILE HOMES IN BOTH CANADA AND THE UNITED STATES. -
Page 18: Operation
3.0 OPERATION WARNING Always operate this appliance with the door closed and latched except during start up and re-fueling or when using the spark screen. Always wear gloves to prevent injury. Do not leave the fire unattended when the door is unlatched or when using a spark screen as unstable wood could fall out of the fire chamber creating a fire hazard to your home. -
Page 19: When Lit For The First Time
WHEN LIT FOR THE FIRST TIME The appliance will emit a slight odour for a few hours. This is a normal temporary condition caused by the “burn-in” of internal paints and lubricants used in the manufacturing process and will not occur again. Simply open a window to suffi... -
Page 20: Draft
DRAFT WARNING Always operate this appliance with the door closed and latched except during start-up and re-fueling. Burning your appliance with the doors open or ajar creates a fi re hazard that may result in a house and or chimney fi re. Draft is the force which moves air from the appliance up through the chimney. -
Page 21: Extended Fire
3.5.2 EXTENDED FIRE Load your larger pieces of wood compactly, packed close enough to prevent the fl ames from penetrating it completely. After approximately 30 minutes, depending on the size of the load, close the draft control completely making sure that the fi re is not extinguished. DO NOT OVERFIRE THE APPLIANCE! Overfi... -
Page 22: Runaway Or Chimney Fire
RUNAWAY OR CHIMNEY FIRE WARNING A chimney fi re can permanently damage your chimney system. This damage can only be repaired by replacing the damaged component parts. Chimney fi res are not covered by the lifetime limited warranty. Runaway fi res can be the result of two major factors: 1. -
Page 23: Door Removal
DOOR REMOVAL WARNING Burning your appliance with the doors open or ajar creates a fire hazard that may result in a house and or chimney fire. Pivot the door open and lift the door and pins off the bushings. Set the door aside being careful not to scratch the paint. -
Page 24: Wood
WOOD Burn only dry, clean unpainted wood that has been seasoned. It produces more heat and less soot or creosote. Freshly cut wood contains about 50% moisture while after proper seasoning only about 20% of the water remains. As wood is burned, this water boils off consuming energy that should be used in heating. The wetter the wood, the less heat is given off and the more creosote is produced. -
Page 25: Replacements
5.0 REPLACEMENTS Contact your dealer or the factory for questions concerning prices and policies on replacement parts. Normally all parts can be ordered through your Authorized dealer / distributor. FOR WARRANTY REPLACEMENT PARTS, A PHOTOCOPY OF THE ORIGINAL INVOICE WILL BE REQUIRED TO HONOUR THE CLAIM. - Page 26 COMPONENTS PART NUMBER DESCRIPTION W105-0016 AXLE, ASH PAN DOOR LATCH W570-0125 SCREW DOOR LATCH W485-0033 HINGE ASH PAN DOOR W485-0032 PIN DOOR LATCH W135-0355 DOOR, RIGHT SIDE W135-0356 DOOR, LEFT SIDE W485-0029 HINGE PIN DOOR W562-0053 GASKET, DOOR GLASS W300-0111 CERAMIC GLASS W080-0979 BRACKET, GLASS RETAINER...
- Page 27 W415-0721 / 05.06.09...
-
Page 28: Service History
6.0 SERVICE HISTORY 43.1 W415-0721 / 05.06.09... -
Page 29: Notes
7.0 NOTES 44.1 W415-0721 / 05.06.09...