D-Link GO-RTW-N300 User Manual
Wireless n300 easy wall-plug router
Hide thumbs
Also See for GO-RTW-N300:
- Brochure & specs (3 pages) ,
- Quick installation manual (61 pages)

Related Manuals for D-Link GO-RTW-N300


Summary of Contents for D-Link GO-RTW-N300
-
Page 1: User Manual
Version 1.0 | October 02, 2013 User Manual Wireless N300 Easy Wall-Plug Router GO-RTW-N300... -
Page 2: Preface
Preface D-Link reserves the right to revise this publication and to make changes in the content hereof without obligation to notify any person or organization of such revisions or changes. Manual Revisions Revision Date Description October 02, 2013 • Initial release... -
Page 3: Table Of Contents
Router Mode ................13 Device Info ..............48 Initial Setup Wizard ............13 Active Client Table ...........49 Manual Configuration ............15 Statistics ..............50 Setup ..................16 Help..................51 Wizard ................16 Access Point Mode ..............52 Local Network ............20 Manual Configuration ............52 Internet Setup ............24 D-Link GO-RTW-N300 User Manual... - Page 4 Status ..................65 Device Info ..............65 Active Client Table ...........66 Statistics ..............67 Help..................68 Connecting.a.Wireless.Client...........69 WPS Button ...................69 Windows® 8 ...................70 WPA/WPA2 ................70 Windows® 7 ...................72 WPA/WPA2 ................72 WPS ..................75 GO-RTW-N300..............76 Windows Vista® ................79 WPA/WPA2 ................80 WPS/WCN 2.0 ...............82 D-Link GO-RTW-N300 User Manual...
-
Page 5: Product.overview
Section 1 - Product Overview Product Overview Package Contents GO-RTW-N300 Wireless N300 Easy Wall-Plug Router Quick Installation Guide Ethernet Cable If any of the above items are missing from your package, please contact your reseller. D-Link GO-RTW-N300 User Manual... -
Page 6: System Requirements
• Internet Explorer 8 or higher Utility.Requirements • Firefox 8.0 or higher • Safari 4.0 or higher • Google Chrome (16.0.9.12.75) Windows .Users: Make sure you have the latest version of Java ® installed. Visit www.java.com to download the latest version. D-Link GO-RTW-N300 User Manual... -
Page 7: Introduction
TOTAL.NETWORK.SECURITY The GO-RTW-N300 router supports all of the latest wireless security features to prevent unauthorized access, be it from over the wireless network or from the Internet. Support for WPA/WPA2 standards ensure that you’ll be able to use the best possible encryption method, regardless of your client devices. -
Page 8: Features
802.11n wireless clients. This capability allows users to participate in real-time activities online, such as video streaming, online gaming, and real-time audio. •.Portable.and.Easy.to.Use.- Simply plug the GO-RTW-N300 into a power outlet at home or abroad to create an instant wireless network wherever you are. -
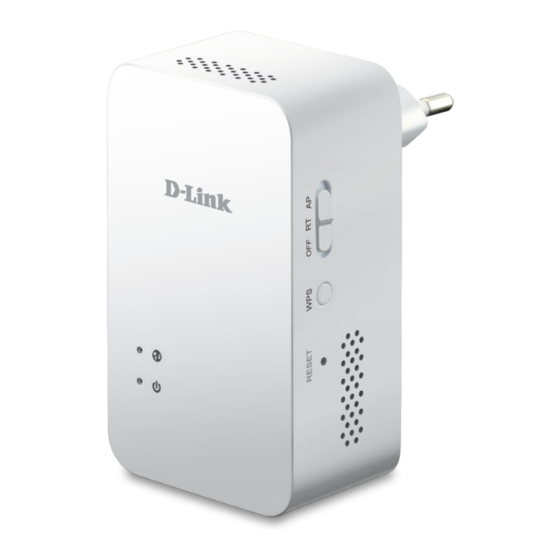
Page 9: Hardware Overview
This indicates the current power status of the GO-RTW-N300, as detailed in the table below. Internet LED This indicates the current Internet link status of the GO-RTW-N300, as detailed in the table below. Mode Selector Switch Slide this switch to select between Router Mode and Access Point Mode WPS Button Press this to activate Wi-Fi Protected Setup(WPS) to connect other wireless devices automatically. -
Page 10: Bottom
Section 1 - Product Overview Hardware Overview Bottom Internet Port Connects to your broadband modem through an Ethernet cable. LAN Port Connects 10/100 Ethernet devices such as laptop computers. D-Link GO-RTW-N300 User Manual... -
Page 11: Operation Modes
Section 1 - Product Overview Operation Modes Depending on how you want to use your GO-RTW-N300 will determine which mode you use. The following pages describe each mode to help you figure out which one to use. • Router Mode: page 8 •... -
Page 12: Router Mode
Section 1 - Product Overview Router Mode In Router Mode, the GO-RTW-N300 connects to your cable modem, DSL modem, or other Internet source and shares your Internet connection with your devices wirelessly, providing Internet access for an entire home or office. -
Page 13: Access Point Mode
Access Point Mode In Access Point Mode, the GO-RTW-N300 connects your wireless devices together, but does not provide routing functionality. It also allows a connected wired device to connect to your other devices wirelessly. This can be useful if you already have an existing Internet router that does not have built-in wireless capabilities. -
Page 14: Wireless Installation Considerations
1. Keep the number of walls and ceilings between the D-Link router and other network devices to a minimum - each wall or ceiling can reduce your adapter’s range from 3-90 feet (1-30 meters.) Position your devices so that the number of walls or ceilings is minimized. -
Page 15: Setting.up.with.a.web.browser
Section 2 - Setting Up With a Web Browser Setting Up With a Web Browser 1. Move the switch on the top of the GO-RTW-N300 to the desired mode, then plug it into a wall outlet near your cable/ DSL modem or router. Verify that the power LED is lit before continuing. -
Page 16: Router Mode
(default http://192.168.0.50) in the address bar. Access Point Mode 5. If you have set up the GO-RTW-N300 before, you will see a login screen. Type “admin” as your user name, and enter the password for the GO-RTW-N300. By default, the password should be left blank. -
Page 17: Router Mode
Section 2 - Setting Up With a Web Browser - Router Mode Router Mode Initial Setup Wizard If this is your first time setting up the GO-RTW-N300, open your web browser. You will automatically be directed to the Wizard Setup Screen. - Page 18 Enter the primary DNS server supplied by you ISP. You can Secondary DNS: also enter secondary address for backup purposes. Enter the SSID (name) to identify your wireless network, and a key (password). Click Save.and.Connect to save the current settings and complete the setup wizard. D-Link GO-RTW-N300 User Manual...
-
Page 19: Manual Configuration
Section 2 - Setting Up With a Web Browser - Router Mode Manual Configuration This section will show you how to configure your new D-Link wireless router using the web-based configuration utility. This section describes the configuration interface for Router Mode. -
Page 20: Setup
WAN connection manually, which will take you to the Setup > Internet Setup page. The Setup Wizard will be explained on the next pages and Internet Setup will be explained in the Internet Setup section. D-Link GO-RTW-N300 User Manual... - Page 21 WAN and click Next to continue. If you selected PPPoE, enter your PPPoE username and password twice and click Next to continue. Click the Account Validate button to validate your information and make sure it is correct. D-Link GO-RTW-N300 User Manual...
- Page 22 20/40MHz. For the others, 20MHz is the only option. Disable You can also choose to not use wireless security by Security: selecting this, but this is not recommended. WPA/WPA2- If you select this, enter a passkey in the box that appears. Personal: D-Link GO-RTW-N300 User Manual...
- Page 23 Section 2 - Setting Up With a Web Browser - Router Mode Click Finish to complete the setup process. When the router has finished saving, the Status > Device Info window will open. D-Link GO-RTW-N300 User Manual...
-
Page 24: Local Network
LAN Interface: Use this section to configure the router’s local network settings. DHCP Server Use this section to configure the GO-RTW-N300’s built-in Settings: DHCP server settings. DHCP Static IP Use this section to add a new DHCP Static IP configuration. - Page 25 IP address in your browser to get back into the configuration utility. Subnet Mask: Enter the subnet mask. The default subnet mask is 255.255.255.0. Click the Apply Changes button to save any changes made. D-Link GO-RTW-N300 User Manual...
- Page 26 Section 2 - Setting Up With a Web Browser - Router Mode DHCP stands for Dynamic Host Control Protocol. The GO-RTW-N300 has a built-in DHCP server. The DHCP Server will automatically assign an IP address to the computers on the LAN/private network. Be sure to set your computers to be DHCP clients by setting their TCP/IP settings to “Obtain an IP Address Automatically.
- Page 27 The DHCP Static IP Table displays the IP reservations that have been created. To make any changes, select a reservation in the table by clicking the circle next to it and click Update. To delete a reservation, select a reservation and click Delete Selected. D-Link GO-RTW-N300 User Manual...
-
Page 28: Internet Setup
Select Default MAC to use the router’s MAC address. Select MAC. from. PC to copy your PC’s MAC address, or select MAC.Manual.to manually enter a MAC address in the field provided. When you have finished configuring the WAN settings, click the Apply Changes button. D-Link GO-RTW-N300 User Manual... - Page 29 Select Default MAC to use the router’s MAC address. Select MAC. from. PC to copy your PC’s MAC address, or select MAC.Manual.to manually enter a MAC address in the field provided. Click Apply.Changes to save the current configuration, or click .Reset to discard. D-Link GO-RTW-N300 User Manual...
-
Page 30: D-Link Go-Rtw-N300 User Manual
Select Default MAC to use the router’s MAC address. Select MAC. from. PC to copy your PC’s MAC address, or select MAC.Manual.to manually enter a MAC address in the field provided. When you have finished configuring the WAN settings, click the Apply Changes button. D-Link GO-RTW-N300 User Manual... -
Page 31: Wireless
20 MHz and 20/40 MHz. For the others, 20 MHz is the only option. Security Select a wireless security encryption option. You can also Options: choose to not use one by selecting None, but this is not recommended. D-Link GO-RTW-N300 User Manual... - Page 32 Wireless security helps to prevent unauthorized users from accessing your wireless network, or seeing data being passed between the router and wireless clients. The GO-RTW-N300 supports two popular wireless security protocols, you should select a protocol based on the wireless clients which will be accessing your network.
- Page 33 Enter a pre-shared key (password) to secure your wireless network. Wireless clients will require this password in order to connect to your network. It is recommended that you make a record of this password for future reference. Click Apply to save the current settings. D-Link GO-RTW-N300 User Manual...
-
Page 34: Wi-Fi Protected (Wps) Setup
Enter the PIN for the wireless NIC and click Start PIN. If successful, you will then be taken to another screen and a message will tell you to run WPS in the client device within 2 minutes. D-Link GO-RTW-N300 User Manual... -
Page 35: Advanced Wireless
N devices operating within the same vicinity. When disabled, the GO-RTW-N300 will drop back to the slower 20 MHz when heavy congestion is detected on the 40 MHz band. - Page 36 Check this box to lock the current configuration. If this Configuration: option is disabled, wireless clients will not be able to automatically adjust the router’s WPS settings when connecting. Click Apply.Changes to save the current configuration. D-Link GO-RTW-N300 User Manual...
-
Page 37: Advanced
The Current ACL Table will show a summary of current access control rules. Click Delete to remove a rule from the list. Click the Add button to save and add these settings to the Current ACL table. D-Link GO-RTW-N300 User Manual... -
Page 38: Port Triggering
Click the Apply Changes button to save any changes made. The application will then be added to the Current Portrigger Table. Click the Delete button in the Action field for an application type if you wish to delete it. D-Link GO-RTW-N300 User Manual... -
Page 39: Dmz
DMZ. If the machine receives an IP address from the DHCP server, you should create a static DHCP reservation to ensure that the machine always receives the same address from the DHCP server. Click Apply.Changes to save the current configuration. D-Link GO-RTW-N300 User Manual... -
Page 40: Url Block
Click the Add Keyword button to save any changes made. The keyword will then be added to the URL Blocking Table below. To delete a keyword, select the keyword in the table and click the Delete Selected Keyword button. D-Link GO-RTW-N300 User Manual... -
Page 41: Dynamic Dns
Click the Add button to save any changes made. The DDNS Configuration will then be added to the Dynamic DDNS Table below. To delete an existing DDNS configuration, select a configuration in the table and click the Remove button. D-Link GO-RTW-N300 User Manual... -
Page 42: Qos
Enter the source port number if applicable. This box will be greyed out for certain protocols. Up Floor: Enter the minimum upload speed. Down Floor: Enter the minimum download speed. Source Netmask: Enter the source netmask. Dest Netmask: Enter the destination netmask. D-Link GO-RTW-N300 User Manual... - Page 43 Click the Add button to save any changes made. The QoS Rule will then be added to the QoS Rules Table. To delete an existing QoS Rule, select it in the QoS rules Table and click the Delete button. D-Link GO-RTW-N300 User Manual...
-
Page 44: Upnp
This page allows you to enable the Universal Plug and Play (UPnP) feature. UPnP: Click Enable to use the UPnP feature. UPNP provides compatibility with networking equipment, software and peripherals. Click the Apply Changes button to save any changes made. D-Link GO-RTW-N300 User Manual... -
Page 45: Virtual Server
Section 2 - Setting Up With a Web Browser - Router Mode Virtual Server The GO-RTW-N300 can be configured as a virtual server so that remote users accessing web or FTP services via the public IP address can be automatically redirected to local servers in the LAN (Local Area Network). - Page 46 Current Virtual Server Forwarding Table below. To delete or disable a virtual server, click the Delete or Disable buttons in the Action field of the virtual server in the table. D-Link GO-RTW-N300 User Manual...
-
Page 47: Maintenance
This page allows you to reboot your router or reset it to the factory default settings. Click the Reboot button to reboot the system. To reset the system to the factory default setting, click the Reset button. This will erase the current settings. D-Link GO-RTW-N300 User Manual... -
Page 48: Firmware Upgrade
This page allows you to upgrade the firmware of the router. If you plan to install new firmware, make sure the firmware you want to use is on the local hard drive of the computer. Please check the D-Link support site for firmware updates at http://support.dlink.com. -
Page 49: Backup/Restore
Click the Save Settings to File button to download the current configuration settings as a file onto your hard drive. To load a previously saved settings file, click the Browse button to locate the file on your hard drive, then click the Upload button. D-Link GO-RTW-N300 User Manual... -
Page 50: Admin
Modify button. To delete an existing account, click the Select tab next to the user account in the table and then click the Delete button. D-Link GO-RTW-N300 User Manual... -
Page 51: Time And Date
Select the time zone you are in from the pulldown menu. GMT Time: This shows the current GMT (Greenwich Mean Time) time. Click Apply Changes to save any changes made. To start the NTP, click Get GMT Time to obtain the GMT time. D-Link GO-RTW-N300 User Manual... -
Page 52: Status
Displays the wireless MAC address and your wireless Configuration: settings such as SSID and Channel. Displays the MAC address and the public IP settings for Configuration: the router. Click the Refresh button to view the most current information. D-Link GO-RTW-N300 User Manual... -
Page 53: Active Client Table
This page displays lists of all wired and wireless clients. The IP address and MAC address of each client is displayed in the tables. Active Wired Client This table displays all active wired clients. Table: Active Wireless This table displays all active wireless clients. Client Table: Click the Save Settings button to save any changes made. D-Link GO-RTW-N300 User Manual... -
Page 54: Statistics
This page displays the statistics for packets that have been transmitted and received on the network on the router’s WAN and LAN ports, and wireless bands. Click the Refresh button to refresh the router’s traffic statistics. D-Link GO-RTW-N300 User Manual... -
Page 55: Help
Section 2 - Setting Up With a Web Browser - Router Mode Help This section provides an explanation of each configuration or setting for the GO-RTW-N300. Click on the links to be taken to the help text for that particular section of router’s setup. -
Page 56: Access Point Mode
Access Point Mode Manual Configuration This section will show you how to configure your new D-Link wireless router using the web-based configuration utility. This section describes the configuration interface for Access Point Mode. Make sure that the mode selector switch is in the “AP”... -
Page 57: Setup
Local Network This section will allow you to change the local network settings of the access point. IP Address: Enter the IP address of the access point. Subnet Mask: Enter the subnet mask of the access point. D-Link GO-RTW-N300 User Manual... -
Page 58: Wireless
20 MHz and 20/40 MHz. For the others, 20 MHz is the only option. Security Select a wireless security encryption option. You can also Options: choose to not use one by selecting None, but this is not recommended. D-Link GO-RTW-N300 User Manual... - Page 59 Wireless security helps to prevent unauthorized users from accessing your wireless network, or seeing data being passed between the router and wireless clients. The GO-RTW-N300 supports two popular wireless security protocols, you should select a protocol based on the wireless clients which will be accessing your network.
- Page 60 Enter a pre-shared key (password) to secure your wireless network. Wireless clients will require this password in order to connect to your network. It is recommended that you make a record of this password for future reference. Click Apply to save the current settings. D-Link GO-RTW-N300 User Manual...
-
Page 61: Wi-Fi Protected (Wps) Setup
Enter the PIN for the wireless NIC and click Start PIN. If successful, you will then be taken to another screen and a message will tell you to run WPS in the client device within 2 minutes. D-Link GO-RTW-N300 User Manual... -
Page 62: Advanced Wireless
N devices operating within the same vicinity. When disabled, the GO-RTW-N300 will drop back to the slower 20 MHz when heavy congestion is detected on the 40 MHz band. - Page 63 Check this box to lock the current configuration. If this Configuration: option is disabled, wireless clients will not be able to automatically adjust the router’s WPS settings when connecting. Click Apply.Changes to save the current configuration. D-Link GO-RTW-N300 User Manual...
-
Page 64: Maintenance
This page allows you to reboot your router or reset it to the factory default settings. Click the Reboot button to reboot the system. To reset the system to the factory default setting, click the Reset button. This will erase the current settings. D-Link GO-RTW-N300 User Manual... -
Page 65: Firmware Upgrade
This page allows you to upgrade the firmware of the router. If you plan to install new firmware, make sure the firmware you want to use is on the local hard drive of the computer. Please check the D-Link support site for firmware updates at http://support.dlink.com. -
Page 66: Backup/Restore
Click the Save button to download the current configuration settings as a file onto your hard drive. To load a previously saved settings file, click the Browse button to locate the file on your hard drive, then click the Upload button. D-Link GO-RTW-N300 User Manual... -
Page 67: Admin
Modify button. To delete an existing account, click the Select tab next to the user account in the table and then click the Delete button. D-Link GO-RTW-N300 User Manual... -
Page 68: Time And Date
Select the time zone you are in from the pulldown menu. GMT Time: This shows the current GMT (Greenwich Mean Time) time. Click Apply Changes to save any changes made. To start the NTP, click Get GMT Time to obtain the GMT time. D-Link GO-RTW-N300 User Manual... -
Page 69: Status
Displays the wireless MAC address and your wireless Configuration: settings such as SSID and Channel. Displays the MAC address and the public IP settings for Configuration: the router. Click the Refresh button to view the most current information. D-Link GO-RTW-N300 User Manual... -
Page 70: Active Client Table
This page displays lists of all wired and wireless clients. The IP address and MAC address of each client is displayed in the tables. Active Wired Client This table displays all active wired clients. Table: Active Wireless This table displays all active wireless clients. Client Table: Click the Save Settings button to save any changes made. D-Link GO-RTW-N300 User Manual... -
Page 71: Statistics
This page displays the statistics for packets that have been transmitted and received on the network on the router’s WAN and LAN ports, and wireless bands. Click the Refresh button to refresh the router’s traffic statistics. D-Link GO-RTW-N300 User Manual... -
Page 72: Help
Section 2 - Setting Up With a Web Browser - Access Point Mode Help This section provides an explanation of each configuration or setting for the GO-RTW-N300. Click on the links to be taken to the help text for that particular section of router’s setup. -
Page 73: Connecting.a.wireless.client
The easiest and most secure way to connect your wireless devices to the router is WPS (Wi-Fi Protected Setup). Many wireless devices will have a WPS button (or a software utility with WPS) that you can press to connect to the GO-RTW-N300 router. Please refer to your user manual for the wireless device you want to connect to make sure you understand how to enable WPS on it. -
Page 74: Windows® 8
Wireless Icon Clicking on this icon will display a list of wireless networks which are within connecting proximity of your computer. Select the desired network by clicking on the network name. D-Link GO-RTW-N300 User Manual... - Page 75 WPS button on your router at the point to enable the WPS function. When you have established a successful connection a wireless network, the word Connected.will appear next to the name of the network to which you are connected. D-Link GO-RTW-N300 User Manual...
-
Page 76: Windows® 7
If you are joining an existing network, you will need to know the security key or passphrase being used. 1. Click on the wireless icon in your system tray (lower-right corner). Wireless Icon 2. The utility will display any available wireless networks in your area. D-Link GO-RTW-N300 User Manual... - Page 77 If you get a good signal but cannot access the Internet, check your TCP/IP settings for your wireless adapter. Refer to the Networking Basics section in this manual for more information. 4. The following window appears while your computer tries to connect to the router. D-Link GO-RTW-N300 User Manual...
- Page 78 It may take 20-30 seconds to connect to the wireless network. If the connection fails, please verify that the security settings are correct. The key or passphrase must be exactly the same as on the wireless router. D-Link GO-RTW-N300 User Manual...
-
Page 79: Wps
Section 3 - Connecting a Wireless Client The WPS feature of the GO-RTW-N300 can be configured using Windows® 7. Carry out the following steps to use Windows® 7 to configure the WPS feature: 1. Click the Start button and select Computer from the Start menu. -
Page 80: Go-Rtw-N300
Section 3 - Connecting a Wireless Client 3. Double-click the GO-RTW-N300. GO-RTW-N300 4. Input the WPS PIN number (displayed in the WPS window on the Router’s LCD screen or in the Setup.> Wireless.Setup menu in the Router’s Web UI) and click Next. - Page 81 Section 3 - Connecting a Wireless Client 5. Type a name to identify the network. 6. To configure advanced settings, click the icon. Click Next to continue. D-Link GO-RTW-N300 User Manual...
- Page 82 Make a note of the security key as you may need to provide this security key if adding an older wireless device to the network in the future. 9. Click Close to complete WPS setup. D-Link GO-RTW-N300 User Manual...
-
Page 83: Windows Vista
Click on a network (displayed using the SSID) and click the Connect button. If you get a good signal but cannot access the Internet, check you TCP/IP settings for your wireless adapter. Refer to the Networking. Basics section in this manual for more information. D-Link GO-RTW-N300 User Manual... -
Page 84: Wpa/Wpa2
1.. Open the Windows Vista® Wireless Utility by right-clicking on the wireless computer icon in your system tray (lower right corner of screen). Select Connect.to.a.network. 2.. Highlight the wireless network (SSID) you would like to connect to and click Connect. D-Link GO-RTW-N300 User Manual... - Page 85 It may take 20-30 seconds to connect to the wireless network. If the connection fails, please verify that the security settings are correct. The key or passphrase must be exactly the same as on the wireless router. D-Link GO-RTW-N300 User Manual...
-
Page 86: Wps/Wcn 2.0
Current PIN that is displayed on the Advanced > Wi-Fi.Protected.Setup section or choose to click the Generate.New.PIN button or Reset.PIN.to.Default button. If you are using third party software to set up Wi-Fi Protection, carefully follow the directions. When you are finished, proceed to the next section to set up the newly-configured router. D-Link GO-RTW-N300 User Manual... -
Page 87: Windows® Xp
Click on a network (displayed using the SSID) and click the Connect button. If you get a good signal but cannot access the Internet, check you TCP/IP settings for your wireless adapter. Refer to the Networking. Basics section in this manual for more information. D-Link GO-RTW-N300 User Manual... -
Page 88: Wpa/Wpa2
1. Open the Windows® XP Wireless Utility by right-clicking on the wireless computer icon in your system tray (lower-right corner of screen). Select View.Available.Wireless.Networks. 2. Highlight the wireless network (SSID) you would like to connect to and click Connect. D-Link GO-RTW-N300 User Manual... - Page 89 It may take 20-30 seconds to connect to the wireless network. If the connection fails, please verify that the WPA-PSK settings are correct. The WPA-PSK passphrase must be exactly the same as on the wireless router. D-Link GO-RTW-N300 User Manual...
-
Page 90: Troubleshooting
1..Why.can’t.I.access.the.web-based.configuration.utility? When entering the IP address of the D-Link router (192.168.0.1 for example), you are not connecting to a website nor do you have to be connected to the Internet. The device has the utility built-in to a ROM chip in the device itself. Your computer must be on the same IP subnet to connect to the web-based utility. - Page 91 • Close your web browser (if open) and open it. • Access the web management. Open your web browser and enter the IP address of your D-Link router in the address bar. This should open the login page for your web management.
- Page 92 • Windows® 95, 98, and Me users type in command (Windows® NT, 2000, XP, Vista®, 7 and 8 users type in cmd) and press Enter.(or click OK). • Once the window opens, you’ll need to do a special ping. Use the following syntax: . ping.[url].[-f].[-l].[MTU.value] Example: ping.yahoo.com.-f.-l.1472 D-Link GO-RTW-N300 User Manual...
- Page 93 • To change the MTU enter the number in the MTU field and click Save.Settings to save your settings. • Test your email. If changing the MTU does not resolve the problem, continue changing the MTU in increments of ten. D-Link GO-RTW-N300 User Manual...
-
Page 94: Wireless.basics
D-Link wireless products are based on industry standards to provide easy-to-use and compatible high-speed wireless connectivity within your home, business or public access wireless networks. Strictly adhering to the IEEE standard, the D-Link wireless family of products will allow you to securely access the data you want, when and where you want it. You will be able to enjoy the freedom that wireless networking delivers. -
Page 95: What Is Wireless
Why.D-Link.Wireless? D-Link is the worldwide leader and award winning designer, developer, and manufacturer of networking products. D-Link delivers the performance you need at a price you can afford. D-Link has all the products you need to build your network. How.does.wireless.work? Wireless works similar to how cordless phone work, through radio signals to transmit data from one point A to point B. - Page 96 Who.uses.wireless?. Wireless technology as become so popular in recent years that almost everyone is using it, whether it’s for home, office, business, D-Link has a wireless solution for it. Home • Gives everyone at home broadband access •...
-
Page 97: Tips
The wireless connection in public places is usually called “hotspots”. Using a D-Link CardBus Adapter with your laptop, you can access the hotspot to connect to Internet from remote locations such as airports, hotels, coffee shops, libraries, restaurants, and convention centers. -
Page 98: Networking.basics
Check your IP address After you install your new D-Link adapter, by default, the TCP/IP settings should be set to obtain an IP address from a DHCP server (i.e. wireless router) automatically. To verify your IP address, please follow the steps below. -
Page 99: Statically Assign An Ip Address
Set Primary DNS the same as the LAN IP address of your router (192.168.0.1). The Secondary DNS is not needed or you may enter a DNS server from your ISP. Step.5 Click OK twice to save your settings. D-Link GO-RTW-N300 User Manual... -
Page 100: Technical.specifications
• 80 grams (0.18 lbs) Security • Wi-Fi Protected Access (WPA/WPA2) • WPS™ (PBC) Advanced.Features • Web Setup Wizard • UPnP support • Active Firewall Network Address Translation (NAT) Frequency Range varies depending on local regulations. D-Link GO-RTW-N300 User Manual... -
Page 101: Safety.statements
Appendix D - Safety Statements Safety Statements CE.Mark.Warning: This is a Class B product. In a domestic environment, this product may cause radio interference, in which case the user may be required to take adequate measures. D-Link GO-RTW-N300 User Manual...