Table of Contents
Advertisement
Available languages
Available languages
Quick Links
Download this manual
See also:
Owner's Manual
Heavy-Duty Gas Grill
Parrilla de Gas de Alta Resistencia
OWNER'S MANUAL / MANUAL DEL PROPIETARIO
GUARDE ESTE MANUAL PARA REFERENCIA FUTURA
NOTICE TO INSTALLER:
LEAVE THESE INSTRUCTIONS
WITH THE GRILL OWNER FOR
FUTURE REFERENCE.
AVISO PARA EL
INSTALADOR:
ENTREGUE ESTAS
INSTRUCCIONES AL
PROPIETARIO DE LA PARRILLA
PARA REFERENCIA FUTURA.
ASSEMBLY AND OPERATING INSTRUCTIONS
INSTRUCCIONES DE ARMADO Y OPERACIÓN
SAVE THIS MANUAL FOR FUTURE REFERENCE
HAZARDOUS EXPLOSION MAY RESULT IF THESE WARNINGS AND INSTRUCTIONS
ARE IGNORED. READ AND FOLLOW ALL WARNINGS AND INSTRUCTIONS IN THIS
MANUAL TO AVOID PERSONAL INJURY, INCLUDING DEATH OR PROPERTY DAMAGE.
SE PUEDE PRODUCIR UNA EXPLOSIÓN PELIGROSA SI SE HACE CASO OMISO A
ESTAS ADVERTENCIAS E INSTRUCCIONES. LEA Y SIGA TODAS LAS ADVERTENCIAS
E INSTRUCCIONES EN ESTE MANUAL PARA EVITAR LESIONES PERSONALES,
WARNING/ADVERTENCIA
INCLUSO LA MUERTE, O LOS DAÑOS MATERIALES.
Advertisement
Chapters
Table of Contents

Related Manuals for Charmglow Heavy-Duty Gas Grill


Summary of Contents for Charmglow Heavy-Duty Gas Grill
- Page 1 Heavy-Duty Gas Grill Parrilla de Gas de Alta Resistencia OWNER’S MANUAL / MANUAL DEL PROPIETARIO ASSEMBLY AND OPERATING INSTRUCTIONS INSTRUCCIONES DE ARMADO Y OPERACIÓN SAVE THIS MANUAL FOR FUTURE REFERENCE GUARDE ESTE MANUAL PARA REFERENCIA FUTURA WARNING/ADVERTENCIA NOTICE TO INSTALLER:...
- Page 2 IMPORTANT SAFETY WARNINGS WE WANT YOU TO ASSEMBLE AND USE YOUR GRILL AS SAFELY AS POSSIBLE. THE PURPOSE OF THIS SAFETY ALERT SYMBOL IS TO ATTRACT YOUR ATTENTION TO POSSIBLE HAZARDS AS YOU ASSEMBLE AND USE YOUR GRILL. WHEN YOU SEE THE SAFETY ALERT SYMBOL PAY CLOSE ATTENTION TO THE INFORMATION WHICH FOLLOWS! READ ALL SAFETY WARNINGS AND INSTRUCTIONS CAREFULLY BEFORE ASSEMBLING AND OPERATING YOUR GRILL.
-
Page 3: Table Of Contents
TABLE OF CONTENTS General Warnings ..........3 Installation and LP Cylinder Specifications and Safe Use. -
Page 4: General Warnings
GENERAL WARNINGS WARNING • Never use natural gas in a unit designed for liquid propane gas. • Never use charcoal or wood briquets in a gas grill. Flavoring chips must be contained in a metal smoking box to contain ash and prevent fires. •... -
Page 5: Installation And Lp Cylinder Specifications And Safe Use
WARNING • FOR OUTDOOR USE ONLY. DO NOT operate indoors or in an enclosed area such as a garage, shed or breezeway. • Use your grill OUTDOORS in a well ventilated space away from dwellings or other buildings to prevent dangers associated with gas accumulation and toxic vapors. We recommend your grill be situated at least 10 feet (3.1 m) from buildings. - Page 6 CYLINDER SPECIFICATIONS: When purchasing or exchanging a cylinder for your gas grill, it must be constructed and marked in accordance with the specifications for LP gas cylinders of the U.S. Department of Transportation (DOT) or the National Standard of Canada, CAN/CSA-B339 Cylinders, Spheres and Tubes for Transportation of Dangerous Goods;...
-
Page 7: Connecting Lp Cylinder And Hose / Regulator To Grill
WARNING FILLING THE LP GAS CYLINDER: • Allow only qualified LP gas dealers to properly fill or repair your LP gas cylinder. • New tanks should be purged prior to filling; inform LP gas dealer if you are using a new tank. •... - Page 8 WARNING • Never use your grill without leak testing all gas connections and hoses. See the section on "Leak Testing" in this manual for proper procedures. WARNING The pressure regulator and hose assembly supplied with your gas grill must be used. •...
-
Page 9: Leak Testing
DANGER LEAK TESTING: To prevent fire or explosion hazard: • DO NOT smoke or permit ignition sources in the area while conducting a leak test. • Perform test OUTDOORS only in a well ventilated area. • Never perform a leak test with a match or open flame. •... -
Page 10: Pre-Start Check List
6. Check each place listed (A–H) for growing bubbles which indicates a leak. 7. Turn off gas supply at cylinder valve. 8. Turn on control knobs to release gas pressure in hose. 9. Turn control knobs to "OFF" position. 10. Tighten any leaking connections. 11. -
Page 11: Connecting Lp Cylinder And Hose / Regulator To Grill
WARNING Read, understand and follow all warnings and instructions contained in this manual. DO NOT skip any of the warnings and instructions contained in the preceding sections of this manual. WARNING LIGHTING INSTRUCTIONS: Follow the instructions exactly. 1. OPEN THE GRILL LID before attempting to light a burner so that fumes do not accumulate inside the grill. - Page 12 Match MATCH LIGHTING THE SEAR BURNER: 1. Open the lid of your grill before lighting. 2. Make sure the control knob is in the "OFF" position. 3. Place a paper match in the end of the matchlighter. Strike and carefully place a match approximately 1/2" (1 to 2 cm) from the lower left corner of the sear burner element.
-
Page 13: Operating Grill And Helpful Hints
WARNING OPERATING THE GRILL: Never use Charcoal or Lighter Fluid inside your Gas Grill. Read and follow all warnings and instructions contained in the preceding sections of this manual. BREAKING IN YOUR GRILL: • In manufacturing and preserving the components of your grill, oil residue may be present on the burner and cooking surfaces of your grill. -
Page 14: Using Other Features Of The Grill
USING OTHER FEATURES OF THE GRILL: Indicator Light THE WARMING DRAWER: 1. To turn the warming drawer ON, turn control knob of warming drawer to desired temperature. 2. To turn the warming drawer OFF, turn control knob of warming drawer to the OFF position. Note: Warming drawer is equipped with an air vent. -
Page 15: Proper Care And Maintenance
GRILL COOKING TIPS CLEANLINESS • Always wash hands thoroughly with soap and hot water prior to handling food and after handling raw meat, uncooked poultry or seafood. • When using a platter to carry raw meat, uncooked poultry or seafood to the grill, make sure to wash the platter thoroughly with soap and hot water before placing cooked foods back on the platter or use different platters for raw and cooked foods. -
Page 16: Cleaning And Maintenance
CLEANING AND MAINTENANCE: • Keep the appliance free and clear of combustible materials, gasoline and other flammable vapors and liquids. • Keep the ventilation openings of the cylinder enclosure free and clear of debris. • Visually check burner flames for proper operation (see pictorial in "Burner Assembly/Maintenance" under Proper Care and Maintenance). -
Page 17: Transporting And Storage
COOKING GRILLS • Clean with mild soap detergent and water. A brass bristled brush or a nylon cleaning pad can be used to remove residue from the stainless steel surfaces. Do not use steel wire bristles to clean the cooking grills. -
Page 18: Trouble Shooting
TROUBLE SHOOTING Problem: Possible Causes: 1. Check LP cylinder fuel level. 2. Bad electrode spark. Check to see if the grill will match light. Electrode or collector may need adjustment. • Burner will not light 3. Burner may not be properly seated. 4. -
Page 19: Lighting Instructions
FREQUENTLY ASKED QUESTIONS Your grill's serial number and model number, and the contact information for Brinkmann Customer Service, are listed on a silver label found beneath the control panel, on the back of the grill or on the side of the grill body, under the side shelf. -
Page 20: Frequently Asked Questions
FREQUENTLY ASKED QUESTIONS Cleaning Stainless Steel Cooking Grills: Wash grills with a mild detergent and rinse with hot water before initial use and as needed. DO NOT use a commercial oven cleaner. For stubborn food residue, use a degreaser and fiber or brass cleaning brush. Cleaning Porcelain-Finished Cast-Iron Cooking Grills: Wash grills with a mild detergent and rinse with hot water before initial use and as needed. -
Page 21: Parts List And Assembly Instructions
READ ALL SAFETY WARNINGS & ASSEMBLY INSTRUCTIONS CAREFULLY BEFORE ASSEMBLING OR OPERATING YOUR GRILL. WE RECOMMEND TWO PEOPLE WORK TOGETHER WHEN ASSEMBLING THIS UNIT. ® The following provided tools are required to assemble this Charmglow Deluxe Kitchen Gas Grill: • Screwdriver PARTS LIST:... - Page 22 FOR GRILL WARRANTY REPLACEMENT PARTS, PLEASE VISIT US AT: www.grillpartsonline.com (Proof of purchase will be required.) Inspect contents of the box to ensure all parts are included and undamaged.
- Page 23 Choose a good, cleared assembly area and get a friend to help you put your grill together. Lay cardboard down to protect grill finish and assembly area. CAUTION: Some parts may contain sharp edges. Wear protective gloves if necessary. Step 1 Screw the short tube into the elbow of the light fixture assembly.
- Page 24 Step 4 Halfway unscrew the eight bolts pre- installed to the left and right support brackets. Align the left canopy support bar holes with the support bracket holes and tighten the support bracket bolts. Repeat for right canopy support bar. (Left and right canopy supports are called out when viewed from front of the grill) Right...
- Page 25 Step 7 Remove the two screws from drawer handle then attach handle to drawer, insert the screws from the inside of the drawer. Step 8 Loosen four screws on each side of the grill body about halfway. With the help of a friend, place the slots on the right side table over the four screws and slide downward.
- Page 26 Step 10 Insert sliding lids on grill body into left and right side tables. Note: Lift sliding lids over tabs when inserting into side tables. Step 11 Unscrew pre-attached four bolts on bottom panel. Align the holes in the tank drawer with the holes of the bottom panel.
- Page 27 Step 14 Halfway unscrew the four bolts that hold the electrical sockets. Electrical outlets are located in the back of the Remove grill. Remove the bolt in the center of this Bolt the right hand outlet Step 15 Install electric box gasket onto the bolts.
- Page 28 Step 17 Side Burner Grate Place the heat distribution plates on lower level of grill body Cooking Grills assembly directly above burners. Step 18 Place side burner grate over side Heat Distribution burner on far left side. Plates Step 19 Place cooking grills on support ribs directly above heat distribution plates.
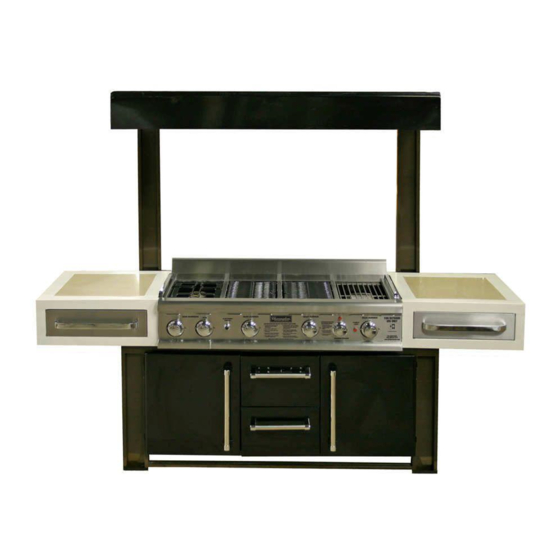
- Page 29 ® Charmglow Deluxe Kitchen 8750 (Assembled)
-
Page 30: Light Canopy Wiring Diagram
Canopy Wiring Diagram... -
Page 31: Cart Assembly Wiring Diagram
Cart Wiring Diagram Note: If the original heater electrical cord needs to be replaced, use an approved appliance wiring rated for 250˚ C. Use only with a GFCI protected circuit. Use only extension cords approved for outdoor use marked with W-A and rated for the power of this appliance. - Page 32 IMPORTANTES DE SEGURIDAD ADVERTENCIAS QUEREMOS QUE USTED ENSAMBLE Y UTILICE SU PARRILLA CON LA MAYOR SEGURIDAD POSIBLE. LA FINALIDAD DE ESTE SÍMBOLO DE ALERTA DE SEGURIDAD ES ATRAER SU ATENCIÓN A LOS POSIBLES RIESGOS INHERENTES EN EL ENSAMBLADO Y USO DE SU PARRILLA.
- Page 33 ÍNDICE DE MATERIAS Advertencias generales ........33 Instalación, especificaciones y uso seguro del cilindro de gas LP .
-
Page 34: Advertencias Generales
ADVERTENCIAS GENERALES ADVERTENCIA • Nunca utilice gas natural en una unidad hecha para gas propano líquido. • Nunca utilice briquetas de carbón vegetal o de leña en una parrilla de gas. Los trocitos para impartir sabor deben permanecer en una caja metálica para el ahumado para guardar la ceniza y prevenir incendios. •... -
Page 35: Instalación, Especificaciones Y Uso Seguro Del Cilindro De Gas Lp
ADVERTENCIA • PARA USO EXTERNO ÚNICAMENTE. NO lo opere adentro o en áreas cerradas como una cochera, un cobertizo o un pasadizo techado abierto. • Use su parrilla AFUERA en un lugar bien ventilado lejos de viviendas u otros edificios para evitar peligros relacionados con la acumulación de gas y vapores tóxicos. - Page 36 ESPECIFICACIONES DEL CILINDRO: Al comprar o cambiar el cilindro para su parrilla de gas, fíjese que haya sido hecho y marcado conforme a las especificaciones para cilindros de gas LP del Departamento de Transporte de los EE.UU. (DOT) o de la Norma Nacional Canadiense, CAN/CSA-B339 para cilindros, esferas y tubos para el transporte de mercancía peligrosa y de la comisión, como sean pertinentes;...
-
Page 37: Cómo Conectar La Manguera O El Regulador Del Cilindro De Gas Lp A La Parrilla
ADVERTENCIA CÓMO LLENAR EL CILINDRO DE GAS LP: • Deje que sólo distribuidores calificados de gas LP llenen o reparen debidamente su cilindro. • Los nuevos tanques deben ser purgados antes del llenado; notifíquele al distribuidor de gas LP si está usando un nuevo tanque. •... - Page 38 ADVERTENCIA • Nunca use su parrilla sin antes revisar todas las conexiones y mangueras para detectar fugas. Consulte la sección sobre "Prueba de detección de fugas" de este manual para seguir los métodos indicados. ADVERTENCIA Deben utilizarse el regulador de la presión y el ensamblado de la manguera incluidos con su parrilla de gas.
-
Page 39: Prueba De Detección De Fugas
PELIGRO PRUEBA DE DETECCIÓN DE FUGAS: Para evitar un incendio o riesgo de explosión: • NO fume ni permita fuentes ignífugas en la zona donde realice la prueba de detección de fugas. • Realice la prueba AFUERA y sólo en una zona bien ventilada. •... -
Page 40: Lista De Revisión Antes Del Primer Uso
6. Revise cada lugar mencionado (A–H) para ver si salen burbujas que indicarán una fuga. 7. Cierre el suministro de gas en la válvula del cilindro. 8. Abra las perillas de control para dejar salir la presión del gas en la manguera. 9. -
Page 41: Instrucciones De Encendido
ADVERTENCIA Lea, entienda y siga todas las advertencias e instrucciones contenidas en este manual. NO se salte ninguna advertencia e instrucción contenida en las secciones anteriores de este manual. ADVERTENCIA INSTRUCCIONES DE ENCENDIDO: Siga las instrucciones al pie de la letra. 1. - Page 42 Fósforo CÓMO ENCENDER EL QUEMADOR DE FUEGO DIRECTO CON UN FÓSFORO: 1. Abra la cubierta de su parrilla antes de encender. 2. Asegúrese de que la perilla de control esté en la posición de "OFF". 3. Ponga un fósforo (cerillo) de papel en el extremo del encendedor de fósforos, encienda el fósforo y acérquelo cuidadosamente a aprox.
-
Page 43: Cómo Utilizar La Parrilla Y Consejos Útiles
ADVERTENCIA CÓMO UTILIZAR LA PARRILLA: Nunca use carbón de leña o líquido encendedor en el interior de su parrilla de gas. Lea y siga todas las ADVERTENCIAS e instrucciones contenidas en las secciones anteriores de este manual. CÓMO ESTRENAR SU PARRILLA: •... - Page 44 CÓMO UTILIZAR LAS OTRAS FUNCIONES DE LA PARRILLA: Luz indicadora COMPARTIMIENTO DE CALENTAMIENTO: 1. Para ENCENDER el compartimiento de calentamiento, gire la perilla de control del compartimiento de calentamiento a la temperatura deseada. 2. Para APAGAR el compartimiento de calentamiento, gire la perilla de control a la posición de OFF.
-
Page 45: Debido Cuidado Y Mantenimiento
CONSEJOS PARA COCINAR A LA PARRILLA LIMPIEZA • Siempre lávese las manos muy bien con agua y jabón antes de manipular comida y después de manipular carne cruda (res, cerdo, aves de corral), pescado y mariscos. • Si utiliza un platón para llevar carne, aves de corral, pescado o mariscos crudos a la parrilla, no se olvide lavar el platón muy bien con agua y jabón antes de poner la comida cocida nuevamente sobre el platón o utilice platones distintos para los alimentos crudos y cocidos. -
Page 46: Limpieza Y Mantenimiento
LIMPIEZA Y MANTENIMIENTO: • Mantenga su electrodoméstico sin ningún material combustible, gasolina u otros vapores y líquidos inflamables. • Mantenga las aberturas de ventilación del cilindro sin cubiertas y libres de escombros. • Revise las llamas del quemador para ver que estén funcionando bien (vea la ilustración en "Ensamblado y mantenimiento del quemador"... -
Page 47: Transporte Y Almacenaje
PARRILLAS PARA COCINAR • Límpielas con detergente suave y agua. Puede utilizar un cepillo con cerdas de latón o una almohadilla para limpiar hecha de nylon para quitar los residuos de las superficies de acero inoxidable. No use cerdas de alambre de acero para limpiar las parrillas para cocinar, ya que el acero puede causar que el acabado se agriete o descascare. -
Page 48: Guía De Resolución De Problemas
RESOLUCIÓN DE PROBLEMAS Problema: Posibles causas: 1. Revise si hay suficiente gas en el cilindro. 2. Mala chispa del electrodo. Revise si la parrilla se enciende con el fósforo. El electrodo o colector pueden necesitar un ajuste. • El quemador no enciende 3. -
Page 49: Las Preguntas Más Frecuentes
LAS PREGUNTAS MÁS FRECUENTES El número de serie y de modelo de su parrilla, así como la información de contacto para el Servicio al Cliente de Brinkmann, están impresos en la etiqueta plateada situada debajo del panel de control ya sea en la parte trasera de la parrilla o al lado del cuerpo de la parrilla, bajo el anaquel lateral. - Page 50 LAS PREGUNTAS MÁS FRECUENTES Cómo limpiar parrillas para cocinar de acero inoxidable: Lave las parrillas con detergente suave y enjuáguelas con agua caliente antes de usarlas por primera vez y cuando sea necesario. NO utilice un limpiador de hornos comercial. Para residuos de comida difíciles de quitar, use un desengrasador y una fibra o un cepillo para limpiar latón.
-
Page 51: Lista De Piezas E Instrucciones De Ensamblado
ENSAMBLADO ANTES DE ENSAMBLAR O UTILIZAR SU PARRILLA. RECOMENDAMOS QUE DOS PERSONAS COLABOREN EN EL ENSAMBLADO DE ESTA UNIDAD. Las siguientes herramientas son indispensables para ensamblar esta parrilla de gas Charmglow® Deluxe Kitchen: • Destornillador PARTS LIST: Ensamblado del Cuerpo de la Parrilla... - Page 52 PARA PARTES DE REEMPLAZO DE PARRILLA BAJO GARANTIA, FAVOR DE VISITARNOS POR LA RED MUNDIAL EN: www.grillpartsonline.com (Se requerirá el comprobante de compra.) Inspeccione el contenido de la caja para verificar que todas las partes estén incluidas e intactas.
- Page 53 Escoja un área abierta y libre de escombros para el ensamblado y pídale a un amigo que le ayude a ensamblar su parrilla. Ponga cartón debajo para proteger al acabado de la parrilla y al área del ensamblado. PRECAUCIÓN: Algunas piezas pueden tener bordes filosos.
- Page 54 Paso 4 Desatornille a la mitad los ocho pernos preinstalados de las abrazaderas de soporte izquierda y derecha. Alinee los orificios de la barra de soporte izquierda para la campana con los orificios para la abrazadera de soporte y apriete los pernos de ésta.
- Page 55 Paso 7 Quite los dos tornillos del asa del compartimiento y luego una el asa al compartimiento, introduzca los tornillos desde el interior del compartimiento. Paso 8 Afloje aproximadamente a la mitad los cuatro tornillos de cada lado del cuerpo de la parrilla. Con la ayuda de un amigo, coloque las ranuras situadas en la mesa lateral derecha sobre los cuatro tornillos y deslice...
- Page 56 Paso 10 Inserte las cubiertas deslizantes al cuerpo de la parrilla, a las mesas laterales izquierda y derecha. Nota: Levante las cubiertas deslizantes sobre las lengüetas al insertar en las mesas laterales. Paso 11 Desatornille los cuatro pernos previamente unidos al panel inferior. Alinee los orificios en el compartimiento del tanque con los orificios del panel inferior.
- Page 57 Paso 14 Desatornille a la mitad los cuatro pernos que detienen los casquillos eléctricos. Los tomacorrientes están Quite este situados en la parte trasera de la perno parrilla. Quite el perno del centro del tomacorriente derecho. Paso 15 Instale el empaque de la caja eléctrica de salida a los pernos.
- Page 58 Paso 17 Rejilla del quemador Coloque las placas de distribución Parrillas para lateral térmica en el nivel inferior del cocinar ensamblado del cuerpo de la parrilla directamente encima de los quemadores. Placas de distribución Paso 18 térmica Coloque la rejilla del quemador lateral sobre el quemador lateral situado en el extremo izquierdo.
- Page 59 Charmglow ® Deluxe Kitchen 8750 (Armada)
-
Page 60: Diagrama Del Cableado De La Campana
Diagrama del cableado de la campana... -
Page 61: Diagrama Del Cableado Del Carrito
Diagrama del cableado del carrito Nota: Si es necesario cambiar el cable eléctrico original del calentador, use un cableado aprobado para el electrodoméstico aprobado para 250° C. Use solamente una tomacorriente protegido por un GFCI (Interruptor de Circuito de Defecto de Suelo). Use solo extensiones aprobados para uso al aire libre marcadas con las letras W-A y clasificadas para el uso de este aparato. - Page 64 LISTED ABOVE FROM THE DATE OF PURCHASE. SOME STATES DO NOT ALLOW LIMITATIONS ON HOW LONG AN IMPLIED WARRANTY LASTS, SO THE ABOVE LIMITATION MAY NOT APPLY TO YOU. ANY LIABILITY FOR INDIRECT, INCIDENTAL OR CONSEQUENTIAL DAMAGES ARISING FROM THE FAILURE OF THE CHARMGLOW ®...