Table of Contents
Advertisement
Advertisement
Table of Contents

Related Manuals for Pandigital S8X1102


Summary of Contents for Pandigital S8X1102
-
Page 1: User Guide
Handheld Wi-Fi Wand Scanner User Guide S8X1102 v1.1... -
Page 2: Table Of Contents
Tab le o f Co n t en ts What’s in the Box ..........................4 Important Safety Precautions ......................4 Introduction ............................5 Software CD ............................5 Scanner Overview ..........................6 Scan Settings ............................7 Scanner Indicator Lights ........................8 Storage Capacity ..........................8 Built‐in Disk ..........................8 Memory Card ..........................8 Battery Performance .........................9 Folder Structure ..........................9 Considerations for all Scanning .......................9... - Page 3 Optical Character Recognition (OCR) - Mac ................26 Convert images to text (OCR) ....................27 Set Preferences ........................27 Back up/Restore Files ......................27 Restore Files .......................... 27 Uninstall PageManager - Mac ....................27 Photo Stitching – PC & Mac ......................28 Bonus Software Programs ......................
-
Page 4: What's In The Box
Wh a t’ s in t h e B o x Check the package for the following items. If there are any items missing or damaged, please contact your place of purchase immediately. Handheld Wi-Fi Wand Scanner with Software CD with Presto! Rechargeable Lithium-Polymer Battery PageManager for PC and Macintosh, ... -
Page 5: Introduction
When in scanner mode, do not look directly at or shine the scanner light directly at other people or animals. The light emitted from the scanner could cause eye damage. The Li-ion battery must be treated with special care and attention. Refer to page 31 for Li-ion Battery Care instructions and considerations. -
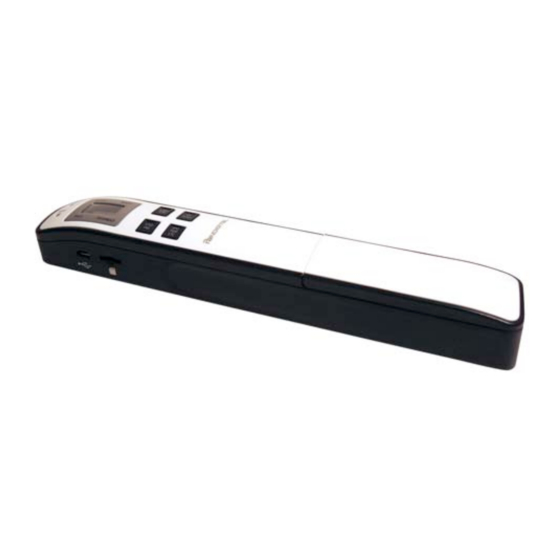
Page 6: Scanner Overview
Scan n er Ov er v i ew Front Name Function/ Description Indicator LEDs Indicates the operating status of the scanner and Wi-Fi status. LCD screen Displays the status of scan settings. ... -
Page 7: Scan Settings
Sc an S ett in gs Color or Black & White Mode Color BW You can choose to scan in full color or black & white by pressing the Scan Resolution The scan resolution is measured in DPI (dots per inch); the higher the DPI, the more detail on the original is captured by the scanner, producing a higher quality scanned image. -
Page 8: Scanner Indicator Lights
Scan n er I n d i cator L i gh t s Power Scan Wi-Fi lights indicate the scanner status, depending on the action, as specified below: Wi-Fi Scan Light Status Light The scanner is off (LCD screen is off). Initializing system and storage space/memory card;... -
Page 9: Battery Performance
B atter y Per fo r m an c e The scanner includes a Lithium Ion rechargeable NP-45 battery pack. If the “Low Battery” error code – E08 appears on the LCD screen, your scanned images may scan at a lower quality and the scanner may malfunction. Recharge the battery as soon as possible. -
Page 10: Suitable And Unsuitable Original Types
To use the image stitching feature effectively, you should scan your originals with the right edge of the original aligned against the left edge of the Stitch mark on the scanner. The originals need to overlap by 2” (45mm) or more. You will use Presto! PageManager software installed on your computer to complete the stitching process. -
Page 11: Getting Started
Gett in g Star ted Remove the foam, bag and any protective taped cushions before use. Before first time use, insert and charge the battery. Insert the battery as shown below. a) Remove the cover. b) Insert battery pack. c) Replace the cover. Charge the battery by connecting the scanner to your computer (powered on) via the included microUSB cable or connect the scanner to the included USB power supply via the microUSB cable. - Page 12 ColorBW Press the button to choose document color. Color mode outputs documents in full color, mode outputs documents in grayscale. STDHQ Press the button to choose your resolution. STD HQ = 300dpi, = 600 dpi, and = 1200 dpi ...
-
Page 13: Scanned Images
Automatic Rotate 90 Option If you scan documents vertically (right-to-left), the saved image will require a 90 rotation for correct viewing on your computer. You can use PageManager or your favorite graphic software to perform the rotation. If you are scanning multiple pages vertically, such as a book, you can eliminate the need to manually rotate each page by pre-setting the scanner to automatically rotate the scanned image 90 right before it’s saved. -
Page 14: View, Download And Print Your Scanned Images
View, Download and Print your Scanned Images You can use multiple methods for viewing, downloading, editing or printing your scanned images: • Connect to Scanner Wi-Fi Access Point (refer to page 14) • Connect Scanner to Computer (refer to page 16) •... - Page 15 The image files found in the scanner (built-in disk or microSD card) are automatically displayed. Click or tap on any image to view in full screen. Click or tap on the left/right arrows to scroll through all images. Menu Options under Image Thumbnails To password protect your data, you can setup a User Name and Password so that you will be prompted to enter your password each time you connect to the scanner wirelessly.
-
Page 16: Connect Scanner To A Computer
You can quickly delete image files from the scanner. a. Click or tap in the select box next to the file name(s) that you want to delete. Delete b. Click or tap c. The file(s) are automatically deleted (you won’t be prompted to confirm the deletion). -
Page 17: For Windows Xp Users
For Windows XP Users When the PC recognizes the scanner [with an inserted microSD Card], a pop-up PD_SCAN window appears. To view photos, change Windows Explorer’s settings as follows: Open folder to view files using Windows Explorer 1. Select “Always do the selected action” 2. -
Page 18: Connect With Macintosh Computer
Connect with Macintosh Computer When the computer recognizes the scanner [with an inserted memory card], the volume icon appears on the desktop. To view the contents of the CD, double-click the icon to open a Finders’ window. The scanner automatically turns off if it’s left idle for 3 minutes. Safely Disconnect the Scanner (Macintosh) Click and drag the volume icon on the desktop to Trash. -
Page 19: Pc System Requirements
PC System Requirements Personal computer with Pentium IV 599 MHz or higher processor Microsoft Windows XP Pro SP3, Windows Vista SP2, Windows 7 SP1 512 GB RAM 750 MB free hard disk space for installation Microsoft Internet Explorer 7.0 or higher Recommended: ... -
Page 20: Launch Pagemanager On Windows Pc
Presto_PMxxx_PC\Setup.exe* WINDOWS: Double-click Presto_PMxxx_Mac\PMxxx_Setup.mpkg* MAC: Click *x’s are replaced by the specific file name and version (i.e., Presto_PM9.08_PC and Setup.exe for PC, and Presto_PM9.08_Mac and PM9.08_Setup.mpkg for Mac). To install the CreateXEsoftware individually: Presto_PMxxx_PC\CreateXE\cxeinst.exe WINDOWS: Double-click Presto_PMxxx_Mac\CreateXE\cxeInstaller.dmg MAC: Click To install the Stitching software individually: Presto_PMxxx_PC\AutoStitch\Stitch_Setup.exe WINDOWS: Double-click Presto_PMxxx_Mac\AutoStitch\Stitch_Setup.pkg... -
Page 21: View Your Scanned Images In Pagemanager
You can drag frequently used folders to the Quick Links area. Folders dragged here are shortcuts only and not actual folders. You Quick Links can right-click shortcuts to open, rename, or remove them without affecting the real folders. Displays the folder organization for your computer just as in Tree View ... -
Page 22: Presto! Wrapper
original file. You can enter text, stamp, highlight, draw lines, and add notes. You can also choose from the Annotations menu to hide or show the annotations when viewing Page annotated files in view. Image Annotation Toolbar Display Area In the window, double-click an image thumbnail to open it Page view. -
Page 23: Optical Character Recognition (Ocr) - Pc
File name: d. In the field, enter the desired name for the executable file. Save e. Click 2. View with Presto! Wrapper [wrapper file].exe a. Double-click the file. The Presto! Wrapper viewer appears with image thumbnails displayed in the left pane. b. -
Page 24: Set Preferences
Save 8. Select the desired location for the new file, enter a file name, and then click Set Preferences Tools> Preferences Click and specify how you want PageManager to handle files. Save PDF Options – Set multiple options for saving PDF files. Tip Settings –... -
Page 25: Launch Pagemanager On Macintosh
Launch PageManager on Macintosh PageManager Desktop Click on the icon on the computer desktop. The opens: You can refer to the PageManager Help for more details than documented here. Provides the commands you use to perform the functions of the ... -
Page 26: Edit And Annotate Image
DCIM\100PHOTO DCIM\200DOC 2. Click on to view JPG images or to view PDF files. Import 3. Select one or more images, and then click When you select PDF files, you are prompted to select the preferred application for opening PDF files, PageManager or an associated application (i.e., Adobe Acrobat). -
Page 27: Convert Images To Text (Ocr)
Convert images to text (OCR) Tree View In the window, select a document thumbnail. Click the icon on the Command toolbar. The document is evaluated and text in the image is now recognized as editable text. Click the text and edit as desired. Save as When proofing is finished, save the OCR result by clicking the button... -
Page 28: Photo Stitching - Pc & Mac
Ph o to St it ch i n g – P C & M ac You can convert collective scanned JPG files in Panoramic photos by using the scanner’s Stitching (STC) mode and PageManager software. To use the image stitching feature effectively, you should scan your originals with the right edge of the original aligned against the left edge of the Stitch mark on the scanner. -
Page 29: Scanner Maintenance
Start.exe Double-click on To install a software program, click on the desired install button: Follow the on-screen instructions to complete the installation. You can view a video tutorial before installing to see what benefits each program offers to you, or view the video after installation for usage instructions. To view the video, click on the video play button at left of the desired software name. -
Page 30: Calibrate The Scanner
Remove the microUSB cable from the scanner and microUSB power adapter, and remove the power adapter from the wall outlet. Place the scanner, microUSB power adapter, and microUSB cable in a box or bag to keep them from accumulating dust. Place them in a cool and dry place, inaccessible to small children. -
Page 31: Li-Ion Battery Care
displayed on the LCD screen, and then the original calibration data will be restored. Repeat Step 7 until the flashing green indicator goes off. The scanner completes the calibration sequence and automatically shuts off. Carefully place the calibration sheet back into the plastic sleeve and store until next use. Li - io n B att er y C ar e Danger Warning: To prevent the possibility of the battery leaking, overheating or explosion, please observe the... -
Page 32: Storing The Scanner
Use only the battery provided with the scanner, a replacement battery provided by Sunglow, or a compatible battery purchased as an accessory from Sunglow. Sto r in g th e S c an n er If the scanner will not be used for a prolonged period of time, follow the instructions below to store the scanner for future use. - Page 33 Why doesn’t my computer recognize my scanner when it’s connected via the microUSB cable? Make sure the cable connection is secure. Restart the computer if necessary. How can I tell whether the scanner is scanning at 300DPI, 600DPI or 1200DPI? The color of the Scan button light indicates the selected resolution: Green = 300DPI, STDHQ Orange = 600DPI, Red = 1200DPI.
- Page 34 My browser or slideshow is not working? Since all browser settings are different, make sure no proxy is set, nor secured HTTP protocol is supported. Browsers like Google Chrome for PC don’t support slideshows with default settings, so you will need the navigation bar to maneuver your browsing. My browser can’t access the Easy View window and the Easy PhotoView slideshow window? When DNS is resolving your request to launch Easy View session, you can enter URL –...
-
Page 35: Information Codes
File name 4. Enter the desired 5. Please note that some programs can’t read multiple-page TIFF files correctly (i.e., PageManager ACDSee Windows Imaging Adobe Photoshop). read multiple-page TIFF files correctly. How do I use the basic Backup function? You can back up or restore important files, which are compressed as PMF files. Follow the instructions in the “Backing Up Files”... -
Page 36: Technical Specifications
Recalibrate the scanner. Follow Internal check failed and found Calibration Data the calibration instructions on calibration data error. page 30. Failure to correct will prevent user Charge the battery for at least 2 Low battery from updating firmware or calibrating hours before updating the warning the scanner, and scan quality may be... -
Page 37: Customer Support
LABOR: For a period of one (1) year from the date of purchase, if this Device is found to be defective, Sunglow will repair or replace the Device, at its sole option, at no charge. After this one (1) year period, labor charges will be charged on a case by case basis. -
Page 38: Disclaimer
D isc l a im er Sunglow North America, Inc. reserves the right to revise this publication and to make changes from time to time in the contents thereof without obligation to notify any person of such revision or changes. - Page 39 installing, copying, or otherwise using the Software, End User agrees to be bound by the terms of this EULA. If you do not agree to the terms of this EULA, do not install or use the Software. License This EULA grants End User the following non-exclusive rights to install and use the Software on a hard disk or other storage device;...
- Page 40 purpose. No oral or written information or advice given by NewSoft, its distributors, dealers, agents, or employees shall create a warranty or in any way increase the scope of this warranty and End User may not rely on any such information or advice.