Table of Contents
Advertisement
Advertisement
Table of Contents

Related Manuals for Pandigital S8X1103


Summary of Contents for Pandigital S8X1103
- Page 1 ORTABLE AND CANNER WITH EEDER User G uide S8X1103 v1.0...
-
Page 2: Table Of Contents
T a b l e o f C o n t e n t s Read This First ............................. 4 Important Safety Precautions ......................4 What’s in the Box ..........................5 ... - Page 3 Connect Scannerto a Computer ....................... 27 Computer System Requirements ....................27 Connect with Windows Vista or Windows 7 ..................28 Connect with Windows XP ......................28 Connect with Macintosh Computer ....................29 Presto! PageManager 9 ........................29 ...
-
Page 4: Read This First
R e a d T h i s F i r s t Please read the following important safety instructions carefully before using the scanner. Failure to observe these instructions may result in personal injuries or damages to the scanner. Important ... -
Page 5: What's In The Box
S o f t w a r e C D The software CD included with your scanner contains electronic versions of the Pandigital Quick Start Guide, User Guide, Presto! PageManager software for PC and Macintosh computers, and Photo Designer, a bonus graphic editing software. -
Page 6: Scanneroverview
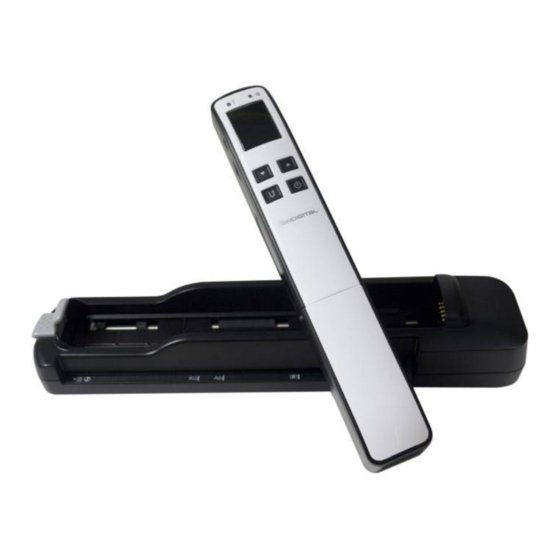
Œ No. Name Function/Description Hand-held Wand scans: the rollers are part of Pandigital’s ScanRite roller tracking technology for guiding your scans. Feed Sensor Rollers Sheet-fed with Feeder Dock: the rollers work with the feeder dock feed sensor rollers to feed originals through the feed slot. - Page 7 Ž Feeder D ock Œ ‘ ’ “ ” No. Name Function/Description Secures the scanner in the feeder dock. Press down on latch to Scanner latch insert and release scanner. Feeds originals through device while scanning.
-
Page 8: Scanner Led Indicator Lights
S c a n n e r L E D I n d i c a t o r L i g h t s Power Wi-‐Fi a nd LED lights indicate the scanner and Wi-Fi status, depending on the action, as specified below: Wi-Fi Scan Light... -
Page 9: Battery Performance
To increase your storage capacity, and to avoid running out of space while scanning, you can insert a SD card (not included) to continue scanning or you can move your scanned images from the built-in storage to a folder on your computer. Memory ... -
Page 10: Getting Started
G e t t i n g S t a r t e d b Remove packaging and scanner from the feeder c a dock: a) Press the latch. b) Lift the end of the scanner up to clear the latch. c) Pull the scanner out of the feeder dock to disengage from the connector. -
Page 11: Considerations For All Scanning
Turning t he S canner O ff To turn the scanner off, press and hold for three seconds. If using a SD card (not included), you can now safely remove the SD card from the scanner. The scanner has a power-saving feature which automatically turns the scanner off when it’s left idle for a specified number of seconds (if not connected to a computer). -
Page 12: Suitable And Unsuitable Original Types
When u sing m icroSD C ard ( not i ncluded w ith s canner) Do not remove a microSD card or disconnect the power supply while the indicators are blinking. ... -
Page 13: Stored File Folder Structure
Stored F ile F older S tructure The following folder structure is created automatically in the built-in storage or on a microSD card (not included) when the scanner is powered on, or first item is scanned to each storage area. - Page 14 Press to turn scanner off. Remove the scanner from the feeder dock: b a) Press the latch. c a b) Lift the end of the scanner up to clear the latch. c) Pull the scanner out of the feeder dock to disengage from the connector.
-
Page 15: Sheet-Fed Scanning With Feeder Dock
S h e e t -‐ f e d S c a n n i n g w i t h F e e d e r D o c k Always place the feeder dock on a flat surface for scanning. -
Page 16: Connect To Scanner Wi-Fi Access Point
Wi-‐Fi n etwork Mac users: Click the icon on the menu bar and select the network ID (Pandigital-XXXX). No password is required; wait for the connected status confirmation. Make sure you are connected to only one IP interface (either Wi-Fi or Ethernet port). -
Page 17: Menu Options Under Image Thumbnails
Settings Wi-‐Fi S ettings Android users: Go to → select → the network ID (Pandigital-XXXX), and then tap Connect . No password is required; wait for the connected status confirmation. d. Open an Internet Explorer window. Start Program F iles Internet ... -
Page 18: Exit Wi-Fi Mode
Note: The file path of the downloaded photos or document may varied depending on the manufacturer of the tablet and phones. E.g., some in microSD Card/download and some in internal memory user/download/. Pandigital configured their tablets in /download/photo. You can quickly delete image files from the scanner. -
Page 19: Preview Scanned Images On Lcd Screen
P r e v i e w S c a n n e d I m a g e s o n L C D S c r e e n You can quickly and easily preview your JPG scanned images on the LCD screen immediately after a scan, or at any other time you can view all images individually or as a slideshow. -
Page 20: Photo Stitching (Wand Scans Only)
P h o t o S t i t c h i n g ( w a n d s c a n s o n l y ) You can convert collective wand-scanned JPG files into panoramic photos by using the scanner’s Stitching (STC) mode and PageManager software. -
Page 21: Color Mode
However, a higher DPI also results in a larger image size and occupies more storage space. 300 D PI 600 D PI 1200 D PI The scanner includes three resolution modes, (default), , or 1200 DPI mode is not supported when scanning with feeder dock. To change the scanning resolution: With the “Scan Ready”... -
Page 22: Power Saving
With the “Scan Ready” screen displayed, press to enter Menu mode. Settings Press to select LCD o ff Press to scroll to , and then press to select it. Press to focus on the desired setting, and then press to select it. -
Page 23: Anti-Mirror (Wand Scans Only)
To change the orientation setting: With the “Scan Ready” screen displayed, press to enter Menu mode. Settings Press to select Orientation Press to scroll to , and then press to select it. Press to focus on the desired orientation, and then press to select it. -
Page 24: Auto-Crop (Sheet-Fed Scans Only)
Auto-‐crop ( sheet-‐fed s cans o nly) When using the feeder dock, the scanner has a built-in cropping function that detects and crops dark edges of an original and dark background around an original during the scan process (see following example). -
Page 25: Language
If the original is fed slightly crooked, the original is only cropped a maximum amount per following illustration: Original Cropped i mage 0.5mm 1.5mm When scanning darker originals, over-cropping may occur (see example below of night sky photo). Please insert the original in a different direction (orientation) and try again. -
Page 26: Calibration (As Needed Only)
To set the Date & Time: With the “Scan Ready” screen displayed, press to enter Menu mode. Settings Press to select Date & T ime Press to scroll to , and then press to select it. Press to navigate to each setting option. -
Page 27: Use Of Protective Sleeves (Optional)
U s e o f P r o t e c t i v e S l e e v e s ( o p t i o n a l ) 5”x7”... -
Page 28: Connect With Windows Vista Or Windows 7
Connect w ith W indows V ista o r W indows 7 When the computer recognizes the scanner with an inserted SDcard, an “AutoPlay” pop-up window appears.Select the settings as follows: Always d o t his f or p ictures ... -
Page 29: Connect With Macintosh Computer
Safely D isconnect t he S canner ( Windows) 1. On the Windows System Tray, click the hardware removal icon as indicated below. Hardware R emoval I con 2. Click the ‘Safely remove USB mass Storage device’ message with the corresponding Drive. -
Page 30: Features
PageManager s aves i n t he f ollowing f ile f ormats: BMP, PCX, GIF, TIFF, JPEG, PICT, TGA, PSD, Wrapper WINDOWS: Images Viewer, XPS Images BMP, JPEG, JPEG-2000, PICT, PNG, EXR, TIF, TIFF (multi- page), GIF, PSD, SGI, TGA MAC: Documents... -
Page 31: Software Installation
Wi-Fi connection is off. The scanner must be connected to the computer during software installation for the software to automatically activate. Turn the scanner on. Insert the Pandigital CD, containing the PageManager software, into the CD/DVD drive on your computer. WINDOWS: In a Windows Explorer window, click on the volume titled Pandigital\Software CD ... -
Page 32: Launch Pagemanager On Windows Pc
Launch P ageManager o n W indows P C PageManager D esktop Click on the icon on the computer desktop. The opens to display examples of supported files: Œ Ž ‘ ’ “... - Page 33 View y our S canned I mages i n P ageManager With the PageManager software launched, connect the scanner to your computer via the included microUSB cable or insert a SD card (not included) containing your Import ...
-
Page 34: Presto! Wrapper
Touch u p toolbar appears on the right side of the Click top icon screen. If it is not visible, click in the top right to display the corner. Touch up and Click t he t op p aint p allet i con t o d isplay t he Annotation toolbars Annotation ... -
Page 35: Optical Character Recognition (Ocr) - Pc
Import from Presto! Wrapper Tree V iew In the window, select or create a folder for the imported files. File > I mport f rom > P resto! W rapper Click Open [wrapper ... -
Page 36: Back Up/Restore Files
Compression – Images can be converted to JPEG file format in PageManager. JPEG I mage Q uality Click and slide the slider to set your preferred image quality. – Select the desired default language for OCR. Document ... -
Page 37: Launch Pagemanager On Macintosh
Launch P ageManager o n M acintosh PageManager D esktop Click on the icon on the computer desktop. The opens to display examples of supported files: Ž Œ ’ “ ‘ ” ... - Page 38 PD_SCAN\DCIM\100PHOTO Locate and click on t o view JPG images, PD_SCAN\DCIM\200DOC PD_SCAN\DCIM\300STC to view PDF files, and to view panoramic stitch JPG files Import Select one or more images, and then click When you select PDF files, you are prompted to select the preferred application for opening PDF files, PageManager or an associated application (i.e., Adobe Acrobat).
-
Page 39: Optical Character Recognition (Ocr) - Mac
Optical C haracter R ecognition ( OCR) -‐ M ac You can convert text in a scanned image to editable text using the OCR function. This function is only available for documents that are stored on your computer. You cannot convert documents that are stored in the scanner or on your SD card (not included). -
Page 40: Bonus Software Programs
Start > C omputer > If the directory for the CD drive does not open automatically, click CD/DVD d rive < > to open it. Pandigital\Software\Bonus In a Windows Explorer window, click on the volume titled Start.exe Double-click on ... -
Page 41: Clean The Scanner And Feeder Dock
C l e a n t h e S c a n n e r a n d F e e d e r D o c k In order to maintain the scanned image quality and prevent dust accumulation, it is recommended that you clean the scanner and feeder dock (outer casing and feed rollers) approximately every 200 scans, or if vertical lines or stripes appear on the scanned image. -
Page 42: Error Messages
Carefully place the calibration sheet back into the plastic cover and store until next use. WARNING: Do not interrupt the calibration sequence or try to shut off the device while it is calibrating. If you stop the calibration before it has completed, a calibration error may occur. - Page 43 Q: How can I tell whether the scanner is scanning at 300DPI, 600DPI or 1200DPI? A: The color of the Scan button light indicates the selected resolution: Green = 300DPI, Orange = 600DPI, Red = 12000 DPI. Use the Resolution option under Settings to set the resolution (1200 DPI mode is not supported when scanning with feeder dock).
- Page 44 If using a microSD card (not included): a. Is the microSD card inserted properly into the card slot? Re-insert the card and try again. b. Is the microSD card full? The indicator blinks when the free space on a microSD card is below 15MB.
- Page 45 Q: Are all browsers supported? A: All browsers have different configurations. The following browsers have been tested: Browser Version Internet Explorer 7.0, 8.0, & 9.0 19.0 PC and Mac – slideshow may not work Chrome depending on browser’s settings Safari 6.0 Mac, 5.1.7 PC iOS Safari...
-
Page 46: Presto Pagemanager 9
Q: What size originals can I feed through the feeder dock? A: Up to 8.5” x 14. Q: Do all scanner settings work the same as hand-held scanning when using the feeder dock? A: Yes, the settings are controlled by the scanner not the feeder dock. Presto PageManager 9 Q: How do I sort the thumbnails? A: Follow these steps to sort by Name, Type, Size, Date, Author or Keyword:... -
Page 47: Technical Specifications
Tree V iew In the window, click and drag the file that you want to print to the printer icon in File> P rint/Fax> [ our o utput p rinter] the Application bar. Or select the file and then click Q: How can I back up files containing annotations when moving them to a different computer? Backup... -
Page 48: Li-Ion Battery Care
Mass Storage Built-in 128MB NAND Flash Wand Manual with ScanRite Technology Scanner Feed Feeder Twin Roller Dock Lithium Ion NP-45 rechargeable battery pack included. (Battery performance varies by original size and various scanner settings; refer to page 9.) Scanner When the scanner is off and engaged in the feeder dock, the feeder Power dock charges the rechargeable battery. -
Page 49: Store The Scanner
The Limited Warranty set forth below is provided to you by Sunglow North America, Inc. (“Sunglow”) with respect to the Pandigital™ scanner products S8X1103 (the “Device”) purchased and used in the United States of America. Sunglow warrants this product as follows: LABOR: For a period of one (1) year from the date of purchase, if this Device is found to be defective, Sunglow will repair or replace the Device, at its sole option, at no charge. -
Page 50: Disclaimer
CONSEQUENTIAL DAMAGES, SO THE ABOVE EXCLUSION OR LIMITATION MAY NOT APPLY TO YOU. All content included on the Sunglow website as well as Pandigital Devices, including pre-loaded demonstration images, digital media, digital cookbooks, text, graphics, logos, designs, photographs, button icons, images, audio/video clips, digital downloads, data compilations, and software, are the property of Sunglow or its suppliers and is protected by United States and international copyright laws or other intellectual property laws and treaties. -
Page 51: Copyright
C o p y r i g h t Copyright © 2012 by Sunglow North America, Inc. All rights reserved. No part of this publication may be reproduced, transmitted, transcribed, stored in a retrieval system or translated into any language or computer language, in any form or by any means, electronic, mechanical, magnetic, optical, chemical, manual or otherwise, without the prior written permission of the company. - Page 52 same principal user of the Software, and an additional copy of the Software may be made to support such use. As used in this EULA, the Software is "in use" when it is either loaded into RAM or installed on a hard disk or other permanent memory device.
- Page 53 Remedy for breach of warranty NewSoft will repair or replace the Software and / or updates at no charge. If NewSoft cannot repair or replace it, NewSoft will refund the amount that End User paid for the Software. You must uninstall the Software and return any media and other associated materials to NewSoft with proof of purchase to obtain a refund.