Table of Contents
Advertisement
Quick Links
Advertisement
Table of Contents

Related Manuals for Supero AOC-SIMSO


Summary of Contents for Supero AOC-SIMSO
- Page 1 UPER ® AOC-SIMSO/SIMSO+ USER'S GUIDE Rev. 1.1c...
- Page 2 AOC-SIMSO/SIMSO+ User's Guide The information in this User’s Guide has been carefully reviewed and is believed to be accurate. The vendor assumes no responsibility for any inaccuracies that may be contained in this document, makes no commitment to update or to keep current the information in this user's guide, or to notify any person or organization of the updates.
-
Page 3: Table Of Contents
1.5 An Important Note to the User ..............1-5 1.6 Contacting Supermicro ................1-6 Chapter 2: Technical Specifications and Hardware Installation ..2-1 2.1 The Configuration of the AOC-SIMSO/SIMSO+ & the AOC-USB2RJ45..........................2-1 2.2 AOC-SIMSO/SIMSO+ Connector and Jumper Locations ....2-2 2.2.1 Front Components on the AOC-SIMSO(+) .......... -
Page 4: Chapter I: Introduction
With an independent Raritan KIRA100 processor built-in, the AOC-SIMSO/SIMSO+ provides the user with a solution to ease the complex and expensive systems, allowing an administrator to access, monitor, diagnose and manage network interfacing anywhere, anytime. -
Page 5: Product Features
Supermicro's Tech. Support. Please refer to the following checklist when contacting us. i. AOC-SIMSO/SIMSO+: ii. The SKT-0240L Kit (The SKT-0240L kit is included in the AOC-SIMSO+ shipping package Only. The SKT-0240L kit contains full-size and low profile I/O backplates, a USB2RJ45 add-on card, and a CBL-0165L cable.) iii. CDR-SIMIPMI: One Installation CD iv. -
Page 6: Contacting Supermicro
AOC-SIMSO/SIMSO+ User's Guide 1.6 Contacting Supermicro Headquarters Address: SuperMicro Computer, Inc. 980 Rock Ave. San Jose, CA 95131 U.S.A. Tel: +1 (408) 503-8000 Fax: +1 (408) 503-8008 Email: marketing@supermicro.com (General Informaion) support@supermicro.com (Technical Support) Web Site: www.supermicro.com Europe Address: SuperMicro Computer B.V. -
Page 7: Chapter 2: Technical Specifications And Hardware Installation
(CBL-0165L) for External LAN access. One end of the CBL-0165L cable is con- nected to the mini USB connector (J1) located on the AOC-SIMSO(+) card and the other end to that of the AOC-USB2RJ45 card. There are two LEDs located on the LAN port to indicate network links and activities. -
Page 8: Aoc-Simso/Simso+ Connector And Jumper Locations
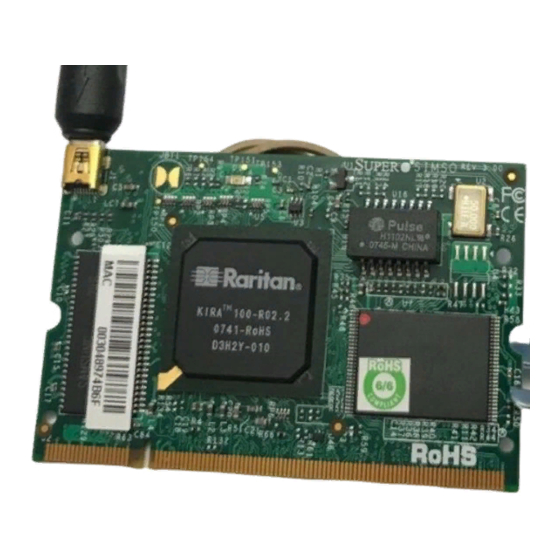
AOC-SIMSO/SIMSO+ User's Guide 2.2 AOC-SIMSO/SIMSO+ Connector and Jumper Locations Front View 2.2.1 Front Components on the AOC-SIMSO(+) 1. Raritan's Kira 100 RISC System on Chip 2. Firmware with Linux System & Boot ROM 3. Transformer 4. SDRAM (128Mb/133MHz) 5. J1: Mini USB 9-pin Connector (Note) 6. -
Page 9: Connector Descriptions And Pin Definitions
If a cable is not detected, the AOC-SIMSO(+) will transfer the "Remote Control" Function to LAN1 on the motherboard. If a cable is detected, the AOC-SIMSO(+) will use the dedicated LAN on the card to manage motherboard activities via Remote Console. -
Page 10: Led Descriptions And Pin Definitions
AC power-on or reset, the Heartbeat LED is off for about a minute. Then, the Heartbeat LED will be on again to indicate that the AOC-SIMSO(+) is active. See the table on the right for details. #8 Dedicated LAN LED Indicators... -
Page 11: Rear Components On The Aoc-Simso(+)
Chapter 2: Technical Specifications and Installation Rear View 2.2.5 Rear Components on the AOC-SIMSO(+) Rear Side Components 1. SDRAM (64Mb/133MHz) 2. V-SDRAM (64Mb/166MHz) 3. PHY... -
Page 12: Block Diagram
AOC-SIMSO/SIMSO+ User's Guide 2.3 Block Diagram... -
Page 13: Installing The Aoc-Simso(+)
For SIMSO slot loca- tions, please refer to Section 2.4.2. SMC Motherboards with SIMSO(+) support The following Supermicro's motherboards support the AOC-SIMSO(+). 1. The X7DBR-8/X7DBR-i Series 2. The X7DBR-3/X7DBR-E Series... -
Page 14: Simso Slot Locations
AOC-SIMSO/SIMSO+ User's Guide 2.4.2 SIMSO Slot Locations To properly use the AOC-SIMSO(+), be sure to install it in the right slot. Refer to the MB layouts below for SIMSO slot locations. 1. The X7DBR-8/X7DBR-i Series SIMSO Slot (JIPMI) 2. The X7DBR-3/X7DBR-E Series SIMSO Slot (JIPMI) 3. -
Page 15: Chapter 3: Software Application And Usage
Set Gateway IP (format: ###.###.###.###) Note 2: For the H8QM8-2(+)/H8QME-2(+) motherboards, the AOC-SIMSO(+) IPMI card has to flash the firmware bin from \Firmware\H8Qxx-x in the Driver CD. If this AOC-SIMSO(+) is used on the onboard LAN1 of the H8QM8/E- 2(+), you can only use the IPMIView utility to access the AOC-SIMSO(+) IPMI card. - Page 16 AOC-SIMSO/SIMSO+ User's Guide To Access the SIMSO/SIMSO+ Card from a Computer Using the H8QM8-2(+)/H8QME-2(+) Motherboards A. Using the Onboard LAN1 Connection 1. Choose a computer that is connected to the same network and open the IPMIView utility. 2. Go to File>New>System. Type System Name, IP Address of LAN1, Description in the appropriate blanks and press the <Enter>...
-
Page 17: Home Page
Chapter 3: Software Application and Usage 3.1 Home Page Home Remote Console Screen Logout Console 3.1.1 Buttons from the Home Page Home: Click this icon to return to the Home Page. Console: Click this icon to go to the Remote Console Screen. Remote Console Screen: Displayed in the window is Remote Console Screen. - Page 18 AOC-SIMSO/SIMSO+ User's Guide 3.1.2 Function Keys from the Home Page Click on these function keys to use the functions as specified below. 1. Remote Control: Click on this icon for remote access and management of Video Console Redirection. 2. Virtual Media: Click on this icon to use virtual remote media devices.
-
Page 19: Functions Listed On The Home Page
Chapter 3: Software Application and Usage 3.2 Functions Listed on the Home Page 3.2.1. Remote Control Click on the icon of Remote Control to activate its submenus-KVM Console and Remote Power as listed below. a. KVM Console Click on this item to configure keyboard, mouse or video settings for the remote host. - Page 20 AOC-SIMSO/SIMSO+ User's Guide b. Remote Power Click on this item to configure the power settings for Remote Console as shown below. Remote Power Screen Explanation of Functions Power On: Click on this icon to power on the remote host. Power Down: Click on this icon to power down the remote host.
-
Page 21: Virtual Media
Chapter 3: Software Application and Usage 3.2.2. Virtual Media Click on the Virtual Media icon on the Home Page to activate its submenus-Floppy Disk, CD-ROM, Drive Redirection and Options as listed below. a. Floppy disk Floppy Disk Screen Explanation of Functions Floppy Disk: Click on this function key to upload the data stored in the local floppy disk image to the remote host. - Page 22 AOC-SIMSO/SIMSO+ User's Guide b. CD-ROM Image CD-ROM Image Screen Explanation of Functions CD-ROM image: Click on this function key to share data stored in your local CD-ROM drive with other users in the remote host through the Windows Share application via USB.
- Page 23 Chapter 3: Software Application and Usage c. Drive Redirection Drive Redirection Screen Explanation of Functions Drive Redirection: Click on this function key to make lo- cal drives accessible for other users via console redirec- tion. This function allows you to share your local drives (Floppy, CD-ROM and HDDs) with users in the remote systems.
- Page 24 AOC-SIMSO/SIMSO+ User's Guide d. Virtual Media Options Virtual Media Options Screen Explanation of Functions Options: Click on this function key to activate the Virtual Media sub-menu. Virtual Media Options: Use this option to disable or en- able USB MASS storage in the remote host. Check this...
-
Page 25: System Health
Chapter 3: Software Application and Usage 3.2.3. System Health Click on the System Health icon on the Home Page to activate its submenus: Chas- sis Control, Monitor Sensor, System Event Log and Alert settings as listed below. System Health Screen a. - Page 26 AOC-SIMSO/SIMSO+ User's Guide Power Control The following Power Control items are included: Refresh: Click on this icon to refresh the screen of the re- mote host. Power On: Click on this icon to power on the system for the remote host.
- Page 27 Chapter 3: Software Application and Usage b. Monitor Sensors Monitor Sensors Screen Monitoring Sensor: Click on this function key to display the following Health Moni- toring Information shown in the following table: 3-13...
- Page 28 AOC-SIMSO/SIMSO+ User's Guide Health Monitoring Sensor Information on the Remote Host Temperature Monitoring CPU1 Temperature Temp A: CPU1 Core1 Temperature, Temp B: CPU1 (Temp A, Temp B) Core2 Temperature, CPU2 Temperature Temp A: CPU2 Core1 Temperature, Temp B: CPU2 (Temp A, Temp B)
- Page 29 Chapter 3: Software Application and Usage c. System Event Log System Event Log Screen System Event Log: Click on this function key to display the System Health Event Log for the remote host system. 3-15...
- Page 30 AOC-SIMSO/SIMSO+ User's Guide d. Alert Settings Alert Settings Screen Alert Settings: Click on this function key to activate the alert settings submenu for the remote host system. The items monitored include: 1. Filter List, 2. Policy List and 3. LAN Destination List...
-
Page 31: User Management
Chapter 3: Software Application and Usage 3.2.4. User Management Click on the User Management icon on the Home Page to activate its submenus: Change Password, Users & Group and Permissions as listed below. User Management Screen a. Change Password User Management: Click on this icon to activate the User Management submenu. Once this submenu displays, you can access the New Password fields. - Page 32 AOC-SIMSO/SIMSO+ User's Guide b. Users & Groups-User Management and Group Management Users & Groups: Click on this icon to activate the Users & Groups submenu. User Management: This window displays the user's information. Existing users: Select an existing user for information updates. Once a user is se- lected, click on the "Lookup" icon on right to view user information.
- Page 33 Chapter 3: Software Application and Usage IPMI Privilege Level: Click on the arrow key on the right to activate the Privilege Selection menu. The IPMI Privilege Level contains five categories: No Access, User, Operator, Administrator and OEM. Create: Click on this button to enter a new user's or group information in the User/ Group Management fields.
- Page 34 AOC-SIMSO/SIMSO+ User's Guide c. Permissions Permissions: Click on this icon to activate the User/Group Permissions submenu. Show Permissions for User/Group: click on the arrow on the right to activate the user/group permissions selection menu. Update: Click this icon to update permissions information.
-
Page 35: Kvm Settings
Chapter 3: Software Application and Usage 3.2.5. KVM Settings Click on the KVM Settings icon on the Home Page to activate its submenus: User Console and Keyboard/Mouse as listed below. a. User Console KVM Settings: User Console 3-21... - Page 36 AOC-SIMSO/SIMSO+ User's Guide a. User Console 1. User Console: Click on this icon to activate the User Console submenu. 2. User Selection: This field allows you to decide which group the user belongs to. Click on the arrow on the right to activate the selection menu and highlight the name of the group to select it.
- Page 37 Chapter 3: Software Application and Usage 14. Miscellaneous Remote Console Settings: This window allows you to specify the following Remote Console Settings. 15. Start in Monitor Mode: Check this box to enable the Start in Monitor Mode which will allow data to be displayed in the remote monitor as soon as Remote Con- sole is activated.
- Page 38 AOC-SIMSO/SIMSO+ User's Guide b. Keyboard/Mouse KVM Settings: Keyboard/Mouse 1. Keyboard/Mouse: Click on this function key to configure the following Keyboard/ Mouse Settings. 2. Key Release Timeout: Check this box to enable the function of "Key Release Timeout," which will set the time limit for a key to be pressed by the user. 3. Timeout after_______msec: If the "Key Release Timeout" indicated above has been enabled, click on the arrow on the right to activate a selection menu to select the timeout setting for the item above.
-
Page 39: Device Settings
Chapter 3: Software Application and Usage 3.2.6. Device Settings Click on the Device Settings icon on the Home Page to activate its submenus: Net- work, Dynamic DNS, Security, Certificate, Date/Time, Event Log and SNMP Settings as listed below. a. Network Device Settings: Network a. Network 1. Device Settings: Click on the Device Settings icon to activate its submenus: Network, Dynamic DNS, Security, Certificate, Date/Time, Event Log and SNMP Set- tings. - Page 40 AOC-SIMSO/SIMSO+ User's Guide 3. Network Basic Settings: This window allows you to configure basic settings for your network. 4. IP Auto Configuration: Click on the box to activate the selection menu and select a desired item from the list. The options are None, DHCP, and BOODP. 5. Preferred Host Name (DHCP only): Enter a Preferred Host Name in the box.
- Page 41 Chapter 3: Software Application and Usage b. Dynamic DNS Device Settings: Dynamic DNS b. Dynamic DNS 1. Dynamic DNS: Click on this function key to activate its submenu and configure the following Dynamic DNS (-Domain Name Server) settings as listed below. 2. Enable Dynamic DNS: Check this box to enable the Dynamic DNS service. 3.
- Page 42 AOC-SIMSO/SIMSO+ User's Guide 9. Check Interval: Enter the interval for the IPMI to report to the Dynamic DNS again. 10. Delete Saved External IP Address: Click on the Delete Icon to delete the IP Address for an external system that has been previous entered and saved.
- Page 43 Chapter 3: Software Application and Usage c. Security Device Settings: Security c. Security 1. Security: Click on this function key to activate its submenu and configure the fol- lowing Security settings as listed below. 2. Encryption Settings: This window allows you to configure encryption settings. 3. Force HTTPS for Web Access: Check this box to enable the function-Force HTTPS for Web Access. If enabled, you will need to use an HTTPS connection to access to the web.
- Page 44 AOC-SIMSO/SIMSO+ User's Guide 6. Enable IP Access Control: Check this box to enable the function of IP Access Control. This function is used to limit user access to the network by identifying them by their IP addresses. (This function is available to the LAN interface only.) 7.
- Page 45 Chapter 3: Software Application and Usage d. Certificate Device Settings: Certificate d. Certificate 1. Certificate: Click on this function key to activate its submenu and configure the following Certificate settings as listed below. 2. Certificate Signing Request (CSR): This window allows you to define the Cer- tificate Signing Request (CSR) form. The IPMI uses the Secure Socket Layer (SSL) protocol for encrypted network traffic between itself and the remote host servers. When a connection is made, the IPMI has to expose its identity to a remote host by using a cryptographic certificate.
- Page 46 AOC-SIMSO/SIMSO+ User's Guide 3. Common Name: Enter the (fully qualified domain) network name of the IPMI. 4. Organization Unit: Enter the name of the department within an organization that the IPMI belongs to. 5. Organization: Enter the name of the organization that the IPMI belongs to. 6. Locality/City: Enter the name of the city or the location where the organization is located.
- Page 47 Chapter 3: Software Application and Usage e. Date/Time Device Settings: Date/Time e. Date/Time 1. Date/Time: Click on this function key to activate its submenu. This feature allows you to set the internal realtime clock for your SIMLP card. 2. UTC Offset: This window allows you to offset the UTC Timer. 3.
- Page 48 AOC-SIMSO/SIMSO+ User's Guide f. Event Log Device Settings: Event Log 3-34...
- Page 49 Chapter 3: Software Application and Usage f. Event Log 1. Event Log: Click on this function key to activate its submenu. This feature allows you to set Event Log Targets and Event Log Assignment. 2. Event Log Targets: This section allows you to manually set the event log targets and settings.
- Page 50 AOC-SIMSO/SIMSO+ User's Guide g. SNMP Settings Device Settings: SNMP Settings g. SNMP Settings 1. SNMP Settings: Click on this function key to activate its submenu. This feature allows you to configure Simple Network Management Protocol settings. 2. Enable SNMP Agent: Check the box to enable the SNMP Agent and allow it to interface with your SIMLP card.
- Page 51 Chapter 3: Software Application and Usage 5. System Location: Enter the physical location of the SNMP host server. This loca- tion will be used in response to the SNMP request as "sysLocation0." 6. System Contact: Enter the name of the contact person for the SNMP host server. This value will be referred to as "sysContact0." 7. Click here to view the SNMP MIB: Click this link to view the SMLP card SNMP MIB file. This file may be necessary for an SNMP client to interface with the SIMLP card.
-
Page 52: Maintenance
AOC-SIMSO/SIMSO+ User's Guide 3.2.7 Maintenance Click on the Maintenance icon on the Home Page to activate its submenus: Device Information, Event Log, Update Firmware and Unit Reset Settings as listed below. a. Device Information Maintenance: Device Information 1. Device Information: Click on this function key to activate its submenu. This fea- ture displays the information of the SIMLP card and its firmware. - Page 53 Chapter 3: Software Application and Usage b. Event Log Maintenance: Event Log 1. Event Log: Click on the function key on the left to activate the Event Log submenu. Once the submenu is displayed, the Event Log List will display. The Event Log List contains the information of events that are recorded by the SIMLP in the order of Date/Time, Types, and the descriptions of the events including the IP address(es), person(s) and activities involved.
- Page 54 AOC-SIMSO/SIMSO+ User's Guide c. Update Firmware Maintenance: Update Firmware 1. Update Firmware: Click on this function key to enable "Update Firmware." 2/3. Firmware File: Enter the name of the firmware you want to update or click on the "Browser" icon to select the firmware file. 4. Update: Click on the "Upload" icon to upload the firmware file to the server for the update. (Note: This process is not reversible once the firmware is updated, so pro- ceed with caution. It might take a few minutes to complete the procedure.) 3-40...
- Page 55 Chapter 3: Software Application and Usage d. Unit Reset Maintenance: Unit Reset 1. Unit Reset: This feature allows you to reset the following components: 2. Reset Keyboard/Mouse: Click the "Reset" icon to reset Keyboard/mouse. 3. Reset USB: Click the "Reset" icon to reset the USB module. 4. Reset Video Engine: Click the "Reset" icon to reset Video and its controller. 5. Reset Device: Click the "Reset" icon to cold reset the IPMI firmware. 3-41...
-
Page 56: Remote Console Main Page
AOC-SIMSO/SIMSO+ User's Guide 3.3 Remote Console Main Page Log Out Click to Open Home Console Remote Console Preview Screen Refresh Reset Power On Power Down After you have entered the correct IP address for your remote console and typed in correct user name and password, you should be connected to the remote console. -
Page 57: Remote Console Options
Chapter 3: Software Application and Usage 3.3.1 Remote Console Options After the remote console screen appears, click on the button "Option" on the very upper right corner to display the Options Menu as shown below. Options Menu Options No KB/Mouse: a. Options Menu Items (Crossed-out) The following items are included in the Options Menus: 1. - Page 58 AOC-SIMSO/SIMSO+ User's Guide 6. Chat Window: This item allows the user to communicate with other users logged in the same remote host by clicking on the Chat Window button. The screen below shows a Chat Window displayed in a scaled down remote console screen.
- Page 59 Chapter 3: Software Application and Usage 7. Video Settings: This item allows the user to set the monitor display settings by clicking on the Video Settings button (marked "1" below.) After you've clicked the Video Settings button, the submenu displays as shown below. Video Settings Button Video Settings Submenu Use your cursor pointer to click on the triangles (marked 2 and 3) to adjust the setting for each of the following items: i.
- Page 60 AOC-SIMSO/SIMSO+ User's Guide 8. Soft Keyboard: This item allows the user to use the soft keys that have been pre-installed in the "Soft Keyboard" of the particular language selected. After you've clicked the Soft Keyboard button, the submenu displays as shown below. Keys in the Soft Keyboard Language List Keys in English Soft Keyboard i Soft Keyboard: Click on this button to use the pre-installed soft keys or to select keyboard language.
- Page 61 Chapter 3: Software Application and Usage 9. Local Keyboard: This item allows the user to manually change the local keyboard setting for interaction with a remote host. Use this function to change the language mapping of your browser machine running the remote console host. After you have clicked Local Keyboard button, the submenu displays as shown below.
- Page 62 AOC-SIMSO/SIMSO+ User's Guide 10. Hot Keys: This item allows the user to select a pre-defined hot key from a hot key list. Once a hot key is selected, the command associated with the hot key will be sent to the remote console host for execution. After you've clicked Hot Key button, the submenu displays as shown below.
- Page 63 Chapter 3: Software Application and Usage 11. Remote Console Interface Window: This item allows the local host to interact with a remote server. Through the Remote Console Interface Window, the user can share files stored in the local drive with a user connected to the remote server, down- load data from a local drive to the remote server, issue commands to manage the remote server, or allow the remote server be controlled and managed by a local user logged in the remote server.
- Page 64 AOC-SIMSO/SIMSO+ User's Guide i./ii. Local Drive List: The box displays a list of local drives available for remote ac- cess. Select from the list a local drive that you want to make accessible for a remote server. iii. Refresh: Click this button to refresh the local drive list.
- Page 65 Chapter 3: Software Application and Usage Confirming Message 3-51...
- Page 66 AOC-SIMSO/SIMSO+ User's Guide To Log Out Return to the Home Page and click on the "Log Out" button to log out from Remote Console Interface. Logout 3-52...
-
Page 67: Chapter 4: Frequently Asked Questions
Chapter 4: Troubleshooting Chapter 4 Frequently Asked Questions 1. Questions: How do I flash the firmware of an IPMI card such as a SIMSO card or a SIMSO+ card? Answer: • 1. Log on to the web interface page of the IPMI card by typing the IP address of the card. • 2. Click on the maintenance button. • 3. Browse to choose the correct file to flash the firmware. • 4. Click on the "Update Firmware" button and proceed with firmware flashing. 2. - Page 68 AOC-SIMSO/SIMSO+ User's Guide Notes...