Jet JPS-10TS Operating Instructions And Parts Manual
10-inch proshop table saw with riving knife
Hide thumbs
Also See for JPS-10TS:
- Operating instructions and parts manual (32 pages) ,
- Brochure (2 pages) ,
- Specifications (2 pages)
Table of Contents
Advertisement
This .pdf document is bookmarked
Operating Instructions and Parts Manual
10-inch ProShop
Table Saw
™
with Riving Knife
Model JPS-10TS
(shown with steel wings and 30" rail set)
for serial no. 11120136 and higher
WALTER MEIER (Manufacturing) Inc.
427 New Sanford Road
LaVergne, Tennessee 37086
Part No. M-708490
Ph.: 800-274-6848
Revision B1 04/2012
www.waltermeier.com
Copyright © 2012 Walter Meier (Manufacturing) Inc.
Advertisement
Table of Contents

Related Manuals for Jet JPS-10TS


Summary of Contents for Jet JPS-10TS
-
Page 1: Table Saw
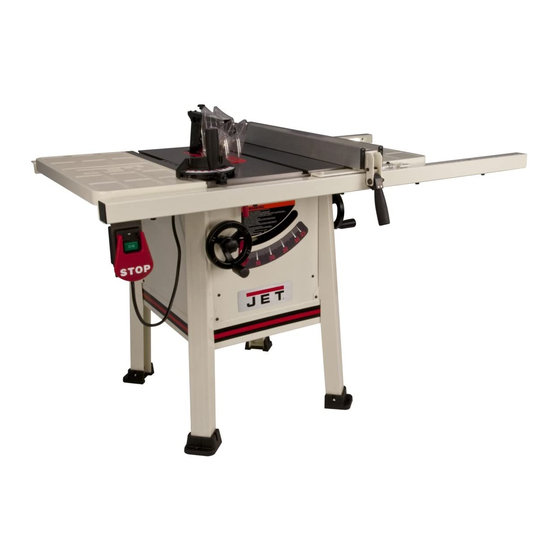
Operating Instructions and Parts Manual 10-inch ProShop Table Saw ™ with Riving Knife Model JPS-10TS (shown with steel wings and 30” rail set) for serial no. 11120136 and higher WALTER MEIER (Manufacturing) Inc. 427 New Sanford Road LaVergne, Tennessee 37086 Part No. -
Page 2: Warranty And Service
Walter Meier is consistently adding new products to the line. For complete, up-to-date product information, check with your local Walter Meier distributor, or visit waltermeier.com. WARRANTY JET products carry a limited warranty which varies in duration based upon the product (MW = Metalworking, WW = Woodworking). WHAT IS COVERED? This warranty covers any defects in workmanship or materials subject to the exceptions stated below. -
Page 3: Table Of Contents
12.0 Safety devices.......................... 24 13.0 Maintenance ..........................25 14.0 Optional accessories ........................ 26 15.0 Troubleshooting the JPS-10TS....................27 16.0 Replacement Parts ........................27 16.1.1 Motor and Trunnion – Exploded View .................. 28 16.1.2 Motor and Trunnion – Parts List ..................29 16.2.1 Table and Cabinet –... -
Page 4: Safety Warnings
• Lead from lead based paint. • Crystalline silica from bricks, cement and other masonry products. • Arsenic and chromium from chemically 3.0 Safety warnings treated lumber. 1. Read and understand the entire owner's Your risk of exposure varies, depending on manual before attempting assembly or how often you do this type of work. -
Page 5: Kickback
23. Give your work undivided attention. Looking Kickback can also result in the operator’s hands around, carrying on a conversation and being pulled into the blade. “horse-play” are careless acts that can result Kickback Prevention in serious injury. Tips to avoid the most common causes of 24. -
Page 6: About This Manual
4.0 About this manual This manual is provided by Walter Meier (Manufacturing) Inc. covering the safe operation and maintenance procedures for a JET Model JPS-10TS ProShop™ Table Saw. This manual contains instructions on installation, safety precautions, general operating procedures, maintenance instructions and parts breakdown. -
Page 7: Glossary
5.0 Glossary Arbor: Metal shaft that connects the drive Parallel: Position of the rip fence equal in mechanism to the blade. distance at every point to the side face of the saw blade. Bevel Edge Cut: Tilt of the saw arbor and blade Perpendicular: 90°... -
Page 8: Features
6.0 Features Figure 1 7.0 Specifications Model number ..............................JPS-10TS Stock numbers: (Steel Wings) (Cast Iron Wings) Saw Unit only with Steel Wings ............708490 ..............Saw Unit only with Cast Iron Wings ........................708491 Saw with 30” Rails/Fence Kit............708492K ..........708494K Saw with 52”... - Page 9 Arbor and blade: Blade included ............................40 Tooth, ATB Blade diameter ............................10” (254mm) Arbor diameter............................. 5/8” (15.88mm) Arbor speed (RPM) ..............................4000 Arbor lock ................................yes Maximum depth of cut at 90 degrees ....................3-1/8” (79mm) Maximum depth of cut at 45 degrees ....................2-1/8” (54mm) Maximum rip to right of blade ..................
-
Page 10: Setup And Assembly
8.0 Setup and assembly Hardware Package (p/n JPS10TSR-HP) Remove contents from all packets and sort. Use 8.1 Shipping contents Figures 3 and 4 to help identify hardware. Carton contents (see Figure 2) Lock knob (HP-1) Bushing (HP-2) NOTE: Some parts may have come pre- Knobs for dust hood (HP-3) assembled to the table saw. -
Page 11: Unpacking And Cleanup
10mm wrench. 8.4 Handwheels Figure 6 Referring to Figure 6: The JPS-10TS Table Saw is equipped with two handwheels which look identical except for the mounting holes, as follows: 1. On front of table saw, slide bushing (HP-2) onto shaft (A) followed by handwheel (C) -
Page 12: Extension Wings
Tighten these just enough to hold the wing in place but loose enough to change An extensive line of JET dust collectors is the wing height by tapping on it. available – contact your dealer or visit our 2. -
Page 13: Riving Knife
be necessary. However, proper alignment is very important. Before operating table saw, read section 8.15 – Aligning Blade Guard and Riving Knife, to verify and follow the adjustment procedure if necessary. 8.12 Anti-kickback pawls Referring to Figures 12. 1. Push and hold the button (A) on the opposite side of the head to release the catch pin. -
Page 14: Blade Guard
1. Using the handwheels, raise the blade arbor fully and lock saw at zero degrees by tightening lock knob at center of handwheel. Referring to Figure 16: 2. Press arbor lock button (E) and rotate arbor until you feel arbor lock engage. Continue pressing arbor lock button. -
Page 15: Aligning Blade Guard And Riving Knife
8.17 Table insert 8.15 Aligning blade guard and riving Referring to Figure 18: knife 1. Remove blade guard and riving knife. Referring to Figure 17: 2. Lower blade completely. 1. Remove blade guard and hold anti-kickback pawls (J) away from table surface, or 3. -
Page 16: Electrical Connections
9.0 Electrical connections This tool is intended for use on a circuit that has The JPS-10TS table saw is rated at 115/230V an outlet that looks like the one illustrated in A, power, and is pre-wired for 115 volt. The table Figure 20. -
Page 17: Overload Reset Button
junction box (A, Figure 21), tilt blade to 45 shown in Figure 22. To safeguard your machine degrees, and remove right side cover. from unauthorized operation and accidental starting by young children, the use of a padlock (not included) is highly recommended. Place the key in a location that is inaccessible to children and others not qualified to use the tool. - Page 18 3. Set blade 90º to table by turning blade tilting 9. Place a square (D, Figure 25) on the table handwheel (D, Figure 23) counterclockwise and verify that blade (E, Figure 25) is at 45º as far as it will go. Do not force beyond stop. to table.
-
Page 19: Table To Blade Alignment
Figure 26 Figure 28 10.3 Table to blade alignment 6. Lower blade all the way down. Remove blade guard and riving knife and any loose Refer to Figures 27 and 28. items from table top. The table has been set square with blade by the 7. - Page 20 Not maintaining alignment of the rip fence so that it tends to angle toward rather than away from the saw blade front to back. Applying feed force when ripping to the cutoff (free) section of the workpiece instead of the section between saw blade and fence.
- Page 21 Never reach behind the blade with either hand to hold down or remove the cutoff piece with the saw blade rotating. Always use blade guard, splitter/riving knife and anti-kickback pawls. Make sure splitter/riving knife is properly aligned. When wood is cut along the grain, the kerf tends to close and bind on the blade and kickbacks can occur.
- Page 22 Resawing Resawing is a ripping operation in which thick boards are cut into thinner ones. Narrow boards up to 3" can be resawn in one pass. Wider boards up to 6" must be resawn in two passes. In resawing wider boards, adjust the blade height so as to overlap the two cuts by 1/2"...
- Page 23 Provide auxiliary support for any workpiece Have the blade extend only 1/8" above the top of extending beyond the table top with a tendency the workpiece. Exposing the blade above this to sag and lift up off the table. point can be hazardous. Dado cutting –...
-
Page 24: Safety Devices
12.0 Safety devices Feather board The feather board (Figure 42) should be made of straight grain hardwood approximately 1" thick and 4" to 8" wide depending on the size of the machine. The length is developed in accordance with intended use. Feather boards can be fastened to the table or rip fence by use of C-clamps. -
Page 25: Maintenance
Failure to do this may result in serious personal injury. Cleaning Clean the JPS-10TS according to the schedule below to ensure maximum performance. Note—The following maintenance schedule assumes the saw is being used every day. -
Page 26: Optional Accessories
14.0 Optional accessories These accessory items, purchased separately, can enhance the functionality of your table saw. Contact your dealer to order, or call Walter Meier at the phone number on the cover. # 708489 – Dado Insert for ProShop Saw with Riving Knife # 708119 –... -
Page 27: Troubleshooting The Jps-10Ts
15.0 Troubleshooting the JPS-10TS Symptom Possible Cause Correction Motor will not start Low voltage. Check power line for proper voltage. Open circuit in motor or loose Inspect all lead connections on motor for connection. loose or open connections. Motor will not start: fuses Short circuit in line cord or plug. -
Page 28: Motor And Trunnion - Exploded View
16.1.1 Motor and Trunnion – Exploded View... -
Page 29: Motor And Trunnion - Parts List
32 .... JWTS10-132 ....Flange ................... 1 33 .... JWTS10-133 ....Arbor Nut .............5/8”-12 ....... 1 34 .... JETLOGO-1 ....JET Logo Plate ................1 35 .... TS-1522011 ....Socket Set Screw .........M5x6 ......2 36 .... JPS10TS-136 ....Fixing Ring ..................1 37 .... - Page 30 Index No Part No Description Size 55 .... JWTS10-155 ....Wave Washer ..........WW-16 ...... 1 56 .... LM000636 ....Warning Label................1 57 .... JPS10TSR-157.... Angle Scale ................... 1 58 .... TS-1541011 ....Nylon Lock Hex Nut........M5 ......2 59 .... JWTS10-159 ....Collar .................... 1 60 ....
- Page 31 106 ..TS-152705 ....Angle Wrench (not shown) ......4mm ......1 107 ..JPS10TSR-107.... Nylon Socket Head Cap Screw .....M6x15......1 ....STRIPE-1-3/4 ....JET Stripe (not shown) .........1-3/4” w....per ft....JPS10TSR-HP..... Hardware Package (see section 8.1 for included items) ....1...
-
Page 32: Table And Cabinet – Exploded View
16.2.1 Table and Cabinet – Exploded View... -
Page 33: Table And Cabinet – Parts List
16.2.2 Table and Cabinet – Parts List Index No Part No Description Size 1 ....JPS10TSR-301..Table ....................1 2 ....JPS10TS-302 ..Left Steel Extension Wing ..............1 3 ....JPS10TS-303 ..Right Steel Extension Wing ..............1 4 ....TS-2361081 ....Lock Washer ............M8 ......3 5 .... - Page 34 Index No Part No Description Size 54 .... JPS10TSR-354..Lock Knob ..................1 55 .... JPS10TSR-355..Support Arm ..................1 56 .... JPS10TSR-356..Left Fixing Bracket ................2 57 .... JPS10TSR-357..Right Fixing Bracket ................2 58 .... TS-1532032 ....Phillips Pan Head Machine Screw......M4-0.7Px10....2 59 ....
-
Page 35: Stand Assembly - Exploded View
16.3.1 Stand Assembly – Exploded View 16.3.2 Stand Assembly – Parts List Index No Part No Description Size 1 ....TS-2246122 ....Socket Head Button Screw ........M6x12...... 16 2 ....JPS10TSR-402..Leg ....................4 3 ....TS-1482031 ....Hex Cap Screw ..........M6x16......8 4 .... -
Page 36: Cast Iron Wings - Exploded View
16.4.1 Cast Iron Wings – Exploded View 16.4.2 Cast Iron Wings – Parts List Index No. Part No. Description Size 1 ....JPS10TS-501 ..Cast Iron Wing..................2 2 ....TS-1490031 ....Hex Cap Screw ..........M8x20......8 3 ....TS-1550061 ....Flat Washer .............M8 ......8... -
Page 37: Electrical Connections - 115V
17.1 Electrical Connections – 115V... -
Page 38: Electrical Connections - 230V
17.2 Electrical Connections – 230V... - Page 40 WALTER MEIER (Manufacturing) Inc. 427 New Sanford Road LaVergne, Tennessee 37086 Phone: 800-274-6848 www.waltermeier.com...