Table of Contents
Advertisement
USER'S MANUAL
Thank you very much for purchasing this product.
To ensure correct and safe usage with a full understanding of this product's performance, please be
sure to read through this manual completely and store it in a safe location.
Unauthorized copying or transferral, in whole or in part, of this manual is prohibited.
The contents of this operation manual and the specifications of this product are subject to change
without notice.
The operation manual and the product have been prepared and tested as much as possible. If you
find any misprint or error, please inform us.
Roland DG Corp. assumes no responsibility for any direct or indirect loss or damage which may
occur through use of this product, regardless of any failure to perform on the part of this product.
Roland DG Corp. assumes no responsibility for any direct or indirect loss or damage which may
occur with respect to any article made using this product.
Advertisement
Table of Contents

Related Manuals for Roland GX-24


Summary of Contents for Roland GX-24
- Page 1 Roland DG Corp. assumes no responsibility for any direct or indirect loss or damage which may occur through use of this product, regardless of any failure to perform on the part of this product.
- Page 2 This is a Class A product. In a domestic environment this product may cause radio interference in which case the user may be required to take adequate measures. Roland DG Corp. has licensed the MMP technology from the TPL Group.
-
Page 3: Table Of Contents
Included Software ........................26 3-2 If You're Using a Windows ..........................27 System Requirements for USB Connection ..................27 System Requirements for the Roland CutStudio ................27 System Requirements for the Driver ....................27 Installing the Software ........................28 What to Do If Installation Is Impossible (USB connection) ............30 Uninstalling the Driver ........................ - Page 4 7-2 Locations of the Power Rating and Serial Number Labels ................ 65 7-3 Specifications ................................. 66 CutStudio is a trademark of Roland DG Corp. Windows® is either a registered trademark or trademark of Microsoft® Corporation in the United States and/or other countries.
-
Page 5: To Ensure Safe Use
To Ensure Safe Use Improper handling or operation of this machine may result in injury or damage to property. Points which must be observed to prevent such injury or damage are described as follows. About WARNING and CAUTION Notices Used for instructions intended to alert the user to the risk of death or severe WARNING injury should the unit be used improperly. - Page 6 Failure to do so may result in fire, electrical Never place gasoline, alcohol, thinner, or shock, or electrocution. Immediately disconnect any other flammable material near the the power cord and contact your Roland DG machine, or use an aerosol spray close to Corp. service center. the machine.
- Page 7 To Ensure Safe Use Warning Labels Warning labels are affixed to make areas of danger immediately clear. The meanings of these labels are as follows. Be sure to heed their warnings. Also, never remove the labels or allow them to become obscured. Caution: Moving Carriage The cutting carriage moves at high speed and pose a hazard.
-
Page 8: Pour Utiliser En Toute Sécurité
Pour utiliser en toute sécurité La manipulation ou l'utilisation inadéquates de cet appareil peuvent causer des blessures ou des dommages matériels. Les précautions à prendre pour prévenir les blessures ou les dommages sont décrites ci-dessous. Avis sur les avertissements Utilisé pour avertir l'utilisateur d'un risque de décès ou de blessure grave en ATTENTION cas de mauvaise utilisation de l'appareil. - Page 9 Pour utiliser en toute sécurité PRUDENCE Ne pas approcher les mains de la protec- tion de la lame lorsque le chariot de coupe se déplace. Il est possible de se blesser. Installer sur une surface stable. Sinon, l'appareil risque de se renverser et de causer des blessures.
- Page 10 électrocution. Débrancher immédiatement la fiche de la prise et communiquer avec le revendeur ou le centre de service autorisés de la société Roland DG. Si l'appareil reste inutilisé pendant plusieurs heures, débrancher la fiche de la prise électrique.
- Page 11 Pour utiliser en toute sécurité Vignettes d'avertissement Des vignettes d'avertissement sont apposées pour qu'il soit facile de repérer les zones dangereuses. La signification des vignettes est donnée ci-dessous. Respecter les avertissements. Ne jamais retirer les vignettes et ne pas les laisser s'encrasser. Attention : Chariot mobile Le chariot de coupe se déplace très rapidement et peut être dangereux.
-
Page 12: Important Notes On Handling And Use
Important Notes on Handling and Use This machine is a precision device. To ensure the full performance of this machine, be sure to observe the following important points. Failure to observe these may not only result in loss of performance, but may also cause malfunction or breakdown. Main Unit This Machine Is a Precision Device Handle carefully, and never subject the machine to impact or excessive force. -
Page 13: About The Documentation
Roland CutStudio Online Help (Windows) This describes in detail the operation and features of Roland CutStudio, the included Windows-based cutting program. CAMM-1 Driver Online Help (Windows) This describes in detail the operation and features of the driver. -
Page 14: Viewing The Manuals In Electronic Format
[Help]. For more information, refer to the "CutStudio Plug-in for Adobe Illustrator/CorelDRAW Setup Guide." Operation Manuals Click [Start], point to [Programs] (or [All Programs]), then point to [Roland GX-24 Operation Manuals]. Click the electronic-format manual you want to view. Macintosh... -
Page 15: Chapter 1: Getting Started
Chapter 1: Getting Started... -
Page 16: Machine Features
Two-line backlit display for clear visibility even in dark locations Operation panel and menus organized with a simple, easy-to-understand layout Comes with Roland CutStudio which is a Windows-based cutting program enabling high-quality cutting with easy operation Versatile Range of Practical Applications... -
Page 17: Included Items
1-2 Included Items The following items are packed together with the unit. Make sure they are all present and accounted for. AC adapter: 1 Power cord: 1 Blade: 1 Blade holder: 1 Pin: 1 Roller base: 1 Separating knife: 1 Test-use material: 1 Tweezers: 1 (Colored material) -
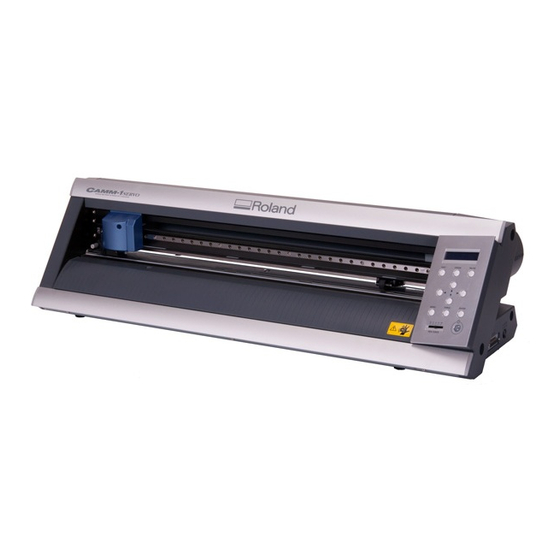
Page 18: Part Names And Functions
1-3 Part Names and Functions Main Unit Left Pinch Roller Cutting Carriage This clamps the material when This is where you install the the loading lever is raised. You blade holder. It moves to the Right Pinch Roller set this at the left-hand edge left and right to cut the ma- This clamps the material when of the material. -
Page 19: Operation Panel
1-3 Part Names and Functions Operation Panel Display This displays various setting PAUSE Key menus and other informa- This interrupts the operation tion. in progress. Pressing it a sec- ond time resumes the opera- TEST Key tion. Pressing and holding this for ORIGIN Key one second or longer cuts a Pressing and holding this for... -
Page 21: Chapter 2: Preparing The Gx
Chapter 2: Preparing the GX This describes how to set up and prepare the machine, including how to install it and make the cable connections. -
Page 22: Installing
The material moves during cutting. Never place any object at the front or rear of the machine. Use a special stand (sold separately) The special stand (part number PNS-24) is sold separately. For more information, contact your vendor or the nearest authorized Roland DG Corp dealer. Chapter 2: Preparing the GX... -
Page 23: Removing The Packing Materials
2-1 Installing Removing the Packing Materials Tape and packing materials are attached to the machine to protect it from vibration during transportation. When installation is complete, remove these. Remove all packing materials. Any that remain may cause faulty operation or breakdown when the power is switched on. -
Page 24: Connecting The Cables
2-2 Connecting the Cables Connecting the Power Cord Do not use with any electrical power supply that does not meet the ratings dis- WARNING played on the AC adapter. Use with any other power supply may lead to fire or electrocution. AC Adapter Power cord Power-cord... -
Page 25: Connecting To The Computer
Never use a USB hub or the like. Serial Connection(Windows only) The serial cable is sold separately. Use a cable suited to your computer. For more information about the specifications of the serial interface, refer to the "GX-24 Reference Guide" (electronic- format manual). Serial cable (sold separately) -
Page 26: Changing The Language Used For The Display
2-3 Changing the Language Used for the Display Change the language used for the display to match your preference. Procedure Hold down and press the power button. The power comes on. Operation Panel Press to choose the language you LANG._ENGLISH want to use for the display. -
Page 27: Chapter 3: Installing/Uninstalling Software
Chapter 3: Installing/Uninstalling Software This describes how to install, set up and uninstall the included programs and other software. -
Page 28: About The Included Software
Windows Driver This is a Windows-based driver required for sending data from a computer to the machine. Be sure to install it Roland CutStudio This is a Windows-based cutting program that enables you to accomplish high-quality cutting through easy operation. -
Page 29: If You're Using A Windows
1) Computers preinstalled with Windows 98 SE/Me/2000/XP at the time of purchase (This includes such computers later upgraded to Windows Me/2000/XP.) 2) Computers on which USB operation is assured by the manufacturer of computers System Requirements for the Roland CutStudio Operating system Windows 98 SE (Second Edition)/Me/2000/XP... -
Page 30: Installing The Software
3-2 If You're Using a Windows Installing the Software Installing the Driver Never make the connection to the computer before installing. Keep the machine and the computer unconnected until you carry out this installation operation. Failure to follow the correct procedure may make installation impossible. p 30 "What to Do If Installation Is Impossible"... - Page 31 3-2 If You're Using a Windows Installing CutStudio Install the Windows-based cutting program "CutStudio." Display the setup menu of the Roland GX-24 Soft- ware Package. Click [Install]. The setup window appears. Thereafter, follow the instructions in the messages to complete installation and setup.
-
Page 32: What To Do If Installation Is Impossible (Usb Connection)
Windows 2000 Right-click [My Computer] on the desktop. Click [Properties]. Click the [Hardware] tab, then click [Device Manager]. The [Device Manager] appears. Delete [GX-24] (or [Unknown device]). Go to the [Action] menu, and click [Uninstall]. At the [View] menu, click [Show hidden devices]. - Page 33 3-2 If You're Using a Windows Close the [Device Manager] and click [OK]. Detach the USB cable connected to the computer. Restart Windows, then uninstall the driver. p 32 "Uninstalling the Driver" Redo the installation from the beginning. p 28 "Installing the Driver" Windows 98 SE/Me Refer to "Uninstalling the Driver"...
-
Page 34: Uninstalling The Driver
In this illustration, drive D is specified as the CD-ROM drive. Windows 98 SE/Me (CD-ROM drive letter):\Drivers\WIN9X\SETUP.EXE The Setup program starts and the [Driver Setup] window appears. Choose [Uninstall]. Choose [Roland GX-24]. Click [Start]. Click [Yes] to restart the computer. Chapter 3: Installing/Uninstalling Software... -
Page 35: If You're Using A Macintosh
Procedure Insert the included CD-ROM into the CD-ROM drive. Double-click the [Roland GX-24] icon that appears on the desktop. Double-click the "Install_e.html" icon. The [Mac OS Installation and Setup Guide] appears. -
Page 37: Chapter 4: Performing Cutting
It also describes the main operations when using other materials. For other operations not covered in this chapter, refer to the "GX-24 Reference Guide" (electronic- format manual). If you're using a Macintosh, refer to the "Macintosh Cutting Guide" (elec-... -
Page 38: Practicing Cutting Using The Test-Use Material
4-1 Practicing Cutting Using the Test-use Material Now let's learn basic cutting operations while creating a sticker like the one shown in the figure below, using the included test-use material and CutStudio cutting program. Follow the procedure below to carry out the operations. Step 1: Load Material Load the included test-use material on the machine. - Page 39 4-1 Practicing Cutting Using the Test-use Material Move the pinch rollers so that they are positioned at the edges of the material and also inside the areas of the pinch-roller position-verification marks. Be sure to position the left pinch roller inside the area of the wide mark.
- Page 40 4-1 Practicing Cutting Using the Test-use Material Switch on the power to the machine and make it ready to receive data from the computer. Press the power button. The power comes on. Press to choose "PIECE." SELECT SHEET * PIECE Press The cutting carriage moves to the left edge and the material moves forward and back-...
- Page 41 Cutting force Blade offset to the "GX-24 Reference Guide" (electronic- format manual). This completes the procedure for loading the material. Go on to "Step 2: Install the Blade." p 40 "Step 2: Install the Blade"...
-
Page 42: Step 2: Install The Blade
4-1 Practicing Cutting Using the Test-use Material Step 2: Install the Blade Do not touch the tip of the blade with your fingers. CAUTION Doing so may result in injury. Insert a blade into the blade holder. Turn the blade-holder cap to tighten completely Blade holder (tighten until the cap cannot be turned further). - Page 43 4-1 Practicing Cutting Using the Test-use Material Install the blade holder. Loosen the screw of the cutting carriage. Cutting carriage Support the screw from below and insert the blade holder. If installed without supporting the screw in this way, cutting quality may become poor. Insert until the collar is Screw flush with the surface.
-
Page 44: Step 3: Optimizing The Cutting Quality For The Material
4-1 Practicing Cutting Using the Test-use Material Step 3: Optimizing the Cutting Quality for the Material To obtain high-quality cutting results, then before you perform the actual cutting, carry out a cutting test to check the cutting quality for the material. Performing a Cutting Test Make sure the [PEN FORCE] slider is centered (at "0"... - Page 45 4-1 Practicing Cutting Using the Test-use Material If the two shapes peel off together or show other problems with cutting, adjust the blade force and perform a cutting test a second time. First, change the blade force. Changing the Blade Force Make sure the [PEN FORCE] slider is centered (at "0"...
- Page 46 4-1 Practicing Cutting Using the Test-use Material Moving the Cutting Carriage Pressing moves the cutting carriage, and pressing moves the material. When you want to adjust the position a little at a time, press the key repeatedly, holding it down for only a short time with each press.
-
Page 47: Step 4: Set The Origin Point
4-1 Practicing Cutting Using the Test-use Material Step 4: Set the Origin Point Set the origin point for determining the cutting position. If you have performed a cutting test, then move the cutting carriage to a location where it does not overlap with the test area. Doing this lets you use the material with minimal waste. -
Page 48: Step 5: Create Cutting Data
Point to [Roland CutStudio], then click [CutStudio]. Make the settings for the cutting range. Click [File], then click [Cutting Setup]. The [Cutting setup] screen appears. For [Name], choose "Roland GX-24." Click [Properties]. The [Roland GX-24 Printing Preferences] screen appears. Chapter 4: Performing Cutting... - Page 49 4-1 Practicing Cutting Using the Test-use Material Click the [Size] tab. (*)Click [Get from Machine]. The cuttable range is displayed. * If you're using a serial connection, en- ter manually the values of the width (W) and length (L) displayed on the machine's display.
- Page 50 4-1 Practicing Cutting Using the Test-use Material Insert text and shapes to create the cutting data. In this example, we'll enter the word "SALE" as the text and draw a frame around it to make it easier to peel off later. Click [ Click anywhere in the white area, then type in "SALE."...
- Page 51 4-1 Practicing Cutting Using the Test-use Material Click [ Displayed around the text are symbols. Drag the symbols for the text box to change the size of the text. Click, then drag to the required size. Click [ Click the upper-left corner, then drag to the Draw a rectangle around the "SALE"...
-
Page 52: Step 6: Perform Cutting
4-1 Practicing Cutting Using the Test-use Material Step 6: Perform Cutting After the data is prepared, you're finally ready to start cutting. Procedure Click the [Cutting] button. Click [OK]. The cutting data is sent from the computer and cutting starts. Cutting of the "SALE"... -
Page 53: Step 7: Remove The Material
4-1 Practicing Cutting Using the Test-use Material Step 7: Remove the Material When cutting has ended, remove the material. Procedure Press several times to display the UNSETUP screen shown in the figure. Press SELECT SHEET The cutting carriage returns to the standby *ROLL position. -
Page 54: Step 8: Apply The Cut Material
4-1 Practicing Cutting Using the Test-use Material Step 8: Apply the Cut Material To apply the material you have cut, you use the included application tape. Cut it to the required size for use. Before applying, thoroughly clean the surface where you want to affix the material to remove any dust or grease. Procedure Use tweezers to peel off any excess material, leaving only the text. -
Page 55: Using A Variety Of Materials
4-2 Using a Variety of Materials Using Roll Material or Lengthy Flat Material With this machine, you can use not only such standard-size material as the test-use material, but also lengthy flat material, as well as roll material (sold separately). To use flat material or roll material whose length is more than 1.6 meters, follow the steps below. - Page 56 4-2 Using a Variety of Materials Switch on the power to the machine and make it ready to receive data from the computer. Press the power button. The power comes on. Press and choose "ROLL" or SELECT SHEET "EDGE." * ROLL Choosing "PIECE"...
- Page 57 4-2 Using a Variety of Materials Check whether the material comes loose. Press CONDITION Press Press AREA 1.0 m Press Press AREA 1.0 m to set the value 0.5 m for the required length of the material. It is a good idea to set a value that is about 0.2 meters longer than the required material length.
-
Page 58: Fine-Tuning The Blade Force
Blade cutting-in amount Other Features For descriptions and more information about other features and menu items, refer to the "GX-24 Reference Guide" (electronic-format manual). p 11 "About the Documentation" p 29 "Installing the Operation Manuals" Chapter 4: Performing Cutting... -
Page 59: Chapter 5: Maintenance
Chapter 5: Maintenance This describes how to clean the machine and replace the blade. -
Page 60: Cleaning
5-1 Cleaning Before attempting cleaning, lower the loading lever and remove the material. Clean by wiping with a cloth moistened by water then wrung dry. Lower the loading lever. Pinch rollers Periodically wipe away any grime. Display Wipe gently with a clean, soft cloth. Grit rollers Use a brush to remove any buildup of material scraps and the like. -
Page 61: Replacing The Blade
5-2 Replacing the Blade If the blade becomes dull, replace it with the included replacement blade. Before replacing the blade, remove the material. p 51 "Step 7: Remove the Material" Do not touch the tip of the blade with your fingers. CAUTION Doing so may result in injury. -
Page 63: Chapter 6: What To Do If
Chapter 6: What to Do If... -
Page 64: What To Do If
If this happens, contact your authorized Roland DG Are the settings for the driver correct? Corp. dealer or service center. -
Page 65: Chapter 7: Appendix
Chapter 7: Appendix... -
Page 66: Usable Materials
7-1 Usable Materials Conditions for Usable Materials Loadable material width 50 to 700 mm (2 to 27-1/2 in.) Loadable material length Flat Material: 100 mm (3-15/16 in.) or more Roll Material: no restriction A) Cuttable material thickness Material-portion thickness of 0.1 (0.004 in.) mm or less B) Maximum media thickness (including backing paper) 0.3 mm (0.012 in.) or less (Material measuring up to 1.0 mm (0.039 in.) can be loaded.) -
Page 67: Locations Of The Power Rating And Serial Number Labels
7-2 Locations of the Power Rating and Serial Number Labels Serial Number This is required when you seek maintenance, servicing, or support. Never peel off the label or let it get dirty. Power Rating Use an electrical outlet that meets the require- ments for voltage, frequency, and amperage given here. -
Page 68: Specifications
AC adapter, power cord, blade, blade holder, separating knife, roller base, twee- zers, test-use material, application tape, USB cable, CD-ROM, user's manual According to material and cutting conditions as specified by Roland DG Corp. (using the PNS-24 stand, sold separately). Excluding material expansion and contraction. - Page 70 Roland may change the specifications of this Software or its materials without notice. Roland shall not be liable for any damage that may be caused by the use of the Software or by exercise of the right licensed by this agreement.