Table of Contents
Advertisement
Advertisement
Table of Contents

Related Manuals for Zoom RhythmTrak RT-323


Summary of Contents for Zoom RhythmTrak RT-323
- Page 1 OPERATION MANUAL...
-
Page 2: Usage And Safety Precautions
• • • • • • • • • • • • • • • • • • • • • • Deleting Data From the SmartMedia Card • • • • • minus" plug (Zoom AD-0006). Usage Precautions To Stop Recording •... -
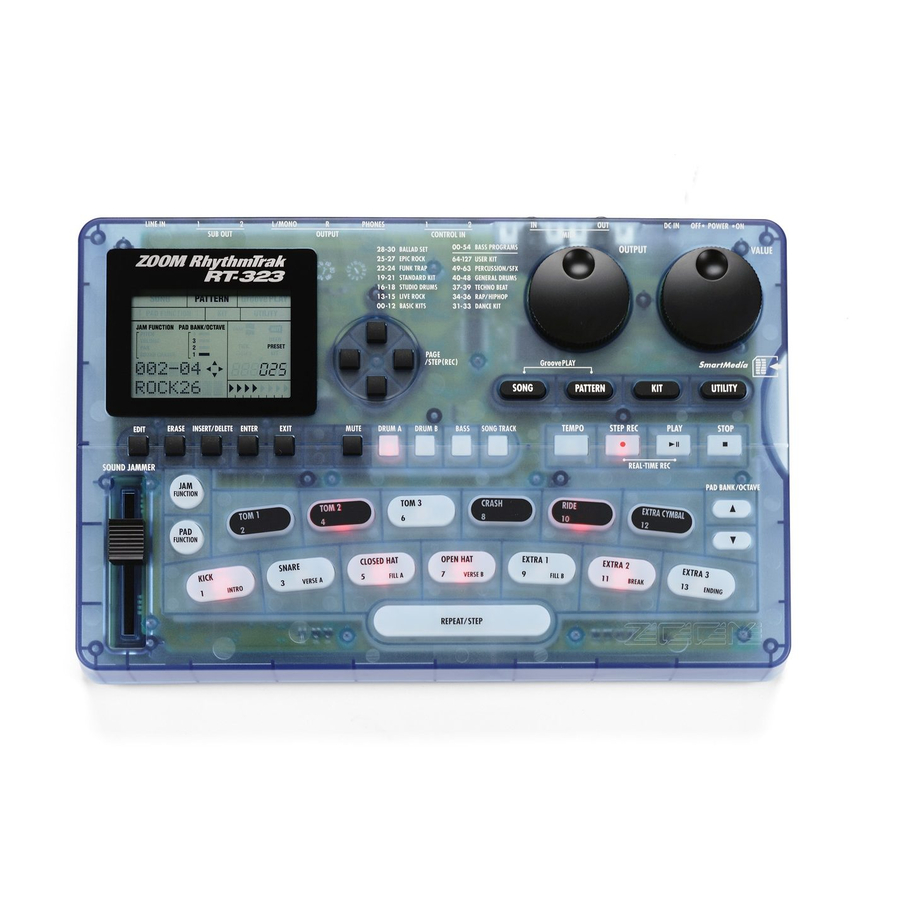
Page 3: Names Of Parts
Names of Parts Top Panel [ ] / [ ]keys ] / [ ]keys [OUTPUT] dial [VALUE] dial [SONG] key Display [PATTERN] key [KIT] key [UTILITY] key [ENTER] key [TEMPO] key (LED) [ERASE] key ] (STOP) key [EDIT] key ] (PLAY) key (LED) [INSERT/DELETE] key REC] (STEP REC) key (LED) [EXIT] key... -
Page 4: Getting Connected
[SUB OUT 1/2] jack. Mixer, audio system, or other playback equipment Multi-effect (ZOOM 505II etc.) To play an external MIDI component Close the battery compartment cover. from the RT-323, connect the [MIDI OUT] connector of the RT-323 to the... - Page 5 Quick Guide 1 Listening to the Demo The Quick Guide section of this manual is intended to help you become familiar with the RT-323. Drum Kits and Bass Programs To hear what the unit can do, we recommend that you listen to the built-in demo song which uses a variety of sounds.
- Page 6 Quick Guide 2 Playing the Pads The top panel of the RT-323 has 13 pads which serve to play drum kits and bass programs. Playing a Bass Program Playing a Drum Kit Press the [BASS] key Press the [PATTERN] key The [BASS] key lights up, and you can play the bass program with the pads.
- Page 7 Quick Guide 3 Listening to Patterns The RT-323 incorporates 400 preset read-only patterns which you can use as follows. Changing the Tempo Playing a Pattern While holding down the [TEMPO] key, Press the [PATTERN] key press one of the [ ]/[ ] keys While you hold down the [TEMPO] key, The display shows the currently the display shows the current tempo...
-
Page 8: To Start Recording
Quick Guide 4 Creating a Pattern The user pattern feature of the RT-323 lets you create your own patterns. You can hit the pads in To Start Recording time with the metronome and play an original pattern to be stored. While holding down the [ REC] key, Selecting the Record Pattern/Track press the [... - Page 9 Quick Guide 5 Using Groove Play Groove play is a special feature of the RT-323 which lets you switch among various patterns To Keep Playing the Pattern After simply by tapping the pads. This makes it easy to play with patterns like a DJ spinning records. Releasing the Pad To Use Groove Play Hold down the [REPEAT] key and push...
- Page 10 Hands-on Lessons To erase an existing song to make it empty, see page 68. The RT-323 allows you to line up patterns in a desired order to create an entire backing sequence (song). This section contains several lessons that will show you how you can use the preprogrammed patterns to create your original songs.
- Page 11 Press the [ ] key. G Transposing the bass track During step input, you can not only select a pattern number but also add various other information When you press the [ ] key, the display moves to the point such as volume, tempo, bass transpose value, etc.
- Page 12 setting value is "5" (five semitones higher = perfect fourth G Entering a fill-in pattern higher). With the previously described steps, we have created an 8-measure chord progression. But the The transpose setting remains active until the point rhythm simply repeats the same pattern. To add a bit of flourish, proceed as follows. where the next transpose value is entered (start of fifth measure in this example).
- Page 13 Now measure 7 will play the beginning of the pattern 116, Press the [SONG] key to activate the song mode, and measure 8 switches to pattern 117. and use the [L]/[M] keys to select the song created in lesson 1. Measure number first half...
- Page 14 Press the [ENTER] key, and use the [L]/[M] keys Copy target start Use the [L]/[M] keys to call up " Bas PTN" on the measure number or the [VALUE] dial to select the measure number display. of the copy target. The bass track replacement is now possible.
- Page 15 Hit the pad with the first pattern to start real-time Lesson 3 Creating a Song [Real-time Input] input. In the final lesson, we will use "real-time input", which is another method for creating a song. With this method, you assign desired patterns to the pads and play them in real time by hitting the pads. Hitting a pad in this condition starts real-time input, and the Current beat What you play is recorded by the RT-323.
-
Page 16: Playing The Pads
Application Guide [Pads/JAM Slider] To switch the pitch range of the bass program, press the [OCTAVE] key while the This section explains the use of the RT-323 pads and the JAM slider. bass program is selected. Playing the Pads Currently When the RT-323 is in pattern mode, you can play drum kits and bass programs. - Page 17 Application Guide [Drum Kits/Bass Programs] While moving the JAM slider, hit the pad. The RT-323 comprises 128 drum kits and 55 bass programs. This section describes the operation steps to control these functions. Drum Kit Operation Switching drum kits RT-323 incorporates 64 read-only preset drum kits (00 - 63) and 64 rewritable user drum kits (64 - The sound selected in step 2 changes.
- Page 18 When wanting to retrieve the bass drum or snare drum sound separately from the [SUB OUT 1] jack, set the OUTPUT MAIN parameter for the respective pad to zero, and increase the value of the OUTPUT SUB 1 parameter. • GROUP The indication "KIT"...
-
Page 19: Copying A Drum Kit
When the name is as desired, press the [EXIT] key. Copy source pad Copy The drum kit name is updated, and the unit returns to the condition of step 2. To return to source pad pattern mode, press the [PATTERN] key. Press the [ENTER] key, and hit the pad to be used as copy target. - Page 20 Press the [UTILITY] key, and use the [ ] keys to call up "TUNING" on the Bass display. program number Bass program name Current setting While holding down the [BASS] key, use the [L]/[M] keys. With each push of the [L]/[M] keys, the bass program number is switched up or down by one increment.
-
Page 21: Muting A Track
Application Guide [Patterns] To stop pattern playback, press the [I] key. This section explains various operation steps related to patterns. It also outlines the groove play function which lets you assign various patterns to the pads and play them in real time. Playing a Pattern Instead of the [I] key, you can also press the [ ]key to set the unit to pause mode... - Page 22 can check the light on/off status of the [DRUM A]/[DRUM B]/[BASS] keys to see which The pattern is played back in a loop. Pressing the same pad again cancels the loop. tracks are muted. To play multiple patterns simultaneously, you can press several pads together. To cancel muting, hold the [MUTE] key down and press the [DRUM A]/[DRUM In groove play mode, you can play up to four patterns.
- Page 23 During pattern real-time input, you can also input notes via a MIDI keyboard or other component connected to the [MIDI IN] jack. I Bass track recording In the factory default condition, a scale with semitone pitch steps such as C, C#, D, D#,...B, C is assigned to the pads, except for pad 6.
- Page 24 sixteenth note, to enter a rhythm kick as shown in the score below, operate the pads and [STEP] The JAM slider operation is only effective for a sound currently played with a current pad. key as follows. Moving the JAM slider by itself has no effect on the recorded sound. To terminate real-time input, press the [I] key.
-
Page 25: Deleting A Track
and the note at that position is cleared. Deleting a User Pattern [PAD1](KICK) This clears all playing information from the currently selected user pattern, returning it to the empty condition. Drum A track Snare drum In pattern mode, use the [L]/[M] keys or the [VALUE] dial to select the user pattern Bass drum you want to delete. - Page 26 If you press the [G REC] key instead of the [EXIT] key in step 4, the notes recorded in the current pattern are aligned to the quantize setting. Press the [ENTER] key, and use the [L]/[M] keys or the [VALUE] dial to select the Adjusting the rhythm flourish (swing) copy target user pattern (U00 - U99).
- Page 27 I Fewer measures than current setting Setting the volume balance for each track The excessive measures are cut off. After returning to pattern mode, the deleted measures cannot be restored. You can adjust the volume of the drum A, drum B, and bass track in a user pattern. This setting is stored for each user pattern individually.
-
Page 28: Song Playback
Application Guide [Song] Shift Setting value = 24 (sixteenth note) This section explains various operation steps related to song playback, creating new songs, and editing existing songs. Song Playback Deleted The RT-323 can store up to 100 songs. Pause of same length as setting value Press the [SONG] key to switch to song mode. -
Page 29: Assigning A Pattern To A Pad
To mute a specific track, hold down the [MUTE] key and press the [DRUM Press the pad to which you want to assign a pattern. A]/[DRUM B]/[BASS] key. You can now assign a pattern to the selected pad. Pattern number Pattern name The key lights up, and the selected track is muted. - Page 30 Hit the pad with the first pattern. Content Parameter Setting Range This starts the real-time input mode, and the pattern is played back. Also when you release the Pattern number assigned to pad 000 – 399,U00 –U99 pad, the pattern will continue to play until the preset number of measures is reached, or until 000A –399A, U00A –U99A, Dr B Drum B track playing information...
- Page 31 To enter the selected pattern, press the [ENTER] key. Song Step Input For song step input, you enter various information (pattern, tempo, bass transpose, etc.) separately, while the RT-323 is in the stop condition. To do this, proceed as follows. To check the entered pattern, you can play the pattern with the [ ]/[I] keys.
- Page 32 I To delete a measure With each push of the [STEP] key, the current position is shifted by a sixteenth note (24 ticks). Use the [ ]/[ ] keys to move to the start of the measure you want to delete, and press the [DELETE] key.
- Page 33 Transposing the bass track This section explains how to shift (transpose) the pitch of the bass track of a pattern input for a song. Using the transpose function, you can create various chord progressions from a small number The entered transpose information remains valid until the next transpose input. of patterns.
- Page 34 • Pattern numbers ending in b (Example: 001b, U99b) If you press the [L] key while a pattern event is selected, the indication "EV➝" appears on the display. While this indication is shown, the number of ticks (1/96 of a beat) for the Will be replaced by the contents of the drum B track of the applicable pattern.
-
Page 35: Copying A Song
Copying Specific Measures You can use measure units to copy a part of a song for which pattern information has been input. This is useful for example to repeat parts of a song. To carry out the delete process, press the [ENTER] key. To cancel the process, press the [EXIT] key. - Page 36 • If the duration of the contents of the song track is longer than the duration of the song, Song the end point of the song track will become the new end point of the song. In this case, Drum A song track the last pattern entered for the song is repeated until the new end point.
-
Page 37: Changing The Song Name
To delete, press the [ENTER] key. To cancel the process, press the [EXIT] key. Current repeat setting Editing Song Settings Use the [L]/[M] keys to specify the number of the measure where repeat playback This section describes how to alter settings that affect the entire song, such as tempo, song name, etc. is to be triggered. -
Page 38: Formatting A Smartmedia Card
Application Guide [SmartMedia] Saving Data on the SmartMedia Card This section describes various uses of the SmartMedia card facility. The entire data of the RT-323 can be saved (stored) on a formatted SmartMedia card as a file. Formatting a SmartMedia Card Insert a formatted SmartMedia card into the [DATA CARD] slot on the side panel of Before a SmartMedia card can be used for saving and loading data, it must be formatted the RT-323. - Page 39 • If the indication "CARDFULL" appears while saving data, there is Press the [UTILITY] key, and use the [ ]/[ ] keys to bring up the indication not enough free space on the SmartMedia card. Delete "CARD?" on the display. Then press the [ENTER] key. unnecessary data first ( ¡...
- Page 40 The RT-323 is compatible with pattern data of the ZOOM Palmtop Studio PS-02. This section target. (If there are no empty user patterns, allocation will be made sequentially, starting from user pattern number U00.)
- Page 41 When you edit pattern data on the RT-323 and then write the data back to the PS-02 PS-02 pattern number SmartMedia card, the original data will be overwritten. If you want to keep the original pattern of the PS-02, create a backup of the PS-02 SmartMedia card first. (For details, PS-02 pattern name refer to the PS-02 Operation Manual.) Use the [L]/[M] keys or the [VALUE] dial to select the pattern, and press the...
- Page 42 Application Guide [Remote Control] Press the [PATTERN] key to return to pattern mode. This section describes how to use the [CONTROL IN] jack in conjunction with an optional foot pedal or foot switch, to perform remote control of the RT-323. Controlling the RT-323 With a Foot Pedal (FP01/FP02) Operate the FP01/FP02 while hitting the pad.
-
Page 43: Basic Steps
Application Guide [MIDI] While holding down the FS01, press the key or pad that you want to control. This section describes the various MIDI related settings of the RT-323 and gives information on MIDI track operation. FS01 Available MIDI Functions The RT-323 incorporates the following MIDI functions. - Page 44 Press the [ENTER] key, and use the [ ]/[ ] keys to select the setting item. Enable/disable control change information send (CTRL) Determines whether the RT-323 sends control change information. While the indication "CTRL" is Currently selected shown on the display, use the keys or the [VALUE] dial to select "ON"...
- Page 45 • MIDI: When MIDI sync messages are received from an external component, the RT-323 Assign program change number to drum kit (PC DRUM) functions accordingly. This allows for example operating the RT-323 in sync with the This item allows you to change the default program change numbers allocated to the drum kits. tempo of an external MIDI sequencer.
- Page 46 Saving RT-323 Internal Data on MIDI Equipment MIDI Track Operation The internal data of the RT-323 including all setting information can be converted to MIDI The RT-323 incorporates a MIDI track that can record MIDI messages such as output for example messages and output via the [MIDI OUT] jack (bulk dump).
-
Page 47: Adjusting The Metronome Volume
Application Guide [Other Functions] Set the RT-323 to song mode and select a song. This section describes how to use the metronome, how to return the RT-323 to the factory default condition, and other auxiliary functions. You can also select an empty song where no pattern information is recorded, and record MIDI messages on the MIDI track. -
Page 48: Troubleshooting
Troubleshooting 1: A precount of 1 measure is carried out before recording starts (default setting). Check the following items first if there seems to be a problem with the RT-323. 2: A precount of 2 measures is carried out before recording starts. PAD: Precount is off. -
Page 49: Specifications
Drum Kit List Reference * In the factory default condition, user kits 64 - 115 contain LiveRock. * The PC# can be changed as required. * User kits 116 - 127 are PS-02 compatible kits. PRESET KIT No. PC# Display Kit name USER KIT No. -
Page 50: Bass Program List
Bass Program List Drum PAD NOTE# List Instrument List PAD No PAD NAME BANK1 BANK2 BANK3 Display Program name Display Instrument name Display Instrument name PAD1 KICK 0, 63, 118 LiveBass Live Bass HvyKick Heavy Kick Live S12 Live Snare 12 PAD2 TOM1 1, 34, 64, 119... - Page 51 Display Instrument name Display Instrument name Display Instrument name Display Instrument name StdioTm2 Studio TOM 2 DlyDncT2 Delayed Dance TOM 2 Doumbek 4 Doumbek 4 EleCwBel Electric CowBell StdioTm3 Studio TOM 3 DlyDncT3 Delayed Dance TOM 3 Doumbek 5 Doumbek 5 DancCwBl Dance CowBell StnddTm1...
- Page 52 Preset Patterns * When you press the [ ]/[ ] keys in pattern mode, the unit jumps to the first pattern in the section divided by bold lines. Kit number Pattern Pattern Recommended Fill * Songs in the same frame contain similar patterns, making it easy to create songs. DRUM A DRUM B BASS...
- Page 53 Kit number Kit number Pattern Pattern Recommended Pattern Pattern Recommended Fill Fill number name tempo DRUM A DRUM B BASS number name tempo DRUM A DRUM B BASS Song HIP s2VA RnB 01 HIP s2VB RnB 02 HIP s2FB RnB 03 HIP s2VC RnB 04 HIP s2VD...
- Page 54 Kit number Kit number Pattern Pattern Recommended Pattern Pattern Recommended Fill Fill number name tempo number name tempo DRUM A DRUM B BASS DRUM A DRUM B BASS AMB 01 SKA 01 AMB 02 SKA 02 AMB 03 SKA 03 AMB 04 SKA 04 Song...
- Page 55 Preset Song Pad Parameter Defaults Kit number Pattern Pattern Recommended Fill DRUM A DRUM B BASS number name tempo SONG00 ROCK tmpl 120BPM KEY=E SONG03 TRSHtmpl 129BPM KEY=D INTRO01 INTRO02 PAD No PtnA DrumB Bass Transp Next PAD No PtnA DrumB Bass Transp...
-
Page 56: Midi Implementation
MIDI Implementation SONG06 HIP tmpl 96BPM KEY=E SONG09 JAZZtmpl 150BPM KEY=Bb 1. Recognized Messages PAD No PtnA DrumB Bass Transp Next PAD No PtnA DrumB Bass Transp Next Status Description ----------------------------------------------------------------------------------- PAD 1 PAD 1 Note Off kk: note number PAD 2 3 FILL PAD 2... -
Page 57: Midi Implementation Chart
MIDI Implementation Chart Sub ID #2 : Identity Reply Manufacturer : ZOOM Corporation [ MultiTrack Rhythm Machine Date :15.DEC.2000 Machine ID low : RT-323 Model RhythmTrack RT-323 MIDI Implementation Chart Version :1.00 high : Family ID low Family ID high... - Page 58 Index "MIXLVL" • • • • • • • • • • • • • • • • • • • • • • • • • • • • • • • • • • "EXPORT" [MUTE] key 41, 56, 71 •...
- Page 59 ZOOM CORPORATION NOAH Bldg., 2-10-2, Miyanishi-cho, Fuchu-shi, Tokyo 183-0022, Japan PHONE: +81-42-369-7116 FAX: +81-42-369-7115 Web Site: http://www.zoom.co.jp Printed in Japan RT-323 - 5000-2...