Table of Contents
Advertisement
Advertisement
Table of Contents

Related Manuals for Zoom MRT-3


Summary of Contents for Zoom MRT-3
- Page 1 Operation Manual 8 8 8 8...
-
Page 2: Safety Precautions
Pay close attention to the labelling of the battery to make sure you choose the correct type. • If the MRT-3 is not to be used for an extended period of time, remove the battery from the unit. • If batteries leakage has occurred, wipe... -
Page 3: Usage Precautions
Care should be taken to minimize the risk of damage. • Cleaning Use a soft, dry cloth to clean the MRT-3. If necessary, slightly moisten the cloth. Do not use abrasive cleanser, wax, or solvents (such... -
Page 4: Table Of Contents
Deleting a Song Deleting All Songs Other Functions • • • • • • • • • • • • • Controlling the MRT-3 With a Foot Switch • • • • • • • • • • Synchronizing Playback With an External Device •... -
Page 5: Introduction
The Multitrak Recording Studio ZOOM MRS-4 is an ideal match, letting you synchronize the audio tracks from the recorder with the rhythm track from the MRT-3. Playing the sounds of the MRT-3 with an external MIDI component is also possible. -
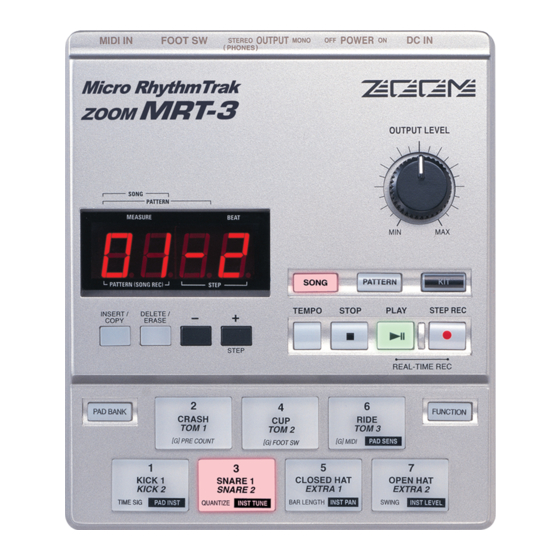
Page 6: Names Of Parts
Keys marked (LED) have an integrated LED that causes the key itself to light up. Rear Panel [DC IN] connector [OUTPUT MONO] jack MRT-3 ZOOM [VALUE +/-] keys [OUTPUT LEVEL] knob Pads 1 – 7 (LEDs) Names of top panel controls and rear panel connectors are indicated with angle brackets [ ] in this manual. -
Page 7: Getting Connected
FS01 foot switch FS01 to the [FOOT SW] jack, you can control start/stop and switch the sound of the MRT-3 with your foot. For stereo playback, connect a Y cable to the [OUTPUT STEREO/PHONES] jack and plug the other end of the... -
Page 8: Preparations
[OUTPUT LEVEL] knob of the MRT-3 to obtain a suitable volume. Using Batteries The MRT-3 can be powered from batteries (not supplied). Follow the steps below to insert the batteries. Turn the unit over and open the battery compartment cover. -
Page 9: Terms Used In This Manual
■ Song A song is a sequence of patterns played in subsequent steps. The maximum number of steps in a song is 99. Provided that there is free memory, the MRT-3 has the capability to store up to 99 songs. - Page 10 Kits 01 – 50 are read-only preset kits and kits 51 – 70 are read/write user kits. ■ Pad/Pad Bank Each pad on the MRT-3 can be used to play the currently selected sound, and to record it as a phrase in a pattern.
-
Page 11: Listening To The Demo Song
Listening to the Demo Song The MRT-3 comes with a demo song already built in. Listen to this song to hear for yourself what the MRT-3 can do. Press the [FUNCTION] key. The [FUNCTION] key flashes. Press the [SONG] key. -
Page 12: Playing The Pads (Manual Play)
To switch the kit played by the pads, press the [KIT] key. The [KIT] key lights up, and the MRT-3 goes into kit mode. In this mode, you select the kit for playing the pads and patterns. The display shows the currently selected kit number. - Page 13 Try hitting the pads and switching the pad bank to check out which sounds are available in the newly selected kit. When you have found the desired kit, press the [PATTERN] key to return to the pattern mode. MRT-3 ZOOM...
-
Page 14: Using Patterns (Pattern Mode)
This section shows how to play and record patterns of the MRT-3 in pattern mode. Playing a Pattern The MRT-3 has 396 read-only preset patterns (A01 – D99) and 99 read/write user patterns (U01 – U99). To select and play a pattern, proceed as follows. -
Page 15: Changing The Tempo Of Pattern Playback
The [TEMPO] key lights up and the current tempo is shown on the display. While keeping the [TEMPO] key depressed, use the [VALUE +/-] keys to adjust the tempo. Measure Beat 0 1 - 3 Tempo value (BPM) 1 1 2 1 1 4 MRT-3 ZOOM... -
Page 16: Real-Time Pattern Recording
Real-Time Pattern Recording The MRT-3 has 99 user pattern slots which can be filled with your own patterns. Creating and recording a pattern is possible in two ways: by actually playing the pattern on the pads (real-time recording), or by entering each sound individually (step recording). - Page 17 Thirty-second note • • • • • • • Thirty-second triplet note • • • • • • • 1 tick (1/96 of quarter note) • • • • • • • Measure Beat 0 1 - 3 MRT-3 ZOOM...
- Page 18 • If a MIDI clock signal is being received, real-time recording is not possible. For details, please refer to page 44. • When there is not enough remaining free memory in the MRT-3, the indication "FULL" appears on the display, and further recording is not possible. Erase unneeded patterns.
-
Page 19: Pattern Step Recording
This section describes step recording, which allows you to enter and record each sound separately, step by step, while the MRT-3 is in the stop condition. Even without mastering how to play the pads in real time, you can easily create complex drum and bass patterns. And you don't need to stop there, because you can even create patterns that would be impossible to play in real time. - Page 20 • If you press the [PLAY] key, the current position within the beat is shown as number of ticks, for as long as the button is held. • When there is not enough remaining free memory in the MRT-3, the indication "FULL" appears on the display, and further recording is not possible. Erase unneeded patterns.
-
Page 21: Changing User Pattern Resolution After Recording
You can change the length (number of measures) of a user pattern. Select the user pattern whose length you want to change. Press the [FUNCTION] key and then pad 5 (BAR LENGTH). The number of measures for the user pattern selected in step 1 is shown. MRT-3 ZOOM... -
Page 22: Changing The User Pattern Beat
The beat of the user pattern selected in step 1 is shown. Use the [VALUE +/-] keys to set the new beat. The available settings for the beat are as follows: 2 (2/4), 3 (3/4), 4 (4/4), 5 (5/4), 6 (6/4), 7(7/4). MRT-3 ZOOM... -
Page 23: Copying A Pattern
Use the [VALUE +/-] keys to select a user pattern (U01 – U99) as copy target. Only user patterns can be selected as copy targets. Copy source pattern number A 0 5 C O P Y @ 0 5 MRT-3 ZOOM... -
Page 24: Erasing A Single User Pattern
In pattern mode, select the user pattern to be erased (U01 – U99). The pattern number is shown on the display. Press the [DELETE/ERASE] key. The [DELETE/ERASE] key flashes and the indication "dEL" alternates on the display with the pattern number. MRT-3 ZOOM @ 0 1 @ 0 1 D E L... -
Page 25: Deleting All User Patterns
To execute the delete process, press the [DELETE/ERASE] key. When wishing to cancel the process, press the [STOP] key. When you press the [DELETE/ERASE] key, all user patterns U01 – U99 are returned to the empty state. @ 0 5 E A L L D E L MRT-3 ZOOM... -
Page 26: Editing A User Kit
Press the [KIT] key. The [KIT] key lights up and the MRT-3 goes into kit mode. In this mode, you can select kits to use for patterns and songs, and you can create your own user kits. The display shows the currently selected kit number. - Page 27 • • • • Overall kit level • • • • • • Pad sensitivity (response to hitting intensity) for overall kit • • • • • • Pad number Setting of currently selected item 1 2 1 2 MRT-3 ZOOM...
-
Page 28: Kit Items
Pad 5: INST PAN Allows adjusting the panning (stereo left/right position) of the instrument sound assigned to a pad. Adjustment is possible over a range of L63 (fully left) – C (center) – R63 (fully right). MRT-3 ZOOM Category number... - Page 29 This setting gives the highest sensitivity. This setting gives medium sensitivity. This setting gives low sensitivity. This setting gives the lowest sensitivity. To achieve a loud sound, the pads must be hit very hard. PAD SENS value N O R M MRT-3 ZOOM...
-
Page 30: Copying A Kit
Copying a Kit A kit of the MRT-3 (preset kit or user kit) can be copied to any other user kit number (51 – 70). This is useful for example when wishing to change only a part of a kit. - Page 31 [STOP] key. When copying is completed, the unit returns to the kit mode with the copy target kit being selected. If copying was canceled, the unit returns to the kit mode with the copy source kit being selected. MRT-3 ZOOM...
-
Page 32: Creating Songs (Song Mode)
99 steps. The maximum number of songs that can be stored in the MRT-3 is 99. (The actual number of available steps and songs will depend on the number of distinct sounds in user patterns and the number of steps in other songs.) Note that the number of steps is not equal to the number of measures. -
Page 33: Recording Song Patterns
This section describes how you can collect a number of patterns into a song. Press the [SONG] key. The MRT-3 goes into song mode, and the [SONG] key lights up. The display shows the currently selected song number. Use the [VALUE +/-] keys to select an empty song number. - Page 34 • By holding down the [SONG] key while pressing the [VALUE +/-] keys, you can move back and forth among steps. • When there is not enough remaining free memory in the MRT-3, the indication "FULL" appears on the display, and further recording is not possible. Erase unneeded songs.
- Page 35 To resume playback from the same point, press the [PLAY] key once more. Delete Pattern B Pattern C Pattern D Pattern B Pattern D Song number 0 1 0 3 Measure count from start of song 0 1 2 5 Step number MRT-3 ZOOM...
-
Page 36: Changing The Tempo Within A Song
As in pattern mode, you can also tap the [TEMPO] key twice or more to specify the tempo. The MRT-3 automatically stores the tempo ("master tempo") for each song. When you switch a song, the tempo that was last selected for that song will be selected. -
Page 37: Changing The Song Volume
Hold down the [SONG] key while pressing the [VALUE +/-] keys to select the step you want to edit. The last two digits of the display show the step number. - - - 1 2 2 Step number 0 1 2 5 MRT-3 ZOOM... -
Page 38: Selecting A Dedicated Song Kit
Use the [VALUE +/-] keys to select a dedicated kit for that song. When you have selected the kit, press the [FUNCTION] key. MRT-3 ZOOM - - -... -
Page 39: Checking The Amount Of Remaining Memory For Songs
In song mode, select the song you want to copy. Press the [INSERT/COPY] key. The [INSERT/COPY] key flashes and the current song is selected as copy source. The indication "CoPy" flashes on the display. Copy source song number 0 1 0 0 C O P Y MRT-3 ZOOM... -
Page 40: Deleting A Song
The [DELETE/ERASE] key flashes and the indication "dEL" alternates on the display with the song number. To execute the delete process, press the [DELETE/ERASE] key. To cancel the process, press the [STOP] key. MRT-3 ZOOM 0 1 0 0 D E L... -
Page 41: Deleting All Songs
You can also reset the unit to the factory default condition, with all songs, user patterns, and user kits returned to the original state. For details, see "Returning the MRT-3 to the Factory Default Condition" (➝ p. 48). -
Page 42: Other Functions
Other Functions This section describes other convenient functions of the MRT-3 and how to return the unit to the factory default condition. Controlling the MRT-3 With a Foot Switch The separately available foot switch FS01 can be used to control various functions of the MRT-3. - Page 43 [KIT] key (the indication "MutE" appears on the display). When you have selected the function, press the [FUNCTION] key once more. The FS01 function is now set, and the MRT-3 returns to the previous mode. Try pressing the foot switch while using the MRT-3, to check the effect.
-
Page 44: Synchronizing Playback With An External Device
The illustration shows an example for connecting the Multitrak Recording Studio ZOOM MRS-4 to the MRT-3. If you connect the output of the MRT-3 to the AUX IN jack of the MRS-4, as shown here, the MRT-3 can be used to supply a dedicated rhythm track without taking up any audio tracks of the MRS-4 Make sure that the external MIDI sequencer can send MIDI Clock, Start, Stop, and Continue signals. - Page 45 Use the [VALUE +/-] keys to select the "Midi" or "rMt" setting. When wishing to control the tempo, transport operations, and locate operations all from the external device, select "Midi". In this case, the internal tempo settings of the MRT-3 have no effect. Set the tempo at the external device.
-
Page 46: Playing Mrt-3 Sounds From An External Midi Component
Component Using an external MIDI sequencer or MIDI keyboard, you can play the sound sources of the MRT-3. To do this, the MIDI receive channel setting of the MRT-3 must match the MIDI send channel of the external device. Connect the MIDI OUT jack of the MIDI sequencer or similar to the [MIDI IN] connector of the MRT-3, using a MIDI cable. -
Page 47: Setting The Pattern/Song Playback Swing
[MIDI IN] connector. For information on note number assignments, please refer to the "Reference" section at the end of this manual. It is also possible to send a program change message to the MRT-3 to switch the kit. For information on program change number assignments, please refer to the "Reference" section at the end of this manual. -
Page 48: Setting The Precount For Real-Time Recording
Setting the Precount for Real-Time Recording The MRT-3 can perform a countdown before the start of real-time recording. The number of precount measures can be changed, and precount can also be turned off. This setting affects all patterns. In pattern mode, press the [FUNCTION] key and then pad 2 (PRE COUNT). -
Page 49: Returning The Mrt-3 To The Factory Default Condition
Returning the MRT-3 to the Factory Default Condition You can return all stored data and settings of the MRT-3 to the factory default condition. This is called initialization. Use this function with care. Initialization will clear all user pattern data, user kit data, and song data that you have created. -
Page 50: Troubleshooting
Troubleshooting Check the following items first if there seems to be a problem with the MRT-3. No sound or very low volume. • Is the [POWER] switch set to ON? Turn power on, as described in the section "Preparations" (page 8). -
Page 51: Specifications
(Maximum output level +3 dBm, into load impedance of 10 kilohms or higher) AC adapter 9 V DC, center minus, 300 mA (ZOOM AD-0006) Batteries IEC R6 (size AA) x 4 Battery life for continuous operation: approx. 15 hours (with... -
Page 52: Reference
Live Rock Mastering Studio Mastering Funk Trap Mastering Epic Rock Mastering Ballad Mastering Modern Mastering Power-benddown Special Effect Sounds 1 Special Effect Sounds 2 MRT-3 ZOOM Reference MIDI PC# KIT# USER 51 USER 70 PRESET 01 PRESET 50 13, 33... -
Page 53: Midi Note Number Chart
High Agogo Low Agogo Cabasa Maracas Short Whistle Long Whistle Short Guiro Long Guiro Claves High Wood Block Low Wood Block Mute Cuica Open Cuica Mute Triangle Open Triangle Shaker Jingle Bell Belltree Castanets Mute Surdo Open Surdo MRT-3 ZOOM... -
Page 54: Instrument List
Stereo DIGI-ANA Reverb Snare 1 Reverb Snare 2 Room Snare Power Snare Electric Snare Brush Short Brush Long Brush Slap Bend Down MRT-3 ZOOM Name Category 3: TOM 4: HI HATS Inst # Name Live Tom 1 Live Tom 2... - Page 55 Open Surdo Filter Swept Cymbal Gamelan Bass Slide REV Wet 1 REV Wet 2 Bell Odaiko ChuDaiko Oedo Chinese Temple Mokugyo Huge Clock 8: SFX Door Close Door Open Kishimi Sliding Engine Cell Sonar Space Sequence Minor7 Major7 ZOOM MRT-3...
-
Page 56: Pattern List
Rock02 Rock03 Rock04 Rock05 Rock06 Rock07 Rock08 Rock09 Rock10 Rock11 Rock12 Rock13 Rock14 Rock15 Rock16 Rock17 Rock18 Rock19 Rock20 MRT-3 ZOOM Display Pattern name Rock21(shuffle) Rock22(shuffle) Rock23 Rock24 Rock25 Rock26 Rock27 Rock28 Rock29 Rock30 Rock31 Rock32 Rock33 Rock34 Rock35T HRK01... - Page 57 BALD05 BALD06 BALD07(shuffle) BALD08(shuffle) BALD09(shuffle) BALD10(shuffle) BALD11(shuffle) BALD12T BALD13T BLUS01(shuffle) BLUS02(shuffle) BLUS03(shuffle) BLUS04(shuffle) BLUS05(shuffle) BLUS06T BLUS07T BLUS08T CNTR01 CNTR02 CNTR03 CNTR04 CNTR05 JAZZ01 JAZZ02 JAZZ03 JAZZ04 JAZZ05 JAZZ06 JAZZ07 JAZZ08T JAZZ09P SHFL01 SHFL02 SHFL03 SHFL04 SHFL05 SHFL06 SHFL07 ZOOM MRT-3...
- Page 58 HIP32 DANC01 DANC02 DANC03 DANC04 DANC05 DANC06 DANC07 HOUS01 HOUS02 HOUS03 HOUS04 HOUS05 HOUS06 TECH01 TECH02 TECH03 TECH04 TECH05 MRT-3 ZOOM Display Pattern name TECH06 TECH07 TECH08 DnB01 DnB02 DnB03 DnB04 DnB05 DnB06 DnB07 TRIP01 TRIP02 TRIP03 AMB01 AMB02 AMB03...
- Page 59 COUNTRY-FILL02 JAZZ-FILL01 JAZZ-FILL02 SHUFFLE-FILL01 SHUFFLE-FILL02 HIP-FILL01 HIP-FILL02 DANCE-FILL01 DANCE-FILL02 DANCE-FILL03 DANCE-FILL04 HOUSE-FILL01 HOUSE-FILL02 TECHNO-FILL01 TECHNO-FILL02 DRUMnBAS-FILL01 DRUMnBAS-FILL02 AMBIENT-FILL01 AMBIENT-FILL02 INDUSTRIAL-FILL01 SHUFFLE-FILL01 REGGAE-FILL01 REGGAE-FILL02 LATIN-FILL01 LATIN-FILL02 BOSSA-FILL01 BOSSA-FILL02 AFRO-FILL01 AFRO-FILL01 MidE-FILL01 MidE-FILL02 ENDING01 ENDING02 ENDING03 ENDING04 ENDING05 ENDING06 ENDING07 ZOOM MRT-3...
-
Page 60: Midi Implementation
4. Note On messages can be recorded into a pattern. 2. Transmitted Messages NONE. 3. System Exclusive Messages No SysEx messages are recognized/transmitted. MRT-3 ZOOM Description Note Off kk: note number vv: velocity will be ignored... -
Page 61: Midi Implementation Chart
MIDI Implementation Chart [DRUM MACHINE Model MRT-3 MIDI Implementation Chart Transmitted Function ... Basic Default Channel Changed Default Mode Messages Altered ****************** Note Number True voice ****************** Velocity Note ON Note OFF After Key's Touch Ch's Pitch Bend Control Change... -
Page 62: Index
MIDI components Playing MRT-3 sound • • • • • • • • • • • • • • • • • • • • • • • • • • • • • • • • • • •... - Page 63 • • • • • • • • • • • • • • • • • • • • • • • • • • • • • • • • • • • • • • • • • • • • • • • • • • • • • • • • • • • • • • MRT-3 ZOOM...
- Page 64 ZOOM CORPORATION NOAH Bldg., 2-10-2, Miyanishi-cho, Fuchu-shi, Tokyo 183-0022, Japan PHONE: +81-42-369-7116 FAX: +81-42-369-7115 Web Site: http://www.zoom.co.jp MRT-3 – 5000-2...