Table of Contents
Advertisement
Quick Links
Download this manual
See also:
Manual
Advertisement
Table of Contents

Related Manuals for Fluke 5320A


Summary of Contents for Fluke 5320A
- Page 1 ® 5320A Multifunction Electrical Tester Calibrator Users Manual September 2006, Rev. 1, 7/07 © 2006, 2007 Fluke Corporation. All rights reserved. All product names are trademarks of their respective companies.
- Page 2 Fluke authorized resellers shall extend this warranty on new and unused products to end-user customers only but have no authority to extend a greater or different warranty on behalf of Fluke. Warranty support is available only if product is purchased through a Fluke authorized sales outlet or Buyer has paid the applicable international price.
- Page 3 Immediately upon arrival, purchaser shall check the packing container against the enclosed packing list and shall, within thirty (30) days of arrival, give Fluke notice of shortages or any nonconformity with the terms of the order. If purchaser fails to give notice, the delivery shall be deemed to conform with the terms of the order.
- Page 5 OPERATOR SAFETY SUMMARY WARNING HIGH VOLTAGE is used in the operation of this equipment LETHAL VOLTAGE may be present on the terminals, observe all safety precautions! To avoid electrical shock hazard, the operator should not electrically contact the output HI or SENSE HI binding posts. During operation, lethal voltages of up to 1100V ac or dc may be present on these terminals.
- Page 6 Symbols Marked on Equipment DANGER — High Voltage, risk of electric shock Protective ground (earth) terminal Attention — refer to the manual. This symbol indicates that information about the usage of a feature is contained in the manua Power Source The 5320A is intended to operate from a power source that will not apply more than 264V ac rms between the supply conductors or between either supply conductor and ground.
-
Page 7: Table Of Contents
Introduction and Specifications............1-1 Introduction......................1-3 Calibrator Functions ..................1-3 Function Descriptions..................1-3 Instruction Manuals ................... 1-4 5320A Getting Started Manual..............1-4 5320A Users Manual..................1-5 Safety Information ..................... 1-5 General Safety Summary................1-5 Symbols ......................1-7 Contacting Fluke....................1-8 Accessories ......................1-8 Included Accessories .................. - Page 8 5320A Users Manual Warm-Up Time....................2-7 Front-Panel Operation ................ 3-1 Introduction......................3-3 Controls and Indicators ..................3-3 Front-Panel Feature Descriptions ..............3-3 Rear Panel...................... 3-7 Display Panel Features .................. 3-8 Controlling the Calibrator .................. 3-9 Selecting a Function ..................3-9 Setting the Output Signal Value ..............
- Page 9 Contents (continued) Terminators....................5-7 Numeric Output Format ................5-7 Supported SCPI Commands ................5-7 Description of Abbreviations ................ 5-8 SCPI Command Summary ................5-8 SCPI Command Details................. 5-17 Standard Status Data Structures ..............5-43 IEEE 488 Interface Configuration..............5-47 Operator Maintenance ................ 6-1 Introduction......................
- Page 10 5320A Users Manual...
- Page 11 1-1. Included Accessories....................1-8 1-2. Optional Accessories....................1-9 2-1. Package Contents ....................2-3 2-2. Line Power Cord Types Available from Fluke ............2-5 3-1. Front-Panel Features ....................3-4 3-2. Rear-Panel Features ....................3-7 3-3. Display Panel Features ................... 3-8 3-4.
- Page 12 5320A Users Manual 6-12. DC Voltage Limits ....................6-17 6-13. AC/DC Voltage Multimeter Limits................ 6-17 6-14. AC/DC Current Meter Limits ................6-17 6-15. HIPOT Leakage Current Multimeter Limits ............6-17 6-16. 10 kV Divider Limits ..................... 6-18 6-17. 40 kV AC/DC Voltage Divider Limits ..............6-18 A-1.
- Page 13 List of Figures Figure Title Page 2-1. Line Power Cord Types Available from Fluke ............2-5 3-1. Keypad Entry Display .................... 3-10 3-2. Setup Menu ......................3-12 4-1. Simplified Low Resistance Source Schematic............4-4 4-2. Typical Low Resistance Display................4-5 4-3.
- Page 14 Connections to 1550B when Using Resistance Multiplier........7-10 7-9. Ground Bond Resistance Calibration on Fluke 6500 Using the Cable Adapter ..7-11 7-10. Ground Bond Resistance Calibration on Fluke 6500 Using Single Test Leads..7-12 7-11. Ground Bond Resistance Calibration on Bench Ground Bond Tester ....7-12 7-12.
- Page 15 Page Introduction......................1-3 Calibrator Functions ..................1-3 Function Descriptions..................1-3 Instruction Manuals ................... 1-4 5320A Getting Started Manual..............1-4 5320A Users Manual..................1-5 Safety Information ..................... 1-5 General Safety Summary................1-5 Symbols ......................1-7 Contacting Fluke....................1-8 Accessories ......................1-8 Included Accessories ..................
- Page 16 5320A Users Manual...
-
Page 17: Introduction And Specifications
Introduction and Specifications Introduction Introduction The Fluke 5320A and 5320A/VLC are Multifunction Electrical Tester Calibrators (hereafter referred to as the Calibrator), designed for full calibration and testing of electrical safety testers. Some examples of these testers are: Megohm meters Ground bond testers... -
Page 18: Instruction Manuals
5320A Users Manual (CD ROM, PN 2634346) Order additional copies of these manuals using the part numbers provided. For ordering instructions, refer to a Fluke catalog or contact a Fluke sales representative. 5320A Getting Started Manual Use this manual for basic setup information, contacting Fluke, unpacking, and general specifications. -
Page 19: 5320A Users Manual
Calibrator. Please read this information before operating the Calibrator. 5320A Users Manual The Users Manual is available in PDF format on the CDROM provided with your Calibrator. The manual contains information on operating the Calibrator using the front panel. - Page 20 5320A Users Manual Safety Information XWWarning: To avoid electric shock, personal injury, fire, or death, observe the following warnings before using the Calibrator: Use the Calibrator only as specified in this manual, or the protection provided by the instrument might be impaired. Do not use the Calibrator in wet environments.
-
Page 21: Symbols
Double insulated. Recycle. Static awareness. Static discharge Do not dispose of this product as unsorted can damage part(s). municipal waste. Contact Fluke or a qualified recycler for disposal. Do not connect to public network Maintenance or Service. (e.g., telephone system.) Battery or battery compartment. -
Page 22: Contacting Fluke
5320A Users Manual Contacting Fluke To order accessories, receive operating assistance, or get the location of the nearest Fluke distributor or Service Center, call: USA: 1-800-44-FLUKE (1-800-443-5853) Canada: 1-800-36-FLUKE (1-800-363-5853) Europe: +31 402-678-200 Japan: +81-3-3434-0181 Singapore: +65-738-5655 Anywhere in the world:... -
Page 23: Optional Accessories
Introduction and Specifications General Specifications Optional Accessories Table 1-2 lists optional accessories for the Calibrator. Table 1-2. Optional Accessories Model Description 5320CASE Transit case for 5320A Calibrator Y5320 Rack mount kit for mounting a 5320A in a standard 19 inch rack. 5320A-LOAD Load resistor adapter for hipot leakage current calibration General Specifications... -
Page 24: Electrical Specifications
5320A Users Manual Electrical Specifications Low Resistance Source Total Range ............100 m to 10 k Resolution ............3½ digits (continuously variable) Uncertainty and Maximum Ratings 2-Wire Uncertainty 4-Wire Uncertainty Maximum AC or DC Range Resolution Current (tcal ±5 C) (tcal ±5 C) 400 mA 100 m to 4.99... -
Page 25: High Resistance Source
Introduction and Specifications Electrical Specifications High Resistance Source Range ..............10 k to 10 G plus 100 G single value selection. Resolution ............4½ Digit (continuously variable for 10 k to 10 G range) Uncertainty and Maximum Ratings Maximum Voltage Uncertainty Range Resolution... -
Page 26: Ground Bond Resistance Source
5320A Users Manual Ground Bond Resistance Source Range ..............25 m to 1.8 k Resolution ............16 discrete values Minimum test voltage/current......10 V / 10 mA Uncertainty and Maximum Ratings Absolute Maximum Maximum Short- Deviation from Uncertainty of Continuous Test term Test Test Current Nominal Value... -
Page 27: Line/Loop Impedance Source
Introduction and Specifications Electrical Specifications Line/Loop Impedance Source Range ..............25 m to 1.8 k Resolution ............16 discrete values Minimum test voltage/current......10 V/10 mA Uncertainty and Maximum Ratings Absolute Maximum Maximum Nominal Deviation from Uncertainty of Continuous Test Short-term Test Current Resistance... -
Page 28: Leakage Current Source
5320A Users Manual Correction COMP Mode (Active Loop Compensation) (5320A/VLC only) Residual Impedance Range ......0 to 2 Maximum Test Current ........<25/N A pk, where N equals number of UUT generated test current periods. Uncertainty of compensation ......(1 % + 15 m ) + uncertainty of selected resistance value. Uncertainty is valid at the point in time when the COMP function is initiated. -
Page 29: Ac/Dc Voltage Calibrator (5320A/Vlc Only)
Introduction and Specifications Electrical Specifications AC/DC Voltage Calibrator (5320A/VLC only) Range ..............3 to 600 V, ac or dc Resolution ............4 digits Internal Ranges: AC Mode............30, 100, 300, and 600 V (Autoranging only) DC Mode............30, 150, and 600 V (Autoranging only) Frequency: Range ............. - Page 30 5320A Users Manual Current Range ..............0 to 20 A continuous, 30 A for up to 30 minutes, ac rms or dc Resolution ............4½ digits Internal Ranges ..........300 mA, 3 and 30 A (Autoranging only) Frequency Range..........DC, 20 to 400 Hz Time Constant ...........
-
Page 31: Preparing The Calibrator For Operation
Chapter 2 Preparing the Calibrator for Operation Title Page Unpacking and Inspecting the Calibrator ............2-3 Power Considerations ..................2-4 Power Cord....................2-4 Selecting the Line Voltage ................2-5 Replacing the Fuses..................2-5 Installing the Calibrator in an Equipment Rack..........2-5 Turning Power On ..................... - Page 32 5320A Users Manual...
-
Page 33: Unpacking And Inspecting The Calibrator
If you need to reship the Calibrator, use the original container. If it is not available, you can order a new container from Fluke by identifying the Calibrator’s model and serial number. When you unpack the Calibrator, check for all the standard equipment listed in Table 2-1. -
Page 34: Power Considerations
5320A Users Manual The calibrator is designed to be supplied by 230 or 115 V, 50 or 60 Hz ac power (mains). It is a laboratory instrument whose parameters are guaranteed at 23 ±5 °C. Before powering on the instruments, place it on a level surface. Do not cover the vents at the bottom side and the fan opening at the rear panel. -
Page 35: Selecting The Line Voltage
Preparing the Calibrator for Operation Installing the Calibrator in an Equipment Rack Table 2-2. Line Power Cord Types Available from Fluke Type Voltage Fluke Part No. North America/Japan 120 V 2743310 Universal Euro 240 V 2743331 United Kingdom 240 V... -
Page 36: Turning Power On
5320A Users Manual Turning Power On With the Calibrator setup for the proper line voltage, press the power switch on the back panel so the “I” side of the switch is depressed. During its power-up cycle, the Calibrator displays a power supply test screen while initializing internal circuits and checking the mains connection. -
Page 37: Operation Rules
Preparing the Calibrator for Operation Operation Rules Note The Calibrator resets to its reference state whenever line power is removed and then reapplied to the Calibrator. Operation Rules The following rules should be strictly observed to guarantee correct operation of the calibrator: The calibrator can only be switched on and off by pressing the power switch located at the rear panel. - Page 38 5320A Users Manual...
-
Page 39: Front-Panel Operation
Chapter 3 Front-Panel Operation Title Page Introduction......................3-3 Controls and Indicators ..................3-3 Front-Panel Feature Descriptions ..............3-3 Rear Panel...................... 3-7 Display Panel Features .................. 3-8 Controlling the Calibrator .................. 3-9 Selecting a Function ..................3-9 Setting the Output Signal Value ..............3-10 Numeric Keyboard .................. - Page 40 5320A Users Manual...
-
Page 41: Introduction
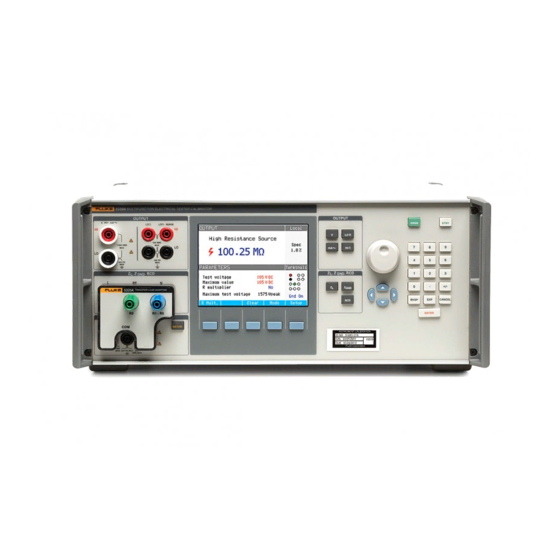
Front-Panel Operation Introduction Introduction The Calibrator can be controlled either by sending commands through one of its communication interfaces or by manual manipulation of its front-panel controls. This chapter explains the function and use of the controls and indicators located on the front and rear panel, of the Calibrator. - Page 42 5320A Users Manual Table 3-1. Front-Panel Features 5320A MULTIFUNCTION ELECTRICAL TESTER CALIBRATOR OUTPUT OUTPUT OPER STBY , HI , mA - SENSE 50V PK 1500V PK 20V PK 20V PK GND , GND, Z GND 280V 280V BKSP CANCEL 20V PK ENTER METER INPUT...
- Page 43 Front-Panel Operation Controls and Indicators Table 3-1. Front-Panel Features (cont.) Item Description E Impedance and RCD Terminals XWWarning Electric shock hazard. Lethal voltages are either applied to or supplied from these terminals when the Calibrator is operating. Ensure the Calibrator and UUT is in standby mode before connecting or removing leads to these terminals.
- Page 44 5320A Users Manual Table 3-1. Front-Panel Features (cont.) Item Description TPUQ Output adjustment controls; if any of these keys are pressed or the knob is rotated, a digit on the output area of the display is highlighted. The output increments or decrements as the knob is rotated.
-
Page 45: Rear Panel
Front-Panel Operation Controls and Indicators Rear Panel Table 3-2 lists the items found on the Calibrator’s rear panel. Table 3-2. Rear-Panel Features elv002.eps Item Description A Fan Filter The filter covers the air intake to keep dust and debris out of the chassis. -
Page 46: Display Panel Features
5320A Users Manual Table 3-2. Rear-Panel Features (cont.) Item Description H IEEE 488 Port A standard interface for operating the Calibrator in remote control as a Talker or Listener on the IEEE 488 Bus. Refer to Chapter 5 of this Manual for bus connection and remote programming instructions. -
Page 47: Controlling The Calibrator
Front-Panel Operation Controlling the Calibrator Table 3-3. Display Panel Features (cont.) Item Description C Softkey labels Displays the labels for the five soft keys below the display. D Terminals Displays the active terminals for the selected function. E Specifications Displays the accuracy of the output signal or measured parameter. -
Page 48: Setting The Output Signal Value
5320A Users Manual 3. If necessary, make changes to the functions parameters through the setup menu by pressing the softkey under Setup. To return to the function selected without changing the parameters, press the softkey under Exit. 4. With the desired function selected, function parameters set, and the UUT properly connected to the Calibrator, press the OPER key to activate the Calibrator’s outputs. -
Page 49: Cursor Key Editing
Front-Panel Operation Controlling the Calibrator 2. With the desired value displayed, press the softkey for the appropriate units or add an exponent value by pressing D, followed by the value, and then press E to complete the entry or press a softkey with the desired terminator (k for example). Note To exit the numeric entry without entering the typed value, press C. -
Page 50: Readings
5320A Users Manual Readings Readings taken by the Calibrator’s functions are displayed either in the OUTPUT/INPUT area or PARAMETERS area of the display. All readings are displayed in red with an appropriate units label. If a reading is outside the specified limits of the function, the Calibrator disconnects the active terminals and displays an error message of “Input overloaded”. -
Page 51: Setting A General Setup Function
Front-Panel Operation Calibrator Setup Menu Setting a General Setup Function The general setup selections are used to set the time, date, beeper on/off, beeper volume, display brightness, time on display, and calibration password. You can also view the Calibrator serial number, software versions, and installed options through the General Setup menu selection. -
Page 52: Setting The Beeper Volume
5320A Users Manual Setting the Beeper Volume To set the beeper volume: 1. After entering the setup menu, press P or Q or rotate the rotary knob to highlight “Beeper Volume” in the list of setup selections. 2. Press the Select softkey or press in on the rotary knob. 3. -
Page 53: Factory Settings
Front-Panel Operation Factory Settings Factory Settings Table 3-4 lists the setup functions and their respective factory set values. Table 3-4. Factory Settings Setup Item Factory Set Value Volume Brightness Beeper Calibration password Time Date Voltage calibrator Yes/No Compensator Yes/No Calibrator GND High resistance source GND R multiplier input 0 MN... - Page 54 Internal RxD timeout! Internal error Internal error of the calibrator. Turn the calibrator off, wait 5 seconds, then turn it on. If the error appears again, contact Fluke. Internal Internal error Internal error of the calibrator. Turn the communication! calibrator off, wait 5 seconds, then turn it on.
-
Page 55: Calibrating Instruments
Chapter 4 Calibrating Instruments Title Page Introduction......................4-3 Setting the Low Resistance Source Output............4-3 Function Selection ..................4-3 Setting the High Resistance Source Output ............4-5 Function Selection ..................4-6 Setting the Ground Bond Resistance Output ............. 4-8 Setting the Loop and Line Impedance Output ........... 4-10 Line and Loop Residual Impedance .............. - Page 56 5320A Users Manual...
-
Page 57: Introduction
Calibrating Instruments Introduction Introduction This chapter describes using the Calibrator’s functions for calibrating testers and meters. It is assumed the reader is already familiar with the Calibrator’s controls, connections, and indicators covered in Chapter 3, “Front Panel Operation”. The reader should also be familiar with the safety information contained in Chapter 1 of this manual. - Page 58 5320A Users Manual using the LO HI and LO LO terminals. For 4-wire resistance calibration, additional connections are necessary using the LO -SENSE HI and LO -SENSE LO terminals. See To change between 2-Wire and 4-Wire resistance below to change this setting. Note 4-wire resistance mode is used for low resistance calibrations of UUTs equipped with the 4-wire measurement technique.
-
Page 59: Setting The High Resistance Source Output
Calibrating Instruments Setting the High Resistance Source Output Note Before adjusting the value, make sure the current generated by the UUT will not exceed the maximum allowed value. With the output connected, you can adjust the resistance value with the keyboard, cursor keys or rotary knob. -
Page 60: Function Selection
5320A Users Manual Table 4-2. High Resistance Ranges with Maximum Voltage Rating (cont.) Maximum applicable Resistance range voltage (AC+DC)PEAK 1.0000 to 10.000 G 1,575 V 100 G 1,575 V Notes: [1] Maximum test voltage with the supplied banana leads is 1000 Vrms. - Page 61 Calibrating Instruments Setting the High Resistance Source Output 5. Using the Terminals part of the display as a guide, connect the UUT’s terminals to the Calibrator’s terminals. 6. After confirming all settings and connections are correct, press O to connect the UUT to the selected resistance.
-
Page 62: Setting The Ground Bond Resistance Output
5320A Users Manual 1. Press the Setup softkey. 2. Using the cursor keys or rotary knob, highlight High resistance source and either press the Select softkey or press in on the rotary knob. 3. Using the cursor keys or rotary knob, highlight High resistance source GND and either press the Select softkey or press in on the rotary knob. - Page 63 Calibrating Instruments Setting the Ground Bond Resistance Output Table 4-3. Selectable Resistance with Maximum Continuous Current and Voltage Nominal Resistance Value Maximum Continuous Test Maximum Continuous Test Current AC(RMS) or DC Voltage AC(RMS) or DC 25 m 30 A 0.75 V 50 m 28 A 1.4 V...
-
Page 64: Setting The Loop And Line Impedance Output
5320A Users Manual ehq024.bmp Figure 4-6. Ground Bond Resistance Display While connected to the UUT, the Calibrator monitors the voltage and current appearing across the resistance. If the current or voltage exceeds acceptable limits, the Calibrator will disconnect the output terminals and display an error message. The actual current flowing through the resistance, along with the maximum allowed current, is displayed in the PARAMETERS area of the display. - Page 65 Calibrating Instruments Setting the Loop and Line Impedance Output Fixed Mains Front Panel Socket/Outlet , RCD Line Neutral Compensator ehq013.eps Figure 4-7. Simplified Line Impedance source Schematic For loop impedance calibration, the resistance is inserted between the PE terminal on the front panel and PE (protective earth ground) of the power line input on the rear panel.
- Page 66 5320A Users Manual 4. If necessary, reset the resistance value using the rotary knob. The keypad can also be used to enter a value. If the entered value is not exactly one of the 16 possible selections, the resistance closest to the entered value will be selected. XWWarning To avoid electric shock, ensure the Calibrator is in standby before making connections to the L, PE and N connectors.
-
Page 67: Line And Loop Residual Impedance
Calibrating Instruments Setting the Loop and Line Impedance Output ehq025.bmp Figure 4-9. Line Impedance Calibration Display Line and Loop Residual Impedance While calibrating loop and line impedance functions, the Calibrator uses its ac line power circuit as part of the measurement. The impedance of this branch circuit can cause a significant amount of uncertainty in calibration. -
Page 68: Setting The Manual Residual Impedance Correction Value
5320A Users Manual A second method uses an internal circuit that scans the residual impedance, saves the value, and then adds it to the selected resistance value. A third method (5320A/VLC only) uses an internal electronic compensation block that uses the scanned value to set the compensation value in the block. This compensation circuit is limited to 25 amps of UUT current. -
Page 69: Setting The Scanned Residual Impedance Correction Value
Calibrating Instruments Setting the Loop and Line Impedance Output Note The maximum residual impedance correction value that can be entered manually is between 0 and 10 . To use this manually entered value, you must select the manual residual impedance compensation mode as described in the “Selecting the Residual Correction Mode”... -
Page 70: Performing Leakage Current Calibration
5320A Users Manual the stored scanned value measured in this section is added to the selected loop or line impedance value, and their sum displayed as the calibration value. Note Line residual impedance and Loop residual impedance corrections are two different and distinct values and are applied based on which correction mode is selected. -
Page 71: Calibrating Passive Leakage Current
Calibrating Instruments Performing Leakage Current Calibration Calibrating Passive Leakage Current For passive leakage current calibration, the Calibrator presents a passive variable resistance on the OUTPUT HI and LO connectors. When connected to the Calibrator, the UUT applies a voltage to this resistance and the Calibrator displays the current flowing through the resistance. -
Page 72: Calibrating Diffential Leakage Current
5320A Users Manual 6. Press O to start the calibration process. The Calibrator monitors the input connectors for voltage. When a voltage in the acceptable range is detected, the Calibrator switches in a resistance to start current flow. The Calibrator has a settling time (typically 3 seconds) to adjust the resistance for a current value that matches the nominal current set on the Calibrator. - Page 73 Calibrating Instruments Performing Leakage Current Calibration Front Panel Ω OUTPUT V, HI , mA AC Voltage Source 50 - 100 V ehq016.eps Figure 4-11. Simplified Active Leakage Current Scheme To perform an active leakage current calibration: XWWarning To avoid electric shock, keep hands away from Calibrator terminals while using active leakage current mode.
-
Page 74: Substitute Leakage Current Mode
5320A Users Manual 6. If the rotary knob is used to change the current value, press Exit to go back to the main screen. 7. Referring to the terminals part of the display, connect the UUT to the Calibrator. 8. Press O to start the calibration process. The Calibrator adjusts the source voltage and resistance to get the UUT current as close to the requested current as possible. -
Page 75: Calibrating Rcd Test Functions
Calibrating Instruments Calibrating RCD Test Functions Ω OUTPUT V, HI , mA ehq011.eps Figure 4-13. Simplified Substitute leakage current schematic The Calibrator does not actually measure leakage current in this mode. The substitute leakage current is defined by the nominal power line voltage (115 or 230 V), the nominal leakage current set through Id nominal, and the output resistance of UUT source terminal (R ). -
Page 76: Calibrating Rcd Trip Current Function
5320A Users Manual Fixed Mains Front Panel Socket/Outlet , RCD Line Compensator Neutral ehq018.eps Figure 4-14. Simplified RCD Scheme Calibrating RCD Trip Current Function RCD Trip Current calibration is performed by the Calibrator monitoring current from the UUT and displaying the measured current when it reaches the nominal set value. The output terminals are also disconnected when the trip current level is reached. -
Page 77: Power Line Voltage
Calibrating Instruments Calibrating RCD Test Functions 6. Press Start on the UUT. When the level of test current flowing from the UUT reaches the set nominal trip current value, the Calibrator starts to measure current amplitude. The measuring process lasts for several power line cycles. -
Page 78: Calibrating Rcd Trip Time
5320A Users Manual To change the nominal trip current: 1. Press the Trip I softkey. 2. Using the keypad, type in the desired nominal trip current value and press E. Note The Calibrator’s nominal trip current can be set between 3 and 3000 mA. 3. - Page 79 Calibrating Instruments Calibrating RCD Test Functions level for the specified trip time. In addition to the measured UUT trip current, the Calibrator displays the Power/Touch voltage. Figure 4-16 shows the Calibrator’s RCD trip time process. Trip Current (mA) Trip Time Time (ms) End of trip time period.
-
Page 80: Power Line Voltage
5320A Users Manual 8. Press Start on the UUT. The Calibrator puts power line voltage on the RCD L and N terminals. When start is pressed on the UUT, the UUT’s internal load is connected to the Calibrator’s connectors. When the measured current reaches a value specified by the product of the nominal trip current and the current multiplier, a timer is triggered. -
Page 81: Touch (Contact) Voltage
Calibrating Instruments Calibrating RCD Test Functions Touch (contact) Voltage Touch voltage is the voltage difference between N and PE potentials. UUTs can usually measure this voltage and display it as a measured value or detect crossing over the safe voltage level (25 to 50 volts typical) with an indication of this event. Touch voltage generated by the Calibrator depends on selected series resistance and setup nominal trip current. - Page 82 5320A Users Manual 0.5 – This setting is used for Installation testers that test non-tripping RCDs. When this value is set, the Calibrator measures UUT trip current for 5 seconds and then disconnects the output terminals. If the UUT current exceeds the set nominal trip current or is greater than 4000 mA, the Calibrator disconnects the output connectors and displays a “Trip current too high”...
-
Page 83: Ac/Dc Voltage Calibration (5320A/Vlc Only)
Calibrating Instruments AC/DC Voltage Calibration (5320A/VLC only) set, trip time and trip current can still be calibrated. The Calibrator measures trip current and disconnects the output terminals after the trip time expires. AC/DC Voltage Calibration (5320A/VLC only) The Calibrator calibrates instruments and testers with ac and/or dc voltage measurement functions up to 600 V. - Page 84 5320A Users Manual Front Panel Ω OUTPUT V, HI , mA Power Amplifier Amplitude Feedback Simplified AC/DC Calibrator ehq009.eps Figure 4-18. Simplified Voltage Calibrator Schematic In the Voltage calibration mode, the Calibrator’s output is either grounded or ungrounded. When the output is grounded, the Calibrator’s LO terminal is connected internally to PE or the ground connection of the power cable connector and Calibrator chassis.
-
Page 85: Measuring With The Built-In Multimeter
Calibrating Instruments Measuring with the Built-in Multimeter Cursor icons appear above and below one of the digits in the frequency display. 2. Use the cursor keys, rotary knob or keypad to set the frequency value. 3. Press the Exit softkey to exit the frequency edit mode. To switch between grounded and ungrounded (floating) output: 1. -
Page 86: Measurements
5320A Users Manual ehq66.bmp Figure 4-20. Multimeter Mode Selection Measurements To make a voltage measurement using the built-in multimeter: 1. Press M. 2. If necessary, press the AC/DC softkey to select between ac or dc mode. WCaution To prevent possible damage to the Calibrator, never connect the COM or A connector to the Line (L) terminal of power mains. - Page 87 The Calibrator can measure voltages above 1100 volts when used with a high voltage probe (Fluke 80K-40) or the standard accessory, the 10 kV divider/resistance multiplier. Both accessories will divide down the voltage so the multimeter can measure DC voltage or AC voltage with a frequency of 50 or 60 Hz.
- Page 88 5320A Users Manual ehq061.bmp Figure 4-22. Multimeter Display with Hipot Leakage Current Measurement 4. Connect the test leads to the V and COM jacks. In hipot timer mode, the Calibrator measures the time interval in seconds. To make a hipot timer measurement using the built-in multimeter: 1.
- Page 89 Calibrating Instruments Measuring with the Built-in Multimeter Note Uncertainty of displayed time depends on selection of ac or dc mode. In ac mode, uncertainty is determined by the length of one period of hipot output voltage frequency. WCaution To prevent possible damage to the Calibrator, do not exceed maximum input voltage of the multimeter (1000 V ac/dc).
- Page 90 5320A Users Manual 4-36...
-
Page 91: Remote Operation
Chapter 5 Remote Operation Title Page Introduction......................5-3 Using the IEEE 488 Port for Remote Control ........... 5-3 IEEE488 Bus Restrictions ................5-3 Setting up the IEEE 488 Port................. 5-3 Using the RS-232 Port for Remote Control............5-4 Setting up the RS-232 Port ................5-4 RS-232 Connector Pinout................ - Page 92 5320A Users Manual...
-
Page 93: Introduction
To set up for IEEE 488 bus control: 1. Turn off the Calibrator. 2. Connect the Calibrator to the controller using an IEEE 488 cable. Fluke shielded cables Y8021 (1m), Y8022 (2m), or Y8023 (4m), are recommended. -
Page 94: Using The Rs-232 Port For Remote Control
5320A Users Manual Note The IEEE address is set at the factory to 2, and remains until changed. 10. Press either the UP or DOWN soft key to change the address. The address can be set between 00 and 30. 11. -
Page 95: Rs-232 Connector Pinout
Remote Operation Using the Ethernet Connection for Remote Control RS-232 Connector Pinout Table 5-1 lists the signals on the 9-pin D Sub RS-232 connector on the back panel of the Calibrator. Table 5-1. RS-232 Port Connector Pinout Name Direction Description Output Transmit Input... -
Page 96: Factory Settings
5320A Users Manual 5. Using the cursor keys or knob, highlight Interface and either press the Select softkey or push in on the rotary knob. 6. If the Active Interface selection does not already read Ethernet, use the cursor keys or rotary knob to highlight Active Interface and either press the Select softkey or push in on the rotary knob. -
Page 97: Terminators
Remote Operation Supported SCPI Commands 1. When a command has more than one parameter, the parameters must be separated by commas. When more than one command is contained in one line to the Calibrator, each command must be separated by a semicolon. For example: SAF:LR 100.5;:OUTP ON 3. -
Page 98: Description Of Abbreviations
5320A Users Manual Description of Abbreviations Table 5-3. Abbreviation Descriptions Abbreviation Description Decimal Numeric Program Data. This format is used to express decimal number <DNPD> with or without the exponent. Character Program Data. Usually it represents a group of alternative character <CPD>... - Page 99 Remote Operation Supported SCPI Commands Table 5-4. SOURce Command Summary Command Description [SOURce] Path to SOURCE subsystem. :SAFety Path to SAFETY modes. :MODE? Returns mode the Calibrator is set to. :GBResistance Sets Calibrator to Ground Bond Resistance mode. [:LEVel] <DNPD> Sets the value for the Ground Bond Resistance mode.
- Page 100 5320A Users Manual Table 5-4. SOURce Command Summary (cont.) Command Description :VOLTage? Returns the measured voltage on the open output terminals. [:VOLTage] Path to the Ground Bond Resistance function’s voltage parameters. [:VOLTage]:MAXimum? Returns the maximum measured peak voltage on the open output terminals.
- Page 101 Remote Operation Supported SCPI Commands Table 5-4. SOURce Command Summary (cont.) Command Description :HRSHort Sets Calibrator to High Resistance function in the Short mode. :LOW {GROund|FLOat} Connects or disconnect the Low terminal to ground. :LOW? Returns status of the Low Terminal grounding. :CURRent? Returns the current flowing through the selected resistor.
- Page 102 5320A Users Manual Table 5-4. SOURce Command Summary (cont.) Command Description [:LEVel] <DNPD> Sets the Low Resistance value. [:LEVel]? Returns the set value for the Low Resistance mode. :LOW {GROund|FLOat} Connects or disconnect the Low terminal to ground. :LOW? Returns status of the Low Terminal grounding. :SENSe {ON|OFF} Selects between 4-wire and 2-wire resitance mode.
- Page 103 Remote Operation Supported SCPI Commands Table 5-4. SOURce Command Summary (cont.) Command Description [:CURRent]:LEVel? Returns the I level value. [:VOLTage]:LINE? Returns the power supply voltage. [:VOLTage]:TOUCh? Returns the measured touch voltage. :POLarity? Returns type of test signal generated by UUT. :RCDC Path to RCD Trip Current mode.
- Page 104 5320A Users Manual Table 5-4. SOURce Command Summary (cont.) Command Description :CURRent? Returns measured current flowing through selected resistance. :CLEar Clears the maximum value of peak current. [:CURRent]:PFC? Returns Prospective Fault Current value. :MANual <DNPD> Sets the Manual residual impedance value. :MANual? Returns the set Manual residual impedance value.
- Page 105 Remote Operation Supported SCPI Commands Table 5-4. SOURce Command Summary (cont.) :FUNCtion? Returns the Multimeter Function setting. :PROBe {OFF|10KV|40KV} Sets HV probe for HIPOT leakage current. :PROBe? Returns the HV probe for HIPOT leakage current. :CURRent? Returns the measured current by the ammeter. :VOLTage? Returns the measured voltage value.
- Page 106 5320A Users Manual Table 5-6. STATus Command Summary Command Description STATus Path to the Status commands. :OPERational Path to the Operational Data registers. :EVENt? Returns value in Operational Data Event register. :ENABle <DPND> Sets the bits of the Operational Data Enable register. :ENABle? Returns the vaule in the Operational Data Enable register.
-
Page 107: Scpi Command Details
Remote Operation Supported SCPI Commands SCPI Command Details The following sections give a detailed description of each command. Using the OUTPut Commands Remotely controlling the application of the output signal to the Calibrator’s output terminals is accomplished through the OUTPut command. OUTPut[:STATe](?) <CPD>... - Page 108 5320A Users Manual [SOUR]:SAF:GBR[:LEV] (?) [<DNPD>] Description: This command selects one of 16 discrete resistors closest to the value specified by DNPD. If not already selected, it also switches the Calibrator to the Ground Bound Resistance function. Parameters: <DNPD> Resistance value in ohms. Example: SAF:GBR 0.1 Ground Bond Resistance with 100 m .
- Page 109 Remote Operation Supported SCPI Commands [SOUR]:SAF:GBOP Description: This command switches the Calibrator to the Ground Bound Resistance function and sets the Open mode. If not already selected, it also switches the Calibrator to the Ground Bound Resistance function. Example: SAF:GBOP [SOUR]:SAF:GBOP:VOLT? Description: This command returns the measured voltage on the open output terminals.
- Page 110 5320A Users Manual [SOUR]:SAF:HRES:LOW(?) <CPD> {FLO | GRO} Description: This command connects or disconnects the High Resistance LO terminal to or from ground. If not already selected, it also switches the Calibrator to the High Resistance Source function. Parameters: <CPD> FL = floating output GRO = grounded output Example:...
- Page 111 Remote Operation Supported SCPI Commands [SOUR]:SAF:HRES[:VOLT]:MAX? Description: This command returns the maximum measured peak voltage on the resistance. If not already selected, it also switches the Calibrator to the High Resistance Source function. This value can be cleared using the SAF:HRES:CLEar command. Query: SAF:HRES:MAX? [SOUR]:SAF:HRES[:VOLT]:CLE...
- Page 112 5320A Users Manual [SOUR]:SAF:HRF[:VOLT]:MAX? Description: This command returns the maximum measured peak voltage on the resistance. If not already selected, it also switches the Calibrator to the High Resistance Fixed 100 G resistance source function. This value can be cleared using the SAF:HRF:CLEar command. Query: SAF:HRF:MAX? [SOUR]:SAF:HRF[:VOLT]:CLE...
- Page 113 Remote Operation Supported SCPI Commands This value can be cleared using the SAF:HRSH:CLEar command. Query: SAF:HRSH:MAX? Returns the maximum current value. [SOUR]:SAF:HRSH[:CURR]:CLE Description: This command clears the measured peak current flowing through the shorted terminals. If not already selected, it also switches the Calibrator to the High Resistance Fixed 100 G resistance source function in the Short mode.
- Page 114 5320A Users Manual Query: SAF:LRES:CURR? Returns the measured current value. [SOUR]:SAF:LRES[:CURR]:LIM? Description: This command returns the maximum current allowed to flow through the resistance. If not already selected, it also switches the Calibrator to the Low Resistance Source function. Query: SAF:LRES:LIM? Returns the maximum current value.
- Page 115 Remote Operation Supported SCPI Commands [SOUR]:SAF:LROP[:VOLT]:LIM? Description: This command returns the maximum allowed voltage on the open output terminals. If not already selected, it also switches the Calibrator to the Low Resistance function in the Open mode. Query: SAF:LROP:LIM? [SOUR]:SAF:LROP[:VOLT]:MAX? Description: This command returns the maximum measured peak voltage on the open output terminals.
- Page 116 5320A Users Manual Parameters: <DNPD> The value of nominal current expressed in amps. Refer to the Leakage Current specifications in Chapter 1 for the acceptable range of values for this function. Example: SAF:IDAC:NOM 0.01 Active Leakage Current function with a nominal current of 10 mA.
- Page 117 Remote Operation Supported SCPI Commands Example: SAF:IDP Passive Current function selected with parameters set previously. [SOUR]:SAF:IDP[:CURR]:NOM (?) <DNPD> Description: This command sets the nominal leakage current to the value specified in DNPD. If not already selected, it also switches the Calibrator to the Passive Leakage Current function.
- Page 118 5320A Users Manual Example: SAF:IDD:NOM 0.01 Differential Leakage Current function with 10 mA nominal current setting. Query: SAF:IDD:NOM? Returns the value of the nominal current setting. Note: Nominal leakage current is valid for all leakage current modes (IDA, IDP, IDS and IDD). [SOUR]:SAF:IDD[:CURR]:INST? Description: This command returns the instantaneous measured current flowing through the calibrator.
- Page 119 Remote Operation Supported SCPI Commands Query: SAF:RCDT:POS? Returns the index value of the selected resistance. Note: The selected resistance is valid for RCD Current function as well. [SOUR]:SAF:RCDT[:CURR]:NOM(?) <DNPD> Description: This command sets the nominal trip current value to the value specified by DNPD.
- Page 120 5320A Users Manual Query: SAF:RCDT:LINE? Returns the measured value of the voltage power supply. [SOUR]:SAF:RCDT:[VOLT]:TOUC? Description: This command returns the measured touch voltage. If not already selected, it also switches the Calibrator to the RCD Time function. Query: SAF:RCDT:TOUC? Returns the measured value of the touch voltage.
- Page 121 Remote Operation Supported SCPI Commands [SOUR:SAF:RCDC[:CURR]:NOM(?) <DPND> Description: This command sets the nominal trip current value to the value specified by DNPD. If not already selected, it also switches the Calibrator to the RCD Current function. Parameters: <DNPD> The value of trip current expressed in amps. Example: SAF:RCDC:NOM 1 RCD Trip Current function with a nominal...
- Page 122 5320A Users Manual X Test current is pulse (dc) with negative polarity (NEG) I Test current is symmetrical (ac) with positive phase (SYMP) J Test current is symmetrical (ac) with negative phase (SYMN) a Test current is dc with positive polarity (DCP) b Test current is dc with negative polarity (DCN) NO is returned when the generated test signal is not valid.
- Page 123 Remote Operation Supported SCPI Commands b Test current is dc with negative polarity (DCN) NO is returned when the generated test signal is not valid. [SOUR]:SAF:LIN:CURR? Description: Returns the measured maximum value of peak current flowing through the selected resistance. If not already selected, it also switches the Calibrator to the Line Impedance function.
- Page 124 5320A Users Manual Query: SAF:LOOP? Returns the value of the resistance setting. [SOUR]:SAF:LOOP:CORR(?) <CPD> {OFF | MAN | SCAN | COMP} Description: This command sets the type of residual impedance correction for Loop Impedance specified by CPD. If not already selected, it also switches the Calibrator to the Loop Impedance function.
- Page 125 Remote Operation Supported SCPI Commands [SOUR]:SAF:LOOP[:CURR]:PFC? Description: Returns the value of prospective fault current. If not already selected, it also switches the Calibrator to the Loop Impedance function. Query: SAF:LOOP:PFC? [SOUR]:SAF:LOOP:MAN(?) <DNPD> Description: This command sets the manual value of loop residual impedance. If not already selected, it also switches the Calibrator to the Loop Impedance function.
- Page 126 5320A Users Manual [SOUR]:SAF:VOLT:FUNC(?) <CPD> {DC | AC} Description: This command sets the voltage generated by the Calibrator to either ac or dc Voltage. If not already selected, it also switches the Calibrator to the Voltage Calibration function. Parameters: <CPD> Type of voltage generation.
- Page 127 Remote Operation Supported SCPI Commands Query: SAF:MET:PROB? Returns whether the multimeter is measuring with a probe and if so, which probe is being used. [SOUR]:SAF:MET:LOW(?) <CPD> {FLO | GRO} Description: This command connects or disconnects the Multimeter COM terminal to or from GND terminal. If not already selected, it also switches the Calibrator to the Meter function.
- Page 128 5320A Users Manual OFF = without probe. 10KV = with 10 kV probe. 40KV = with 40 kV probe. Example: SAF:HIPL:PROB 10KV Sets the multimeter to measure with a 10 kV probe. Query: SAF:HIPL:PROB? Returns whether the multimeter is measuring with a probe and if so, which probe is being used.
-
Page 129: Using System Commands
Remote Operation Supported SCPI Commands Query: SAF:HIPT:VOLT? [SOUR]:SAF:HIPT:[VOLT]:MAX? Description: Returns the maximum peak measured value of voltage using standard exponential format. For example, 230 V is returned as 2.300000e+002. Use the SAF:HIPT:CLEar command to clear the maximum value. If not already selected, it also switches the Calibrator to the HIPOT timer function. -
Page 130: Using The Status Subsystem
5320A Users Manual Query: SAF:TIME? Returns the time in the Calibrator. SYST:ERR? Description: This command queries the Calibrator’s error queue to retrieve the first error in the queue. The error queue stores errors as first-in first-out (FIFO). The error is deleted after being read. In the case of error queue overflow, the last error in the queue is –350,”Queue overflow”. -
Page 131: Using Ieee 488.2 Common Commands
Remote Operation Supported SCPI Commands Example: STAT:OPER:ENAB 2 Sets bit 1 of the Operational Data Enable register while all other bits are set to 0. Query: SAF:OPER:ENAB? Returns the value of the Operational Data Enable register as a decimal value. STAT:OPER:COND? Description: This query command returns the content of Operational Condition register. - Page 132 5320A Users Manual The reply is formatted as follows: FLUKE,5320A,100002,1.12+1.01+1.01+1.02 *OPC Description: This command sets the OPC bit in the ESR (Event Status Register) when all pending operations are complete. *OPC? Description: This command returns “1” to the output queue after all pending operations are complete.
-
Page 133: Standard Status Data Structures
Remote Operation Supported SCPI Commands *CLS Description: This command clears the Event Status Register and the Status Byte Register with the exception of the MAV bit and output queue. The output line is not reset. Standard Status Data Structures The Calibrator meets the standard protocol according to the IEEE 488.2 standard. This protocol is used for checking for error and status behavior of the calibrator. - Page 134 5320A Users Manual HIPT RCD Operation Register Read using STAT:OPER:COND? 1>0 1>0 Transition Register HIPT RCD Event Register Read using STAT:OPER:EVEN? & & & & & & Read using STAT:OPER:ENAB? Enable Register Write using STAT:OPER:ENAB ESR Event Status Register DDE QYE Read using *ESR? &...
-
Page 135: Sre Service Request Enable Register
Remote Operation Supported SCPI Commands Table 5-8. Bit Configuration of the Status Byte Register Bit Name Description Operation Summary Status (bit 7). SCPI-defined. The OSS bit is set to 1 when the data in the OSR (Operation Status Register) contains one or more enabled bits which are true. -
Page 136: Ese Event Status Enable Register
5320A Users Manual Table 5-9. Bit Configuration of the Event Status Register Bit Name Event Description Power On (bit 7). This bit is set to “1” when an off-to-on transition has occurred in the Calibrator’s power supply. User Request (bit 6). This bit is not used by the Calibrator. It is always a “0”. Command Error (bit 5). -
Page 137: Ieee 488 Interface Configuration
Remote Operation Supported SCPI Commands Output Queue The Output Queue stores response messages until they are read. If there is at least one character in the output queue, the MAV register (message available) is set. The Output Queue is cleared upon power-on and after reading all characters from the output queue. - Page 138 5320A Users Manual 5-48...
-
Page 139: Operator Maintenance
Chapter 6 Operator Maintenance Title Page Introduction......................6-3 Accessing the Fuses ................... 6-3 Line-Power Fuse.................... 6-3 Measurement Input Fuses................6-4 Cleaning the Air Filter ..................6-4 Cleaning the Exterior ..................6-5 What to Do In Case of Calibrator Failure ............6-5 Verifying Calibrator Operation................ - Page 140 5320A Users Manual...
-
Page 141: Introduction
Verifying the operation of the Calibrator For intensive maintenance tasks such as troubleshooting or repair, and for all procedures that require opening the cover of the instrument, contact the Fluke service center. The Calibrator should be calibrated annually. Accessing the Fuses The Calibrator uses fuses to protect both the line-power input and various front-panel terminals of the Calibrator. -
Page 142: Measurement Input Fuses
To avoid damaging the Calibrator, use only the fuse specified for each of the measurement inputs. Table 6-2. Measurement Input Fuses Input Fuse Fluke Part No. F3.15L250V (5 x 20 mm) 2743508 Leakage Current F100mL150V (5 x 20 mm) 2743513 Meter T20L500V (6.3 x 32 mm) -
Page 143: Cleaning The Exterior
Subtle faults can cause different symptoms and have different causes. Usually, they cause instability of some parameter. Subtle defects can be caused by events such as unacceptable distortion or degraded insulation etc. In this case contact the Fluke Service Center. -
Page 144: Verifying Calibrator Operation
Multimeter with 4-wire ohms capability Fluke 8508A or equivalent Megaohmmeter with 3 test leads Quadtech 1865 or equivalent Multifunction calibrator Fluke 5500A, Fluke 5520A or equivalent Frequency counter Fluke PM 6690 or equivalent Distortion analyzer HP/Agilent 8903B or equivalent 10 kV ac/dc source... - Page 145 As an additional verification test, it is recommended to verify test points in Table 6-7 using a higher test current. The Fluke 5520A (or similar calibrator) can be used to source the dc test current. The connection diagram shown in Figure 6-1 is used to perform the verification points in Table 6-7 for test current up to 10 A.
- Page 146 1. Select the passive leakage current function on the Calibrator. Connect a standard multifunction calibrator’s output (Fluke 5520A in this example) to the HI and LO V~ terminals of the Calibrator as shown in Figure 6-2. On the 5520A calibrator, set its output to the nominal voltage of the power line voltage the Calibrator is powered from (115 V ac or 230 V ac), and set the frequency to 55 Hz.
- Page 147 Operator Maintenance Verifying Calibrator Operation Fluke 5520A Fluke 5320A Multifunction 5320A MULTIFUNCTION ELECTRICAL TESTER CALIBR Calibrator OUTPUT HI V Output LO V Output GND , METER METER Fluke 8508A A Input COM Input ehq008.eps Figure 6-2. Multimeter Current Verification Setup 3.
- Page 148 5320A Users Manual RCD Trip Time Verification 1. Connect the instruments as shown in Figure 6-3. Fluke 5520A Fluke 5320A Multifunction 5320A MULTIFUNCTION ELECTRICAL TESTER CALIBR Calibrator OUTPUT , HI , mA - SENSE 50V PK 1500V PK 20V PK...
- Page 149 It is not necessary to recalibrate all the functions, just the one that does not meet the specification. Refer to the 5320A Service Manual or contact Fluke for calibration. Note AC voltage frequency and distortion cannot be adjusted in the Calibrator.
- Page 150 5320A Users Manual 10 kV AC/DC Voltage Divider Verification For higher voltages, use the 10 kV High Voltage Probe. The input resistance of the 10 kV HV probe is 300 M 5%. The current flowing through both the 5320A-LOAD and 10 kV HV probe is measured and shown on the 5320A display.
-
Page 151: Tables Of Limits
Operator Maintenance Verifying Calibrator Operation Tables of Limits The following tables are used to verify the operation of the Calibrator. Table 6-4. Low Resistance Source Limits Required standard Nominal value Lower limit Upper limit ohmmeter uncertainty 0.02 % 0.100 89.7 m 110.3 m 0.02 % 0.200... - Page 152 5320A Users Manual Table 6-5. High Resistance Source Limits Required standard Nominal value Lower limit Upper limit ohmmeter uncertainty 0.02 % 10.02 k 10 k 9.98 k 0.02 % 20.04 k 20 k 19.96 k 0.02 % 40.08 k 40 k 39.92 k 80 k 0.02 %...
- Page 153 Operator Maintenance Verifying Calibrator Operation Table 6-6. Ground Bond Source Limits Required standard Nominal value Lower limit Upper limit ohmmeter uncertainty 25 m ±0.5 m Rcal -5 m Rcal +5 m 50 m ±0.5 m Rcal -5 m Rcal +5 m 100 m ±0.5 m Rcal -5 m...
- Page 154 5320A Users Manual Table 6-8. Leakage Current Limits Nominal Required standard Lower limit (mA) Upper limit (mA) Current ammeter uncertainty 0.25 mA dc 0.05 % Istd -2.75 Istd +2.75 2.5 mA dc 0.05 % Istd -9.5 Istd +9.5 25 mA dc 0.05 % Istd -77 Istd +77...
- Page 155 Operator Maintenance Verifying Calibrator Operation Table 6-12. DC Voltage Limits Nominal output Required standard Lower limit Upper limit (V DC) voltage voltmeter uncertainty (V DC) 90 V dc 0.02 % 89.880 90.120 500 V dc 0.02 % 499.32 500.68 Table 6-13. AC/DC Voltage Multimeter Limits Nominal Required standard Lower...
- Page 156 5320A Users Manual Table 6-16. 10 kV AC/DC Voltage Divider Limits Nominal HV Required standard Lower Upper limit Frequency source voltage voltage uncertainty limit (V) 10 kV dc 0.1 % 9,965 10,035 10 kV ac 0.1 % 55 Hz 9,965 10,035 1 kV dc 0.1 %...
-
Page 157: Applications
Chapter 7 Applications Title Page Introduction......................7-3 Calibrating Continuity Testers................7-3 Calibrating Earth Resistance Testers ..............7-4 Calibrating Insulation Resistance Testers ............7-5 Calibrating Insulation Resistance Testers with the Resistance Multiplier..7-8 Calibrating Ground Bond Resistance Testers ............ 7-10 Calibrating Line Impedance Testers ..............7-12 Calibrating Loop Impedance Testers .............. - Page 158 5320A Users Manual...
-
Page 159: Introduction
Applications Introduction Introduction This chapter demonstrates the use of the Calibrator with actual calibration examples. For each Calibrator function, calibration steps along with connection figures are provided for at least one UUT. Calibrating Continuity Testers XW Warning To avoid electric shock, use only high-quality, shrouded test leads and adapters with the appropriate CAT and voltage rating between the Calibrator and instruments being calibrated. -
Page 160: Calibrating Earth Resistance Testers
5320A Users Manual Fluke 5320A 5320A MULTIFUNCTION ELECTRICAL TESTER CALIBR OUTPUT , HI , mA - SENSE 50V PK 1500V PK 20V PK 20V PK GND , 280V 280V 20V PK METER INPUT METER (L2/Green) CAT I 1000V CAT II... -
Page 161: Calibrating Insulation Resistance Testers
Applications Calibrating Insulation Resistance Testers Fluke 5320A 5320A MULTIFUNCTION ELECTRICAL TESTER CALIBR OUTPUT , HI , mA - SENSE 50V PK 1500V PK 20V PK 20V PK GND , 280V 280V 20V PK METER (L3/Blue) INPUT METER (L2/Green) CAT I... - Page 162 5320A Users Manual Fluke 5320A Fluke 1507 5320A MULTIFUNCTION ELECTRICAL TESTER CALIBR OUTPUT 1507 INSULATION TESTER , HI , mA - SENSE 50V PK 1500V PK 20V PK 20V PK GND , 280V 280V 20V PK METER INPUT METER CAT I...
- Page 163 Applications Calibrating Insulation Resistance Testers Fluke 5320A 5320A MULTIFUNCTION ELECTRICAL TESTER CALIBR Kikusui 7200 OUTPUT , HI , mA - SENSE 50V PK 1500V PK 20V PK 20V PK GND , 280V 280V 20V PK METER INPUT METER CAT I...
-
Page 164: Calibrating Insulation Resistance Testers With The Resistance Multiplier
5320A Users Manual Calibrating Insulation Resistance Testers with the Resistance Multiplier WX Warning To avoid electric shock, connect the Resistance Multiplier Adapter chassis to protective earth ground (PE). The ground terminal on the rear panel of the Calibrator can also be used for this purpose. - Page 165 20V PK GND , 280V 280V 20V PK METER INPUT METER CAT I 1000V CAT II 20V PK 600V RMS MAX Front Back Fluke 5320A kV Divider/R Multiplier ehq051.eps Figure 7-7. Connections to Bench Tester when Using Resistance Multiplier Adapter.
-
Page 166: Calibrating Ground Bond Resistance Testers
20V PK 600V RMS MAX Front Back Fluke 5320A kV Divider/R Multiplier ehq048.eps Figure 7-8. Connections to 1550B when Using Resistance Multiplier Calibrating Ground Bond Resistance Testers The Ground Bond Resistance function can be used to calibrate ground bond testers. - Page 167 20V PK 20V PK Fluke 6500 GND , 280V 280V 20V PK METER INPUT METER CAT I 1000V CAT II 20V PK 600V RMS MAX ehq034.eps Figure 7-9. Ground Bond Resistance Calibration on Fluke 6500 Using the Cable Adapter 7-11...
-
Page 168: Calibrating Line Impedance Testers
CAT I 1000V CAT II 20V PK 600V RMS MAX ehq035.eps Figure 7-10. Ground Bond Resistance Calibration on Fluke 6500 Using Single Test Leads Fluke 5320A 5320A MULTIFUNCTION ELECTRICAL TESTER CALIBR OUTPUT , HI , mA - SENSE 50V PK... - Page 169 20V PK 20V PK GND , 280V 280V 20V PK METER (L3/Blue) INPUT METER (L2/Green) CAT I 1000V CAT II 20V PK 600V RMS MAX (L1/Red) Fluke 1653 ehq037.eps Figure 7-12. Line and Loop Impedance Calibration on a Fluke 1653 7-13...
-
Page 170: Calibrating Loop Impedance Testers
5320A Users Manual Calibrating Loop Impedance Testers The Calibrator’s Loop Impedance calibration function is used to calibrate loop testers and multifunction installation testers with loop testing capability. WX Warning To avoid electric shock, do not touch the L, PE, or N terminals on the Calibrator or UUT while performing a Loop Impedance calibration. - Page 171 INPUT METER CAT I 1000V CAT II 20V PK 600V RMS MAX ehq038.eps Figure 7-13. Passive Leakage Current Calibration on Fluke 6500 Fluke 5320A Line Pin 5320A MULTIFUNCTION ELECTRICAL TESTER CALIBR OUTPUT , HI , mA - SENSE 50V PK...
-
Page 172: Calibrating Residual Current Device (Rcd) Testers
INPUT METER CAT I 1000V CAT II 20V PK 600V RMS MAX ehq056.eps Figure 7-15. Active Leakage Current Calibration on Fluke 6500 Fluke 5320A 5320A MULTIFUNCTION ELECTRICAL TESTER CALIBR Associated Research OUTPUT , HI , mA - SENSE Linechek 510L... - Page 173 Applications Calibrating Residual Current Device (RCD) Testers 1. Using Figure 7-17, connect the UUT to the Calibrator’s L, PE, and N terminals. 2. Press R. does not appear in the Output area of the display, press the Mode 3. If RCD Trip Time softkey.
-
Page 174: Calibrating Using 1 X I Multiplier
5320A Users Manual Fluke 5320A 5320A MULTIFUNCTION ELECTRICAL TESTER CALIBR OUTPUT , HI , mA - SENSE 50V PK 1500V PK 20V PK 20V PK GND , 280V 280V 20V PK METER (L3/Blue) INPUT METER (L2/Green) CAT I 1000V CAT II... -
Page 175: Calibrating Using 1.4Xi, 2 X I, And 5 X I Multipliers
Applications Calibrating Residual Current Device (RCD) Testers 6. Press O. The Calibrator connects the L and N terminals directly to the mains voltage and waits for an external load to be connected by the UUT. If no load is sensed within 10 seconds, the Calibrator will switch to STBY. -
Page 176: Calibrating Rcd Trip Current
5320A Users Manual 8. Compare the nominal trip time on the Calibrator display with the trip time displayed on the UUT. Note When calibrating with a 1.4xI, 2xI, or 5xI setting, the UUT time interval is limited to several hundred milliseconds. If the UUT stops the calibration before the elapsed trip time, the Calibrator disconnects the output terminals from the UUT and displays “Set trip time too high”. - Page 177 The settling time after making a voltage change while in operate mode depends on the voltage and frequency setting. Under worst conditions, the maximum settling time is approximately 3 seconds. Fluke 5320A 5320A MULTIFUNCTION ELECTRICAL TESTER CALIBR OUTPUT , HI...
- Page 178 5320A Users Manual Fluke 5320A 5320A MULTIFUNCTION ELECTRICAL TESTER CALIBR OUTPUT , HI , mA - SENSE 50V PK 1500V PK Fluke 6500 20V PK 20V PK GND , 280V 280V 20V PK METER INPUT METER CAT I 1000V CAT II...
-
Page 179: Calibrating Load Test For Appliance Testers
The UUT connects power line voltage to its test socket. The UUT and Calibrator measure power line consumption and load current. 5. Compare the UUT reading with the Calibrator reading. Fluke 5320A 5320A MULTIFUNCTION ELECTRICAL TESTER CALIBR OUTPUT , HI... -
Page 180: Calibrating High Voltage Sources (Hipots) With A High Voltage Probe
5320A Users Manual Fluke 5320A Protection Earth Terminal 5320A MULTIFUNCTION ELECTRICAL TESTER CALIBR OUTPUT , HI , mA - SENSE 50V PK 1500V PK Fluke 6500 20V PK 20V PK GND , Neutral Terminal 280V 280V 20V PK METER INPUT... -
Page 181: Measuring High Voltage With An 80K-40 High Voltage Probe
Figure 7-23.10 kV High Voltage Adapter Application Measuring High Voltage with an 80K-40 High Voltage Probe The Fluke 80K-40 High Voltage probe is a divider that steps down the measured voltage by 1000. To make a high voltage measurement with the 80K-40: 1. -
Page 182: Measuring Leakage Current With The 5320A-Load
5320A Users Manual Fluke 5320A Quadtech Sentry 5320A MULTIFUNCTION ELECTRICAL TESTER CALIBR OUTPUT , HI , mA - SENSE 50V PK 1500V PK 20V PK 20V PK GND , 280V 280V 20V PK METER INPUT METER CAT I 1000V CAT II... - Page 183 Adapter. The Adapter will create the leakage current that will be measured by the Calibrator. The resistance selection on the Adapter should be chosen for the appropriate leakage current based on voltage amplitude used for the test. Fluke 5320A 5320A MULTIFUNCTION ELECTRICAL TESTER CALIBR OUTPUT...
- Page 184 5320A Users Manual ehq64.bmp Figure 7-27. Leakage Current Calibrator Display 3. The current type should be the same on the Calibrator and UUT. Set the Calibrator to ac or dc depending on the signal type setup in the UUT. 4. Set the output voltage level on the UUT and turn the UUT output voltage on. 5.
- Page 185 Applications Calibrating High Voltage Sources (Hipots) with a High Voltage Probe Fluke 5320A 5320A MULTIFUNCTION ELECTRICAL TESTER CALIBR OUTPUT , HI , mA - SENSE 50V PK 1500V PK Hi Output 20V PK 20V PK GND , Input Input 280V...
- Page 186 5320A Users Manual 7-30...
-
Page 187: Appendices
Appendices Appendix Title Page Errors........................A-1... - Page 188 5320A Users Manual...
- Page 189 Appendix A Errors Introduction Table A-1 lists the errors the Calibrator can generate. Each error has an ID, a message and a decritptive explanation. Table A-1. List of Errors Message Description 701,702 Output/Input overloaded Input or output signal over specified limits. Decrease signal level.
- Page 190 5320A Users Manual Table A-1. List of Errors (cont) Message Description -410 Interrupted. Remote interface error. A command was received which sends data to the output buffer, but the output buffer contained data from a previous command. The output buffer is cleared when power has been off, or after reset command has been executed.
- Page 191 Appendices Errors Table A-1. List of Errors (cont) Message Description Output/Input overload. Loop/line compensator overloaded. Wait 10 seconds and switch output terminals again. Temperature too high. Temperature overheating of ground bond resistance decade. Use UUT lower test current or wait 2 minutes before next calibration.
- Page 192 5320A Users Manual...
- Page 193 Front panel, 3-3 Knob control, 3-11 —F— Controls, 3-3 Numeric keyboard, 3-10 Failure Rear panel, 3-7 What to do in case of, 6-5 Fluke contacting of, 1-8 —D— French help guide, 3-10 Date Front Panel Setting system, 3-13 controls, 3-3...
- Page 194 5320A Users Manual Ground Bond Resistance Output, 4-8 —G— High Resistance output, 4-5 German help guide, 3-10 Leakage Current Calibration, 4-16 Ground bond Resistance Loop and Line Impedance Output, 4-10 Setting of, 4-8 Low Resistance output, 4-3 Passive Leakage current, 4-17 —H—...
- Page 195 Index (continued) RS-232 port setup, 5-4 SCPI Commands, 5-7 SCPI Command summary, 5-8 Serial number SCPI Commands, 5-7 display of, 3-14 Service Request Register, 5-45 Service Request Enable Register, 5-45 Source commands, 5-17 Setup Status Byte Register, 5-44 Menu, 3-12 Status subsystem, 5-40 Sotware version Syntax Information, 5-6...
- Page 196 5320A Users Manual...