Sennheiser SYSTEM 2015 Instructions For Use Manual
Hide thumbs
Also See for SYSTEM 2015:
- Instructions for use manual (104 pages) ,
- Instruction manual (21 pages) ,
- Additional information (4 pages)

Related Manuals for Sennheiser SYSTEM 2015


Summary of Contents for Sennheiser SYSTEM 2015
- Page 1 Mikroport System 2015 ® Bedienungsanleitung Instructions for use Notice d’emploi Istruzioni per l’uso Instrucciones de uso Gebruiksaanwijzing...
- Page 2 Sennheiser, Mikroport e Soundfield sono marchi commerciali registrati della società Sennheiser electronic GmbH & Co. KG, Wedemark, Germania Sennheiser, Mikroport y Soundfield son marcas registradas de la sociedad Sennheiser electronic GmbH & Co. KG, Wedemark, Alemania Sennheiser, Mikroport en Soundfield zijn geregistreerde merknamen van...
- Page 3 Mikroport System 2015 ® Instructions for use...
-
Page 4: Information For Users Of Safety Instructions
Keep the units away from central heating radiators and electric heaters. Never expose them to direct sunlight. Use the units in dry rooms only. Use a damp cloth for cleaning the units. Do not use any cleansing agents or solvents. Thank you for choosing Sennheiser! We have designed these products to give you reliable operation over many years. -
Page 5: Table Of Contents
Activating/deactivating the lock mode ..........77 Displaying the frequency ............... 77 Working with the transmitter’s operating menu ......78 Overview of menus .................. 80 Operating menu of the SK 2015 transmitter ........81 Adjustment tips for the operating menu of the transmitter ..82... - Page 6 Working with the configuration menu ..........87 Overview of menus .................. 89 Structure of the configuration menu of the EK 2015 receiver ..90 Structure of the configuration menu of the SK 2015 transmitter 92 Adjustment tips for the configuration menu ........93 Colored battery doors and face plates ..........
-
Page 7: The Receiver The 2015 Mikroport® System
Without wires and with full freedom of movement, the pupil can now hear the teacher as if he were sitting right next to him. For the time in which the teacher is speak- ing, ambient noise is reduced markedly, so that the dialog between teacher and pupil has priority at all times. -
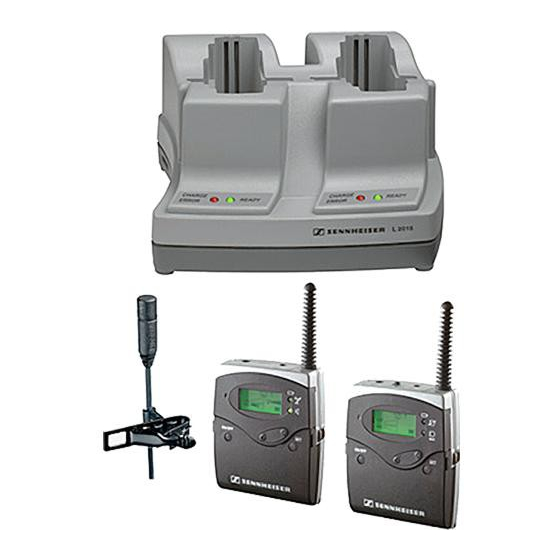
Page 8: The Transmitter Delivery Includes
1 MZQ 2 microphone clip 1 power supply NT 1 BA 2015 1 EZB 2015 system case incl. transport case, transport holding device (for EK 2015 and SK 2015) and shoulder strap EK 2015 2 EZG 2015 pouches with one neck strap each... -
Page 9: Operating Controls Of The Ek 2015 Receiver
Operating controls of the EK 2015 receiver Operating controls LC display panel Headphone output (HI), 3.5 mm jack socket Alphanumeric display Output for hearing aids (LOW), 2.5 mm jack 5-step level display for received audio signal socket (FM) Antenna 5-step display for microphone level (MIC) -
Page 10: Indications And Displays On The Receiver
Indications and displays on the receiver Battery status indication The 4-step battery status display on the display panel and the red LED provide information on the capacity of the BA 2015 battery pack or the bat- teries: 3 segments: capacity approx. 100 % 2 segments: capacity approx. - Page 11 Display for lock mode If the lock mode is activated, the lock mode icon appears on the standard display. If the lock mode is deactivated, the lock mode icon disappears from the standard display. Display backlighting After pressing a button, the display remains backlit for approx. 15 seconds.
-
Page 12: Operating Controls Of The Sk 2015 Transmitter
(UP/DOWN) 4-step battery status display Battery compartment Note: Battery compartment cover Unlocking button Depending on the individual configuration of ON/OFF button with ESC function your transmitter, some of the displays shown here may not appear on the display panel. -
Page 13: Indications And Displays On The Transmitter
Indications and displays on the transmitter Battery status indication The 4-step battery status display on the display panel and the red LED provide information on the capacity of the BA 2015 battery pack or the bat- teries: 3 segments: capacity approx. 100 % 2 segments: capacity approx. - Page 14 Display for lock mode If the lock mode is activated, the lock mode icon appears on the standard display. If the lock mode is deactivated, the lock mode icon disappears from the standard display. Display backlighting After pressing a button, the display remains backlit for approx. 15 seconds.
-
Page 15: Preparing The Units For Use
The units fit snugly in the case preventing damage dur- ing transport. It is possible to store the battery packs in the front pocket of the transport case, as well as in the transport holding device. -
Page 16: Connecting Sound Sources To The Transmitter
Batteries and rechargeable battery cells have different discharging curves. Transmitter and receiver are able to identify the BA 2015 battery pack and to use it to full capacity. They also adapt the battery status display according to the type of power supply used (batteries or battery pack). - Page 17 You can use the MKE 2015-0 plug-on microphone to transmit the speech of several persons at a time with only one transmitter. Put the transmitter with the plug-on microphone on the table in front of the speaker. The per- son speaking should keep a distance of approx. 9.8 inches to the micro- phone.
-
Page 18: Connecting The Receiver To Hearing Aids Or Headphones
Connecting audio sources to the transmitter You can connect audio sources such as a CD player, a television, or the sound card of a computer to the line input of the transmitter. Connect the 3.5 mm jack plug of the connecting cable to the transmit- ter’s 3.5 mm jack socket (LINE) -
Page 19: Attaching The Transmitter Or Receiver To Clothing
Using the EZG 2015 pouch, you can wear the transmitter or receiver around your neck. Insert the transmitter or receiver into the pouch. Use the snap hooks to attach the neck strap to the eyelet of the pouch as shown. Note:... -
Page 20: Using The Receiver
Using the receiver After you have switched on the receiver, it can then be operated with the button and the rocker button (UP/DOWN) , making it very easy to use for children. All settings become effective immediately. The dis- play then switches back to the standard display. -
Page 21: Adjusting The Level Of The Received Audio Signal
Adjusting the level of the received audio signal You can adjust the level of the received audio signal (e.g. the voice of the speaker) in 64 steps. Use the rocker button (UP/DOWN) to adjust the level of the received audio signal so that you can hear the speaker loud and clear. -
Page 22: Displaying The Frequency
You can display the frequency stored in the selected channel. If you operate your system on one of the channels with a freely selectable frequency (channel bank “U”), this feature is very important as it allows you to check if the transmitter and the receiver are set to the same frequency. -
Page 23: Operating Menu Of The Ek 2015 Receiver
Operating menu of the EK 2015 receiver after 3 seconds Current setting 01...64 after 3 seconds MIC. MIC. 01...64 Current level of internal microphone (only if microphone is switched on) after 3 seconds Press SET 1.01 8.16 for 5 seconds... -
Page 24: Using The Transmitter
“OFF” appears on the display. Note: The transmitter can only be switched off when the standard display is shown on the display panel. When in the operating menu, briefly pres- sing the ON/OFF button will cancel your entry (ESC function) and return you to the standard display with the last stored settings. -
Page 25: Activating/Deactivating The Lock Mode
You can display the frequency stored in the selected channel. If you operate your system on one of the channels with a freely selectable frequency (channel bank “U”), this feature is very important as it allows you to check if transmitter and receiver are set to the same frequency. -
Page 26: Working With The Transmitter's Operating Menu
Working with the transmitter’s operating menu By way of example of the “CHAN” menu, this section describes how to use the transmitter’s operating menu. Function of the buttons Mode Buttons To ... Standard display ON/OFF switch the transmitter on/off get into the operating menu... - Page 27 After switching on the transmitter, the name of the transmitter is first dis- played. After approx. three seconds, the standard display appears. Getting into the operating menu Press the button to get from the standard display into the opera- ting menu. The last selected menu flashes on the display.
-
Page 28: Overview Of Menus
(“STORED” appears on the display, indicating that the setting has been stored). Exiting the operating menu Select the “EXIT” menu to exit the operating menu and to return to the standard display. When in the operating menu, briefly pressing the... -
Page 29: Operating Menu Of The Sk 2015 Transmitter
Operating menu of the SK 2015 transmitter ON/OFF Cancels your entry on all levels of the operating menu EXIT after 3 seconds 1.17 SENSIT SEN. SEN. Adjusting the Current sensitivity 1...32 dB microphone setting SET: Stores the sensitivity setting STORED SENSIT SEN. -
Page 30: Adjustment Tips For The Operating Menu Of The Transmitter
The sensitivity is correctly adjusted when the display for line level (LINE) shows full deflection only during the loudest passages. Note: If the sensitivity of the line input is set to “OFF”, the display for line level (LINE) is not shown on the display panel. - Page 31 With the 2015 System, a transmitter can be received by several receivers on the same frequency. In this case, it may be necessary to switch to a chan- nel that is released on all receivers.
-
Page 32: Troubleshooting
Recharge the battery pack or display panel capacity. replace the batteries. Receiver: No RF signal Transmitter and receiver are not Set transmitter and receiver to the same on the same channel/frequency. channel. Check if the frequency is the same. If this is not the case, set transmitter and receiver to a different channel. -
Page 33: Recommendations And Tips
The technical expert must release the channel. If problems occur that are not listed in the above table or if the problems cannot be solved with the pro- posed solutions, please contact your technical expert for assistance. Recommendations and tips ... -
Page 34: Care And Maintenance
... for optimum reception The system’s range depends to a large extent on location and can be up to 164 feet. There should be a “free line of sight” between transmitting and receiving antenna..for multi-channel operation For multi-channel operation, you can only use the channels in a channel bank. Each of the channel banks “1”... -
Page 35: Configuration Of The Units By The Technical Expert
Depending on the area of application, the technical expert configures the transmitter and the receiver for optimum use. Working with the configuration menu By way of example of the “FADE” menu, this section describes how to use the configuration menu. Function of the buttons Mode Buttons To ... - Page 36 Getting into the configuration menu Note: In order to get into the configuration menu, the transmitter or receiver must be switched off. Press the button and keep it pressed. Press the ON/OFF button and keep it pressed for approx. five seconds.
-
Page 37: Overview Of Menus
With most menus, new settings become effective immediately without having to be stored. An exception are the “RESET” menus of both transmitter and receiver and the “TUNE” menu of the trans- mitter. With these menus, new settings only become effective after they have been stored. -
Page 38: Structure Of The Configuration Menu Of The Ek 2015 Receiver
Structure of the configuration menu of the EK 2015 receiver Transmitter must be switched off. Simultaneously press ON/OFF and keep both buttons pressed for 5 seconds ON/OFF Cancels your entry RESET on all levels of the operating menu INT.MIC MIC. - Page 39 PETE15 Assigning a name Current name Enter a name (6 characters) Letters w/o pronounciation marks, numbers from 0...9, special characters, spaces STORED SET: 5 x next character, then store the setting RESET RST. RST. Loading the Confirm your factory-preset selection...
-
Page 40: Structure Of The Configuration Menu Of The Sk 2015 Transmitter
Structure of the configuration menu of the SK 2015 transmitter Transmitter must be switched off. Simultaneously press SET+ON/OFF and keep both buttons pressed for 5 seconds ON/OFF Cancels your entry on all levels of the operating menu RESET ACCESS 1.01 5.20... -
Page 41: Adjustment Tips For The Configuration Menu
“FADE” menu. The higher the set value, the greater the gain reduction. In the “OFF” setting, the automatic priority cir- cuit is switched off, i.e. the gain of the microphones is not reduced while the speaker is talking. - Page 42 For multi-channel operation, we recommend that you only release the chan- nels in one channel bank. Only use the channel banks “1” to “8” since these accommodate fixed preset frequencies which are intermodulation-free.
- Page 43 Selecting the frequencies to be stored in the channel bank “U” TUNE Via the “TUNE” menu, you can select the frequencies to be stored in the channel bank “U” (user bank). When selecting the “TUNE” menu, the trans- mitter or receiver automatically switches to the channel bank “U”.
- Page 44 Entering a name NAME Via the “NAME” menu, you can enter a freely selectable name for the trans- mitter or receiver. This name is briefly shown on the display panel after switch-on. The name can consist of up to six characters such as:...
-
Page 45: Colored Battery Doors And Face Plates
Carefully lever out the front cover on both sides. First insert the colored front cover into the recess on the upper end of the battery compartment and then press it down onto the housing. -
Page 46: Additional Information
20 Each of the channels in the channel banks “1” to “8” has been factory-preset to a transmission/receiving frequency (see enclosed frequency table). These frequencies are preset and cannot be changed as country- specific regulations on frequency usage are taken into account. The channel bank “U” (user bank) allows you to store your selection out of 1,440 transmission/receiving frequencies that are freely selectable within the preset frequency range. - Page 47 RF link. A 110 dB dynamic range signal is thus transmitted with an effective dynamic range of only 55 dB, which is above the 60 dB noise floor of the RF link. In the receiver the signal is expanded in an identical and opposite way in a 1:2 ratio to restore the original signal, at the same time reducing the RF noise to below the noise floor of the receiver.
-
Page 48: Specifications
FM mono Frequency ranges 518–554, 626–662, 740–776, 786–822, 830–866 MHz Transmission/receiving frequencies 8 channel banks with up to 20 factory-preset channels each 1 channel banks with up to 20 freely selectable channels (1,440 frequencies, tunable in steps of 25 kHz) - Page 49 BA 2015 typ. 12 h battery pack with batteries typ. 12 h 3.5 mm jack socket: 2 x 20 mW/32 Ω Headphone output Output for hearing aid 2.5 mm jack socket: 3 mV/2 kΩ Dimensions (H x W x D) 82 x 64 x 24 mm (without antenna) Weight (with BA 2015 battery pack) approx.
-
Page 50: Connector Assignment
12 h Dimensions (H x W x D) 3.2 x 2.5 x 0.9 inches (without antenna) Weight (with BA 2015 battery pack) approx. 0.38 lbs. Temperature range –10 °C to +55 °C Connector assignment SK 2015: SK 2015: 3.5 mm stereo jack plug,... -
Page 51: System Variants And Accessories
Clip-on microphone for SK 2015, condenser, omni-directional, cable length: 31.2 inches ME 2015-H Headset microphone for SK 2015, condenser, super-cardioid, cable length: 31.2 inches BA 2015 Battery pack for EK 2015 and SK 2015 L 2015 Charger for BA 2015 battery pack... - Page 52 31.2 inches KA 40-K cable length: 15.6 inches EZT 2015-20-S Induction neck loop with 3.5 mm jack plug, cable length: 7.8 inches EZT 2015-60-S Induction neck loop with 3.5 mm jack plug, cable length: 23.4 inches EZI 120...
-
Page 53: Warranty Regulations
The guarantee is void if the product is manipulated by non-authorised persons or repair stations. - Page 54 è stato acquistato il prodotto. La garanzia è estesa a tutti i paesi del mondo, tranne agli Stati Uniti, e può essere applica- ta se la legislazione nazi-...
- Page 55 Declaración de garantia EI periodo de garantia para este producto es de 24 meses desde la fecha de compra. Quedan excluidos los acceso- rios adjuntos al producto, acumuladores y baterias dado que, debido a sus caracteristicas, la vida útil de dichos pro- ductos es mucho más corta y, en determinados casos, depende concretamente de la intensidad de utililación.
- Page 57 Certification for USA FCC: DMOB2AUWG Certification pour Canada IC: 2099A-SK2015...
- Page 58 Avant d’utiliser l’appareil, veuillez observer les dispositions légales en vigueur dans votre pays. Nota: Prima della messa in funzione seguite le prescrizioni vigenti nel paese nel quale viene utilizzato! Observación: !Anterior a la puesta en funcionamiento deberán observarse las correspondientes ordenanzas nacionales!
- Page 59 Bemerkung:...
- Page 61 Sennheiser electronic GmbH & Co. KG 30900 Wedemark, Germany Am Labor 1 Phone +49 (5130) 600 0 Printed in Germany Fax +49 (5130) 600 300 Publ. 10/07 www.sennheiser.com 090696 / A02...