Table of Contents
Advertisement
Advertisement
Table of Contents

Related Manuals for Sennheiser Set 860


Summary of Contents for Sennheiser Set 860
- Page 1 Set 860 Set 860 Digital TV Listening System Instruction manual...
-
Page 2: Table Of Contents
Important safety instructions ..............3 Package contents ................... 6 Product overview ................... 7 Putting the Set 860 into operation ............10 Setting up the transmitter ................. 10 Connecting the transmitter to an audio source ........11 Connecting the transmitter to the power supply system ....15 Charging the stethoset receiver’s rechargeable battery ..... -
Page 3: Important Safety Instructions
Protect your hearing from high volume lev- els. Permanent hearing damage may occur when headphones are used at high volume levels for long periods of time. Sennheiser headphones sound exceptionally good and provide clear speech intelligibility at low and medium volume levels. - Page 4 (about every three months). Do not heat above 70 °C/158 °F, e.g. do not expose to sunlight or throw into a fire. Dispose of batteries/rechargeable batteries at special collection points or return them to your specialist dealer. 4 | Set 860...
- Page 5 It is considered improper use when the product is used for any appli- cation not named in the corresponding product documentation. Sennheiser does not accept liability for damage arising from abuse or misuse of this product and its attachments/accessories. Before putting into operation, please observe the respective coun- try-specific regulations.
-
Page 6: Package Contents
The instruction manual in other languages can be downloaded as a PDF file at www.sennheiser.com/download. A list of accessories can be found on the Set 860 product page at www.sennheiser.com. For information on suppliers, contact your Sennheiser partner. To find a Sennheiser partner in your country, search at www.sennheiser.com. -
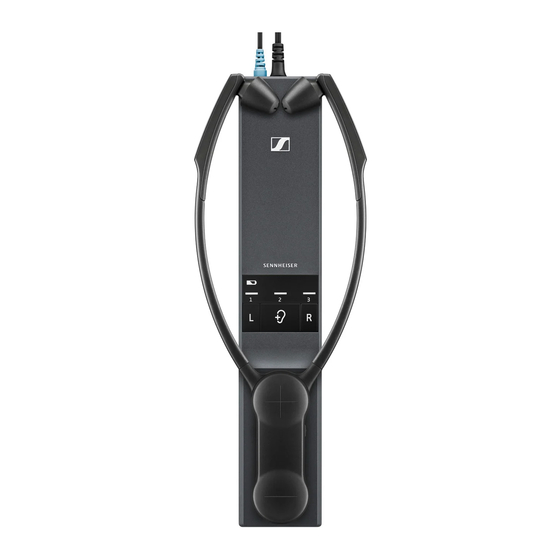
Page 7: Product Overview
Overview of the RR 800 stethoset receiver Ear pads, replaceable marking for the right ear marking for the left ear Ear bows with on/off function Built-in rechargeable battery Volume buttons – Charging contacts Speech intelligibility button Set 860 | 7... - Page 8 Hearing profile LED, Analog 3.5 mm In audio input indicating the activated hearing (marked blue) for connecting an profile (see page 24) analog audio source (3.5 mm jack Charging compartment for socket) stethoset receiver 8 | Set 860...
- Page 9 (see page 38). 5 beeps when changing the The maximum or minimum volume is volume reached (see page 22). when changing the The maximum or minimum balance balance setting setting is reached (see page 23). Set 860 | 9...
-
Page 10: Putting The Set 860 Into Operation
Putting the Set 860 into operation Putting the Set 860 into operation Setting up the transmitter Choose a suitable place near your sound source. Separate the transmitter from other wireless devices in the room by at least 50 cm/20" to avoid interference. -
Page 11: Connecting The Transmitter To An Audio Source
Putting the Set 860 into operation Connecting the transmitter to an audio source You can connect the transmitter either to a digital or an analog audio source (e.g. a TV and a stereo hi-fi system). If you connect an audio source to... - Page 12 Putting the Set 860 into operation Connection possibility A: optical (digital) To achieve the best possible listening experience, connect the trans- mitter to your TV or hi-fi system using the supplied optical digital cable. Note that your wireless headphone system only supports digital signals coded in the format.
- Page 13 Putting the Set 860 into operation Connection possibility B: 3.5 mm jack socket (analog) Connect the stereo audio cable to the blue Analog 3.5 mm In audio input (3.5 mm jack socket) of the transmitter and to the 3.5 mm headphone socket of your audio source.
- Page 14 Putting the Set 860 into operation Connection possibility C: RCA sockets (analog) Plug the RCA adapter* onto the stereo audio cable. Connect the stereo audio cable to the blue 3.5 mm jack socket of the transmitter. Connect the RCA connectors to the RCA sockets (mostly labeled “AUDIO OUT”...
-
Page 15: Connecting The Transmitter To The Power Supply System
Putting the Set 860 into operation Connecting the transmitter to the power supply system Connect the connector of the power supply unit to the yellow socket of the transmitter. Select a suitable country adapter and slide it onto the power supply unit until it clicks audibly into place. -
Page 16: Charging The Stethoset Receiver's Rechargeable Battery
Putting the Set 860 into operation Charging the stethoset receiver’s rechargeable battery A complete charging cycle takes about 3 hours. Before using the receiver for the first time, charge its rechargeable battery for a com- plete charging cycle without interruption. -
Page 17: Displaying The Remaining Operating Time Of The Rechargeable Battery
Putting the Set 860 into operation Always store the stethoset receiver in the transmitter’s charging compartment to ensure that it is fully charged when needed. The intelligent battery charging technology prevents overcharging. The display during charging can be set so that it automatically switches off after 30 seconds (see page 32). -
Page 18: Selecting And Replacing The Ear Pads
Putting the Set 860 into operation Selecting and replacing the ear pads You can choose between: • ear pads for larger ears (pre-mounted on deli- very) • ear pads for smaller ears • ear pads for pressure-sensitive ears To replace the ear pads: Carefully remove the ear pads from the stethoset receiver. -
Page 19: Using The Set 860
Using the Set 860 Using the Set 860 Switching the wireless headphone system on WARNING Vol + Danger of hearing damage due to high volumes! This receiver allows you to set higher volumes than conventional devices. Constant high-volume use can cause hearing damage. -
Page 20: Switching The Wireless Headphone System Off
Using the Set 860 Switching the wireless headphone system off Take the stethoset receiver off so that the ear bows fold inwards. The stethoset receiver automatically switches off after 20 sec- onds. The transmitter automatically switches off (standby) Transmitter when there is no stethoset receiver connected. The status LED goes off. -
Page 21: Wearing The Stethoset Receiver
Using the Set 860 Wearing the stethoset receiver Wear the stethoset receiver so that it hangs freely from your ears and rests lightly on your chest. When putting the stethoset receiver on, observe the (left) and (right) markings on the rear of the ear bows. -
Page 22: Adjusting The Volume
Using the Set 860 Adjusting the volume WARNING Vol + Danger of hearing damage due to high volumes! Before putting the stethoset receiver on, set the volume on the receiver to a low level. Vol - Do not expose yourself to high volume levels for extended peri- ods of time. -
Page 23: Adjusting The Balance
Using the Set 860 Adjusting the balance The balance buttons allow for left/right volume adjustment. Adjust the balance so that you hear equally well with both ears. The balance setting is stored on the stethoset receiver. If you are using several receivers with a transmitter, the respective receivers are optimally adjusted to match the personal hear- ing preferences of the users (e.g. -
Page 24: Selecting A Hearing Profile For Sound Enhancement
Using the Set 860 Selecting a hearing profile for sound enhancement The hearing profiles allow you to alter the sound of the audio signal in order to improve the speech intelligibility and to adjust the sound to suit your preferences. The profiles are used to specifically change certain frequency ranges by e.g. - Page 25 Using the Set 860 Selecting a hearing profile To select the hearing profile that best suits you, proceed as follows: Switch your audio source on and select a program where speech is foregrounded. Put the stethoset receiver on and make sure that only this receiver is connected to the transmitter.
-
Page 26: Activating/Deactivating The Speech Intelligibility Function
Using the Set 860 Activating/deactivating the speech intelligibility function When speech is mixed with annoying background noise, speech may be difficult to understand. The speech intelligibility function automatically detects and reduces annoying background noise. The audio signal is perma- nently analyzed and adjusted accordingly so speech is fore- grounded and easier to understand. -
Page 27: Cleaning And Maintaining The Set 860
Cleaning and maintaining the Set 860 Cleaning and maintaining the Set 860 CAUTION Liquids can damage the electronics of the product! Liquids entering the housing of the product can cause a short-circuit and damage the electronics. Keep all liquids far away from the product. -
Page 28: Replacing The Stethoset Receiver's Rechargeable Battery
Sennheiser service partner. You need suitable tools for replacement. We therefore recommend to have the rechargeable battery replaced by your Sennheiser ser- vice partner. To find a Sennheiser service partner in your country, search at www.sennheiser.com. 28 | Set 860... -
Page 29: Using Additional Functions
Place the stethoset receiver as close as possible to the transmitter. Switch the stethoset receiver on by pulling the ear bows apart. Simultaneously press and hold the volume buttons +/–. Once Transmitter status paring is completed, the LED flashes white. Release the buttons. Set 860 | 29... -
Page 30: Switching Between Stereo And Mono Operation
Activating mono operation Simultaneously press the balance button (left) and the Hearing profile button on the transmitter for 2 seconds. The LED segments 1, 2 and 3 light up for 10 seconds. Mono oper- ation is activated. MONO 30 | Set 860... -
Page 31: Advanced Settings
To save the advanced settings and to deactivate the protected set- settings mode and saving the tings mode: advanced settings Disconnect the transmitter from the power supply system by unplugging the connector of the power supply unit. Set 860 | 31... - Page 32 LED segment lit stethoset receiver. deactivated After switching the wireless headphone system off, all LEDs remain off. LED segment off * factory setting Save the setting by disconnecting the transmitter from the power supply system (see page 31). 32 | Set 860...
- Page 33 (for the hearing profile, the balance setting and stereo/mono operation). Set 860 | 33...
-
Page 34: Restoring The Factory Default Settings
Disconnect the transmitter from the power supply system by unplugging the connector of the power supply unit. The factory settings are restored and you can use the wireless headphone system again. 34 | Set 860... -
Page 35: Charging The Rechargeable Battery Using The Mca 800 Charging Adapter
If the LED on the charging adapter flashes red and green, a charging error/battery error has occurred. In this case, disconnect the charging adapter from the stethoset receiver. More information on the rechargeable battery can be found on page 28. Set 860 | 35... -
Page 36: If A Problem Occurs
Sound too low Increase the volume of the analog The volume of the analog audio audio source to at least a medium – source is adjusted too low. level (approx. 1 V 36 | Set 860... - Page 37 Set 860 product page at www.sennheiser.com for the most up-to-date list of frequently asked questions. You may also contact your local Sennheiser partner for assistance. To find a Sennheiser partner in your country, search at www.sennheiser.com.
-
Page 38: Leaving The Range Of The Transmitter
You hear alerts in the stethoset receiver. If you re-enter the transmission range within 5 minutes, the con- nection is automatically re-established. If you spend more than 5 minutes outside the transmission range, the stethoset receiver switches off automatically. 38 | Set 860... -
Page 39: Specifications
BAP 800 lithium polymer Power supply rechargeable battery, 3.7 V, 350 mAh Weight approx. 61 g (incl. rechargeable battery) Dimensions approx. 102 x 265 x 23 mm (switched off, W x H x D) Set 860 | 39... - Page 40 -25 °C to +70 °C Relative air humidity operation: 10 to 80 % (non-condensing) storage: 10 to 90 % Hearing profiles 1-3 Lows Midrange Highs Gain/dB 0 Hz 0.25 Frequency/kHz Profile 1 Profile 2 Profile 3 40 | Set 860...
-
Page 41: Manufacturer Declarations
Manufacturer Declarations Manufacturer Declarations Warranty Sennheiser electronic GmbH & Co. KG gives a warranty of 24 months on this product. For the current warranty conditions, please visit our website at www.sennheiser.com or contact your Sennheiser partner. FOR AUSTRALIA ONLY Sennheiser goods come with guarantees that cannot be excluded under the Australian Consumer Law. - Page 42 • Consult the dealer or an experienced radio/TV technician for help. Changes or modifications made to this equipment not expressly approved by Sennheiser electronic Corp. may void FCC authorization to operate this equipment. CAN ICES-3 (B)/NMB-3(B) 42 | Set 860...
- Page 43 émetteur, ni utilisé avec une autre antenne ou un autre émetteur. Trademarks Sennheiser is a registered trademark of Sennheiser electronic GmbH & Co. KG. Other product and company names mentioned in this instruction manual may be the trademarks or registered trademarks of their respective holders.
- Page 44 Sennheiser electronic GmbH & Co. KG Am Labor 1, 30900 Wedemark, Germany www.sennheiser.com Publ. 08/17, 570711/A02...